Showing posts with label FK Tartar. Show all posts
Showing posts with label FK Tartar. Show all posts
Wednesday, November 27, 2013
FlisKits Tartar Build Finished
The tail cone was sprayed with aluminum before gluing in place.
The nose cone was sprayed white, off the model.
The body was painted gloss red. Then all three painted assemblies were assembled.
The engine hook and outside shroud seam was lined up under a fin.
I was happy with the way the nested "Super Shroud" turned out. Very smooth and strong.
All the card stock reinforcement pieces still aren't as smooth as I'd like, even after all the sanding between coats.
With its BT-60 size and almost 22" length it could have been a 24mm rocket.
This is a sharp looking model and a great addition to the fleet.
The Fliskits website says it weighs 3.8 oz.
My finished Tartar weighs 3.58 oz.
Tuesday, November 26, 2013
FlisKits Tartar Build Part 15, Fillets and Launch Lug
Always a favorite part of a build is the dry fit.
The models always look different in person.
The strakes are long so apply the fillets 1/2 the length of the root edge.
Smooth one half side then do the other side. Go from the center to the end of the fin strake.
If you were to apply glue all the way down the root edge of this long strake, too much glue would pool up on your finger before you got to the end. The fillet would get wider at the end of the glue swipe.
Applying fillets on half the fin keep the amount of glue manageable.
The ends of the fin covers are open at the ends.
I decided to fill the edges with CWF.
The fin on the left hasn't been filled, the fin on the right is filled and ready for sanding.
Titebond Molding and Trim Glue fillets were applied on both sides of the launch lug.
At the ends the excess glue was rolled off with a tapered Q-tip.
Monday, November 25, 2013
FlisKits Tartar Build Part 14, Fin Gluing
I like to keep templates complete for any repairs down the road.
The fin marking guide was transferred onto 20 lb. copy paper.
Here's the fin guide in place for marking.
After the fins were marked the holding tape was lifted and the guide rotated 90 degrees to be sure the pencil marks were even.
The rear fins hang over the and off the tail cone.
My sanding block was set against the the trailing edge tip to be sure it was even with the end of the tailcone.
The tailcone and engine mount isn't glued in place yet.
The tailcone will be painted silver before gluing the attached mount in the body tube. Trying to mask around the rear of the fins would be hard. It's simply easier to paint the nose cone, body and fins and the tail cone assemblies separately and then assemble everything.
A thin strip of paper was taped around the tube to give a straight line to rest the trailing edges of the strakes.
The strakes are long and take extra time to glue on straight.
The fins and strakes are different thicknesses so I couldn't line them up with clamped on craft sticks. Just do the best you can by eye.
Friday, November 22, 2013
FlisKits Tartar Build Part 13, Tight Sanding TIP
I wanted to sand close to the reinforcement pieces but folding a piece of sandpaper in half could cause scratches at sharp edge.
Another use for a Q-tip:
The cotton tip was dipped in water and the excess shaken off.
The round tip was flattened with my thumbnail.
Wrap some 400 grit sandpaper around the flat tip.
The cotton gives more support with less chance of scratching.
The inside edges of the reinforcement pieces are sanded.
Wednesday, November 20, 2013
FlisKits Tartar Build Part 12, Lower Fin Cover Wraps
With some of the water based CWF filler exposed most glues will be absorbed for a good bond.
Again I'm using a glue stick, perfect for gluing these pieces in place.
It's not as messy as white glue and allows for some repositioning before it dries.
While applying the glue stick I use the tip of a dowel to hold the smaller piece down. This keeps glue off your fingers and leaves less to clean up later.
The cover piece was pressed against my sanding block to even up the root edges.
I'm not sanding here, just being sure the card stock edge is flush with the root edge of the balsa fin.
Pick up any glue that may have squeezed out when pressing down the cover piece. I used a rounded point dowel.
The finished fin, side and root edge views.
As the instructions say:
"This wrap serves two purposes. First as a decoration to mimic that seen on the actual missile. More importantly, it serves to strengthen the fin at the trailing edge where the grain geometry makes the fin extra weak in this area."
These fins are now very strong. Looking ahead, the low side of the root edge isn't even glue to the tail cone.
Sunday, November 17, 2013
FlisKits Tartar Build Part 11, Lower Fin Cover Wraps
The fins were sprayed with one thick coat of primer/filler.
Some builders do multiple primer and filling steps, I just spray and sand once.
Here I'm using 400 grit on a block to remove most off the filler leaving some and filling any remaining grain pores.
You can see there is more filler left on the higher middle of the fin taper.
Don't try to sand down the high point, let the remaining filler/primer help build up and maintain the middle of the raised wedge.
The lower fin cover pieces are close together on the printed card stock.
This is one of prints from the scan.
I liked the Georgia Pacific 110 lb. card stock better than the printed stock supplied in the kit. The FlisKits card stock felt a bit fuzzy where the G.P. stock was smoother.
Here's a moot point but worth considering.
TIP: When cutting through the card stock the top of the sheet is smoother while the underside has a slight ridge.
On the left the cover piece is turned over and there is a raised cut edge.
On the right is the cut side facing up. There is no raised ridge, nothing to smooth down later on.
Wednesday, November 13, 2013
FlisKits Tartar Build Part 10, Strake Covers
I ended up scoring the folds by doing what the instructions said -
Cut about halfway through the card stock with a sharp knife. Fold on the cut line.
You've got to be very careful when cutting a fold line. It's easy to cut through the card stock and ruin the piece.
The upper fold is the cut line. You can see how much sharper and square it is.
Below is the first try, the embossed score is too round.
I used one master template to cut all four covers.
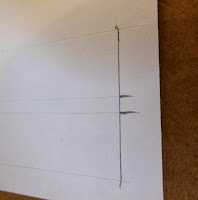
Tape was doubled up and stuck to the back of the template. That was stuck down onto new card stock. Pencil tic marks were drawn at the folds and center line.
Look close and you can see the cuts halfway through the cardstock.
I ended up making the cuts just inside the pencil marks to better fit the thickness of the strakes.
Most of the gray primer filler was sanded off leaving a surface that would absorb some glue. The instructions recommend filling the balsa before gluing on the strake covers.
A glue stick worked perfectly here. Using white glue would be messy and more prone to warping the balsa.
The top was burnished down first with a clean dowel.
The flat sides were burnished next (inset picture).
All four strakes were set inside a heavy book for drying.
They could warp if they didn't dry inside a flat surface.
Tuesday, November 12, 2013
FlisKits Tartar Build Part 9, Strake Covers
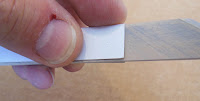
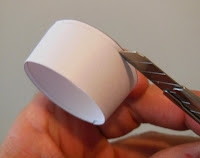
Normally I'd score a fold line using the rolled over back (handle) of a razor blade. (Tape over the blade so you won't cut your fingers.)
This technique works well for a rounded leading edge fold.
This cover pieced needed a sharp square fold.
TIP: For a more accurate cut right on the line: Set your blade on the line then slide the straightedge up to the blade. This gives you the proper spacing for the thickness of the blade and leaves the blade tip right on the line to be cut.
After folding the cover it didn't have the sharp edge I was looking for.
The covers also came up short not covering the entire side of the strake.
Time to make adjustments and cut more!
Luckily I scanned the original and printed up extras.
Monday, November 11, 2013
FlisKits Tartar Build Part 8, Strake Gluing
The front of the strake was traced full size onto the instruction sheet.
The front and rear taper is 5/32" wide.
The taper lines were drawn and extended past the sides of the outline tracing. this make it easier to draw consistent width pencil lines without getting out a ruler each time.
Set the fin on the tracing and draw the taper line using the extended end lines.
 Waxed paper was set down before gluing the strakes together.
The strakes are two pieces, glued in the middle.
All were lined up on a straightedge and taped down.
CA glue was set over the but joint. When the glue was dried another two-piece strake was taped down for gluing.
Another piece of waxed paper was set on top and the four long pieces were dried under a heavy book.

After the strakes had dried, the long top and bottom surfaces were sanded flat.
I wanted to be sure the width was consistent.
A wide slot was cut out of a piece of card stock. The strake was slipped through and sanded down where it was high.
The front and rear taper is 5/32" wide.
The taper lines were drawn and extended past the sides of the outline tracing. this make it easier to draw consistent width pencil lines without getting out a ruler each time.
Set the fin on the tracing and draw the taper line using the extended end lines.
 Waxed paper was set down before gluing the strakes together.
The strakes are two pieces, glued in the middle.
All were lined up on a straightedge and taped down.
CA glue was set over the but joint. When the glue was dried another two-piece strake was taped down for gluing.
Another piece of waxed paper was set on top and the four long pieces were dried under a heavy book.

After the strakes had dried, the long top and bottom surfaces were sanded flat.
I wanted to be sure the width was consistent.
A wide slot was cut out of a piece of card stock. The strake was slipped through and sanded down where it was high.
Sunday, November 10, 2013
FlisKits Tartar Build Part 7, Tail Shrouds
Set a glue line at the centering ring joint and slide the slightly flared shroud end down onto the glue.
The instructions say to glue the tail cone shroud onto the end of the coupler.
The shroud actually overlaps the coupler end. Lay the small glue line on the side of the coupler.
Press the tail cone over the edge. Remove all excess glue from the edge.
Check the fit of the engine mount and interior shroud.
Set the interior shroud above the larger tail cone.
Apply a thin glue line inside the end of the larger tail cone and press the interior cone even with the end of the larger, outside cone.
While the glue is still wet, roll the end of the Sharpie over the ends and "mold" the two edges together.
Roll over the outside then roll over the inside smoothing the ends until the glue sets up.
Turn the engine mount in the body tube end until you find one spot where the shroud best matches the tube end.
Mark the tube at the shroud joint to match it all up later.
If the shroud doesn't match well (if there is gaps) sand the tube at the high spots until you get the best fit all around.
Saturday, November 9, 2013
FlisKits Tartar Build Part 6, Tail Shrouds
TIP: Try to make shrouds with the printing on the inside.
I wish vendors would print shrouds with "Shroud #1" or "Shroud #2" outside the part border area. Paint may not always cover up the black ink.
It's tougher to line up the glue tab, you'll have to transfer the tab edge line to the other side.
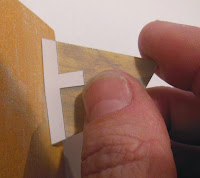
On the left: The interior (nested) shroud overlap is cut off with a sharp knife.
The instructions recommend cutting the engine hook notch after the shroud is formed, a good idea.
I took one of the extra shrouds and marked the notch location.
The inside round cut was punched with the rotary punch.
The straight sides were cut with scissors.
The interior shroud goes over the engine mount tube from the bottom.
This could be hard if the small end of the shroud is too narrow.
If it's too tight, flare the narrow end a bit wider by rolling a dowel around the edge.
Friday, November 8, 2013
FlisKits Tartar Build Part 5, Tail Shrouds
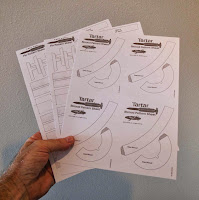
I scanned and printed off a few extra shrouds and fin wraps to be safe.
I'll be making "Super Shrouds" or double nested shrouds this time.
Go to the Apogee Peak Of Flight Newsletter #349 HERE for more detailed instructions.
Why do the Super Shroud? It's simply stronger.
Many will coat a single layer shroud with CA to stiffen after gluing in place. You can still use CA on a nested double shroud.
On advantage of the Super Shroud is the edge that butts up against the body tube is thicker, almost the thickness of the body tube edge.
You've got a wider gluing surface and a stronger adapter, nozzle or tail cone.
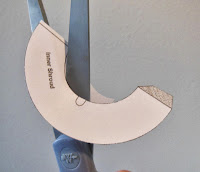
When cutting out curves, use scissors.
You'll cut a smoother curve than you could with a knife.
The scissors actually stay still, the card stock is turned as the scissor blades are closed.
When gluing paper to paper, I've had good luck with glue sticks.
White glue can be too wet. The glue sticks also give a little more time for positioning.
The glued tab was "set" by rolling over it with the back end of a Sharpie.
A clean dowel was set underneath for something to press against.
Thursday, November 7, 2013
FlisKits Tartar Build Part 4, Nose Weight Install

The half ounce of clay weight was rolled into a cylinder to see how long the recess hole would have to be.
With the cylinder at 1//2" diameter it was about 2" tall.

Mark the center of the the flat shoulder end before any drilling.

A 3/16" diameter drill was taped off at 2" so I'd know when to stop.
Twist the drill between your fingers up to the wrapped tape line.
A 1/2" diameter drill followed.
The sides of the hand drilled hole wasn't very clean but will work fine.
The clay was pressed in and a coat of white glue rubbed on over the top.
The screw eye was turned in the side of the nose cone.
Turn the screw eye so it won't bump into the inside wall of the body tube.
Subscribe to:
Posts (Atom)


