Showing posts with label NW Nike Ajax. Show all posts

Sunday, March 10, 2024

New Way Nike Ajax Build, Part 22, Finished


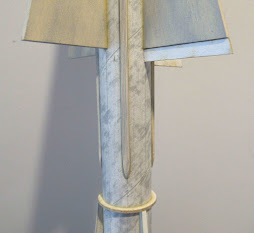
This is a tall one at 30.75" tall.
A good semi-scale representation.


The tunnels are hard to grain fill, the space is tight with 12 fins and four long tunnels.

I sprayed a dull coat to visually hide some fillets that were rougher than I liked.


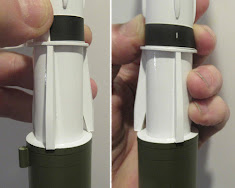
The interstage portion with the black band decal simulating a gap between the stages.
The white decals work well if placed over a clear gloss coat. After the decals dry, follow up with a dull coat and the clear areas of the decals should dissapear.

 
The Nike style flat fins, built as shown in the instructions.
Interesting that the two piece fins are glued together at the mid point, the same centerline where a true diamond taper would start.

Saturday, March 9, 2024

New Way Nike Ajax Build, Part 21, White Decals


I positioned the white decals on the lower stage tube to get an idea of the spacing.


All the white decal go on one side of the tube, centered over the fin opposite the launch lugs.
After the decals dry, the lower body got a clear dull coat.

Friday, March 8, 2024

New Way Nike Ajax Build, Part 20, More Decals


The brown squares are pre-cut in vinyl.

These are in line with the upper tunnels, one square is in line with one of the supports.

That tape line is a guide for the top of the square.

I used the tip of my knife blade to lift and position the square.


Here's the brown squares in place.
The brown is almost lost in the olive drab color, but they are there!
You shouldn't set decals down over a flat finish, the clear areas of the decal can "silver" not adhering well.

You should apply a gloss clear coat, then apply the decals. Let dry for a day then reapply a clear dull coat.

I had to re-mask the upper body. Smaller pieces of white copy paper were taped over the black interstage band. I didn't want the tape to touch and lift the black band decal. 
Flat clear acrylic was sprayed to dull the olive drab paint.

Thursday, March 7, 2024

New Way Nike Ajax Build, Part 19, Starting The Decals

There is a simulated gap between the first and second stages. A black band lays horizontally under the open areas at the base of the interstage supports.

TIP: I couldn't see any way to slip this long black rectangle around the tube, under the three vertical supports. I decided to cut it into three pieces. Water slide decals are too delicate to slip under the tight open support openings.  
Wrap the decal around the tube (above the top of the supports) and mark the cut lines.


Here's the three pieced wrap. Tuck the start and stop ends of the band under the interstage supports.

The four U.S. ARMY decals go on the upper body centered between the tunnels. 
Notice how they are flipped. Repeat the flip on the other side.

Wednesday, March 6, 2024

New Way Nike Ajax Build, Part 18, Masking For The Olive Drab


The lower BT-55 section is painted flat olive drab.
The mask is at the top of the widest ring at the interstage supports.

I laid tape strips that overhung the edge of the largest ring. I know there is Sharpie ink on the inside of the three tape strips, but the mask/color separation is actually outside of the ring. The clear tape is set flat and overhangs the ring edge.


Tape was wrapped around the low overhang of the interstage supports.
A plastic bag covered the rest of the upper body to remain white.


Here's the finished mask after the tape was removed. I was happy with the results.

Tuesday, March 5, 2024

New Way Nike Ajax Build, Part 17, Control Surfaces


Here's the nose section showing the tunnel joint cuts.

On the right side I have dabbed on some CWF to fill the open cut.

The control surfaces are glued and centered onto the trailing edge of the upper triangular fins.

TIP: On the left - how glue is applied right out of the bottle.
On the right - The glue line is evened out before gluing onto the fin edge. 
Swipe the side of your fingertip down both side edges leaving an even glue line in the center.
This smoothing of the glue line leaves less "squeeze out" and a cleaner finished joint.


Here's the control surface piece centered down the trailing edge of the upper fins.

Monday, March 4, 2024

New Way Nike Ajax Build, Part 16, Nose Section Tunnels

TIP: Before gluing on the nose section tunnels - 
I'd recommend filling the nose cone/tube and tube/adapter joints. I wish I had.

The joints are noticeable after the white paint is applied and are hard to fill after the tunnel strips are in place. The small fins and tunnels are close together.

There is good reason why Estes supplied the tunnels in balsa. I went with basswood thinking there wouldn't be grain to fill. Sanding the trapezoid profile in the tunnels would be difficult with the brittle balsa.
But - the balsa is more flexible and easily conforms to all the angles in the nose section.


My basswood tunnels were too stiff and had to be cut halfway through with a razor blade.


The lower picture shows how I had to cut and lightly crack the tunnels to fit the angles of the nose section.


Some 400 grit was wrapped around a Q-tip to sand away the primer for a better glue bond. The sanding also made a flatter gluing surface to match the flat bottom of the tunnels.

Saturday, March 2, 2024

New Way Nike Ajax Build, Part 15, Parachute

A 18" diameter parachute is cut from the multi size parachute kit.

These suggested shroud line lengths seem long. Some simple math tell me they are 1 1/2 times the cute diameter. 
Years back there was a NARAM R&D presentation that showed a 1 1/2  length shroud line is the most efficient.  
I'm used to the Estes lengths. I settled for three 40" long shroud line loops.
 
This red shroud line is a fire resistant Nomex.

The "spool" is interesting. 
When you set your index and thumb tips over the hole, the black spool and pull the string and it will teeter tot back and forth to unwrap.
This is a big improvement over the Estes style of a long looped line that usually gets snagged when you try to open it up.


This chute kit had round reinforcement rings instead of the folded jewelry tags normally seen in the New Way kits.

Cut the chute to 18".
TIP: Apply a ring to both sides of the chute material. Both sides is a great way to go, especially if you use paper reinforcement rings.
Punch holes and tie on the shroud lines.
 

Friday, March 1, 2024

New Way Nike Ajax Build, Part 14, Gluing On The Nose Section Fins


There are a lot of fins glued to the nose section!
In order to fit over the angled adapter - 


The overhanging root edge is sanded at a slight angle. This is where the aluminum sanding block comes in handy. It doesn't take  much sanding for a tight fit. Sand a bit and check, then repeat.

TIP: I'd recommend filling the adapter/tube, tube /nose cone joints before gluing on the fins and tunnels. I didn't and had a hard time filling the balsa and tube joint after the fins and tunnels were glued on.


Here's the upper section with eight small fins in place.


Thursday, February 29, 2024

New Way Nike Ajax Build, Part 13, Gluing On The Upper Fins & Tunnels


I used a tape wrap for a baseline when gluing on the upper four fins.

Three fins below, four fins on the upper body. 
It's a bit confusing as to how they line up, 4 over 3.


The tunnels were set on the tube centered between the upper fins. Trace their top and bottom ends with pencil.


In the right side picture, notice the tunnels extend just over the top of the tube. 


After the glue dries,
Sand the overhanging tunnel ends even with the top edge of the tube.
This will make a tighter fit with less of a joint gap between the tunnels when the nose section is slid in.


Here's the front end showing the ends flush with the end of the tube.
 

Wednesday, February 28, 2024

New Way Nike Ajax Build, Part 12. Interstage Support Details


The interstage supports are laser cut from thin cardstock.

TIP: Look close - you can see some rough edges. You can sand the edges smooth with careful passes with a sanding block.
Left is before, right is after sanding with 400 grit.
As shown in the instructions:
Glue the strip end first and let dry.
Notice the shape of the support piece. You want to glue the strip to the "flatter" side of the balsa piece. The bottom has a sharper angle.

I use very little glue to adhere the cardstock in place. Enlarge the lower picture to see the even fine line of glue centered down the outside edge of the balsa. This glue line shouldn't have much squeeze out, if any to clean up.

TIP: Run a small line of glue, then remove the excess by running your finger at about a 45 degree angle down the sides. this gets the remaining glue to the center of the fin.

These are glued down the three fin lines from the booster fin lines. as shown in Step 12 of the instructions.


TIP:
The upper ring also has laser cut ridges. 
Sand smooth, then rub in a thin coat of wood glue into just the edge to seal it. After it dries, sand smooth with 400 grit.
I applied glue a second time and sanded.


Tuesday, February 27, 2024

New Way Nike Ajax Build, Part 11, Lower Fins Gluing


TIP:
I like to line up the engine hook and launch lug positions.
When launching, set the launch lug to the back side of the model for better photos from the front. This also allows you to bend the igniter (starter) wires forward away from the launch rod and engine hook.


Viewed from the rear, 
This is how the fins line up - three on the booster, four fins on the "main stage". (It is a single stage model.)

The instruction explanation is a bit confusing, just keep this view in mind and you can figure it out.
The pressure sensitive (sticky back) ring goes around the BT-55 lower tube at 2 3/8" from the bottom.

Start and finish the wrap at a fin position. Cut off the excess. This joint will be covered by a fin.

Note I used a wrap of tape for an edge guide to insure a straight wrap and the ends would meet up.

With the trailing edge of the fin even with the end of the body tube, mark the notch position. 


Cut a very shallow notch with a sharp knife. You don't have to go very deep with the cut.

The gray primer/filler was scraped away for a better glue bond. After scraping away the primer, you'll have to redraw the pencil lines for the fin alignment.

Monday, February 26, 2024

New Way Nike Ajax Build, Part 10, Engine Mount Gluing


The instructions say to apply glue 2" up, inside the rear of the BT-55 tube.
Considering how high the mount sits, that would be pushing glue up farther than I'd like above the upper ring.
I apply a bead of glue like this using the end of a dowel. 

With the engine mount set next to the body tube and the engine hook bend even with the end,

That puts the glue dowel applicator mark about 2 1/2" above the end of the tube.
Apply a ring of glue around the top end of the dowel. Set the dowel in the tube up to the 2 1/2" pencil mark and swirl the glue bead on the end inside the tube. Slide the mount in. 
This glue ring will only contact the upper ring.


To remove excess and smooth out the glue ring, 

Tape a Q-tip to the dowel to reach that deep ring/tube joint.


The lower ring gets a fillet of wood glue. 

Smooth and remove excess glue with a Q-tip.

Sunday, February 25, 2024

New Way Nike Ajax Build, Part 9, Tunnels Shaping

I thought the balsa tunnels would be too weak when trying to sand the trapezoidal shape into the sides. (See last picture below.)
I cut them out of 1/16" thick basswood using a kit supplied balsa piece for a template.
Here's four of the upper body pieces below the original kit piece.
GOTCHA: Well, got me anyway! I cut the lower, longer tunnels were fine cut from basswood. They fit a straight  tube surface well. 
On the upper, shorter pieces, the kit supplied balsa is more flexible. The balsa strip is easily pressed into the adapter dip and over the nose cone shoulder curves. I ended up having to cut notches in the upper basswood strips and "cracking" the wood slightly to fit the angle changes. More on this later.
If you want an easier build, stay with the balsa strips supplied with the kit. But, the balsa grain is more difficult to fill.


The strips are sanded to a trapezoid shape, shown below.

I marked the tunnel sides with a soft pencil. This gives me a better contrast, I can see what is sanded off.

Use a sanding block to keep the side corners sharp.


Looking from the back end, here's what you should end up with - 
The basswood is stronger and will hold up to more aggressive sanding.

Friday, February 23, 2024

New Way Nike Ajax Build, Part 8, Centering Rings


Instructions typically tell you to run a line of glue around the tube, then slide the ring into the glue.

TIP: This is unnecessary and you run the risk of the rings freezing in the wrong position. 
Dry slide the rings in place, then apply a glue fillet to either side of the rings.  
One flat face side of the thick 50/55 centering ring will be visible on the finished model. 
Apply a thin coat of glue on the flat face and let dry. This seals the exposed face. Sand the ring face flat with 400 grit on a block.

Slide the rings into position with the glue sealed, sanded face down. Apply fillets to both sides.

The assembly is glued into the BT-55 with the thicker ring (sanded flat) face even with the tip of the tube.


I used some CWF in the joint between the ring and BT-55,
This was sanded smooth with 400 grit.