Showing posts with label E Vesta Intruder. Show all posts

Friday, October 29, 2021

Estes Vesta Intruder #7312 Build, Finished


This was a good challenge!
With the overlay skins, the fins seem very strong.


The long crescent center vanes continue the "swelled body" look below the bulbous nose cone shape.


The nose cone is as long as the main body tube!
I've never seen anything in this shape before.

I like how Estes is combining the Space Corps storyline with the new Sci-Fi models.

Thursday, October 28, 2021

Estes Vesta Intruder #7312 Build, Part 17, More Decals & Shock Cord


These window decals are set around the thinner black canopy.
Note the decal goes around the front and has a break on the right side.

Again, I rounded the angle of the inside left to prevent a decal tear.


The right side picture (above) shows the blue backing being slid under and off. The right side piece was set on afterwards, matching the spacing from the left side decal.

I had to look at the sides of the box to figure out the placement of these decals.


The shock cord mount goes in 2" down from the top edge of the tube.

TIP: Mark the rubber shock cord with a pencil at 2" from the tri-fold mount.
Use the pencil mark as a depth gauge - be sure the mount is placed low enough to allow space for the nose cone shoulder.

Wednesday, October 27, 2021

Estes Vesta Intruder #7312 Build, Part 16, Clay Weight & Decals


I like to cut the clay into small pieces and roll them into balls.
This is a TALL nose cone. I didn't want to chase a clay snake around the tip of the nose cone.

Dropping in the little clay balls allows them to settle into the tip to press them in place. You will need a long dowel or a 3/16" diameter launch rod to tamp the clay in the top of the nose cone.


Lately Estes decals have been thin so I take an extra step to avoid tearing.

Instead of cutting the inside rectangle with tight corners, I punched a circle using my rotary punch. 

Punch the hole and extend the lines down from the sides of the circle.


Do a dry fit to check the final position and spacing beside the fin.


I did another punch of the nose cone decal.

Do another dry check before soaking for transfer. Note the position spacing around the rear of the canopy.

Tuesday, October 26, 2021

Estes Vesta Intruder #7312 Build, Part 15, Nose Cone Paint & Engine Mount


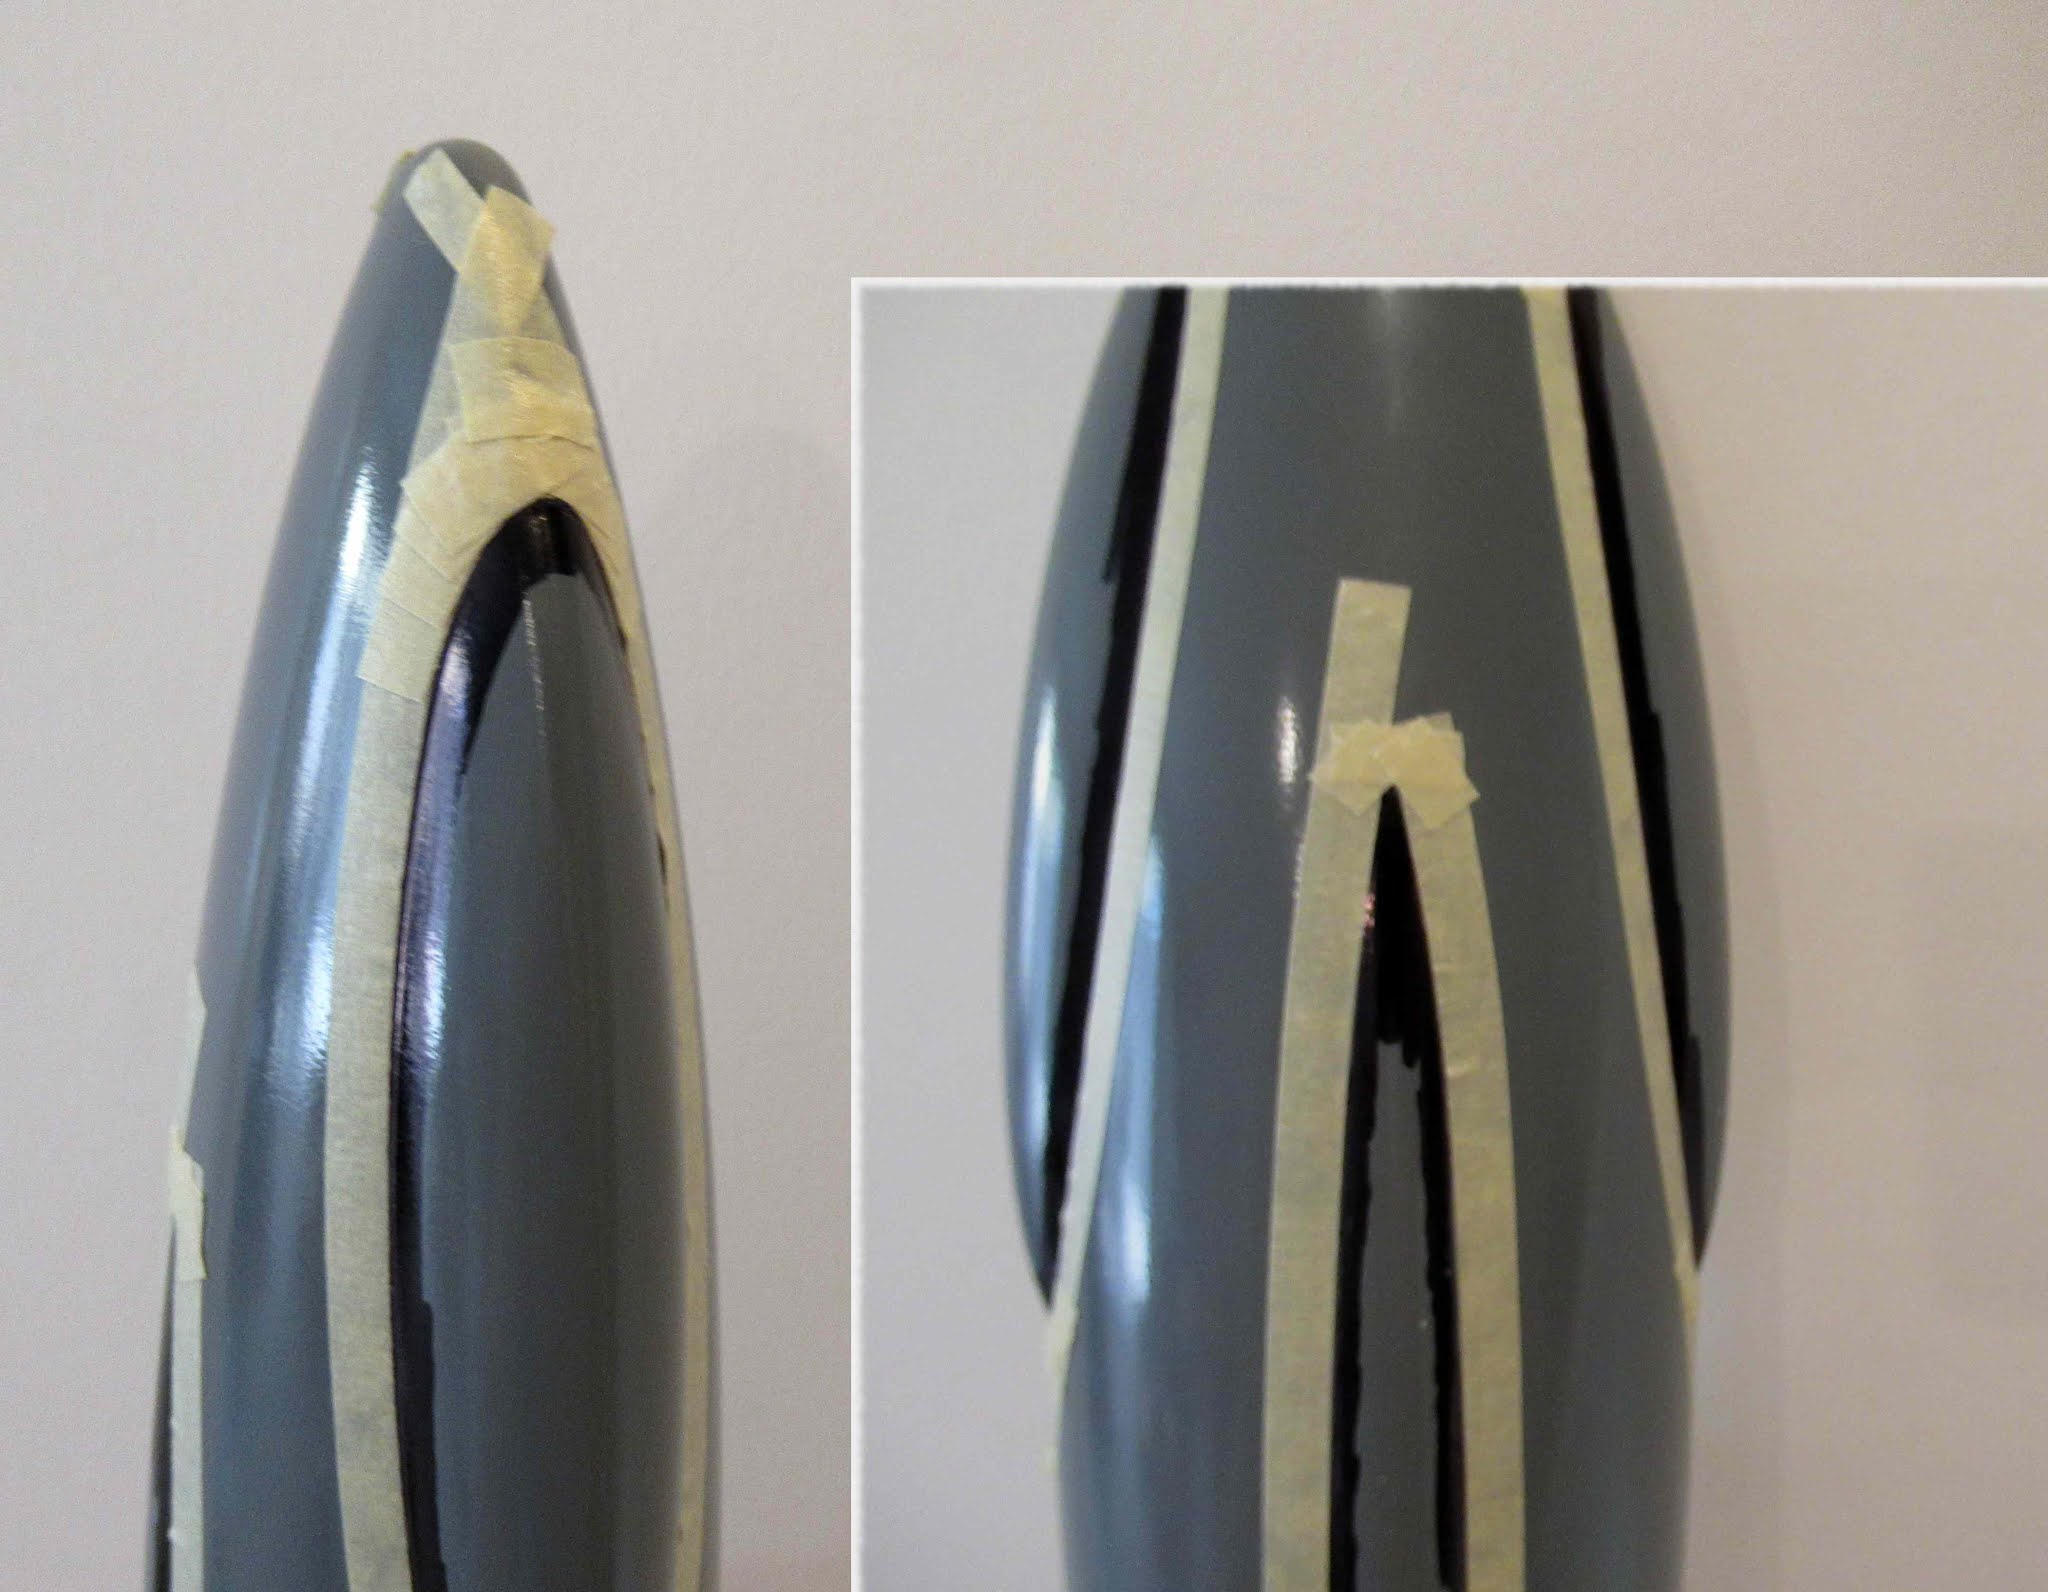
I outlined the black edges with masking tape strips, slightly over the blackened edge.

Because of the different shape of the nose cone and canopies, I ended up covering all the remaining gray areas with brown masking tape.

On the right, the entire nose cone was hit with gloss black paint.


Here's the final look after the tape was lifted.
I did have to do some scraping, pushing back paint lines and touching up with a brush.

Results were good, not great. 
This was not an easy mask.


Before applying any glue in the tube - 
Do a dry fit. Notice how the vanes overhang the end of the tube edge.
Know where the engine hook will align with the fin next to the launch lug location. (See picture below)

A line of glue was set inside the rear of the tube.
Look close - there is a second ring of glue just inside the end edge of the tube.


On a larger diameter tube like this, you can set the engine mount in at an angle barely contacting a rear ring of glue

Slide in the mount and turn into the correct position so the engine hook is in line with that fin.

Monday, October 25, 2021

Estes Vesta Intruder #7312 Build, Part 14, Canopy Black

I wouldn't recommend outlining the canopies the way I did. In the end I didn't get great results. This post shows my first attempt at the canopy masking. You'd probably be better off masking with Tamiya tape or if you are steady with a brush, hand painting.

I couldn't see how to mask the four canopies on the tall nose cone. There are high areas with deep, defined edges. There are also tight, low areas without sharp edges.

I thought I would try a ultra fine point Sharpie outline like I had done before on the Saturn V and Saturn 1B vacu-form wraps. This gives you a definite black outline that is easier to mask when spraying the black fill on the inside of the Sharpie line.

No problems initially, the ultra fine point Sharpie easily followed in the canopy "rut".


It's much harder to outline the rounded top of the canopy.

I pretty much free-handed the curve joining up the outside lines with the round top.


The top of the narrower canopies were hard to outline.
I ended up using a small straightedge, here is the leftover centering ring card. Draw short lines adjusting the cardstock edge every 1/4" or so and continuing the line.


The ultra fine point line was widened in using a standard fine point Sharpie. You don't have to go very wide here. Just enough to help with the masking edge.

Again, you'd probably be better off using a flexible tape mask without the Sharpie outlines.

Sunday, October 24, 2021

Estes Vesta Intruder #7312 Build, Part 13, Finally - Paint!


Here's one of the two models I built.

I sprayed the top end on one to check the coverage. 
When painting, concentrate on the nooks and crannies to be sure you get paint in all the inside areas. 
Here's the other model.

I had to remove some paint to glue on the launch lugs and standoffs.

On the left, some tape was placed over the fairing side to protect it from the sandpaper going down the lug gluing line.

I used a launch rod to check the two lug alignment before the glue totally set up.

Here again I'm spraying the inside areas before spraying the entire model.

Direct some spray paint into the area between the two fin fairings.

On the right I'm directing paint onto the trailing edges of the fins.

A dry fit of the engine mount shows the color contrast. 
Enlarge the picture to see the fin covers, vanes and engine details.

The thin card stock overlays really strengthen the fins.

Saturday, October 23, 2021

Estes Vesta Intruder #7312 Build, Part 12, Vane Sanding & Motor Mount Paint


When I sprayed the white undercoat, I noticed a few fillet bubbles. I had to go back and add more glue fillets.

Here's the back end after some smooth sanding.

When you spray that gloss white undercoat you can easily see all the glue boogers and fillet ridges. Lightly sand them down now for a smoother look on the finished model. 


The suggested color scheme is dark gray over the entire body and engine mount.

After spraying the dark gray I sanded the fillet ridges as best I could. The glue fillets still showed after the next spray coat - more sanding.


I decided to go with a metallic black paint. With the naked eye, metallic paints help cover any rough areas.
The metallic black paint on the engine mount extension will help break up the overall gray model. 


Here's a great Metallic paint, one of the few Rustoleum spray paints I will use on my models.

Spray Black Night Metallic with light coats - it is thin and can easily form drip runs.

Friday, October 22, 2021

Estes Vesta Intruder #7312 Build, Part 11, Fairing Spacing & Vane Fillets

Notice the scraping for the fairing glue line and the lower launch lug.

I wanted to be sure the spacing between the fairings was consistent - 

TIP: Use one of the fairings set between the two glued on fairings to keep the spacing equal and in line with each other.


Before the glue starts to set up - 
remove the center space fairing.

You could also use scrap balsa to set the spacing.


The fillet line on the forward vanes are long!
TIP: On a very long root edge, apply wood glue to only half the length at a time. This prevents pooling from too much glue under your smoothing finger.

With the vanes so close together, you might find it easier to do even shorter fillet lengths then cleaning any excess glue with a Q-tip.


I thought it would be easier to lightly sand the fillets before the first white undercoats. All I was trying to do was knock down the high spots, not do any deep sanding.

Thursday, October 21, 2021

Estes Vesta Intruder #7312 Build, Part 10, Fin Gluing


With the overlays centered I had a little overhang on the small trailing edge.

This was simply sanded off with 400 grit on a block.

Set the root edge next to the fin alignment line.
Mark just below the forward leading edge. You'll want to scrape off the filler/primer inside the root edge length.

To the right is a fin line scraped to the bare tube - 
just short of the root edge length.
The fin line will have to be redrawn after scraping. Use your aluminum angle to re-draw the line.


I rarely use the fin span drawing in the instructions but found it handy on this build.

I only glued on three fins to start. These are actually the three fins that get the faring side pieces glued beside them.


The top picture shows the gap at the root edge when the side fairing pieces are set next to a fin.


Here's a better fit after sanding a slight angle on the root edge of the fairing.

Wednesday, October 20, 2021

Estes Vesta Intruder #7312 Build, Part 9, Fin Skins


The interior tics can be sanded down with some 400 grit.


Same goes for the outside edges. Run a fingertip over the edges and you will feel the tic bumps that should be sanded off.


I didn't want to use white or wood glue to adhere the skins. I was concerned about excess dried glue showing up on the finished model. 

I tried an experiment using a glue stick on some scrap skin cardstock. The glue stick was rubbed on the back of the skin trying to get an even coat.
This was pressed onto some scrap balsa and let dry.

The skins held on very strong, even when I tried to lift them with a knife blade.


That was good enough for me!

Here's a cleaned up skin, glued and centered on a fin. 

TIP: Using a glue stick allows an even thin coat that won't squeeze out when the skin is burnished down. If any glue shows along the edges, pick it up with a Q-tip it before it dries.

Tuesday, October 19, 2021

Estes Vesta Intruder #7312 Build, Part 8, Fin Skins


The hold down tics on the center pieces were cut with a new blade. I wouldn't recommend punching these out. These should be removed or they will be seen when the model is finished.

On the left you can see the tics after the dot was cut out.


I used a sharpened dowel to push the tic up and over the surface.
This was shaved off with my knife.


There was still a small bit left. I did some light sanding with a small diamond rat tail file.


To round out the holes - 

I dipped the sharpened dowel in some water then rolled off most of the water on a paper towel. Very little water is left on the dowel tip.


Roll the damp dowel in the hole to round it out and form a perfect circle.

Monday, October 18, 2021

Estes Vesta Intruder #7312 Build, Part 7, Vane Gluing & Two Fixes

Here you can see the filler/primer scraped off down the pencil lines.
After I scrape the filler/primer, I usually have to re-draw the pencil lines.

The top of the vanes are even with the top of the body tube.

On the bottom end, one vane ended up short!


I had to cut out another one.
Here's the new one, taped down for a shot of filler/primer.


The supplied launch lug is cut in half - 
But it turned out to be a bit longer than the laser cut balsa standoff.

The lugs were trimmed down to match up to the standoff length.

Sunday, October 17, 2021

Estes Vesta Intruder #7312 Build, Part 6, Filler/Primer, Vane Gluing


Here's all the CWF filled balsa and launch lug. Everything is set down on tape with the sticky side up. All root edges are butted up against each other to keep the filler/primer spray out.

That's a lot of balsa!


The tube marking guide wrap matched up! 

In the picture below left -
I set the long vanes in position with no glue yet. I made a pencil mark below the end of the vane tip. I followed by scraping off the filler/primer down to the width of the vane glue line, just inside that short pencil mark.

I used my aluminum angle to extend the pencil lines all the way down the tube. 

I also extend the line over the top edge of the tube. The fins will cover the pencil lines - I can still see the edge tip of the pencil line.


You can also use the aluminum angle to be sure the long vanes are running straight down the tube.