Showing posts with label Cleaning. Show all posts

Friday, October 1, 2021

Estes Super Mars Snooper #7309, Build Part 20, Painting The Lower Shroud


The Scotch tape mask edges were pressed down using a Q-tip before spraying. Using your fingernail to seal the edges could scar the balsa.


After the tape was pulled - 
Results were pretty good, but most all masks need a little cleaning up, especially one with inside edges.


One side had a rough edge.

Before the paint sets up, you can push the high spots back into the larger black area. Try to push the paint first - don't scrape unless you have to.


There were some black overspray.
This was removed with some careful use of a Mr. Clean Magic Sponge. Go light with the sponge - it can dull a gloss finish.

Wednesday, September 8, 2021

Aerotech Mantis Launch Pad, Part 6, Final Adjustments


The four legs were taped together for shipping. 
The tape left some sticky gum, Goo-gone removed it with a paper towel.
With the two sides of the Adapter Disk together, I couldn't easily slide the 1/4" Launch Rod through and down into the Swing Arm base.

I opened up the rod slot with some 220 grit wrapped around the launch rod. Don't take off to much - you will want to keep a fairly tight fit.


Looking at the middle of the Swing Arm, notice the Launch Rod slides down through the middle and rests at the bottom of the assembly.


The leg holders have raised nubs for a friction fit when the legs are slid in.
My fit was a bit too tight so I filed down the raised dots. File, test the fit and file a bit more until the friction fit is workable.

Tuesday, June 22, 2021

Estes Indicator #7244 Build, Part 9, Red Fins

Well, I messed up! 
I should have paid closer attention to the face card coloring. It's not immediately apparent, but there are two black fins and one red fin. I got those reversed. You've really got to look close to find that second black fin. Not a big deal, but that won't work with the supplied decals! I didn't notice until I went to apply the decals.


The rounded leading edges of the fins needed a little push with a knife blade to make the curve smoother.


It looks pretty good - so far!


Most of the straight root edge masks were good -

This one was a bit rough. Oh well!


The low end of the upper fins root edges look okay.
As I mentioned earlier, there is little chance of the low end making contact on landing or breaking off.

Thursday, May 20, 2021

Estes Antar #7310 Build, Part 14, Spray & Tape Pull


Ace Hardware Premium Enamel Hunter Green is a perfect match for the dark green on the decal sheet.

Here I'm wiping off the nozzle after the first base coat spray.

Most of the larger full cover mask has been removed.
Here the center wing mask is being pulled.

The Scotch tape masks will be removed next - Fingers crossed!


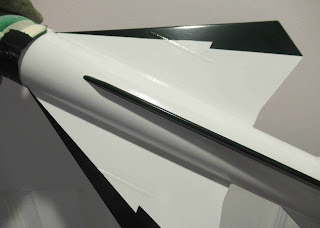
The mask lines were very clean.
There is some spots that will need cleaning up.
It seems there is always a bit of paint that sneaks under the tape edges. I like to remove the mistakes before the paint fully dries. You wouldn't want to remove over spray a few days later.

On the far left is a Mr. Clean Magic Sponge. Wet the sponge and wring out most of the water.
On the right the green has been rubbed and removed.

Sunday, December 20, 2020

Estes Saturn 1B, #7251 Build, Part 23, Spraying The Mid Section Tube

On the left is the mid section mask after the gloss black is sprayed.
The tape was set down the middle of the wide Sharpie ink outlines. I used a combination of brown masking tape and grocery bags for the larger areas.

When spraying over this mask, the outlined black borders help define just that - the borders. Spray directly over (from the top) the open areas - Don't spray from the sides! The paint can get under any raised area.  

I paint scale models with gloss paint so the water slide decals will stick. Decals on flat paint will "silver" and not stick well. You can always hit a glossy model with flat clear after all the decals are in place.

On the right is after the tape was lifted. Get ready - these complex masks over vacu-form corrugations will usually need touch-ups.

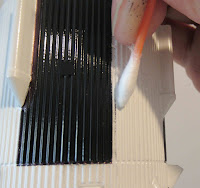
TIP: Below the Q-tip is some black bleed or overspray.
I start with a wet Mr. Clean Magic Sponge. Wet the sponge, squeeze out the excess water. Don't wipe the sponge on the model - Transfer some of the cleaner onto the Q-tip by wiping over the damp sponge.

Rub the cleaner on the overspray to pick up some of the unwanted paint.

You'll have to throw away the Q-tips often. You don't want to transfer the removed paint back on the model.

On the right is the same area after cleaning off the overspray.
Don't overdue it, you could go right down into the white paint.
You'll have the best luck cleaning off a second color before the paint is totally dry and set in. Start cleaning up the paint soon after lifting the masking tape.

This paint overspray was too tight an area to use the Q-tip. I had to scrape off the black paint, then go back and brush on some white. I still had to  touchup with more black.

Build time:
Mask mid section: 35 minutes
Spray and clean up: 1 hour
Total build time so far: 18 hours, 10 minutes

Sunday, June 7, 2020

Estes Doorknob, #9720 Build, Part 10, Overspray & More Masking


I had a little over spray.
This was easily removed with a damp Mr. Clean sponge. Go light with the sponge - it can dull the paint.


TIP: Remove the pencil marks with a white eraser.
Don't use an eraser on the back end of a pencil. A pink eraser will leave pink marks.


Here's the marked Scotch tape masks dividing the nose cone into quarters.

The tip of the nose cone remains white.
This is the upper mask separations.

To get clean corners, the bottom blocks were masked and sprayed.
The bottom is masked off, then the upper orange blocks are masked and sprayed.
You could do all the masking at once but I find better results doing a two-step process.


One black fin.
The fin taper showed up well on the finished model.

Tuesday, May 26, 2020

Centuri Vector V #KB-2 Build, Part 11, Black Paint & Decals


Here's the mask for the black vanes. This picture shows the upper vane placement


This is the vane mask for the lower placement near the top of the shroud.
The picture on the right shows how to pull the tape off, away and folded over itself.


Whoops!
I got some black over spray on the shroud.

TIPS: With the blue totally dry, I was able to use a Mr. Clean Magic Sponge to scrub off the black.


Using a Magic Sponge can dull the gloss a bit.

Hit the dull area with some polishing compound to bring the gloss back.


Most of the decals are self explanatory, there are extras so you can customize a bit.

At the bottom are "Short Bars" that center between the five fins.


TIPS: I cut the decals off the sheet with the low side wide, leaving an even clear space at the bottom of all five bars. With the even cut at the bottom, the clear area was used to space them up from the bottom of the BT-55 tube.

Saturday, May 4, 2019

Paint Thinner $$$

This 1/4 oz. bottle of Testor's Thinner and Brush Cleaner sells on Ebay for $2.79 plus shipping! Very expensive when you consider how long it will last.

Most builders will dip a wet brush and swish it around in the thinner bottle. This leaves too much paint in the thinner that will end up on your next brush.
DON'T MASH THE BRISTLES ON THE BOTTOM OF THE BOTTLE! That will break and bend the bristles.
You are better off just dipping the brush in (don't swish) withdraw the brush and wipe on a paper towel. Repeat until the brush is clean.

You could dedicate one brush to each color as it is hard to remove all the paint left in the bristles. If you later use a "red" brush with white paint, your touch up could have a pink tinge.

You can also clean a brush pretty well using an acetone based nail polish remover. Try to buy 100% acetone remover.
Dip in the brush, remove and gently wipe off on a paper towel. Repeat until you no longer see any paint being transferred onto the paper towel. Just dipping the brush in then removing it will keep the acetone clean.

This Acetone clean is only for natural hair bristles. Acetone will melt the cheapest plastic brushes.
This follow-up I learned from my Mother, she was an artist, sometimes painting in oil.

After the acetone clean, place a drop of liquid dish washing soap in the palm of your hand. Add a few drops of water.
Gently swirl the brush in the soap and water. You might be surprised how much remaining paint will come off the brush.

NOTE: I use a dedicated brush for each color. I probably have ten good brushes, each marked for a specific color.

Saturday, January 16, 2016

New Way A-20 Demon Build Part 11, Masking One Black Fin

One fin was chosen for the black mask. I used Scotch Tape again.

First the sides were set down, centered in the middle of the fillets.
Next a piece was set over the top.
Then two diagonals.
After the picture was taken, four more diagonals were added to further round off the leading edge.

The inset picture has the masking tape pieces over the Scotch Tape, widening the mask area.


A painting wand (dowel with engine casing) was set into the engine mount.
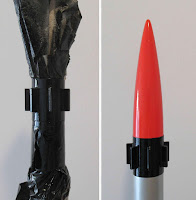
The bottom of a plastic grocery bag was punched over the dowel end. (The stick is upside down in the left side of the picture.)

The open end of the bag is taped around the other three fins and the body tube.


After spraying the tape was lifted.
On the left you can see some black over spray spots above the black fin.

A damp Mr. Clean Magic Eraser took off the paint.

Tuesday, August 11, 2015

Post Flight Soot Cleaning - TIP


After a launch I'll clean off any dirt with a damp paper towel.

Inside the top end of the body tube, an accumulation of ejection soot can make tight fit of the nose cone.
The inside inch or so is wiped off with a dry paper towel. Don't use a wet wipe, the inside tube fibers can swell and break down.


The soot that covers the inside can actually protect the naked Kraft paper surfaces on future launches. I had a flyer tell me he cleans out all the ejection soot he can reach with a toothbrush.
Below the nose cone shoulder area, leave the soot where it is!
The soot layers could be why some models last for hundreds of flights.

When I cut apart my old Centurion I was surprised the bottom of the baffle was so thick with ejection soot. The bottom plate of the baffle wasn't burnt, it was as strong as when it was first assembled.
The Centurion had 15 flights on it before it was beyond repair and cut open.

Tuesday, December 30, 2014

FlisKits Mercury Redstone Build Part 20, Masking and Cleaning Up


I've masked and painted Mercury Redstones before but this was a small hard mask.
The Scotch tape strips look strange in the left side picture. More masking tape was added.
On the right is the reveal after the tape was pulled.
The horizontal lines were rough and there was some paint that got under the tape.
To clean it up I used some orange cleaner on a Q-tip. The swab was dipped into the cleaner and the excess blotted in a paper towel.

Careful wiping took off the black that rolled over the leading edge of the fin.
There wasn't much I could do with the horizontal mask. Some thin decal strips were cut and placed over the bad mask.


Here's the lower end after cleaning it up.
It's not perfect but good enough for me.

More touch-ups with a small brush are needed.

Saturday, September 22, 2012

AVI Nike Tomahawk Build Part 15 Nose Cone and Fin Units

After getting the adapter close, time to prepare the plastic parts.

The top 20mm plastic nose cone is how it comes direct from Quest.

The bottom nose cone has had the seams sanded down and the tip tapered to a more scale profile.

The Tomahawk fin units are very clean, except for the outside edges.

The top unit shows a little molding flash on the right fin.

The bottom unit has been cleaned up with 220 then 400 grit on sanding blocks.
The yellow coupler joins the fin unit to the upper 20mm tube.

Finishing of the Nike Tomahawk will be continued when I return home.
I'm on a cruise until October 3!

The next build turned out to be more interesting than I had thought -
the Estes Mk109 Stingray.

Sunday, June 24, 2012

TIP: Cleaning Up Flat Finish Paints

I've mentioned these Eraser Sponges before.
Here you can see how well they clean up - even on a flat finish.
Enlarge the inset picture to see the dirty decal area before.

Flat finishes can easily pick up dirt and oil from handling.
The Mr. Clean Magic Eraser (or in this case the Scotch Brite Easy Eraser sponge) really cut through the dirt.

Don't use much water on the sponge and keep paper towels at hand to pick up any beads of water.

Sunday, February 26, 2012

Super Alpha Build Part 9 Cleaning Up

Before any spraying was done, a strip of masking tape was set sticky side out around the inside base of the lower main body tube. Reduce the stickingess of the tape by pressing it on your pant leg a few times. Otherwise, the tape could pull and lift a layer of the rough inside surfaces of the body tube.
Paper towel pieces are pressed into the recess and down to the lower centering ring.
This keeps all the paint out of the engine mount, it gives a cleaner look to the finished model.


After the paper towel pieces and tape removed there shouldn't be any paint in or on the mount.

The rear edge of the tube needed some black on the rim.
I used a permanent Sharpie pen.

In the picture the right side of the tube edge has been blackened.


I still have to scrape a bit of black paint off the engine hook.

Friday, December 9, 2011

TIPS: Brush Cleaning Part 2

Put a little water in the palm of your hand and one drop of dish washing detergent.
After taking off most of the paint with the thinner, gently roll the brush in the wet soap.
In the picture you can see some red paint still coming off the brush.

Without this final step, there would still be some red paint left in the brush. If this brush were used again to touch up white paint, the color may end up pink!

Wash off the brush with water to remove the soap.

Here's a final tip artists use to keep a point on their brushes:
Put the brush in your mouth! Roll your tongue around the hair forming it into a round point.
When the saliva dries it will help set and maintain the brush shape between use.

I know, it sounds strange, but that's what the great portrait and landscape artists do!