Showing posts with label T Arapahoe C. Show all posts

Saturday, May 21, 2016

Thrustline Arapahoe C, Finished


This is one of my favorite designs and paint scheme.
Brian Coyle brought his to the Orlando ROCK launch a few years back and I've wanted to build one ever since.
The original Thrustline kit was BT-60 based and D powered. Mine was a downscale BT-55 version for 18mm engines. I kept the Indian theme with the "Kokopelli" name.

This one used metallic red paint. With this paint pattern any second trim color works. I've seen it in yellow, orange, blue, green or gold.

UPDATE: I've flown the Kokopelli three times with the standard A8-3, B6-4 and C6-5 engines.
The A8-3 was a successful launch but altitude was too low. This BT-55 sized model is best with the B6-4 and C6-5 engines.

Friday, May 20, 2016

Thrustline Arapahoe C, Part 14, Strake Decals


The short bars center over the low end of the strakes at the red mask line.


I should have looked ahead with the launch lug placement. It's right in the middle of a decal.
The decal was cut to fit around the lug before it was soaked for transfer.


The overlap was trimmed with a razor blade after the decal dried a bit.
Run the blade down the trough between the lug and strake an peel off the excess.

The "Kokopelli" name decal and main fin larger decals went on without any problems.

Thursday, May 19, 2016

Thrustline Arapahoe C, Part 13, Mask Reveal and Decal Trim


When removing a mask, pull the tape back over itself and away from the line.
The tape is pulled and folded back over itself.


For the red,I used the Rustoleum Red Metallic. I has very fine metallic specs that show well under sunlight. It sprays on thin but dries fast. This paint is best applied in thin coats.
Here's the completed mask.


I printed up some black trim lines on the decal sheet.
To get the black strip to roll around the fin, start it halfway around the leading edge. The second piece on the other side will finish up the half roll.

On the trailing edge, roll the black strip over the trailing edge and let dry a bit before trimming.

With a sharp razor blade, cut straight down the middle of the overlapping decal strips. Cut through the decals only, not into the paint and wood fin.
Lift out the overlap pieces and press down the ends matching up the edges. It's up to you whether or not you want to trim off the lower tip of the "V".

Tuesday, May 17, 2016

Thrustline Arapahoe C, Part 12, Masking

This is not an easy mask. The fin tips and strakes get some different paint treatment.

On the right is one of the two fin tips. A single piece of Sharpie marked clear tape goes over the leading edge and down the sides. The picture shows the ends trailing over the back. The ends actually roll over the trailing edge and angle over the opposite side.


Another small strip covers the "V" angle left from the first pieces layed down around the trailing edge.


The strakes are masked the same way you'd do the squared leading edge of a fin.

The fins and strakes are fairly close, I couldn't use pieces of a plastic grocery bag to cover the larger areas.
This has got to be one of the messiest looking masking jobs I've ever done. When you are in doubt about the coverage of a mask - add more tape!

Monday, May 16, 2016

Thrustline Arapahoe C, Part 11, Fin Gluing and White Spray


This is a dry fit of a fin. Notice the pencil mark on the fin root edge at the break between the body tube and tail cone.


Above the pencil mark, wood glue will be used for the wood/body tube joint.
Below the pencil mark, The Beacon Fabri-Tac glue will be used for the wood/plastic boat tail joint.

Crap! I got some bad Rusto 2X paint!
Luckily I stopped early and it sands down easily.
Why do I continue to use Rustoleum 2X?
The good outweighs the bad. It covers in fewer coats with a good gloss finish. I've only had occasional rough, "cottage cheese" with the gloss white paint.


After sanding the model got another coat of white.
I made sure to do some test sprays (off the model) to be sure the rough crud was cleared of the spray tube inside the can.

Saturday, May 14, 2016

Thrustline Arapahoe C, Part 10, Fin Position Marking

After the tube was shot and the filler/primer sanded, it was marked for three fins and three long strakes.
The difference on this design is the strakes go down the tube length between the three fin positions.

Here the fin root glue positions were sanded down using a block. Sand to a estimated width of the fillet. Pencil lines were then redrawn.


The Estes Monarch kit fin marking guide fit well.
To get six positions from the three fin marking guide, the paper guide was folded in half between the printed two lines.


The strakes were glued on first.
I used an aluminum angle to check and make sure they were straight.

Friday, May 13, 2016

Thrustline Arapahoe C, Part 9, Tail Cone Gluing, Ends and Edges


Before gluing on the tail cone and spraying primer, the shoulder was sanded down to the same outside diameter of the body tube.

TIP: Beacon Fabri-Tac was used to glue the engine mount and centering rings to the tail cone.
Card board to plastic glue joints can be weak. The Fabri-Tac glue was bought for another purpose, fabric gluing obviously. The Fabri-Tac glue has acetone in it, acetone will break down the plastic a bit.
Using this glue reminds me of old style plastic glue, when you pull the bottle away there are a thin string of glue floating around.
I don't know how this glue will hold up long term. So far, it's a strong bond.


On the forums I see a lot of builders using CA on body tube ends. Some claim it will prevent a zipper. Some dried CA glue probably won't stop a too long length of Kevlar from cutting through a tube.

I do this to seal the ends, I don't go deep into the tube.
The CA glue hardens the tube and lets you sand down the fuzzies for a cleaner, sharper finished tube end.

Thursday, May 12, 2016

Thrustline Arapahoe C, Part 8, Strakes


I rounded just the tip corners on the fins first before rounding down the long leading edge. The way the grain is running, these fins are very easy to break at the corners.


I had to dip into some balsa scraps to make the strakes. Most all these balsa pieces were left over from other kits.

The strakes are 1/4" high x 13" long. Both ends taper to a point at 2 1/2" from the ends.

I didn't have any 13" long strips so the strakes were pieced together.
The splice joint was cut at an angle for a stronger joint.

The pieces were glued in a straight baseline against a ruler edge.

Wednesday, May 11, 2016

Thrustline Arapahoe C, Part 7, Fin Cutting and Fitting


To help prevent the wood from breaking down the grain, start the cut at the corner where chipping can occur.

Only one fin half had to be pieced together.
When piecing balsa together, sand the edges flat (get rid of the burnt laser cut edge and square up) before gluing together.

Here's the three fins, ready for gang sanding and rounding of the leading edge.


The root edge did take some fitting to follow the tail cone curve.

Tuesday, May 10, 2016

Thrustline Arapahoe C, Part 6, Fin Planning


The root edge of the fins runs down the curve of the tail cone.
An easy way to get a start on the curve is to simply trace around the tail cone on some card stock.
Hold the tail cone and body tube still. Trace while holding the pencil perfectly vertical.
The inset picture on the right shows the rough tracing.


Here's the cutout fin pattern set against the tube and tail cone.
The fin is two pieces, notice the grain direction.
An exotic, flowing shape like this requires the different grain directions.


The Monarch kit fins have enough excess balsa you should be able to cut out most of the three fin halves.
Pay special attention to the grain direction before tracing.


Here's how the fin cuts fit on the existing Monarch balsa sheet.

Monday, May 9, 2016

Thrustline Arapahoe C, Part 5, Engine Mount and Hook Relief

The engine mount tube has got to be longer than the kit supplied tube. I was trying to do this kitbash using only parts from the two Monarch kits.
I used part of the second kit engine mount tube. To joint them together, a strip of card stock was glued around the two tubes.
Both centering rings were sandwiched together.
The Kevlar loop was fed through the engine hook notch.


The original Arapahoe kit had a friction fit engine. I decided to add an engine hook.

A notch will have to be cut into the tail cone to allow the engine hook to move. A sharp knife and small diamond files were used to keep the notch sharp and square.

Saturday, May 7, 2016

Thrustline Arapahoe C, Part 4, Tail Cone

The tail cone is made from the nose cone from a second Monarch kit.
The BT-20 engine mount tube has to fit inside. The nose cone tip is removed.
Set the engine mount tube over the NC tip and trace around it with a pencil.
Saw off the end on the pencil line.

More of the nose cone lip had to be removed until the BT-20 tube was a friction fit.


The top of the shoulder is cut off.
Leave a rolled lip on the shoulder so the centering rings have something to glue onto.

Friday, May 6, 2016

Thrustline Arapahoe C, Part 3, Fin Pattern Printing


To get a print of the re-sized fin patterns,
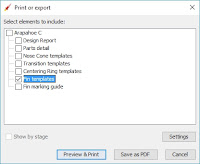
Go to FILE,
Click on PRINT / EXPORT PDF


This window is brought up.
Click on ARAPAHOE, to clear all the boxes,
Then click on FIN TEMPLATES.


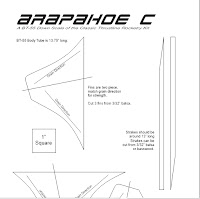
These patterns should show up.
This main fin is from Page 3.
Pages 1 and 2 show the long gussets as two pieces.


From that print out, I drew up a fin pattern sheet. I'll print it out on card stock.
The name font is close to the original. The downloaded font took some editing to get it close.

I made a mistake here -
I took the fin pattern from the Open Rocket file. You can't draw fin root edges that curve around a tail cone. I went back and added the root edge curve to my Corel art.

Thursday, May 5, 2016

Thrustline Arapahoe C, Part 2, Background and Sizing


Go to the right under EDIT, go down to SCALE.


At the SCALE FROM line,
change the 1.637" (BT-60 dia.) to 1.325" (BT-55 dia.)
Hit the SCALE button.


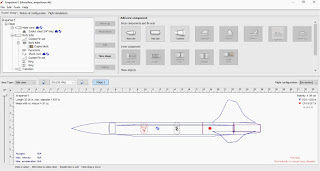
Here's the model in BT-55 size, Open Rocket does the work for you.
The model looks bigger in the window, I just adjusted the percentage in the View Type lower window.

Wednesday, May 4, 2016

Thrustline Arapahoe C, Part 1, Background and Sizing

I've always liked the OOP Thrustline Arapahoe E design.
This picture is from Rocket Reviews: CLICK HERE
John McClure did the build and review.

The original kit was made for D and E engines. The main body tube was a BT-60.


I picked up a few Estes Monarch kits in the recent clearance sales.
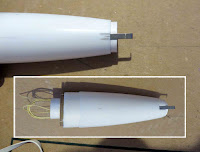
I'm not too hot on the Monarch design, it reminds me of a three fin Big Bertha or the Quest Big Betty in a BT-55 body.
This was one of those kits where the face card advertises: "Water Slide Decals!" The only decal included is the MONARCH name in a smaller size than shown on the face card. Masking and placement of all those silver pinstripes wouldn't be easy.

I bought the kits for parts or a possible kitbash. A down scaled Arapahoe C might put the Monarch parts to better use. This will end up with a BT-55 body tube and 18mm power.

I downloaded the original (BT-60)RockSim file:
http://www.rocketreviews.com/unknown-arapahoe-e.html
and loaded it into Open Rocket:


Some changes were made and component materials fixed. When you use online RockSim files you do have to double check the parts. This file was missing a launch lug, among other slight things.
Continued in Part 2 . . .