Showing posts with label E Super Orbital Transport. Show all posts

Wednesday, August 17, 2022

Estes Super Orbital Transport Build, Kit #7314, Finished


I didn't get a overall, full picture of the finished model. One of those: "It was packed up before I realized it!"
It looks just like the original BT-50 version of the kit, only bigger. To see the BT-50 finished pictures: CLICK HERE

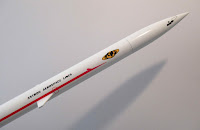
Above is the underside of the larger Super O.T. version.
To the right is the top end.


And the Glider.
The correct title is "Parasite Glider".


The Glider underside - 
I was happy with the fit of the wing and elevon dihedrals.

Tuesday, August 16, 2022

Estes Super Orbital Transport Build, Kit #7314, Part 22, Finishing Up -


Here's the back end of the glider.

The Nozzle is glued in, all the decals are in place.


This is the wrap decals that rolls around the back end of the engine housings.

It's a little tricky - be sure to wet the painted, sealed surface before sliding the decal into place.


I saved gluing in the engine tubes for the end of the build.

You can certainly glue them in earlier as shown in the instructions, but I was able to get better paint coverage painting them before assembly.

Estes Super Orbital Transport Build, Kit #7314, Part 21, Final Decals, Ends & Edges

Before soaking the long narrow side decals -

Cut a relief at the bottom of the decal to clear the small front canard fins on both sides.
If you have built the Low Boom SST, you know about the long decals that can stretch.

TIP: I cut the long side stripe decal in two halves. Trust me on this one!
Apply the front half, let dry, then transfer the rear half.


The rear surface of the engine mount centering ring is even with the end of the BT-55 booster body tube. This is why you'll want to sand centering rings flat (before assembling the engine mount) so on the finished model the ring end will show a smooth surface.
I hadn't glued the engine mount in the body yet and it still needed to be painted gloss white. The rings and the extension of the engine hook were taped off and sprayed.
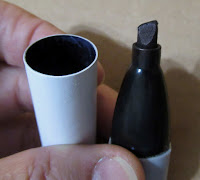
The interior of the glider nozzle is black. I used a wide point black Sharpie to color the inside surface.
On the left you can see some of the black on the edge of the nozzle.
Some very light sanding with 800 grit removed the black ink and gave a clean, white edge. 

Before gluing the nozzle in the rear of the glider, 
You can still do a little forming of the circle shape if it ended up slightly oval.
The nozzle is glued into the rear of the glider, with the centering ring even with the end of the tube. 
TIP: Rotate and line up the shroud seam at the bottom and it won't be as noticeable.

Monday, August 15, 2022

Estes Super Orbital Transport Build, Kit #7314, Part 20, Booster Decals


Another two decal overlap!
The small Glider cockpit windows are set into the open area of the Booster rear decal.


I didn't want to risk a transfer tear or fold under with that sharp inside cut.
TIP: Cut the decal into two pieces.
These decals are thin. They are useable with some "work-arounds". 


Set the half first as shown on the left.

The red rectangles and band are applied after the rear black decal has dried.

Sunday, August 14, 2022

Estes Super Orbital Transport Build, Kit #7314, Part 19, Orbiter Decals

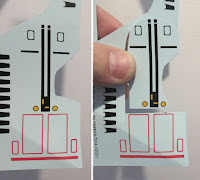
On the left is the decal illustration from the instructions. Notice how the Orbiter rudder decal (left picture, right side) juts into the open space of the rear tube decal.

TIP: When cutting out the decals, don't make any sharp inside corners. Round out any inside cuts as shown on the right.
Sharp corner cuts invite tears in the thin decals.
   

Do a dry fit to see how far this tube decal tucks into the tube/wing joint.
Be sure to rub some water onto the tube surface and leave wet before transferring decals onto the model. The wet surface allows for repositioning. 

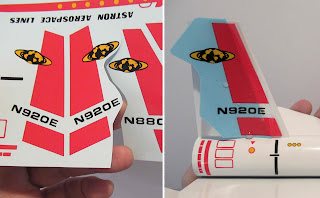
Here's another example of decal overlap on the sheet. Again, use rounded cuts.

TIP: On this application - Start the slide off from the straight front edge with the longest straight cut.
Down the body of the Orbiter is the name decal. Note the position of the flipped over straightedge. 
The small tip (left red side) lines up in a straight line. The rear (right side) taper turns up a bit.

Saturday, August 13, 2022

Estes Super Orbital Transport Build, Kit #7314, Part 18, Nozzles & Paint

I painted the engine tubes off the model so I could get white paint into the housings and full coverage on the tubes.

These were spray painted Gloss White and allowed to dry.
The tubes were lifted off the tape and turned to get the other side covered.


You could do this with a brush and black paint - 
I went the easy route blackening the inside rear half of the engine tubes with a medium point Sharpie.

Note the tube edge is still white. 

Before spray painting the Glider nozzle,
TIP: Lightly sand off any ink lines off the edges.

This ink could bleed through the final white paint.


Here's the nozzle assembly taped down to a piece of scrap cardboard for Gloss White spraying.

Friday, August 12, 2022

Estes Super Orbital Transport Build, Kit #7314, Part 17, Joining The Tubes & Filling The Seam

The two BT-55 tubes are joined by a red coupler.
Before gluing - 
TIP: Do a dry test fit. Glue the red coupler into the lower tube. Slide on the upper tube (dry, no glue) and turn the upper tube to find the position of the best fit, making sure the tubes are in line. Mark this position with a pencil line over both tubes. Let the lower half coupler glue dry. Apply glue inside the upper tube. Slide on the upper tube and rotate to align the best fit pencil marks.


While the glue is still wet, 
Use your burnisher to mold and even up the joint edges. Let dry.

The tube seam is filled much like filling balsa.
First use CWF to do the bulk of the filling.


After sanding the CWF, you may have roughed up the tube.


A wipe of medium CA glue will harden up the edges for smooth sanding. 


Next up is a shot of filler/primer to fill in any remaining joint seam.

The launch lug and tip of of the forward wing strake is taped off from any filler/primer overspray.


Here's the seam after filling and sanding.
It will be barely noticeable after the gloss white is sprayed.

Thursday, August 11, 2022

Estes Super Orbital Transport Build, Kit #7314, Part 16, More Fins & Glue Fillets


The cardstock "U" angle guide is used to line up the two "T" pieces.
I suggested to Estes the angle guides might have a letter that matches the letter name of the balsa pieces. Example - "The cardstock "TT" angle guide is used to line up the two "T" pieces. 
It would be less confusing. 
TIP: To keep the glue squeeze out to a minimum and get a more even glued joint - 
Lay down a line of glue, shown on the left.

Right side picture: With the side of a finger, wipe down both sides of the fin evening out and leaving a consistent glue line down the center.

You could also smooth the glue bead by holding your thump and index fingers together (in a "pinch") and running them down the glued root edge evening out and centering the glue line - both sides at once.


It is difficult to apply a glue fillet along the inside root edge of the "T" pieces. 

Again - do half the fillet line and smooth forward.
Then apply glue to the rear half and smooth to the rear.

Wednesday, August 10, 2022

Estes Super Orbital Transport Build, Kit #7314, Part 15, Gluing On The Engine Housings

Mentioned earlier - 
I sanded off the tabs (on the engine housings) and left the balsa notch slots in the wings. I thought it would be easier than filling the low tabs slots later.

This shows the top surface of the wing. Note the gluing areas for the vertical fins are sanded through the primer, down to the (glue soluble) CWF filler.
The inset picture shows the area near a fin root edge sanded down just through the primer for a stronger wood glue bond and fillet.


The engine housing assemblies were glued in place and the joints filleted.
The bottom of the wing assemblies had already got some early shots of Gloss White before gluing onto the body tube to be sure the fillets were smooth. Any glue fillet ridges were lightly sanded and paint shot again.
In the above picture the wing has been glued on. The support jigs are under the wing and the smaller forward stand under the body tube.

I continued the pencil lines around the inside end of the body tube. With the wing in place, the pencil line down the body tube would be covered. 
TIP: The wing and forward strake long fillets should be done in two passes. This prevents the glue bead from pooling up and getting too wide under you smoothing finger.

Lay a line of glue down from the center of the root edge and smooth to the rear. Lay down a second, forward line of glue down the remaining 1/2 of the root edge and smooth to the front.

Tuesday, August 9, 2022

Estes Super Orbital Transport Build, Kit #7314, Part 14, Gluing On The Glider Wing


Mentioned earlier - the glider marking guide was too large. This was a pre-production kit, I'm sure corrections were made.

I made another one out of some copy paper. It's simple, the tube is marked twice on opposite sides of the tube.


I had already filled and primed the balsa pieces.

Some 320 grit was wrapped around a Q-tip and the center gluing area had the primer sanded down to the CWF - no lower. Just remove the gray primer.
This is all the glue I used to adhere the wing to the tube. I didn't want glue to be pushed out and seen on the finished model. 
TIP: Don't attempt to apply fillets into the tight wing/tube joint. You'll end up with bubbles and too many glue applications trying to get rid of them.


Earlier I had extended the pencil line inside the tube for alignment with the wing joint.


The tip of the wing seam aligns with the pencil line running down the tube.

Monday, August 8, 2022

Estes Super Orbital Transport Build, Kit #7314, Part 13, Fitting The Nozzle Ring


Well
- the green centering ring was loose in the BT-50 glider tube.
Normally I'd build up the outside diameter with a ring of glue, but I didn't want a open gap between the tube and ring. 

I built up the ring with a wrap of copy paper.
The strip was 1/4" wide x 4 1/8" long.


Use a glue stick to apply the band of paper. Wood glue is too wet and could make a sloppy wrap.
Here's the built up ring with a much better fit.

TIP: Note the inside edge of the ring is a bit wide and rolled in over the edge for an easier slide into the body tube.
Those two dots indicate this is the second of three builds.

I won't glue the glider nozzle in until after the inside surfaces are painted black.

Sunday, August 7, 2022

Estes Super Orbital Transport Build, Kit #7314, Part 12, Glider Nozzle Shroud Gluing

I don't put glue on area marked TAB - 
TIP: Instead I place the glue inside the other straight edge. shown by the shaded area in the left side picture.
If just a skin of glue is spread out to the flat edge you shouldn't find any glue squeezed outside the finished shroud.


Have two clean dowels ready.
Set and align the tab. Place the shroud over the larger dowel. Press and roll the second dowel over the tab area.

Check the roundness of the nozzle and use the dowels to shape if needed.


A narrow line of glue is set along the inside of the 20/50 ring. 

Center and lightly press onto the nozzle shroud.

Saturday, August 6, 2022

Estes Super Orbital Transport Build, Kit #7314, Part 11, Glider Nozzle Shroud Forming

The flat outside face of this 20/50 nozzle support ring will visible on the finished model, even with the end of the BT-50 Orbiter body.
Sand the outside face smooth with 400 grit on a block.

TIP: You can "seal" the ring face with a light coat of wood glue and lightly sand again when dry. Sealing a rough surface like this gives you a more even paint coverage. The paint won't soak in if the surface is sealed.

TIP: As I always recommend, scan and make a few practice copies of the shroud. Form a few and pick the best one for the build.

Cut the flat sides with a straightedge and knife. Cut the rounded sides with scissors for a smoother arc.

TIP: Run a fingertip over the curved sides and you'll probably reel some high and low spots. Run some 400 grit over the sides to smooth them out.

Pre-form the shroud in the heel of your hand with a clean dowel.
Press into the shroud with the dowel in an "arc" shape shown by the arrows.

You might need a little more pressure forming at the ends to get a complete full circle shape.

Friday, August 5, 2022

Estes Super Orbital Transport Build, Kit #7314, Part 10, Gluing Elevons


The glider elevons (Part FF) have an angle sanded on the gluing edge.
Use a 220 grit sanding block while checking the angle with Part GG.


Here's a glued on elevon.
The edge fit is good but is tough to get perfect.


Any open joint seams are filled with CWF and sanded with a 400 grit block.