Showing posts with label M Bomarc. Show all posts

Wednesday, March 30, 2016

Madcow Bomarc Finishing Break

I assembled the Madcow Bomarc three months ago when I was drawing up the instructions.
Finishing got as far as a white undercoat and some smooth sanding.
In Florida we've had rain every afternoon so I haven't been able to paint.

We'll finish it up soon!

Monday, March 28, 2016

Madcow Bomarc Build, Part 9, Gorilla Glue and Nose Cone Weight

I read about the old style brown Gorilla Glue on the forums. To see the posts, CLICK HERE. Read posts 8 and 15.

Some nose cone plastic is waxy, most glues won't stick to it. The Gorilla Glue seems to work. It held the nose weight very well over the past few months when the model was first assembled.

Today I hit the nose cone against a counter top a few times to see if I could jar the nose weight loose. I hit it pretty hard, probably harder than any boost acceleration could effect the weight. The nose weight finally came loose!
It's an easy fix, I squirted more glue into the nose cone and dripped in a little water. It set up and the weight is again held in the tip of the nose cone.
Even clay weight in an Estes kit can sometimes work loose.

The whole trick to using Gorilla Glue is water.
The instructions on the back label tell you to dampen the two pieces that are to be joined together.
A little bit of water activates the glue and it foams up.

I wouldn't recommend using Gorilla Glue for general model rocket construction. It can come in handy for some things like nose weight retention.

Sunday, March 27, 2016

Madcow Bomarc Build, Part 8, Conduit and Nose Cone Work


Here's the front and back end views with the conduit glued on.
In the upper picture there is a slight gap on the conduit sides. This will take a few fillets of Titebond M&TG.
The rear picture shows the tapered conduit fit around the base of the rudder.
Now the model is looking like the Bomarc.


The nose cone has to be opened up for the nose weight.
Cut an opening on the opposite side of the shock cord tie.
The plastic was easily cut with a hobby knife.

Saturday, March 26, 2016

Madcow Bomarc Build, Part 7, Rounding The Conduit Ends


Mark both the front and back end 1 1/2" from the ends.
The first rough cuts were made with a knife.


Don't round over the ends yet, just sand the side profile.
After the sides are tapered and even then round the top.


Here's the finished front and back.
Round over the edges down the entire length of the conduit strip

When rounding the ends remember, the front end is twice as high as the rear rudder end.

Friday, March 25, 2016

Madcow Bomarc Build, Part 6, Making The Conduit

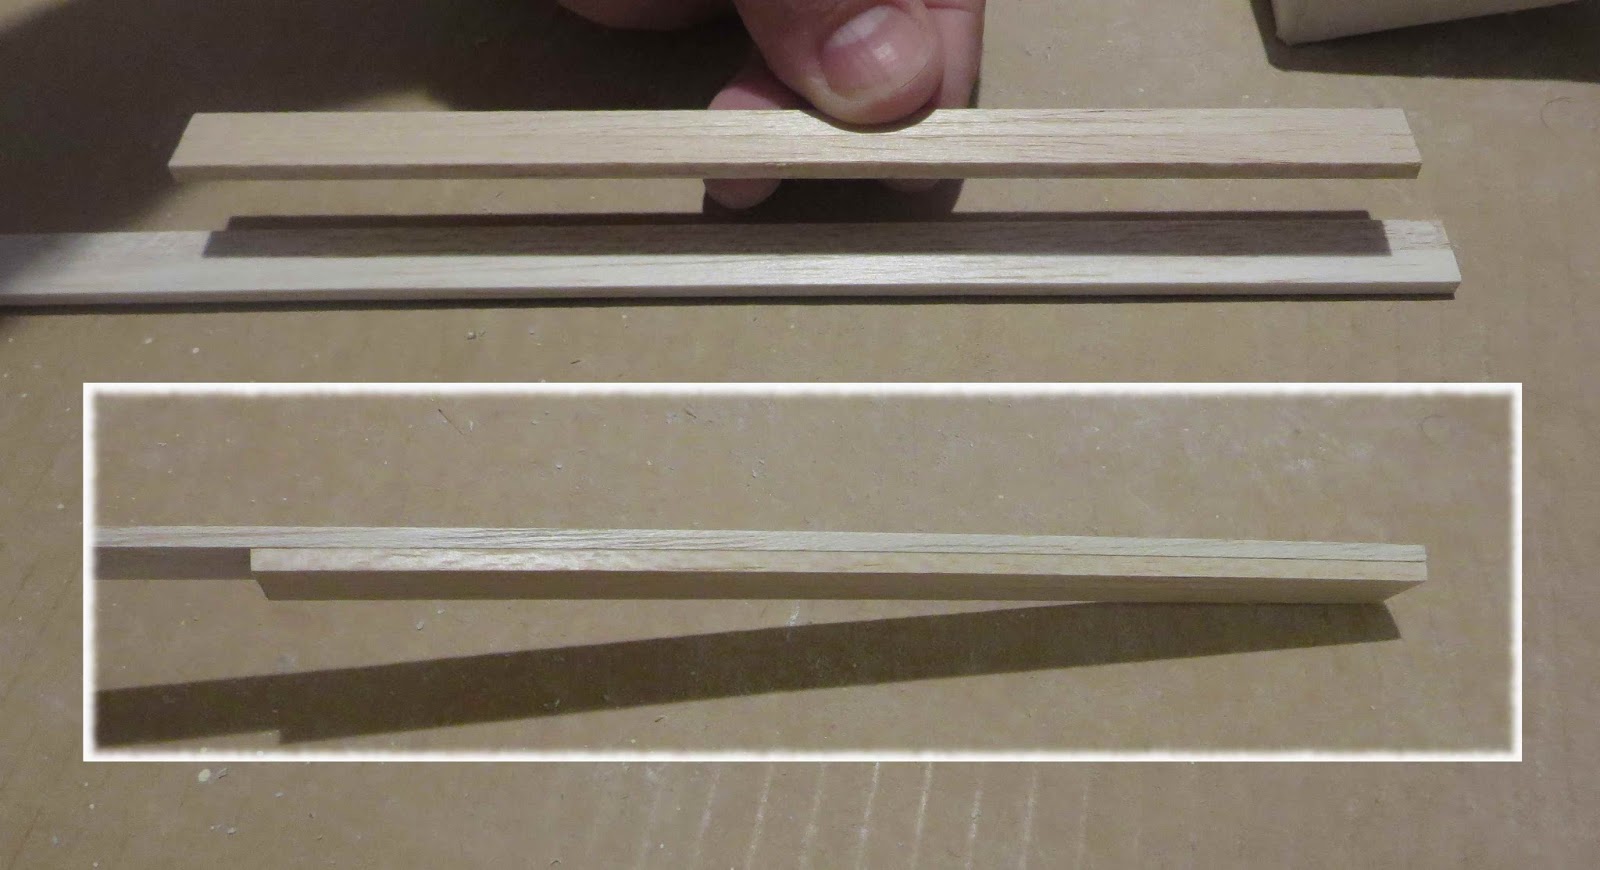
Two of the long balsa strips are glued together, side by side.
After drying, cut the two glued pieces to 19 3/4" long. In the picture on the right that part is on the bottom.
From the remaining balsa strip,  cut two pieces 7 1/2" long. Glue these two side by side.
Glue them onto the longer piece, even with the front. The inset picture shows the "step" that fits over the front edge of the wing.


Here's the back end before the long overlay strips was cut to 19 3/4" long.
The back end goes over the spacer strip and over the stabilizer.
A notch will have to be cut through the center for the rudder tab to fit in.
In the picture I've marked where the rudder will fit.
Now the end can be cut to 19 3/4" length.


Here's the notch and measurements for the cut.
The notch should be made 1/8" x 1 1/4" long.
Mark and cut right down the center.


After cutting the notch do a test fit with the rudder notch in place.

Thursday, March 24, 2016

Madcow Bomarc Build, Part 5, Wing and Fin Gluing

The tied shock cord is rolled up and stuffed into the engine mount tube.
The engine mount was glued into the rear of the body tube. Both tube ends are flush.

The main tube has been marked down its length for gluing on the wing assembly.

While the wing assembly glue dries, mark the tube for the two ramjet pod locations.
Cut out the wrap, roll and tape it around the front end of the tube. On the wrap is a line that says: "Center Line of Wing". Set this over the pencil line running down the tube.

Mark the pod locations and extend those pencil lines down the body tube length.

Apply a line of glue down the body tube on the center pencil line.

Set the body tube over the wing and press into the glue.
The rear edge of the stabilizer is even with the body tube end.
Double check the alignment before the glue can set up.

Wednesday, March 23, 2016

Madcow Bomarc Build, Part 4, Fin Assembly

All the fin and wing assembly pieces are squared up with a sanding block.
Study the picture below to see how the parts fit together.

There are three rectangular pieces, the longest one goes between the rear of the wing and the stabilizer. The two shorter rectangular pieces are used on the ramjet pods.


I chose to round the leading sides and trailing side edges.
Don't round any edges that will have any strips glued to them. All edges that are vertical in the above picture should be left square.

It's up to you, the edges could be left square.

Tuesday, March 22, 2016

Madcow Bomarc Build, Part 3, Engine Mount


The assembly of the motor mount is standard, but heavier duty.
The engine hook got a few wraps of electrical tape.
The rear plywood centering ring is notched for engine hook movement.
The forward ring has a notch on the outside for the braided Kevlar.


Here's a drawing I did for the new Madcow instructions.
To see the posted instructions, CLICK HERE
The braided yellow Kevlar is tied around the top of the engine mount. The line goes through the notch in the upper ring.
A yellow glue fillet goes over the Kevlar wrap and the overhand knot.


The yellow Kevlar is tied to the white nylon shock cord with a simple overhand knot.
For now, the end of the Kevlar is taped to prevent it from unraveling.

Monday, March 21, 2016

Madcow Bomarc Build, Part 2, Parts Prep

I usually dress up the parts before construction.
This involves squaring up the edges and filling nose cone seams.

The burnt edges of the laser cut fins (wings) were squared up with 220 grit on a sanding block.
Most laser cut parts are cut at a slight angle. The laser cut line on top is narrow, the bottom of the cut is slightly wider.
Hold and square the pieces at a 90 degree angle. When you have pieces that will butt up against and glue to other pieces a squared side is important.


The body tube had a slight uneven cut. This is seen on many kits, most builders won't even notice it. Thicker body tubes are harder to cut and should be checked.
Sand and square up if needed by using a block with 220 grit.


After sanding the raised nose cone molding seam, I tried two different methods to fill the concave areas.
I've been wanting to try the Squadron Putty on a plastic nose cone seam.

The upper half got a raised bead of medium CA, the lower half got the Squadron Putty.
On this plastic the Squadron putty didn't adhere as well.
You can see the darkened area where the CA glue was sanded down.
The plastic in this nose cone requires roughing up and a coat of primer for the final color coats to stick.

Sunday, March 20, 2016

Madcow Bomarc Build, Part 1, Parts


This will be a fun build. I've always liked the Bomarc design ever since I had the Estes Citation Bomarc in the mid 1970s. I picked up that kit at the Estes factory.
This is a very heavy duty model. The centering rings are die-cut plywood. 
The fins are laser cut from basswood. The parachute is 18" nylon.
The ramjet nose cones are balsa, the tunnel strips are balsa.

Parts of interest:
Two 1/4" thick walled launch lugs are included.
The shock cord is a thick braided Kevlar tied to a long white nylon cord.
A 6" square parachute protector.
Black plastic nose cone with a long shoulder.
18" nylon parachute.


One of the more interesting parts is the main body tube.
The walls are very thick at .05".
It is almost a BT-60 diameter. The outside diameter is 1.6". A standard BT-60 is 1.637" diameter.