Friday, January 31, 2014

Estes Hornet Build Part 9, Correcting The Black Fin?

That short black band on top trails behind the Hornet name and to the leading edge of the 3/32" thick fin.
At the bottom is the thicker band I thought was used for connecting the name to the fin.

(Look close and you can see the the production date pressed into the decal. It's almost in the image area!)

I went back and re-sprayed the black fin adding a 3/32" thick extension to the front of the leading edge. I wanted the decal to smoothly meet the front of the fin.


After spraying the paint "ledge" was lightly sanded so it wouldn't show under the decal.
There is tape on either side of the black paint tip so I won't sand into the yellow beside it.

Jeffy Jeep's Space X Falcon on EBAY

Jeffy Jeep also sells finished models on EBAY.
He and his wife do great work! My favorites are the variations on the Estes Spaceman clones.
His finished model output is fast! Sometimes there are four models up for bid at the same time.

I found it very interesting he had the same observations about the pre-installed body wrap on the Space X Falcon model:

From his recent EBAY listing:
"SINCE THIS IS THE SECOND GENERATION OF THE SCALE MODEL KIT, THE BODY TUBE CAME PREPRINTED INSTEAD OF HAVING A PRINTED ADHESIVE WRAP THAT THE ASSEMBLER HAS TO ALIGN AND MOUNT.  BECAUSE THE BODY TUBE CAME PREPRINTED, THE FINISH IS NOT AS PERFECT AS I WOULD HAVE MADE IT AND NOT AS PERFECT AS I WOULD WANT IT TO BE (SEE PHOTOS.)  THIS SLIGHT PUCKERING OF THE PAPER WRAP IN A FEW PLACES CAN BE SEEN ONLY UNDER CLOSE INSPECTION AND SHOULD IN NO WAY AFFECT THE MODEL'S PERFORMANCE."

Thursday, January 30, 2014

Estes Hornet Build Part 8, Masking the Black Fin

The rounded leading edge was masked with small pieces of Scotch tape set down to a half round circle.
I should have looked ahead and studied the decal sheet. I thought the wider black band band trailed back behind the clear strip going through the word "Hornet". It turns out the wider black band goes around the body tube behind the fins.
The correct decal strip going back from the "Hornet" name is not as wide as the 3/32" fin thickness.


The sharp trailing edge corners were slightly rounded off.
I've learned in the past it looks better with the tips knocked off.


To cover up the large areas I use grocery bags cut into squares.
A piece of masking tape is set on the edge, half on the bag.


The taped bag edge is stuck down to the Scotch tape already on the root edge fillet.
The bag is wrapped around the body and other fins.


More masking tape pieces held the bag piece closed and covered any open spots.
Now it's ready for the black paint.

Wednesday, January 29, 2014

Scale Fin Shaping Article

I wrote a how-to article on Shaping Nike Style Fin Tapers. 
It was just published in the Apogee Peak Of Flight Newsletter, #357 HERE

One of the difficulties in fin shaping is trying to gauge the knife edge thickness when tapering leading and trailing edges. The article explains how to blacken the fin edge for a better contrast. The blackened edge is removed after the fin is shaped.

In addition to Nike style fins this method can help when shaping the trailing edges of air foiled fins.

2014 Estes Catalog is Now Online

On YORF, TurboFireball found the new Estes Catalog has been posted:
HERE

The models on page 12 (on left) look to be the most interesting.
Most other new models are E2X, RTF or ARTF.

I was surprised that many off the models from the big December sale are still listed. I thought those might be discontinued.
Most of the "Classic" line - like the Chuter 2, Flutter-by, Payloader 2, Long Tom and Star Trooper are still in the current kit lineup.
E2X = Easy To Build or Easy To eXecute
RTF = Ready To Fly
ARTF = Almost Ready To Fly

MINT Electro Launch on EBAY


Here's one you don't see everyday!
A pristine Estes Electro-Launch. HERE

The interlock key and an extra continuity light is included.
The blast deflector is rusted but the launcher looks unused!
Heck, there isn't even any leaked battery acid on the inside of the red case!
The seller says: "The only thing missing from this set is the steel rod.  A metal clothing hanger could easily fit the bill for this."
Nope! This one deserves a real launch rod.
EDIT: The high bid was $87.00


I think the only launcher more rare than one in this condition was the clear plastic "Phantom" Elecro-Launch.


The red Elecro-Launch was my first launcher. I remember stripping wires and screwing it all together.
Building experiences like this teach you how to fix a lamp later on in life!
Some collector will have a new prize!

Tuesday, January 28, 2014

Estes Hornet Build Part 7, Refill!

The raised wood grain pores were still visible!
Earlier the raised grain was sanded down and more CWF applied.
After a thick coat of primer/filler I thought everything was smooth.

I couldn't really see the grain until looking under direct sunlight after the first coat of yellow.
The weird thing is, the grain pores can only be seen on the right side of each fin!
I'll try one last time to fill the pores but I can't use CWF now, the wood is sealed and it wont stick.

I'll have to use another shot of primer/filler.
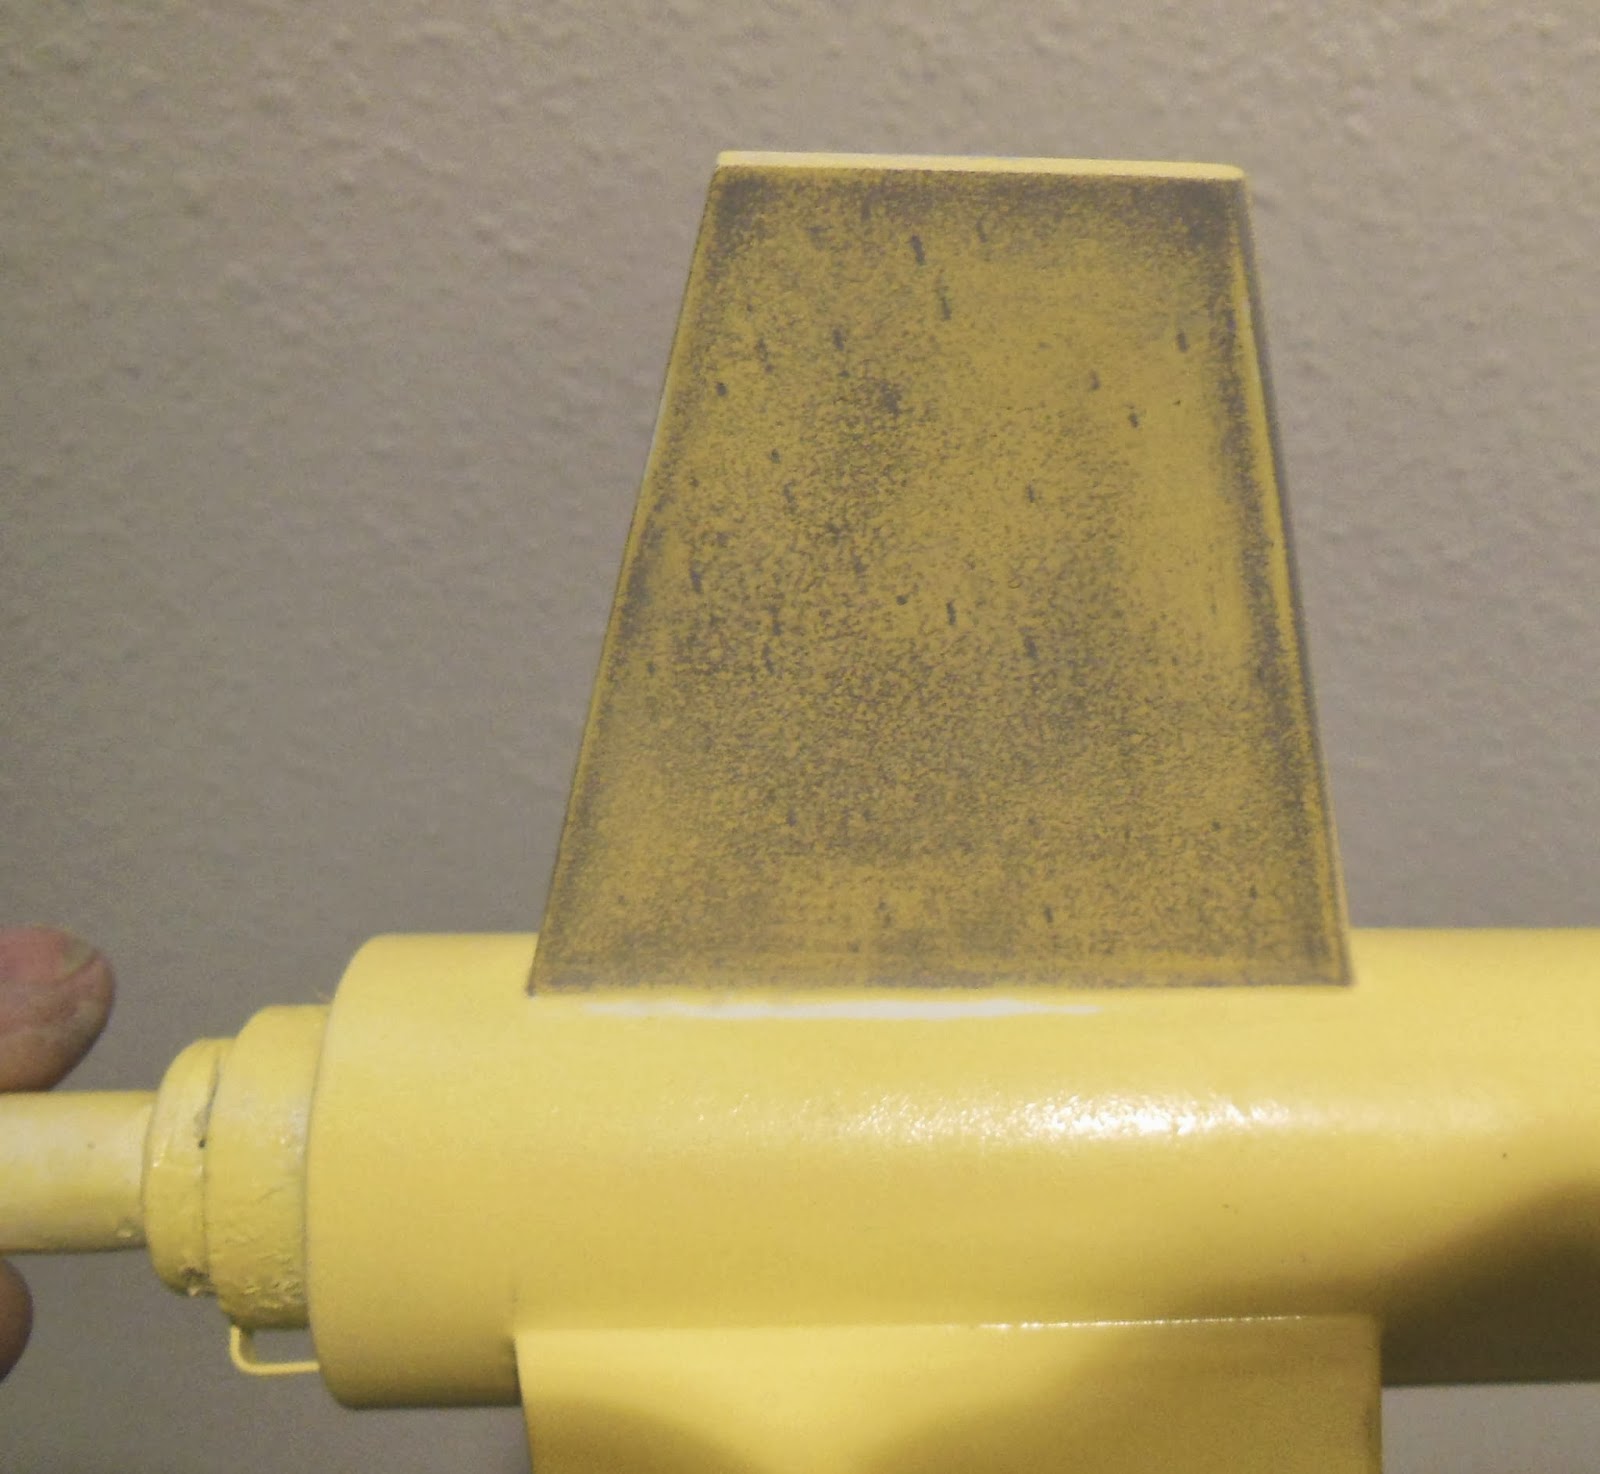
I only want the gray filler on the right side of the four fins.

The tube was masked above and below the fins.
On the lower left of the picture you can see the piece of paper with tape running across the top. This was pressed into the root edge overhanging and covering the fin below it.
One side of a fin was sprayed and the taped paper mask removed.
The tube was turned and the same piece off paper taped down to the next fin root edge.


Here's the primer filler on the single fin after the mask was removed.
Just one side of all four fins was hit with primer.
Mentioned earlier, one side on the "wood" fin sheet had the deeper raised pores.


After wet sanding with 400 grit you can see the primer in the grain pores.
I hope this finally fills everything.

The fin will get another white undercoat an wet sanding.
More yellow will follow.


The nose cone was painted black.

TIP: Don't tie on the shock cord until after the nose cone and rest of the rocket is painted. Keeping things separate makes painting and masking easier.

Estes Hornet Build Part 6, White Undercoats and Sanding


The fins and launch lug both got two fillets with Titebond M&TG.

Here's the model assembled. After primer sanding it's ready for a white undercoat.
The finished model is yellow and black. You'll need a white undercoat for the light yellow color.


With the white paint on you can see the Titebond M&TG boogers at the leading edge joint.
These can be sanded off using 400 grit wrapped around a Q-tip for cushioned sanding.
The front and back end of the body tube look really rough but this will be easily smoothed off with 400 grit.
The roughness of the body tube came after the filler primer was sanded down to the surface.
After 400 grit wet sanding this rough tube won't be noticeable. Some of the newer white body tubes just sand rough like this.

Here's the root edge fillets and launch lug fillets after wet sanding with 400 grit.
Remember, only wet sand after the tubes are considered sealed with paint. CWF is water based and does not seal tube seams or balsa.
Wet sanding is more like damp sanding. Be careful at the tube ends, don't let water get inside the tubes!

Monday, January 27, 2014

Thick Brown Couplers


I bought some brown BT-60 couplers. I only had one older fish paper coupler on hand.
The black fish paper couplers are the older Estes and Centuri style.
The new brown coupler wouldn't even slide into a BT-60 tube!

When stacked you can see how much larger the brown coupler is.


From the top you can see the difference in the wall thickness.


A simple peel is started with the tip of my knife.
Don't take off too much, you can always go back and peel off more if it is still too thick.


Sand with 220 and check the fit.
Sand and check some more.
Finally, the brown coupler is a slip fit into the BT-60 tube like the black coupler.

TIP: Most all the newer Estes RED COUPLERS need sanding for a slip fit.
If using the new Elmer's "Stronger Formula" white glue be ready.
Too many tight couplers have locked up before they are slid into their final position.
You are probably better off using epoxy for engine mount and coupler gluing.

Estes Hornet Build Part 5, Some Minor Snags

The Hornet was originally a Centuri design. I wanted to use the Centuri logo in place of the Estes name.

I checked online but couldn't find a sharp version of the logo.
I ended up doing a font search and re-drawing it. This one did take some changes to the fort I found. The "T" and "I" took the most time.

Enlarge the picture and compare the two larger Centuri logos. The upper one is what was found online. Below it is the redraw.

The Estes logo is about 1.28" wide. I sized the Centuri logo to that width.
The logo isn't 100% accurate, but it's close and much sharper than anything I could find.


Here I've sanded the primer and tube where the lug will glue for better adhesion.

The fin root edge areas were also sanded with 220 grit.
There was a very slight dent in the tube above the launch lug. This is more like a manufacturing blemish and not a crimp that would require replacement of the tube.

This was filled with CWF.
The dent was so shallow I wanted to be sure the CWF stayed on the tube.
After sanding to surface a thin coat of CA was wiped on.

Sunday, January 26, 2014

Estes Hornet Build Part 4, Launch Lug and Nose Cone Filling

TIP: To save time on later builds,
I went head and filled four 3/16" lugs at the same time.

Four lugs were slid down a dowel and tape was placed over the ends to keep them in place.
CWF filler was brushed over all the lugs at the same time.


The filler on the nose cone shoulder is sanded even with the body tube.
Sand carefully so you are just removing the filler and not sanding down the body tube.

Estes Hornet Build Part 3, Fin Fillling


The fin stock was warped, right out of the bag!
After brushing on the thinned Carpenter's Wood Filler I'll have to let these dry under a heavy book.


The grain was raised after the CWF had dried.
These fins might require a little more primer filler after this is sanded down.

Here's the same fin after sanding to surface.
You can't see any raised grain but you can feel it with your finger.

I don't think these fins are actually balsa, but probably tung wood.
They are harder than balsa and filling the balsa grain is different.
I hope the primer filler will seal and fill the leftover grain pores.

Saturday, January 25, 2014

Estes Hornet Build Part 2, Engine Mount

Set the centering rings in place and pencil mark the rings directly opposite the engine hook.
These rings are fairly thin and fitting the tube will be tight.
A round hole was filed in both the rings to fit the plastic (Kevlar) tube.
Cut the low end Kevlar tail even with the end of the engine tube.
You want a tail to grab onto when the Kevlar is pulled for checking it's condition or replacement.

Note the upper end of the plastic straw is not all the way to the front end of the engine mount tube. I try to keep the end a bit away from the ejection charge heat. The red plastic guide tube extends a little past the centering rings on both sides.

The inset picture shows the finished 24mm engine mount. The engine hooks are hanging over the back end of the mount.

Complete directions for installing a Replaceable Kevlar Line are in the Apogee Peak Of Flight Newsletter HERE

I'm not showing the build of the 18mm engine mount, no need as everybody knows how to make one.
I did end up using the supplied blue engine mount tube. This blue tube seemed to be stronger with a shinier outside surface than what I'd seen in the past.

Old MMI Tower Instructions


Ted Mahler (Tedster on YORF) posted the instructions for the Model Missiles Launch Tower HERE

Scroll down to post #3.

That old tower was a lot like putting together an Erector set project. It must have taken hours to assemble!

Friday, January 24, 2014

Estes Hornet Build Part 1 Parts

This model was originally a Centuri kit released in 1982.
This was the start of the conversion from Phoenix to Penrose, some Centuri branded kits were using Estes parts.
This model used a Estes BT-55 and was a "D Engine Convertible.
Recommended engines were a D12-7 and B and C 18mm engines

This catalog page is from the Ninfinger site HERE


The Estes reissue kit is made for 18mm engines, B4-4, B6-4 and C6-5.
I'll be making this one like the original Centuri version for 24mm D engines.

Some upgrades will include a replaceable Kevlar engine mount and a Centuri logo in place of the Estes name.

I won't be using the thin blue engine mount tube.
Because this model will use 24mm engines a 3/16" launch lug will replace the supplied 1/8" lug.

Here's the parts needed for the 24mm engine mount with replaceable Kevlar.

Clockwise from the left:
Generic plastic cotton swab tube, 2050 ring for the engine block,
135 lb. Kevlar, two 50/55 centering rings, 2 3/4" long BT-50 and the finger tab engine hook from the kit.

The finished model is for sale on EBAY right now - HERE

Atlas V Launch, January 23, 2014


One great thing about living in Central Florida - If the skies are clear you can watch the Cape Canaveral launches from your front porch!

The Atlas V went up at around 9:30 last night.
I took the (bad) picture on the right. It looked a lot like a moving bright star at this point.
Moments later the light went out. The flame started again which meant staging had occurred.

Here's some background from the NASA website:
An Atlas V rocket blasted off from Cape Canaveral Air Force Station, piercing the clear night sky on a mission to carry a NASA Tracking and Data Relay Satellite into orbit.
The rocket launched at 9:33 p.m. Thursday, carrying not only the TDRS-L satellite, but also special tribute into space honoring longtime NASA engineer Capt. Arthur J. "Skip" Mackey Jr., who died in November.
Mackey was the "Voice of NASA" in the 1960s and '70s, when he broadcast countdowns for the agency's rocket launches from Cape Canaveral Air Force Station.
It was Mackey's voice the nation heard when NASA began broadcasting countdowns to the public for the first time. Mackey stayed in that role until retiring after decades of service.
Etched onto the side of the Atlas V was a tribute that read:
In memory of our colleague and friend
Arthur J. "Skip" Mackey Jr.
1933-2013
The NASA and ULA Team
Aside from the etching on the rocket, the launch of a tracking and telemetry satellite is a fitting tribute to Mackey as well. It represents the same type of work "Skip" did with NASA.
The TDRS-L is the second of three next-generation satellites scheduled to launch from Cape Canaveral to replace older satellites already in orbit. It's designed to help improve the space agency's Earth-to-space communications network.

Thursday, January 23, 2014

Kit Design Inspiration


From a blog comment from last week:
Anonymous - January 11, 2014 at 2:16 PM
"Great build so far. You should pick up an Estes Fusion X25. It's a fun build, a bit Jayhawk-like."

On the left is the Estes design, the Fusion X25.
On the right a Rocketarium Jayhawk.
And people wonder where some kit designs come from!

I'm not taking anything away from the Fusion X25 design. The paint and decal pattern make the model.
Still, it might be fun to make a Jayhawk style model from the Fusion X25 kit.
Not Jayhawk "scale" still fun if the Fusion kit was painted orange with the black nose cone tip.


Here's another Jayhawk inspired model,
from Red River Rockets - The Redstrike.

Estes SR-71 Blackbird Finished!


This build was tough!
How Estes could label it as a Level 2 is beyond me.
The body shrouds would be impossible for a younger builder. Fitting the shroud front around the complex curves on the nose cone shoulder took too much effort. In the end, the match still isn't great.
The light embossing on the shrouds almost disappear by the time you are finished.
On a craftsman kit water slide decals should be supplied, not peel and stick!
How about this -
Kits with balsa get water slide decals. Plastic RTF or ARTF models get stickers.
Is this considered a bad review? Yeah, probably.

This was one of those builds where you think: "Put a fork in it, it's done!"
You could mess with it more, but after a while you want to move on.

Krylon (flat clear coat) let me down again - Never Again!
It's now glossier than I would like but I can't take the chance of any more finish problems.
The model got a final shot of Americana clear shot from a distance. Not a heavy finish coat for a satin finish.

I still have to glue in the engine mount and install the parachute.
In the end it is a sharp looking bird, tho -

Wednesday, January 22, 2014

Estes SR-71 Blackbird Build Part 23, Engine Cone and Clear Coat Problems

The inlet cones had a loose fit in the tubes.
I added a wrap or two of tape but still left some plastic exposed on either side so the plastic cement would grab.

The instructions say to glue them in with 1 1/4" exposed.
I did a dry fit first and it seemed like the nose cone stuck out too far where it didn't even look like a ramjet cone.
I ended up gluing them so 1 1/8" of cone was exposed.

Oh boy! Here we go!

Sometimes I'll apply a light coat of the Future acrylic with a Q-tip, just enough to seal the decal edges. After a clear coat you shouldn't see the Future coat. NOT SO THIS TIME!
I sprayed some Krylon Flat Clear over the model.
The decals had a raised surface, almost like they were bubbled up!

After the flat clear coat was totally dry I very lightly sanded over the raised edges with some recycled 400 grit. "Recycled sandpaper" meaning an old piece with most of the grit smoothed off from a few wire brush cleanings.
I didn't want to sand through the decal ink, just knock down the surface so the edges weren't so obvious.
With any luck, the next clear coat will fill in any dips in the edge and not be so noticeable.

What caused this? Who knows.
I used the slow drying FixAll black gloss to start. After the top was sanded down, Rustoleum 2X gloss black was sprayed.
Decals followed then a light coat of Future.
The problems occurred when the Krylon dull coat was applied.
It's salvageable, but not my best work!