Showing posts with label Planning Ahead. Show all posts

Thursday, January 23, 2025

Estes Black Star Voyager Build, Part 23, Pre-Painting, Pre-Assembly

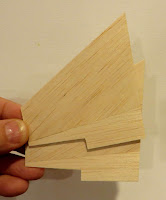
There is an open area where the balsa pieces join on the lower fin unit. I decided to fill it.

Some CWF was dropped in using a toothpick and allowed to dry. It took another drop of CWF to fill as the first application shrunk as it dried.

This was sanded with 400 grit on a block.
Thinking ahead - 
TIP: There are visible inside areas that would be impossible to shoot with a spray can once assembled. I could use a brushed enamel paint, but I didn't want to seal the glue areas.

I ended up using an alcohol based "brush" marker. It's a flexible soft marker that allows you to get into tight areas. I couldn't blacken the tightest inside corners, but these areas won't be seen.
More areas that would be hard to reach with a spray can - 
There are tight inside corners at the root edges of the vanes. You might use too much paint tying to cover the surrounding white surfaces.

I went ahead and sprayed some black concentrating on the inside corners. This showed me more glue boogers that required sanding. The pictures show after that sanding.

Sunday, December 1, 2024

Enerjet by Aerotech Strong Arm Build, Part 23, Final Stickers


I'm building three of the Strong Arm kits for Aerotech and wanted consistency in the models.

I made a template out of cardstock.
Trace around one of the fins.

With the backing still on, set the sticker on the cardstock in a good placement.
Draw around the sticker border and cut out the square.


This is another wet sticker placement.
Set the sticker on the fin, lay the template over the fin and check the sticker position.

Lift and replace until it is centered in the cut out "window".
These dots or screw stickers were included but there is no reference of the placement. I decided to leave them off the rocket.

Placing the stickers takes time!
I counted 66 stickers on each model!

Saturday, November 30, 2024

Enerjet by Aerotech Strong Arm Build, Part 22, Small Stickers


There are a LOT of small stickers
Thin strips can slide while cutting using a metal ruler. Make the cuts carefully.


I'd recommend keeping the small stickers in zip lock bags. 
I was being careful and one fell off the workbench. I had to scour the floor to find it.


The RADOME stickers are spaced 90 degrees around the top of the tube.
I reused the placement guide to evenly place these stickers.

Thursday, November 28, 2024

Enerjet by Aerotech Strong Arm Build, Part 21, Body Stripes

I wrapped a piece of cardstock around the body tube to use as an edge guide for the body wrap strips.
If you've ever tried to get a stripe to meet up after wrapping it around a body tube, you'll appreciate a cardstock guide.

For a cleaner look, start and finish the strip over the launch lugs.

I read these colored stripes designate if a missile is a dummy or armed. 


Tape the guide edge in place, 
Wet the body tube where the stripe will go,

Peel off the backing, dip the strip in some water and leave wet.

As I rolled the stripe around the the tube, I would dip my finger in some water and wipe it under the thin sticker.


Here's the lowest stripe.

Notice the overlap, again centered over the launch lug side. Hiding the overlap joint makes for better pictures on the launcher.

The longer yellow and black stripes go all the way around the tube.
The shorter red, gray and black stripes fit between the dorsal vanes.

These are a little tougher to place, you'll want all separate four segments in line.
For a guide, I placed strips of masking tape on all four sides. I could visually align the stickers against the masking tape strips. 
The red and gray strips are longer than needed. Set one end against a vane side, trim the overhang off the other side with a razor blade.

Wednesday, November 27, 2024

Enerjet by Aerotech Strong Arm Build, Part 20, Placing The Fin Stripes


Cut a strip of cardstock 15/16" tall.

Set the strip edge into the fin/tube root edge joint.

The strip side is set against the top edge of the cardstock. 

Notice the rear edge overhangs the trailing edge. 
While the front edge of the sticker matches the angle of the leading edge, the trailing doesn't quite match. 

Leave some overhang and it can be trimmed off after the set sticker dries.


Recess the from edge of the sticker very slightly.
No reason to let it overhang. You want good adhesion without rolling it over the leading edge.

Tuesday, November 26, 2024

Enerjet by Aerotech Strong Arm Build, Part 19, Placing The Roll Bar Stripes

Setting the vertical roll bar stickers straight with even spacing is difficult. 
How can you leave 17/32" space between them accurately?
      

Two vertical stripes have to be centered between the fins. Mark the center line first. 
Make a simple cardstock centering guide. 
Roll some cardstock around the tube, mark the end of the dorsal fins. Using a ruler, find the center and mark. Make light pencil center lines on the tube. 

Repeat and find the centers between all the dorsal fins.


Before placing any stickers - 
Use a clean knife blade to lift and handle the stickers.

Rub a line of water on the body tube where the sticker will go.
After peeling off the sticker backing, dip it in water and leave wet. The wet sticker allows you lift and reposition.


Notice the placement guide I printed out.
I drew pencil lines, 1/4" to each side of the print line to total 1/2", the width of the stickers.

The low end of the placement guide was slid down to the 6 1/2" top of the sticker position.

Set the top of the sticker between the pencil lines

Use the aluminum angle to line up the sides of the stickers. 
When done, you should be close to the recommended 17/32" spacing between the bars.

Sunday, November 24, 2024

Enerjet by Aerotech Strong Arm Build, Part 18, Waiting For Paint To Dry and Planning Ahead


You may have noticed a slowing of posts - 
That's because I'm building three Strong Arm kits at the same time.

One is a flight version - no seam fills and less attention to details. These are sometimes referred to as: "They'll look good on the pad."
Duplicate builds slow things down, I can't repeat the same build posts three times.


Planning ahead,
You might assume this roll pattern sticker would just roll around the tube -
These will have to be cut apart and placed individually.


But, there is 17/32" space between each vertical bar. 
To make placement easier, I'll print a spacing guide. It'll be a fin marking guide from payloadbay.com


To get to the marking guide tools: 
Hit TOOLS and then FIN WRAP TOOL.
There are eight bars going around a 2.638" diameter tube.

Friday, October 4, 2024

Enerjet by Aerotech, Arreauxbee-Hi, Part 13, Paint Planning Ahead

Here's the instruction copy on how to paint the model.
While the instructions are basically correct, befoe masking, plan ahead. You don't want to paint white over orange fins. You don't want to paint silver over an orange base color.

I would recommend an overall gloss white coat before other colors. 
Mask off all three fins and the upper body (right at the top edge of the tunnels) before painting the body orange. 
Then paint the body orange.

Mask off the two white fins and body tube. Paint the remaining fin black.

Mask off the area below the upper tunnels ends. Paint the upper body tube silver.


Notice the launch lugs must be behind in the cover picture.
Using that lug placement, plan which two fins will be white and the third black.


Here's my build, with the white undercoats applied.
I've marked the fins for white and black paint.

Note the position of of the launch lug. 

Tuesday, November 15, 2022

Estes Odyssey #7235 Build, Part 22, Fitting The TTW Wings


I had already sanded a wedge shape to the root edges of the large wings.
When this was slid through the fin slots, the outside root edges were a little above the ring tube.

This required me to shorten the root edge wedge and bring down the outside edges to contact the tube.


The root edge contact points will have to be masked so the wood glue will soak in and adhere.

I slid out the wing and rudder pieces slightly and traced a pencil line down the root edge for a masking guide. 


Thin strips of masking tape were centered down the pencil lines. These masking strips were about 3/32" wide.
The right side picture shows the wing after spraying with gloss white. The tape strips have been pulled. 

I sprayed these pieces now so there will be white coverage on the inside after the model is glued together. It would be very difficult to get spray paint on the tight inside areas.


There is a paint ridge down the mask lines.

I lightly sanded the lines to knock them down. If I didn't, the mask ridges might show up on the finished model.

Thursday, February 24, 2022

ASP Ram B Build, Part 7, Filler/Primer & Planning The Masks

Here's Friday's post a day early - the internet at the campground is not running.

On the left is the CWF filled balsa and tube seams sanded to surface.
On the right is after spraying with filler/primer.
Notice how rough the tube is. Some tubes fuzz up when sanding the filler on the seams. This fuzzy surface will disappear after light sanding.

The gray filler/primer shown here is right after spraying, still wet and shiny. Depending on what brand of filler/primer you use - wait a few hours or overnight before sanding.


Two fins - the upper one shot with Duplicolor filler/primer.
There isn't any visible grain, the first fill of CWF did it's job. They don't always turn out this smooth after the single pass of CWF.

The lower fin has the filler/primer sanded leaving very little in the remaining grain pores. This was some quality balsa.


Looking ahead - 
Here's a page from Peter Alway's Rockets of the World.
The upper transition swells out like the plastic adapter on the Estes Nike Apache.
This is going to be an interesting mask!

Saturday, September 7, 2019

Semroc (Centuri) Taurus Build, Part 2, Planning Ahead

Remember when the instructions would say: "Read through all the instructions before assembling the model."
That's a great idea for this build. The masking could be difficult if you don't plan ahead. I like a challenge so I'll be painting the rocket in the "Admiralty Colors". Most all of the color separations are done by spraying the sections and nose cones separately before gluing it together.


TRIVIA: This is definitely an old school engine mount. At one time, kits had a black fish paper coupler glued between the heavy card stock engine mount centering rings.

This style of mount can freeze in the wrong place when gluing it into the body tube. There is just too much surface contact with the coupler against the body tube interior.

Test fit and sand, test fit and sand some more. Get a easy, smooth sliding fit inside the main body tube. Check the low inside edge of the main airframe tube to be sure there is no "burr" turned inside the interior.

Sunday, December 23, 2018

Estes Orbital Transport, Kit #K-42, Part 4, Cutting Out The Balsa


I double checked the squareness of some parts with my machine  square. Hold the balsa and square up to the light to check it.
The two large wing pieces are glued together.
Here they are under my trusty clear cutting board. The top has a pebbled surface, the underside is smooth.
With the counter top underneath, this provides an even heavy pressure for gluing.


Here's how they came out.
It took very little surface sanding to smooth out the joint.

There was some slight sanding at the root edge to get both pieces flat for gluing onto the body tube.
I tried a dry fit of the the scram jet engine housing.
After doing this I knew the balsa would have to be filled before assembly. The short BT-5 tube seams will be filled before gluing them side by side.

Most of the wing edges remain square, the angle cut pieces in the housing will be rounded.

Friday, April 17, 2015

Peter Alway Saturn IV Build, Part 13, Planning The Lower Black Mask

A coupler was used to join the upper and lower sections to spray the gloss white.
Here's the model after spraying. The BT-5 tube center section was already sprayed and glued together.


The rear mask was hard to figure out. If you've ever masked a Mercury Redstone you know what I mean.
The problem is, the instruction sheet only shows the front and rear, not the side sections. There is six fins, not four so a Mercury Redstone paint pattern doesn't easily fit.


I ended up extending the colors around one side of the adjoining fins.
I drew up an overhead paint plan to figure it out.
The black is over 1 1/2 fins and the same with the white.

Sunday, November 2, 2014

Estes Patriot Build #2056, Part 12, Red Paint Ridge and Roll Pattern Plan


This is the low end red paint after the Scotch tape mask was pulled.

There is a slight paint ridge. The ridge was carefully wet sanded so it wouldn't show up under the black vinyl wrap.


In the paint and decal instructions the leading edge tip of the fins are cropped and squared. This illustration is probably left over from the old North Coast kit.
Not a big deal, just interesting.

I won't be using the stick-ons. I was concerned the clear areas in the roll pattern would show up more than the overlaps of the Contact Blackboard Paper.


Build time: 
Red paint and Ridge Sand = 10 minutes
Yellow Paint = 5 minutes
Total build time so far = 5 hours 50 minutes

Sunday, January 27, 2013

Quest Aerospace One Part 9 Stick On Trim Check

This model will be painted in sub assemblies then glued together.
Meaning, the wings and rudders will be painted white, masked then the blue trim is sprayed. After that, all will be glued together.
I'll have to mask off the areas that will be glued together for a better bond.

You could certainly build the model by the directions and use the stick on trim.
I preferred to spray paint all the blue trim instead of trying to match the painted nose cone to the blue color of the stickers.


The front wrap around decal was left on it's backing for test fitting.
With the sticker edge flush with the front end of the body tube, this is how it fit against the leading edges of the wing.
Not a good match and tough to touch up.

With the same stick on wrap in place, the black line shows the locations of the canards.
I wanted to double check the canard position to be sure I had room to mask around them. The face card illustration shows the canard right up against the blue.

Monday, September 10, 2012

Midget Clone Build Part 16 White Color Coat


The first white color coat was sprayed.
I'm back using Rustoleum 2X again.

The picture shows the first light coat after lightly sanding with 400 grit.
There is a engine block in the rear of the booster tube so a (casing) painting wand couldn't be used.
The dowel was slid in through the back and out the top. The 18mm casing was then slid on (nozzle end up) over the top.
Now the two sections could be joined and painted at the same time.

Look at the upper picture. Some space between the two sections was needed so the leading and trailing sides of the fins could be easily painted.


I waited until the evening when it was cooler. Florida is in the mid 90s during the day with 100% humidity.

As my usual practice, I do two light coats and then a heavier "wet" coat.

There was some crinkling of the paint near a root edge on the booster!
If this is carefully sanded I might be able to cover it with the second color. Sometimes you can turn a bad result into a positive.

Look over all your fins. The smoothest surfaced fins will probably remain white. You can sand down any small globs and cover those with the second color.