Showing posts with label MMX. Show all posts

Thursday, January 27, 2022

Rocketship Games Alice's Star Rocket #R6, Part 1, Parts


Here's a fun Micro Max rocket design.
I have a feeling that this model was designed for the daughter of the Rocketship Games family. Her name must be Alice.

Note in the picture above, the sheet of pre-cut vinyl stars. There are a few extras.
The six fins are laser cut from 1/16" thick balsa.
Through the wall (TTW) fins on a 1/8 A, MMX rocket!


The red piece in the inset picture is the one piece 3D printed engine mount.
Notice the slots for holding the root edges of the fins.
Integrated into the engine mount is the launch lug and a small Kevlar tie loop.
The yellow square is a sticker for streamer attachment to the Kevlar shock cord.
The white nose cone is very smooth, 3D printed. On the base is a crossbar to tie on the Kevlar shock cord.
The streamer is cut from rip-stop nylon.


Two coloring pages and an additional sticker sheet is included.

This could be a perfect model for a young girl who likes Unicorns.

Tuesday, July 27, 2021

Piglet-sus! Build Part 10, Finished


Well . . .  Here's the weird thing - 
This blog build has been in limbo, in draft form since 2011. 
After ten years, the final posts are missing!
That and I can't find the finished rocket.

Hopefully the above illustration from the PDF will explain the fin gluing and detail work. That Piglet-sus PDF is available to Patreon members.

Interesting - This original design was downscaled from the Odd'l kit. New, re-drawn wings are included in the OR kit.


I found some pictures from my launch records on rocketreviews.com.

The mouth, cheek and nostrils were drawn with a fine point Sharpie.
Practice on paper before drawing on the model. The picture shows the black lines have faded over time. 
The old Estes Cloud Hopper Goonybird had hand drawn details like this. 
The larger Pigasus kit includes water slide decals.

I'll have to make up another Piglet-sus to fill out my MicroMaxx fleet.

Wednesday, July 21, 2021

Piglet-sus! Build Part 3 Laminating Fins

Oops! 
I skipped Step 3 of the build! I'll post it here today, then put it into the correct build order tomorrow.

Here's the wing fin "sandwiched" over the straight edge of the cereal box cardboard you cut earlier
Note the fins aren't cut to shape yet.
Lightly coat the back, unprinted side of the fin with white glue.
Set it over the edge of the cereal box stock. Push the fin fold all the way over (in this picture push to the left) until the fold is touching the straight edge of the cereal box stock.
Lay a clean piece of paper over the three layers and burnish. Clean off any glue that squeezes out around the sides.

Here's the side you'll cut on (left) and the other overlap side. (right)
The overlap on the back gives total color coverage to both sides.


Monday, April 26, 2021

ASP Micro Hawk Build, Part 1, Parts


After building the BIG TLP Hawk, how about  small one - 
I still have to paint and draw up decals for the bigger Hawk.
This one I will finish and apply decal.

Enlarge this picture to see the specs - It's only  4.15" tall!

There are three full pages of instructions, printed on both sides.
From the left going clockwise to the center - 
1" x 8" orange Mylar streamer, Kevlar line, 3D printed nose cone, Styrene angle,
Fin and Tunnel material, water slide decals, two 1 1/2" long brown couplers, nose weights, two main body tubes.


Parts of interest:
The nose cone is very smooth for a 3D printed part.
Two US ARMY water slide decals
Three split lead weights
Plastic launch lug and placement spacer

Wednesday, April 22, 2020

Old MicroMaxx Igniter?

For whatever reason, I dipped all my MicroMaxx (MMX) igniters to be used in 18mm engines. I can't find my spool of nichrome wire. I did have some old, original MMX igniters.
These igniters (pictured to the left) were the type used in the original Quest MMX "Silo" style launcher. To see the Silo launcher: CLICK HERE
These encased igniters were plugged into the launcher so the nichrome ends (at the bottom) made contact. The small rocket was simply slid over the wire "V" at the top. Many silo launches were unsuccessful when combined with the Quest controller and 9 volt transistor battery.

In the picture to the left, the plastic housing is being pried open. The two halves are friction fit and should come apart easily.

Here's the open halves of the housing.

The igniters is held in place with what looks like a piece of masking tape. Carefully lift out the igniter and peel off the tape.

On the right is an igniter you can use with your existing micro clip controller.

I like to use square toothpicks to hold the igniter in place. Round toothpicks could act like a plug, where the square sides (in a round nozzle) allow for some venting.

With the igniter wires slid into the nozzle, there isn't much room for the toothpick. The end on the toothpick was tapered with a sanding block.

NOTE: The toothpick isn't shoved into the nozzle, it only holds the igniter in place. In rare cases, MMX engines have exploded when the the igniter and plug are forced in too tight!
Usually, you gently slide the igniter in the nozzle, then set the rocket engine and igniter on a toothpick. The weight of the rocket holds the toothpick in the nozzle. The low end of the toothpick rests on the blast defector.

Friday, August 17, 2018

Semroc MMX Blue Bird Zero Build, Finished


There was a few questions raised in the instructions. I have mentioned them to Randy at Semroc.

It's interesting that a Micro Maxx downscale probably as difficult to construct as the full size original. Maybe harder?
There are the same amount of parts as in the original full-size kit, just smaller.

Micro-Maxx Model Storage, Part 2


Holes were punched with a bamboo skewer where the Sharpie dots were drawn.

Short lengths of bamboo skewer were cut.
Glue was set in the holes and the short skewer dowels pressed in. Check to be sure the dowels are sticking straight up.

For the longer models that will lay on their side, two posts will sit on either side of the body tube.


Here's how the models ended up. Not very glamorous, but the models are safe and together in a small area.

Thursday, August 16, 2018

Micro-Maxx Model Storage, Part 1

At one time I built and launched quite a few Micro-Maxx models. The finished models were storeded in different places. I wanted them together, protected in one location.

A cardboard box will give them good side wall protection, but how to keep them from sliding around?

I found a thick piece of cardboard and it was cut to fit the bottom of a box.


That thick bottom piece was set down and the models placed on the board, more or less evenly spaced.
The shorter models can stand, the longer models will lay on their side.


Sharpie "dots" marked the locations of small dowels that will slide into the engine mounts. I tried to line up the dots in a straight line.

Semroc MMX Blue Bird Zero Build, Part 8, Coupler Gluing and Streamer


Run the Kevlar line through the upper, blue body tube.

A line of glue was set into the upper tube and the tube slid over the coupler.


The "screw eye" dowel was pushed into the nose cone base and marked with a pencil. Cut the toothpick off at the pencil line.

Knot the end of the Kevlar line and push it into the hole in the nose cone base.
Put some glue into the hole and press the toothpick piece into the hole, locking the Kevlar line into place.

The streamer material is cut in two and taped to the Kevlar line.

Wednesday, August 15, 2018

Semroc MMX Blue Bird Zero Build, Part 7, Paint and Decals


After the first white coat, there were still some rough areas especially around the fin fillets.


This is what I mentioned early on - Don't glue the body tubes together until after the upper section is painted blue.

This blue is a bit dark. I didn't want to buy another can of spray paint. Blue is rarely used to finish a model rocket. I used what I had.


The wrap decal was a little long. I hid the end match below a fin.


The decals are small!
I used a wet Q-tip to get the eagle decal into the crux of the root edges.


Tuesday, August 14, 2018

Semroc MMX Blue Bird Zero Build, Part 6, Ends and Edges


GOTCHA: The instructions say to push the toothpick approximately half way into the nose cone.
Halfway is pretty far! You could split the nose cone. You really only have to push the toothpick in about 3/8".

I marked the center of the nose cone base before pushing the toothpick in.


I'd recommend roughing up one side of the launch lug for better glue adhesion.


The launch lug is tacked on with Super Glue. Fillets follow.


Here's the whole model ready for gloss white paint. The upper tube hasn't been glued on yet so it can be separately painted light blue.

Thursday, August 9, 2018

Semroc MMX Blue Bird Zero Build, Part 5, Fin Gluing


The body tube was marked for the fin positions earlier in Step 3.


The fin alignment slots were too tight on the fins. It took a little sanding with 400 grit to widen the slots.


GOTCHA: The instructions recommend tacking the fins on first with medium Super Glue. I wouldn't recommend this, Super Glue seals the surfaces and effects the adhesion of the glue fillets that follow.
Super Glues become brittle over time and those joints could fail. Super Glues are good for strengthening the ends of body tubes and stiffening up card stock shrouds, not for basic model rocket construction.

TIP: Glue on one fin before using the fin alignment tool. Let the fin dry, then slide on the alignment tool over the glued on fin.
This will steady the alignment tool and makes the second and third fin much easier to place.


The same method is used for the smaller, forward fins. Glue one on, slide on the tool and follow with the second and third fins.

Sunday, August 5, 2018

Semroc MMX Blue Bird Zero Build, Part 3, Body Tube Lengths


Step 3 says to "Take one of the body tubes" and mark it for the fins. It doesn't specify which tube to mark.
Choose the shorter tube, it should be 5 1/4" long. Mine was 5 3/8" long. The upper tube was 6" long. It should probably be closer to 6 1/4" long to be scale.
I cut the long blue coupler down to a 1" length. It just seemed too long to me.

Glue the coupler halfway into the top of the lower 5 1/4" tube.

GOTCHA: Step 8 has you glue the two tubes together.
Don't glue the tubes together, leave them separate for now. You can paint the lower body section white and the upper body light blue. Then glue them together - no masking!

Saturday, August 4, 2018

Semroc MMX Blue Bird Zero Build, Part 2, Engine Mount


The centering rings are laser cut from Letramax material. The laser cutting chars up the parts. Wipe off the ash before gluing anything up.
The instructions say to tie a knot in the Kevlar and set it under the inside engine block inside the engine mount tube.
I went more mainstream and tied the shock cord outside around the engine tube and under the upper centering ring.
This required a notch to be cut in the upper ring.


GOTCHA: The instructions have you glue the engine block flush with the top end of the engine mount tube. With the engine block even with the top, a MMX engine goes in too far. It ends up almost even with the low end of the engine tube. There is very little of the engine hanging out the back end.
For me there's not enough of the casing exposed to easily remove it after a flight.


The engine block will have to be glued down inside the tube. In the picture above, notice the block set next to the engine mount. This is how far down the engine block should be recessed.

With the engine block recessed down from the top, the engine will extend out the back. Enough is exposed to grab and remove a friction fit engine with pliers.

Friday, August 3, 2018

Semroc MMX Blue Bird Zero Build, Part 1, Parts

The original Estes Blue Bird Zero (#1335) was introduced in 1980 and on sale through 1985. BT-55 based and tall, it stood nearly 40". The 1980 price was $6.00.


This was my first purchase of the new Semroc Micro Maxx line.
Most parts were good quality. I had a few concerns - these are explained below:


The two main tubes had some rough cuts. It's understandable, small tubes can be hard to cut clean.

The launch lug and engine block were laser cut. The laser melted the end of the lug and burnt the outside of the engine block.


You are supplied with three fin alignment tools. You probably only need two of these.


The decals are all in black ink. The original bigger kit had the name in white to go over the blue upper tube section. The sheet was cut a bit close to the word "Zero".

Saturday, April 25, 2015

The Micro Fleet


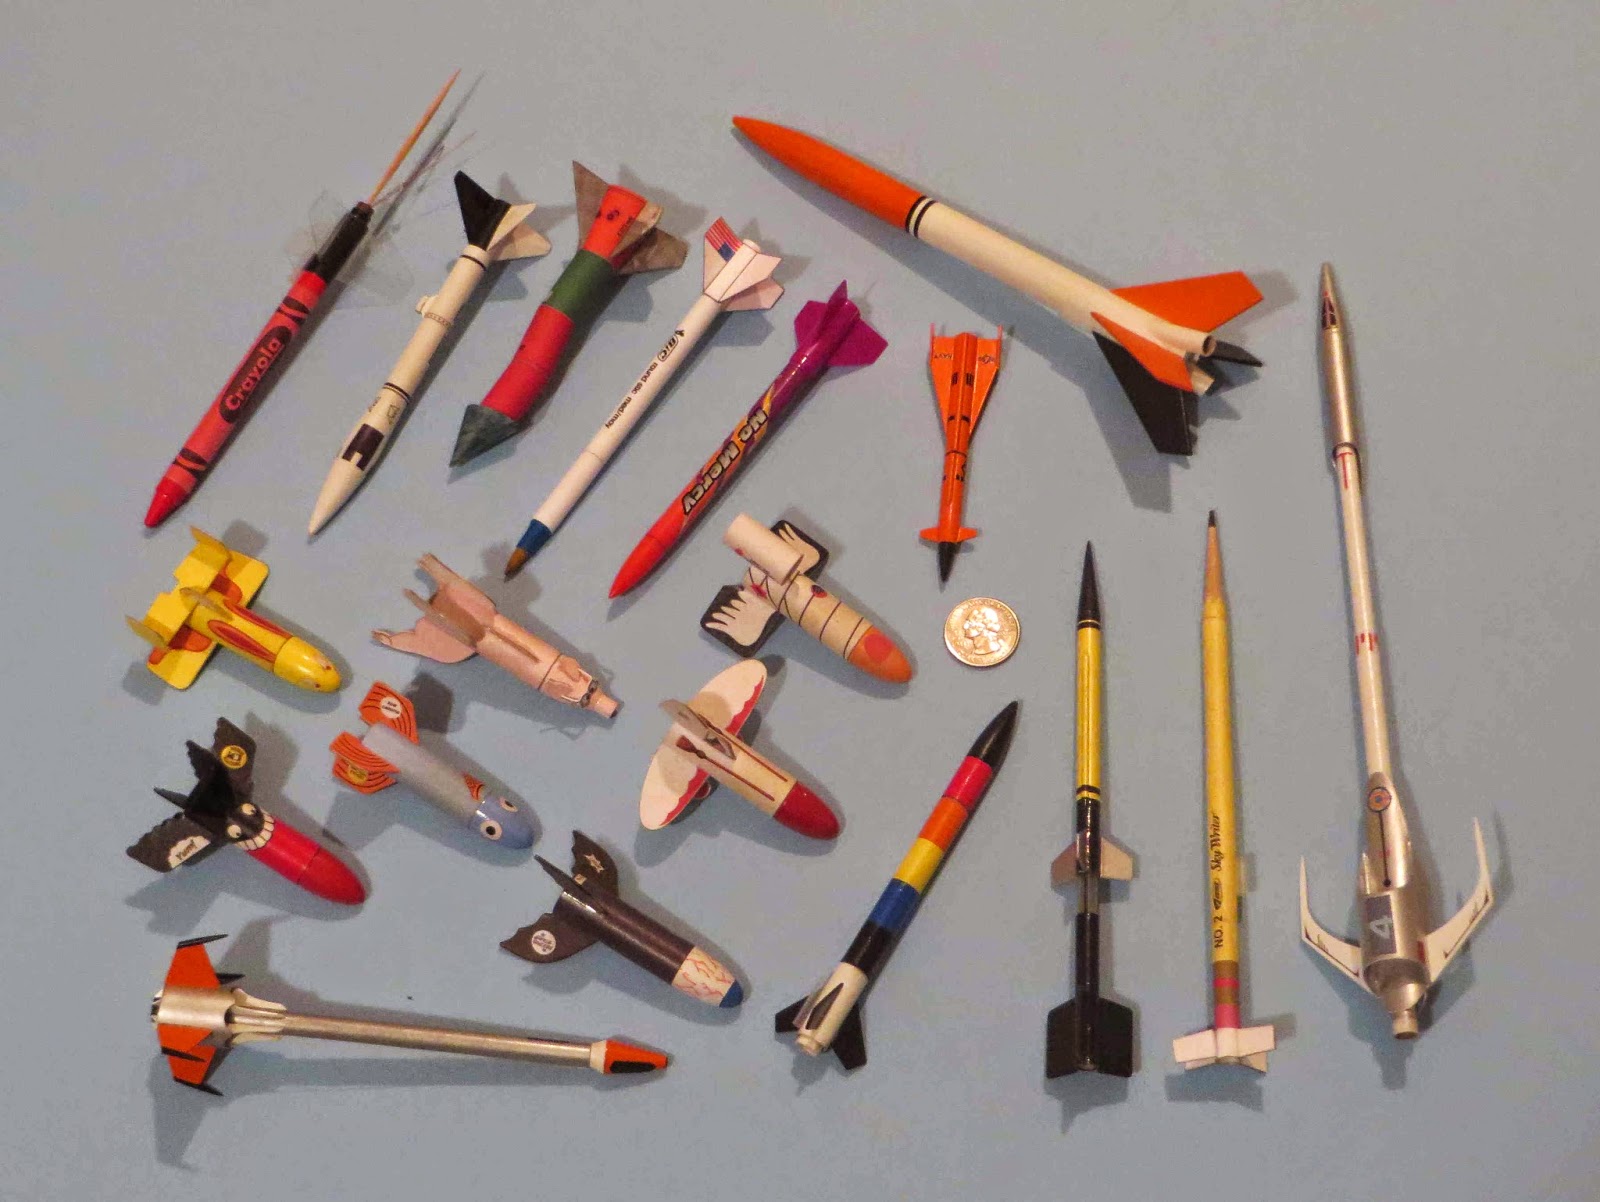
Here's the active MicroMaxx fleet.
I built and flew a lot of Micro models when I got back into rocketry. They are perfect small field flyers. I just wish the delays were a little longer. Any light, streamlined model will eject before apogee.

From top left to right:
FlisKit Crayon, FlisKit Honest John, FlisKit M.A.C.M.E. Spitfire, Applewhite BIC Pen, Quest No Mercy, ASP Jayhawk, FlisKits Dim. Duece.
Middle, left to right:
Goonys, all downscales - Cloud Hopper, Piglet-sus, Missile Toe, Sky Shreak, Galaxy Guppy, Zoom Broom, Star Snoop.
Bottom, left to right:
FlisKit Interloper, Downscale Odd'l Break-Away, ASP Wac Corporal, Downscale Sky Writer, FlisKits HEMV 4.

The Quest No Mercy is the only RTF in the bunch.
The Dueces Wild, Crayon and Interloper went through some minor design changes.

Many of the carded Goony and SkyWriter downscale models are available to Patreon members as a printable PDF. Check out the "Patreon PDF Plans" button above.
Email me at oddlrockets@bellsouth.net and request whatever models you like.

Friday, November 14, 2014

MicroMaxx Wadding Tip


Sometimes you have to pack a very small bit of wadding in a MicroMaxx sized model.
Rolling the wadding between two fingers gives you a roll of paper, the ends going to a point.

I cut the end points off, from both sides.


You end up with a small cylindrical "piston" that gives a good seal inside the tube.

MicroMaxx ejection charges are't very powerful.
This piston has a flat bottom and is more easily ejected.