Showing posts with label V2. Show all posts

Sunday, May 17, 2015

The Big Fix, Estes V2 Fix Part 7, Mask, Black Paint and Finish

Here's the before picture , how it looked after sitting in a tree for a month. The members of the Orlando R.O.C.K. group trimmed the tree and got it back to me. That was back in December of 2012!

This certainly wasn't a quick repair!


The V2 has a new 18" Odd'l parachute and is ready for flight.

The re-build and new paint came out well.
The only body part that was replaced was the BT-70 tube.
The nose cone, tail cone and fins were pretty well sealed and are original.

EDIT: I just noticed, I have to add another trim line at the bottom of the "Vs".

The epoxy fin fillets were originally made narrow at the top and wider at the bottom, like the fairings on the real V2.
The fillets were smooth and the mask lines came out very sharp.

The finish is glossy, I might hit it with a coat of flat clear to dull it up.

Saturday, May 16, 2015

The Big Fix, Estes V2 Fix Part 6, Fin Fill, Level Mask

A little right and up from the center of the fin is a white Squadron Putty fill.
There were two small, shallow dents in the fin. I knew that regular water-based wood filler wouldn't stay in the shallow area when sanded down.
The solvent in the Squadron Putty cut into the white paint and held!
I'm now a big fan of this filler putty.


The flaps were slightly longer than the trailing edge of the fins.
This was on purpose so they could be sanded down to the fins already on the model.

The four sided fingernail file is perfect for shaping like this.


The lower section got another coat of white and some final fine sanding.
Here's the mask using Scotch tape, tan masking tape and grocery bags for the large areas.


The V2 low end got two coats of black paint.

TIP: The BT-70 tube fits perfectly over the top of the Rusto 2x paint can making it a good stand for drying.

Friday, May 15, 2015

The Big Fix, Estes V2 Fix Part 5, Rudder Replacement


Two of the rudders were still on the model after it was taken down from the tree. This told me they weren't glued on as well as I thought.

Two more were cut out, filled sanded and painted.


I still needed a small space around the joint. A card stock strip was cut and glued in place so the rudder would be raised away from the recess.

A small hole was drilled for a cut off pin.
Half the pin is glued into the rudder and the other half into the fin.

Be sure to drill straight. I got off center and punched a hole through the side of a fin.


Here you can see the holes drilled in the fin and rudder.

Each fin and rudder were marked for best fit.
It's easy to get the mixed up.


The cut off pin was glued into the fin and the rudder set over then pin.

A few adjustments had to be made so the rudder fit straight in the recess.

Thursday, May 14, 2015

The Big Fix, Estes V2 Fix Part 4 Fin Repair


The leading edge of one fin was chipped out.
(I probably should have fixed this before I did the black stripes in the last post.)
You could use CWF to fill the void if it were smaller.
I have to replace the leading edge with hard balsa.

You could never fill the chipped area with an exact shaped piece.
I removed a full rectangle of wood.
A replacement piece was cut just a little taller than needed so the leading edge could be sanded even after the glued dried.


The fill piece was sanded to the leading edge, filled and primed.
It's ready for a shot of black.

Wednesday, May 13, 2015

The Big Fix, Estes V2 Fix Part 3, Lug Replacement


A filled and finished white launch lug was cut in two.
A razor blade was rolled over the lug while it was slipped over a dowel for support.


The paint was scraped off at the lug locations.
With the paint removed down to the tube you'll get better adhesion.

Tuesday, May 12, 2015

The Big Fix, Estes V2 Fix Part 2 New Tube and Roll Pattern Stripes


The replacement BT-80 tube was cut to size.
The seams were filled, the tube primed and sanded.
White paint followed.


The tube was epoxied to the engine mount and fin can assembly.


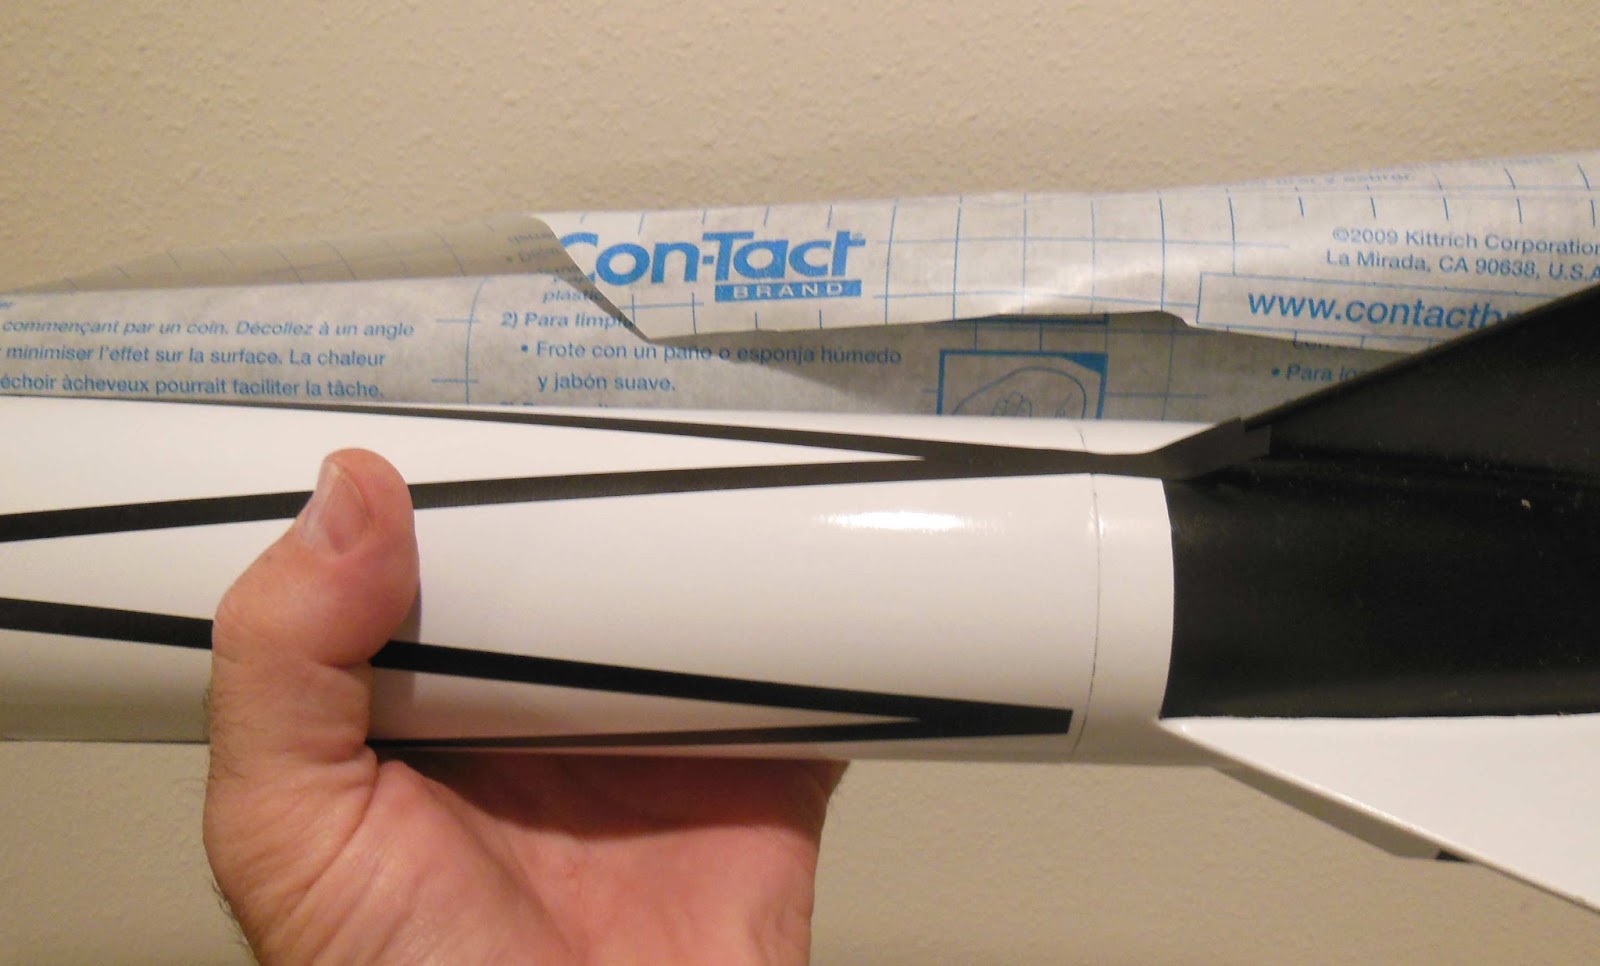
Stripes were cut from the Contact paper blackboard covering.
In the picture the lower stripes were trimmed, the upper strips meeting the black fin have yet to be trimmed.

Monday, May 11, 2015

The Big Fix, Estes V2 Fix Part 1 Removing the Body Tube

My V2 sat in a tree for weeks after a Orlando R.O.C.K. in November, 2012 .
While I gave it up for lost, some club members came back and somehow got it down from the tree!
The fins, tail cone and nose cone were in pretty good shape. The body tube needed replacement and other repairs were needed.


The BT-80 tube is 7 5/8" long.
I picked up some BT-80 tube from JonRocket.com

The lower vinyl strip was peeled off showing the top shoulder of the tail cone.

I have to remove the tube section between the tail cone, keeping the centering rings intact.
Go slow - on a repair like this sometimes you forget what's under the body tube.

I made light cuts and carefully peeled away the tube.


I forgot where the upper centering ring was.
The epoxy fillets had held pretty well.

The tube was easily peeled away from the tail cone shoulder.


Here's the engine mount and tail cone ready for a new body tube.

Monday, March 16, 2015

Full Size V2 Launch


"World's largest amateur rocket to be launched in March 2015 at Thunda Downunder in Queensland, Australia."

The full size V2 was launched yesterday by the group Rocketry Victoria.
The build and initial launch was impressive. I'll leave your opinions to the comments below -

To check out the video CLICK HERE 

Saturday, July 19, 2014

3D Printed V2 on TRF

MrBill2u Posted this on TRF.
Now 3D printing gets very interesting - 

"There is a member of these forums by the name of Raygun who has a shop set up at Shapeways for 3D printed rocket parts. This is a tiny build thread for his BT-55 V2.
Check out the V2 fin can at the Shapeways website HERE
All the available rocket parts: HERE 
Things get interesting on Page 2

Here is a shot of the nosecone and fin can together. I shouldn't have any difficulty coming in under the 3 oz limit of an A engine with weights like this.


The build itself was 10 minutes. I tied the shock chord in a loop, wrapped it around the motor mount, slipped the centering ring on it and tacked it down with CA. I also tacked the nose cone pin with CA on either side. I mixed up some 5 minute epoxy and used it to secure the centering ring and then applied some to the tail cone aft section and tail cone built in centering ring. I inserted the motor mount and left just enough protruding from the back to run a small bead of epoxy around it. I then applied epoxy to the shoulder of the fin can and the inside of the air frame and slid it together. If I had 30 minute epoxy on hand I would have taken some pictures of the build, but the 5 minute clock did not allow for photography. 

Here is the completed rocket coming in just short of 12". I should get a chance to at least get it filled and primed this weekend."


The 3D printed nose cone and fin can are BT-55 based.
This makes this V2 the same size as the old Estes kit.

I have a feeling a few new rocket part companies will be springing up.

Monday, December 17, 2012

V2 Recovered!

Well, Merry Christmas to me!

I was gone for a month since my V2 landed in a tall tree at November's R.O.C.K. launch.
While I'd given up on getting it back, I didn't know that other members of the R.O.C.K. group were "trimming the tree".

Roger and Bracha Smith made too many trips to the launch site trying to knock it down with a rope and weight.
As I understand it, other members of the club came back with saws. Roger and Bracha gave it to me when I picked up Roger for the TTRA launch on Saturday.

Sure it sat in the tree for a month, but it is in very good shape!
I'll have to replace the center tube and some major fin repairs are needed.

It'll fly again - in thanks to those who took the time to get it out of the tree!

Tuesday, August 28, 2012

Estes V2 Finished


Even with a few snags along the way, I'm happy with the way this one turned out.

Lessons learned:
It would have been easier to cut (score) the air vane lines into the fin corners. That or simply using thin decal lines.
Rough up the smooth plastic nose and tail cone so the paint sticks better.

I'm still deciding whether or not to hit it with a dull coat. The black paint on the fins is really glossy.

Monday, August 27, 2012

Estes V2 Build Part 32 Final Stripe Positioning


Remember how the 3/8" wide strip wouldn't fit around the nose cone taper without buckling? The bottom of the strip was smooth but the top half was starting to lift.

I decided to cut two thinner strips 3/16" wide and set one on top of the other.
With the stripes being narrower they both fit the circumference better.
From a foot away nobody will notice.


There is one very thin nose cone line shown on the Stine drawings. I thought I'd try the Contact trim paper (vinyl) again.

I drew a pencil line (as best I could) 2 7/8" from the tip of the nose cone.
A trim line was cut just under 1/16" wide.


It's hard to lay this line down straight.
Because it is so thin you can easily move it up of down with a fingernail.

Sunday, August 26, 2012

Estes V2 Build Part 30 Stripe Cutting

Whoops! I missed posting Part 30, yesterday I posted 31. So they are out of order.
No biggie - here's #30:

Please note:
My detail dimensions (width of stripes and postions) are estimations.
The Estes V2 is a semi scale model. If this were an entry in a NAR Scale contest I would take the time to do the math and make it correct.
In the end it'll capture the look of a White Sands V2.

I'm using my favorite black trim material again - Contact Paper Blackboard Covering. I bought a roll at Michael's Crafts.

The high and low horizontal stripes are about 3/8" wide.
The diagonal stripes will be 7/32" wide.

The hardest part of cutting strips is to have them cut to the same width from end to end. The smallest shift of your straightedge can mess up a horizontal stripe when it meets up after going around the tube.

I cut three separate "master" pieces of the correct width. These are placed against the top of the stripe at the left, middle and right of the strip to be cut.

This gives me something to line my straightedge on.
Those three master pieces are used for all the eight diagonal stripes needed.


First, lay down the 3/8" horizontal stripe at the tail cone and body tube seam.
Don't burnish this tape stripe down!
It will have to be lifted later and is used for a positioning reference right now.

With a pencil, mark the fin and centers between the fins.

Saturday, August 25, 2012

Estes V2 Build Part 31 Stripe Positioning


After all eight diagonal stripes were in place the 3/8" horizontal stripes were lifted up.
The small positioning piece was removed. The diagonal overlaps were cut at the halfway point so the 3/8" horizontal stripe will cover the ends when it was stuck down again.


The same was done at the nose cone end.


The diagonal stripes were cut where the went over the nose cone joint.

Friday, August 24, 2012

Estes V2 Build Part 30 Stripe Positioning


Look back at the Stine drawings and you can see how the diagonal stripes intersect each other. One lays on top of the other to the thickness of one stripe.

I used a piece of 7/32" wide Contact paper for a thickness reference.
On the nose cone another piece of 3/8" stripe was wrapped around the circumference at 1 7/8" above the shoulder lip.

Tape the nose cone to the body tube so it won't rotate while placing the diagonal stripes.

Four more reference pieces were set down to line up the diagonal stripes.

Notice how the 3/8" thick stripe is buckling when going around the taper of the nose cone. It only buckles on the upper half of the stripe.
Remember this for later!

Don't burnish down these horizontal (around the body) stripes. They will be lifted later to trim the diagonals.


This picture shows the first diagonal layed down using the reference pieces as a guide.

Look from the rear to be sure it is straight. You can see the curve on this piece of trim tape.


After lifting and re-positioning a few times the line is pretty straight.

Estes V2 Build Part 29 Mask Results


Here's a few shots of the finished masks.


All in all, results were pretty good.
The corners of these two black blocks didn't match as will as I would have liked.

I might use a decal stripe to raise the upper edge of the lower block so the corners touch.

Thursday, August 23, 2012

Estes V2 Build Part 28 Cleaning Up The Mask


You can be careful and there will still be some paint seeping under the mask.


This small black tick was pressed back onto the black area of the fin.
While the paint is still pliable, press it back using the side of your hobby knife blade. Roll the tick back using the mask line as a guide.