Showing posts with label QE Quad Runner. Show all posts

Tuesday, January 25, 2022

Quest/Enerjet Quad Runner Build #Q5016, Part 9, Oh Boy - STICKERS! & Finished

Hold the stickers by a light and you can see the border edge cuts.
As mentioned before, 
I now peel off a sticker and douse it in a small dish of water.
Apply some water to the area on the rocket where the sticker will go.
Set down the sticker, check alignment without squeezing out the water under the sticker surface.
Burnish and remove excess water only after you are sure of the correct position.


Before setting down the long arc decals - 
Find the center point at the top of the arc. If the top of the arc half is not slightly overlapping the center line you might end up with a gap where the ends should overlap.

Take your time . . . 


The long vertical lines are two pieces on each side. 
Plan for a little overlap at the midpoint of the line.

I built three Quad Runners - two for flight (body tube seams not filled) and one for show (extra smooth and all seams filled)

I made a fin template cutout to guarantee equal positioning of the four Quest logo blocks. One logo goes on each right facing fin.

TIP: Notice the Scotch tape around the sides of the cutout. The cardstock template can get wet when checking the sticker position. The tape stops the excess water from soaking into the template.  


I didn't take any finished pictures of the Quad Runner.
These five models were already boxed up when I realized  I had forgot the pictures.
 
So - the best I can do is show all five builds, relaxing in my easy chair.

Monday, January 24, 2022

Quest/Enerjet Quad Runner Build #Q5016, Part 8, The Paper Mask


The instructions say to use a temporary spray adhesive to hold down the paper mask.
I used a glue stick. It actually worked well, almost too well!

I thought I would use something that could be cleaned up with with a damp paper towel.


The side edges of the paper mask were extended down the sides of the body all the way to the bottom edge of the tube.

The rest of the body was covered with a plastic bag mask. 

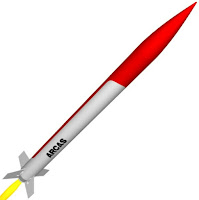
This red/white décor reminds me of the old Estes Arcas mask.


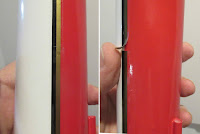
After spraying the red, the paper mask was peeled off. Some paper was left.

The right side picture shows the paper bits that were left along the mask edges.
These were removed with a damp paper towel, it did take some work!


Don't worry if your mask lines aren't perfect, the width of the sticker lines should cover it.
 
I was concerned the raised paint mask would show under the sticker border lines.
Some 400 grit sandpaper was wrapped around a Q-Tip to knock down some of the paint ridge.

Sunday, January 23, 2022

Quest/Enerjet Quad Runner Build #Q5016, Part 7, White Paint & A Paper Mask

I couldn't use one of my smaller painting "wands" - This is a larger diameter model.

I rolled up some corrugated cardboard and friction fit the handle into the top end of the 2" diameter tube.

The body was painted an overall gloss white.


I've said before how I try to look ahead and hopefully avoid some problems later on.

I measured out the center line of the arc on the paper masking guide.
The masking guide was set on top of the sticker sheet over a bright light. It didn't look like the sticker ends were going to be long enough to meet (and slightly overlap) at the top of the arc.

Check out the fourth picture below -


I wasn't convinced that a sheet of paper would block red paint from bleeding through.

TIP: I shot the paper with a good coat of clear acrylic to seal the surface.


Here I've cut a the sheet down the center and overlapped the two pieces by about 3/32". The overlap was taped over.

Saturday, January 22, 2022

Quest/Enerjet Quad Runner Build #Q5016, Part 6, Fin Spacing Guide & Fin Gluing


GOTHCHA: Well, the Fin Marking Guide cut from the instruction sheet didn't fit, the ends didn't match up.

I went to payloadbay.com. then tools to find the fin marking guide link.


I first typed in the diameter of 1.97" but it printed a bit small.
1.98" diameter was a better size.

The picture on the right shows the correct fit.
Two 3/16" diameter launch lugs are supplied.
One is glued even with the low end of the body tube.

The upper lug is glued 8" from the top of the lower lug.
 
My first glue line is evened out by making a "V" with my thumb and index finger. Draw the "V" down the glue line making a even bead. 
The fins and body tube were filled with CWF and sanded. Filler/Primer was sprayed and sanded.

I set a fin next to the root edge glue line and mark below the top tip of the leading edge.
The tube is scraped, down to the bare tube for a stronger glue joint. 
Scrape almost to the top of the root edge length.

After scraping off the filler/primer, re-draw the fin lines with pencil and a aluminum angle.

Friday, January 21, 2022

Quest/Enerjet Quad Runner Build #Q5016, Part 5, NC Lug & Fin Prep


Be sure to file away any rough plastic flash on the inside of the shock cord tie loop.
Edges like this can wear on the shock cord.


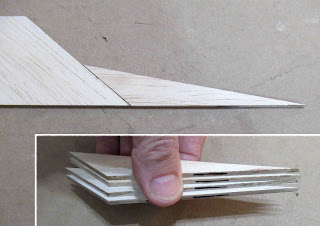
Here's how the lower fin and upper strake will glue together.

I'm building three models, two for flight and one for show.
With three different sets of fins, I mark the root edges from each set so the different balsa grain and densities remain constant.


After sanding off some of the burnt edges, you might end up with slight differences in length.


Line up the pieces, trim off to even up the tips.


The fin and strakes were glued together with the root edges against a straightedge.

Thursday, January 20, 2022

Quest/Enerjet Quad Runner Build #Q5016, Part 4, 4 Motor Cluster Mount


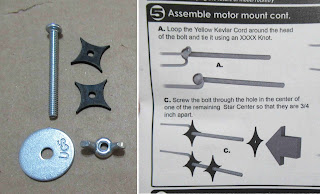
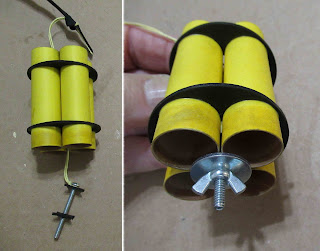
Here's the parts for the central engine retention.

Bolt, washer, 2 star center pieces and a wing nut.


As in the other larger Quest kits - 

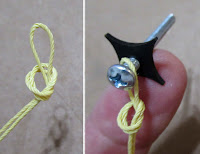
The Kevlar is doubled, the loose ends tied to the 1/4" wide elastic using an overhand knot. Simple and no slipping.

One of the star center pieces is screwed onto the bolt, almost to the end.

Another overhand knot is tied at the center of the Kevlar knot. The loop is slid under the head of the bolt.
The upper star piece is screwed up and against the Kevlar loop.

The second star piece is screwed onto the bolt. 
This assembly is glued inside and between the four cluster tubes. 

The washer is slid on and the wing nut screwed on the end of the bolt.
The washer holds all four motors in place - no tape or engine hooks needed.

Wednesday, January 19, 2022

Quest/Enerjet Quad Runner Build #Q5016, Part 3, 4 Motor Cluster Mount

The motor mount tubes are the same ones that come with the smaller  Quest kits.
There is a pre cut slit for an engine hook, but there are no metal hooks in this kit.
So . . . Place the side with the slit to the top. The engine block will strengthen that slit end of the tube.

I'm not a big fan of these thin, rough tubes. The lower (exposed) end got a wipe of CA glue and smooth sanding.
The tubes are marked with pencil for the centering ring positions.


I cleaned off the laser cut inside edges before gluing them in place. 

That black ash could get everywhere when sliding them over the yellow tubes.


The outside rings are slid in place.

I double checked the spacing of the rings before applying any glue.


Fillets are added afterwards. 
Notice I didn't continue the fillets inside the tight center, just the areas I could easily reach with a finger for smoothing.


The mount assembly was set on a flat surface to be sure all the engine tubes were in line.

The top was evened up using my sanding block. Don't sand the tubes, just press down on the flat block to get all the tubes even.

Tuesday, January 18, 2022

Quest/Enerjet Quad Runner Build #Q5016, Part 2, More Parts & 24mm Engine Mount


More parts:
Star Supports that center four 18mm motor tubes
Screw, washer and wing nut for engine retention
Kevlar line
The box says 18" nylon chute, but my kits had 16" chutes.


Mentioned earlier, 
The kit now includes a 24mm adapter. This mount fits the Quest 50mm tube.

Parts are standard.
On the 24mm mount:
I did punch some half circles for Kevlar and engine hook relief. This is the upper ring, the lower ring has one punch for just the engine hook.

The Kevlar line is doubled over at it's center and fed through the loop as shown.
The Kevlar looped line is pressed into the glue fillet.


This is the finished 24mm motor mount.

TIP: I always use electrical tape instead of masking tape for engine hook retention and better flex of the metal hook. Masking tape dries out and easily tears. Electrical tape can last for years.

Monday, January 17, 2022

Quest/Enerjet Quad Runner Build #Q5016, Part 1, Parts


Here's another build from the Enerjet by Aerotech line, the QUAD RUNNER.
This was part of the Quest Advanced Rocketry line. 2" diameter, 27.5" tall with a four 18mm motor cluster. This larger kit line is transitioning to the Enerjet by Aerotech brand. 
The kit has been revised and now comes with a 24mm adapter. If you want to try a cluster, the four engine mount is also included.


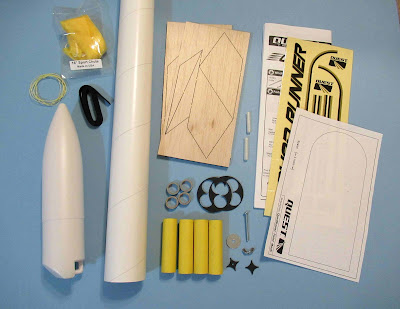
All the parts:
2" diameter nose cone and and (a bit heavier wall) body tube.
1/4" elastic and Kevlar Shock Cord
A 16" rip stop nylon parachute
3/32" thick surface mount balsa fins
The four engine cluster mount
Two 3/16" launch lugs
Instructions and sticker décor.
24mm engine mount shown in next post


Some parts of interest:
A paper masking guide template
A large sheet of stickers.