Showing posts with label S Laser X. Show all posts

Saturday, January 23, 2021

Semroc Laser X, KV-33 Build, Decal Fix


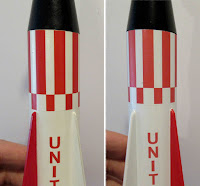
I mentioned I wasn't happy with the opacity of the decals. It's especially noticeable on the upper red roll pattern decal. The vertical lettering doesn't look as bad. 

I could have drawn and printed up a decal, but I thought I'd try something different.
I bought a sheet of self-adhesive red vinyl at Hobby Lobby. I don't have a Cricut machine - this will be done "old school".


It's easy enough to remove a decal that was just applied a day before.
Set some masking tape on the decal and pull up.

If you are lucky, it'll come up in one piece. This one didn't.
I was able to grab a lifted corner and pull up most of the decal in one piece. 


I picked up the older Laser X build and measured the vertical red band widths.


Strips were cut using a straightedge.


These were stuck them down without touching the sticky back, using my knife blade. I can position them easier with a blade than I could with my fingertips.


It came out pretty well.
It's not perfect but a whole lot better than the pale, peeled off decal shown below the new vinyl in the picture.
I can sleep tonight.

Friday, January 22, 2021

Semroc Laser X, KV-33 Build, Finished?


Except for the "pink" decals, this new build turned out pretty well.
The lower fins are thicker and stronger, the fin strake toothpicks are a better diameter.
This wasn't built to be an exact clone. I sometimes like to make personal improvements hoping it will make it through more launches with less repairs.

I'm not happy with the pink decals. It's really apparent on the large roll pattern decal. A fix will follow . . .


Thursday, January 21, 2021

Semroc Laser X, KV-33 Build, Part 13, Comparing Old & New

It's always interesting to look back on an older build and evaluate your work over time.
Throughout this post - On the left is the older build, the right side the new build.

Here you can see the difference in the decal opacity. I really don't like that pink look next to the full red color on the fins.
Also notice the thicker fins on the right side or newer build.


On the lower body - 

I like the wider fin spikes which better fit the thicker fins.
On the left you can see some fin grain and seams in the launch lug. I was probably using sanding sealer then.

My fit and finish of the engine vanes is much better. This time I centered the engine hook in line with the launch lug. The Semroc instructions place the lug and hook as shown on the left.


The shroud is smoother and the paint gloss better. 

On the left side is the original build. It looks like I used super glue to adhere the fins. This time I scraped off a line of paint and used white glue.


This was interesting.
I now attach the Kevlar to the elastic shock cord inside the lip of the body tube edge. I probably wouldn't get a zipper on this model, but why take the chance!

Wednesday, January 20, 2021

Semroc Laser X, KV-33 Build, Part 12, Decals!

The vertical body decals are centered between the fins and upper roll pattern wrap decal.

TIPS: Make a light pencil line at the center point on the body and the center point of the decal. Simply line up the center pencil marks and the decal will be centered.


GOTCHA:
The decals didn't have a deep opaque color like my earlier Semroc Laser X kit did. The decals were also very brittle.

The larger roll pattern wrap cracked!
I figured I would simply slide it up and trim off the broken up area.

Notice the darker red vertical band on the right center side. This is the decal overlap. It has a richer red from being two layers of ink.  
Here's another example of centering marks.

Mark the body tube at the center point. Mark the decal at the center.
If the pencil marks are in line, your decal is centered! This is how I would center headlines when doing paste-up at the print shop.

The UNITED STATES decal (set on bright white paint) looks pink next to the rich red color of the fins.

The upper body adapter did need some masking tape to get a good fit.
TIP: Roll the tape over the edge of the low end of the adapter so the tape edge won't lift up when slid into the body tube.

Tuesday, January 19, 2021

Semroc Laser X, KV-33 Build, Part 11, Red Paint & Spikes


Here's the mask for the larger red fins - 
Marked Scotch tape went into the root edges,
Brown masking tape filled the areas between the fins,
A plastic grocery bag was taped over the top.
After the tape mask was pulled - 
The outside edges of the fins were sanded down to the bare balsa.

The spike sides are a rounded surface, some of the exposed bare balsa might show through on the sides.
TIP: This was one of the rare instances where I could use a Sharpie for touchup that wasn't black ink. The red Sharpie was a good match - that doesn't usually happen with other colors.
Just the edges of the bare balsa got some red.

The black spikes were also scraped for gluing.

Set the spike beside the outside edge of the fin. I used a small wrap of masking tape to make a border edge.

The gluing line was scraped using my knife, ending just inside the tape borders.


Here's the spike glued on.
Again - Use white glue for this visible glue fillet. It dries clear.

Note the spikes aren't centered on the outside edge of the fin.

Monday, January 18, 2021

Semroc Laser X, KV-33 Build, Part 10, Small Red Fin Gluing

I'm doing the red masks in two separate sections, the upper body first.
The upper fins were stuck down on masking tape on some cardboard. These photographed an orange color - the real red is shown below.

On the right are the fin spikes, sprayed gloss black.
Even though the upper fins were set root edge to root edge, some red paint still got into the crack.

On the left is the before,
On the right is the bare balsa after sanding the paint off with a block.

These upper fins will be only "end glued" with no fillets so you need a rough, bare surface for the glue to be absorbed. Why no fillets? White glue dries with a flat finish. To gloss it up would require a clear coat, something I'd rather avoid. 


You can still see the roughed up root edge line under the paint.

I carefully scraped away the paint down the line not getting any wider than the 1/16" thickness of the fins.


TIPS: Use white glue for a visible joint like this. The white glue will dry clear and not be noticed. Yellow glue will dry yellow and be unsightly. 
After the glue dried, I applied a drop of medium super glue with a toothpick at the base of the fins. 

With this drop of glue at the rear of the fins it won't be noticeable. Hopefully it will strengthen the joint a bit.

Sunday, January 17, 2021

Semroc Laser X, KV-33 Build, Part 9, White & Black Paint


I couldn't see a good way to mask the smaller red fins with the cardstock black shroud right below it. I knew I had to paint these fins off the model and glue them on after the adapter was painted black. 

Normally I wouldn't recommend gluing fins on after painting, but these fins are small and not subjected to hard landings.


In the upper picture you can still see the roughened root edge line even after the white paint was shot. 

On of the upper fins broke along the glue line. It had to be glued back, shot with filler/primer and sanded smooth.


Here's the upper body mask for the black nose cone and adapter.

I got a much better gloss on the shroud this time by lightly sanding between coats.


The lower body was hit with an overall gloss white. 
Notice the paper towel keeping any overspray out of the upper tube end.

The engine mount isn't glued in yet so a piece of 65 lb. cardstock was rolled and set in the back end for something to hold on to.

Saturday, January 16, 2021

Semroc Laser X, KV-33 Build, Part 8, Masking & Gluing The Vanes

Here's a weird paint mask to give your a better glue bond on the root edges of the vanes.
The engine mount is not glued in place yet. Slide it in and you can use the fins to place four of the tape strips. The other strips are simply centered between those.


The mount is taped into the tube. The tube is masked and the engine mount tube sprayed black.

On the right - The masking strips are removed.
This mask doesn't have to be very clean, the vanes will cover up any rough edges.


I wasn't getting a good fit of the root edge against the mount. I realized the glue fillet was in the way! I slightly rounded off the corner and got a better fit. 


I glued on every other vane and centered the remaining pieces.

Notice the masking tape wrap around the black coupler. The fit in the main tube was pretty loose.

Friday, January 15, 2021

Semroc Laser X, KV-33 Build, Part 7, Fitting The Shroud


The scanned shroud was loaded into Corel Draw.
Four slightly different sized were copied. Out of these four I should have one that will fit. Always dry fit shrouds before using any glue.

Normally I'd go to payloadbay.com and make a shroud, but the website was down the day I needed to print one up. 
Payloadbay.com is back now, go to the site, and go to the "Tools" section. 


The upper adapter is glued to the low end of the BT-5 size tube.

On the right side, notice how little glue is used on the upper position contact ring of the shroud.
A line of glue was also applied to the edge of the upper centering ring on the adapter.


Finally the right sized shroud! 
A good, sliding fit and a good match to the outside diameter of the lower body tube.


While the glue is still wet,
You can shape and mold the glued joint. Coax the upper joint for a better, even fit.


This is an overlapping tab shroud.
Sometime I fill the raised seam with some CWF.

Thursday, January 14, 2021

Semroc Laser X, KV-33 Build, Part 6, Fin Spikes & Carded Shroud

Now that I'm using thicker fin stock, the toothpicks on the outside edge looked spindly. I decided to go with a 1/8" dowel.

On the left: Why do they use overly sticky glue on the labels? I had to use some Goo Gone to remove the paper.

To start, rough taper the dowel ends with a pencil sharpener.


Clean up and smooth out the ends with 220 then 400 grit sandpaper.

On the right is my older Laser X showing the black toothpick next the to the new 1/8" diameter dowel.

Scissor cut shroud arcs are never perfectly smooth.
TIP: Run your fingertip around the curved shroud cut and you might feel an uneven lip edge.
You can smooth the arc a bit with some 400 grit rolled over a fingertip.


GOTCHA:
A dry fit around the ST-5 tube showed the the shroud was small!

Good thing I scanned the shroud before cutting it out!
I'll load it into Corel Draw and enlarge it a bit.

Wednesday, January 13, 2021

Semroc Laser X, KV-33 Build, Part 5, Fin Filling & Gluing


The 1/16" thick pieces (upper fins, engine strakes and launch lug) were set on a taped board for a good shot of filler/primer.


Here's the four larger fins, ready for their filler/primer coat.

Notice the root edges are set close together to keep the filler/primer paint out. Keep your gluing surfaces "raw" for a strong bond.


This is one of the upper fins - 
On the left is a fin with the filler/primer shot and dried.

On the right is another fin with the filler/primer sanded down using 400 grit. Any balsa grain that was left after the CWF sanding is filled with the filler/primer. Two steps and the balsa grain is filled. 
The fin locations are marked with pencil .
TIP: NEVER use an ink pen to mark fin positions. The ink will bleed through paint and show under finish colors!

Note - The body tube got the same two-step fill of CWF and filler/primer. Look close, you can see some gray filler/primer in the tube seams.

I used the root edge of a fin to mark the high and low ends of the fin.
The tube was roughed up down the vertical pencil line stopping before the high and low end root edge marks. 
You only have to rough up the tube - don't sand deep!


The fins were glued on.
Here the launch lug is placed even with the end of the body tube.

I use my sanding block to even up the lug end.
 

Monday, January 11, 2021

Semroc Laser X, KV-33 Build, Part 4, Gluing Up Fins, Rounding Leading Edges

The instructions don't mention rounding the fin edges. Over the years I have developed a preference to round the leading edges.
These are two piece fins - it's always a chore to round the inside corner edge where the pieces meet.

TIP: I find it easier to round the upper "strake" piece before gluing onto the larger lower fin. This way one half of the inside corner is already rounded. It's easier to form the leading edge on the main fin with the rounded upper strake.


After rounding the upper fin, 
Glue the strake to the larger, lower fin on a flat surface. Use a straightedge to check the root edge alignment.

Set some weight on the joint and allow to fully dry.

On the left is the rounded strake. The larger low fin leading edge is still square.

Working in from the outside of the glue joint -
Round the leading edge working up to and feathering into the rounded edge of the strake.
The shoulder edge of the small nose cone wasn't well defined.

I paint on some CWF, a little over the shoulder. 
Press and turn the nose cone into the tube and lift clear. This should raise a bead of filler, a little wider than the diameter of the nose cone.

After the filler dries, slide it back into the tube.
With 400 grit on a block, sand down the filler bead even with the tube diameter. Try not to sand into the tube. You should end up with a very sharp new shoulder.