Friday, December 31, 2021

2021 Top Ten Builds - Part 1

TOP TEN LIST FOR 2021
Here we go again! These are tough decisions to make. 
Maybe it's the design, parts or how well it went together.
Sometimes it's simple, something I like about the model.
This list isn't from the worst to best, all Ten listed below are very good.
CLICK on the model name to go to the blog build or catalog page.

Sure it's self promotion - but it's always exciting to bring out a new kit!
A blog build is coming in the future . . . 


A smaller 13mm two-stage rocket with a good build challenge. Perfect staged model for a small field.


A tough to cut out nose section and difficult masks.
The finished model is impressive.


Even with 12 fins to fill this one is a favorite. If it wasn't sent back to Quest, it'd probably be a regular flyer.
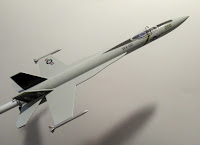


A very slick little MicroMaxx rocket! No balsa grain filling, the fins, nose cone and tunnel details are plastic. 

The Countdown continues tomorrow, builds 5 to 1!

Thursday, December 30, 2021

Estes Skylab #001973, Build, Part 18, Cut, Smooth & Fill

I usually use a break-off blade knife for most of the builds. This is one of those times where a more expensive X-Acto style blade is needed,

In the side cuts, my (new #11) blade was set at an angle almost laying down on the fairing sides.
The top line against the tape goes straight in at a 90 degree angle.

GO SLOW! 
Don't try to cut through with a single cut. 


After the piece is removed the cuts look pretty rough.
Notice the side cuts aren't right against the fairings. I tend to cut wide and trim down to fit. 

I ended up doing a lot of small trim cuts to clean everything up.

First, CWF fill was used in the joints and sanding with 400 grit.

Filler/Primer was sprayed in a small cup then dabbed onto the joints to fill any remaining gaps.

Wednesday, December 29, 2021

Estes Skylab #001973, Build, Part 17, Cutout Between The Fairings


Here's where some measurements don't add up.
The instructions say 5 1/2" from the body tube cut (coming up below) to the bottom of the second wrap.
After this next step the tube cuts left just 5 3/16" for the height of the vertical black bands.
I checked Peter Always Rocket of the World for a second reference drawing.

I penciled in the cut lines straight out to the horizontal taper line on the fins. This is the same line as in the Estes instructions.
If I were to cut as high as the horizontal fin taper line, the vertical black bands would end up short of the 5 1/2" height in the instructions.
Cutting at the horizontal taper line, you would cut right into the corrugations.

Estes doesn't say how tall the cuts should be.
I made a guess and a compromise.

Earlier, the instructions have you cut the wraps with a 1/16" border edge just outside the end of the corrugations. I did the same 1/16" edge here at the bottom of the lowest wrap. This made my cut just at the bottom of the center, tall embossed detail.


I marked the cut line with a pencil.
A piece of tape followed to (visually) make sure the line was horizontal. 

Get ready - Change out your knife with a new blade.
More in the next post.

Tuesday, December 28, 2021

Estes Skylab #001973, Build, Part 16, Lugs, Nozzles & Final Seam Fill


The two launch lugs were set in position and the outside edges trace with a pencil.

The filler/primer was scraped off inside the pencil lines. 
The lugs were glued in place using Fabri-Tac.

Spraying the outside of the nozzle bells is easy. I also wanted paint on the inside.

Some small holes were punched in cardboard and the pins pressed into the holes. 
The inside of the nozzle bells were spray painted silver.

The spacer ring is glued on the top of the bulkhead.

The spacer ring can end up as a friction fit just inside the washers.
Compress the ring sides to get it to fit while still.
Look down from the top and try to center the tube as even as you can get it.
Or - You can trim the middle side off the washer for a slip fit.
After some white paint was sprayed I could still see some very faint spiral seams.

TIP: I don't normally do this - I sprayed some filler/primer in a cup. This was dabbed on the visible seams.

The right side pic shows it sanded down to surface.

Monday, December 27, 2021

Estes Skylab #001973, Build, Part 15, Fairing Fillets & Tunnel Gluing


With the fairing top and crescent base glued to the body,
Now you can follow up with light liquid cement fillets down the sides of the fairing joints.


You'll still see some gaps along the edges.
I used yellow glue to fill the gaps and smooth everything out.

Note in the right side picture there is not much glue used. When the fillet is smoothed out some glue will "pool" against the ribs on the low wrap. 
Smooth the fillets with a single "down" swipe only to keep the fillets small against the ribs. 
When the glue dries and shrinks it won't be as noticeable. 

I know - yellow glue doesn't add any strength, it won't soak into the plastic. It's just something to fill any remaining joint gaps. It will stay put.


I only ran glue down the underside center rib of the tunnels.
I didn't want any glue squeezing out on the sides when pressed in place.

After the glue dries, yellow glue fillets were applied down the length of the tunnel sides. Again, the yellow glue was used as a gap filler.

Sunday, December 26, 2021

Estes Skylab #001973, Build, Part 14, Gluing On Fins & Fairings

This is a bit tricky -
Place both the fairing and fin into place. 
Carefully lift off the fairing while still holding the fin in place against the body.

Use a little bit of liquid plastic cement initially so  adjustments can be made if needed.

Check the position with the fairing in place. If all is good, then add some liquid cement down the root edge fin joint. 


I only used a small amount of Beacon Fabri-Tac on the filler tip piece and along the card stock reinforcement root edge. No glue yet on the thin sides.

Side glue fillets follow after the next step.


Use the placement template piece to be sure the fins are straight and centered in the fairing.

Follow with fillets of liquid cement along the fairing sides applied with a brush.
At one time I was concerned that the liquid cement might melt the thin plastic along the fairing sides. As long as you don't overdo it, it works well as a fillet.

Estes Skylab #001973, Build, Part 13, Fin Fairings - Enough Already!


Here's what the fin slot looked like after fitting and trimming.


You'll know when you've got the slot right when the fin slides in (dry fit against the lower body wrap) and there is a straight line down the long sides of the fairing slot - No bulges or distortion of the fairing!


The rounded tip of the fairing overhangs the top of the low wrap. This overhang leaves a gap.
You don't have to fill this tip gap, it's up to you.

I mentioned about keeping some of the excess border from the vacu-form sheet.
Cut a slightly oversize piece, slip it under the fairing tip and trace with a pencil.


After the tip is glued on,
Cut and sand to the fairing. 

The picture on the right is slightly distorted, that tip piece is glued on straight.

Saturday, December 25, 2021

Estes Skylab #001973, Build, Part 12, Fin Fairings - Patience!

That vacu-form lip on the inside will have to be sanded to match the contour of the card stock crescent piece.
Notice the center mark on the cardstock crescent lines up with the (inside) center rib of the fairing.

Back to the sandpaper taped to the body tube

Sand just to match the circular cut of the card stock crescent - no more. It fits the BT-101 tube curve perfectly.
I've mentioned this is previous builds - 
The original Centuri Saturn V kit provided a Fairing Trim Guide to show the curve of the fairing sides.
While the guide says "trim sides" you'll have more control (and not remove too much) through careful sanding.

If you have sanded correctly, you should end up with that subtle curve on the sides.
I've sanded and fitted just up to the forward ends of the fairing ribs on the side edges.

Notice the fin slot line has a slight up-bulge against the sides of the fin - it's not a straight line. That tells me the fin slot isn't wide enough where the line distorts. That slot still needs more sanding to widen the slot. Go slow and check after sanding. It won't take much to improve the fit.

Look close at the fit of the fairing. 
The fairing sides should fit just inside the corrugations on the lower body wrap. The rounded tip extends over the top of the wrap.
I've seen a few finished Saturn Vs where heavy fillers have covered up a poor fit of the fairings.
The fairings should not rest on, but fit inside the ribs on the low wrap. 

If the fairings don't fit fairly easily inside the corrugation ribs, you probably have more sanding to do.

Friday, December 24, 2021

Merry Christmas Y'all!


Reprinted from December, 2010

OH, ROCKET TREE
    Sung to the melody of Oh, Christmas Tree

Oh Rocket Tree, Oh, Rocket Tree,
How lovely is thy smoke trail,
Oh, Rocket-tree Oh, Rocket-tree,
Fly Vertically without fail.

With C6-3, we’ll rubberneck,
At peak of flight, a rear eject,

Oh, Rocket-tree Oh, Rocket-tree
It landed close - oh whoo-o-pee.


But I heard him exclaim, as he sailed out of sight - 
"Merry Christmas to all, and to all a good flight."

"Say, little Bobby, Did you get a Wedgie for Christmas?"

The Wedgie was an OOP Odd'l Rockets kit that had available skins to fit the triangle sides.

Thursday, December 23, 2021

Estes Skylab #001973, Build, Part 11, Fin Fairings

Before I get into the Fairings: 
They will fit - if you take the extra time to get the sides sanded and trimmed enough to fit just inside the ribs in the low wrap

TIP: Don't cut the sides off too close! The excess edges will crack off when sanding.
Leave a good 1/16" around the fairing sides.

NOTE: On this build I cut out the fin slot before sanding down the sides.
Next time, I would probably work on sanding the sides before cutting out the fin slot. With the slot intact the fairings seem stiffer making sanding down the sides easier.

Trace around the slot recess with a pencil before cutting. This makes the inside lines easier to see.


Some 220 grit sandpaper was taped around the widest, open part of the main body tube.

This is what takes the extra time.

Back and forth, back and forth over the sandpaper


Keep an eye on the sides and corners as they get thinner when sanding.
They will start to fold back.

When the plastic gets thin enough, you can bend it and remove the edges.
Add the reinforcement disks inside the bottom of the fairings before continuing sanding.

I did something similar on my Saturn V #1969 build. Those were simple 110 lb. card stock glued to the bottom face of the fairing.
These thick crescent disks are glued inside the fairing base. I used Fabri-Tac to adhere them.

Notice the inside edge overhangs the crescent disks. There is still more sanding and fitting to be done.

Wednesday, December 22, 2021

Estes Skylab #001973, Build, Part 10, Adapter Joint Fill & Tunnels


You should tape the wraps tightly shut until the adhesive completely sets up.


I mentioned to keep the scrap plastic after cutting out the wraps.

I cut a thin strip of plastic to fill the gap. It was pressed into place even with the two side edges. Medium CA glue was carefully applied with a toothpick.
The long bottom was trimmed off after the glue dried.  
The tunnels are cut to size to fit in the space between the wraps.

Notice on the left picture - the pencil lines ended up a little off after the wraps were glued in place. As mentioned earlier, the tunnels should run straight, you might have to make wrap adjustments so they are perfectly vertical.
Be aware - the corrugated wraps can stretch a bit.

The instructions don't mention this - 
TIP: I cut out a notch in the wrap edge so the tunnels fit flat against the body tube.


After you fit a tunnel - 
TIP: Mark the back of the tunnel and its body tube position.

The bottom four tunnels are in same-size pairs and easy to mix up!

Tuesday, December 21, 2021

Estes Skylab #001973, Build, Part 9, Adapter & Third Stage Wrap


Double check the Third Stage Wrap to be sure you know the top and bottom. I marked mine TOP on the inside wall in pencil.


Tape the wraps down before spraying and adhesive on the back.
Notice the wrap is a little taller than the top of the body tube.

The instructions show the Third Stage Wrap being glued  down before the Body Wrap (adapter) Reduction.
GOTCHA: I'd recommend sticking down the Reduction (adapter) wrap first, then apply the Third Stage Wrap.
I had what I thought was a near perfect fit of the Reduction (adapter) wrap by itself before the Third Stage Wrap was in place. 
I followed the instructions placing the Third Stage Wrap first. That spaced out the fit of the Reduction adapter fit making a gap at the butt joint.


I had to cut a small slice around the low end of the Third Stage Wrap as it was laying over the top edge of the cardstock shroud. This should allow the vacu-form reduction gap to close up a bit. 


This picture shows a dry fit. The gap is shown  before the thin slice was cut from the bottom of the third stage wrap. 
After removing a bit off the Third Stage Wrap, the gap is still there, but no where near as wide.

Monday, December 20, 2021

Estes Skylab #001973, Build, Part 8, Third Stage Adapter Shroud

Here I haven't glued the cardstock shroud in place yet. It is taped to hold and "form" it to the tube diameters.

TIP: Before laying down any tape - reduce the tackiness by pressing the tape on your pantleg. Press and lift, press and lift. Do this a few times so there is less chance of the tape tearing the card stock when the tape is lifted.

On the right side picture - Note the overlap of the card stock shoulder. This edge will be much thicker when the vacu-form wrap is in place. 
Try to fit the shroud edge evenly over the adapter tube top.


Even though the tape is not very sticky, carefully lift the tape.

Don't glue the shroud in place yet - see the next step.


Here's how the instructions show the shroud gluing.
The gray bands imply more glue than is needed.

I would only apply glue to the upper edge of the adapter - just to the left of the arrowheads in the above drawing. 
Make the glue bead small.
Slide the shroud down and seat the edge on the line of glue.

Then - apply a small bead over the joint, 1" at a time and remove excess with a finger.
This will all be covered with the vacu-form body wrap reduction piece.

Sunday, December 19, 2021

A REAL Flying Christmas Tree!


If this doesn't put you into the Christmas Spirit - 
Nothing else will!

Joe Barnard (BPS.space) and some very enthusiastic friends launch a STABLE, 
fully lit Christmas Tree.


Joe's rockets and videos are always well produced.

Estes Skylab #001973, Build, Part 7, Wrap Clean-up & Seam Filling

On the left -  a bit of the spray adhesive got on the outside face of the wrap. Clean this off before using any spray paint.
On the right - There is some adhesive bits along the edges of the wrap. Try to remove them with a knife blade tip and tweezers. You can use regular strength  Goo-Gone on a Q-tip to pick them up. But go light - the Goo-Gone can dissolve the primer coat on the body tube.

The edge seam joints can be filled with medium CA glue applied with a toothpick. This technique works for me, but fill with what you are comfortable with.

Squeeze out a drop of medium CA on scrap cardboard. Dip a  toothpick in the drop of glue and run it down the joint seam. Make a long, shallow bead line of CA glue. Don't go too wide, you are trying to fill just the seam recess crack. Quickly pick up any excess with a Q-tip. 

Lightly sand the hardened CA glue joint with a piece of folded 400 grit. Repeat if needed until the seam joint is filled.
Lightly feel the joint with a dull knife blade to see if the seam is smooth and filled, if not - repeat.