Showing posts with label Shroud Lines. Show all posts

Friday, February 20, 2026

Estes Time Warp Build, #7321, Part 8, Scattered Steps


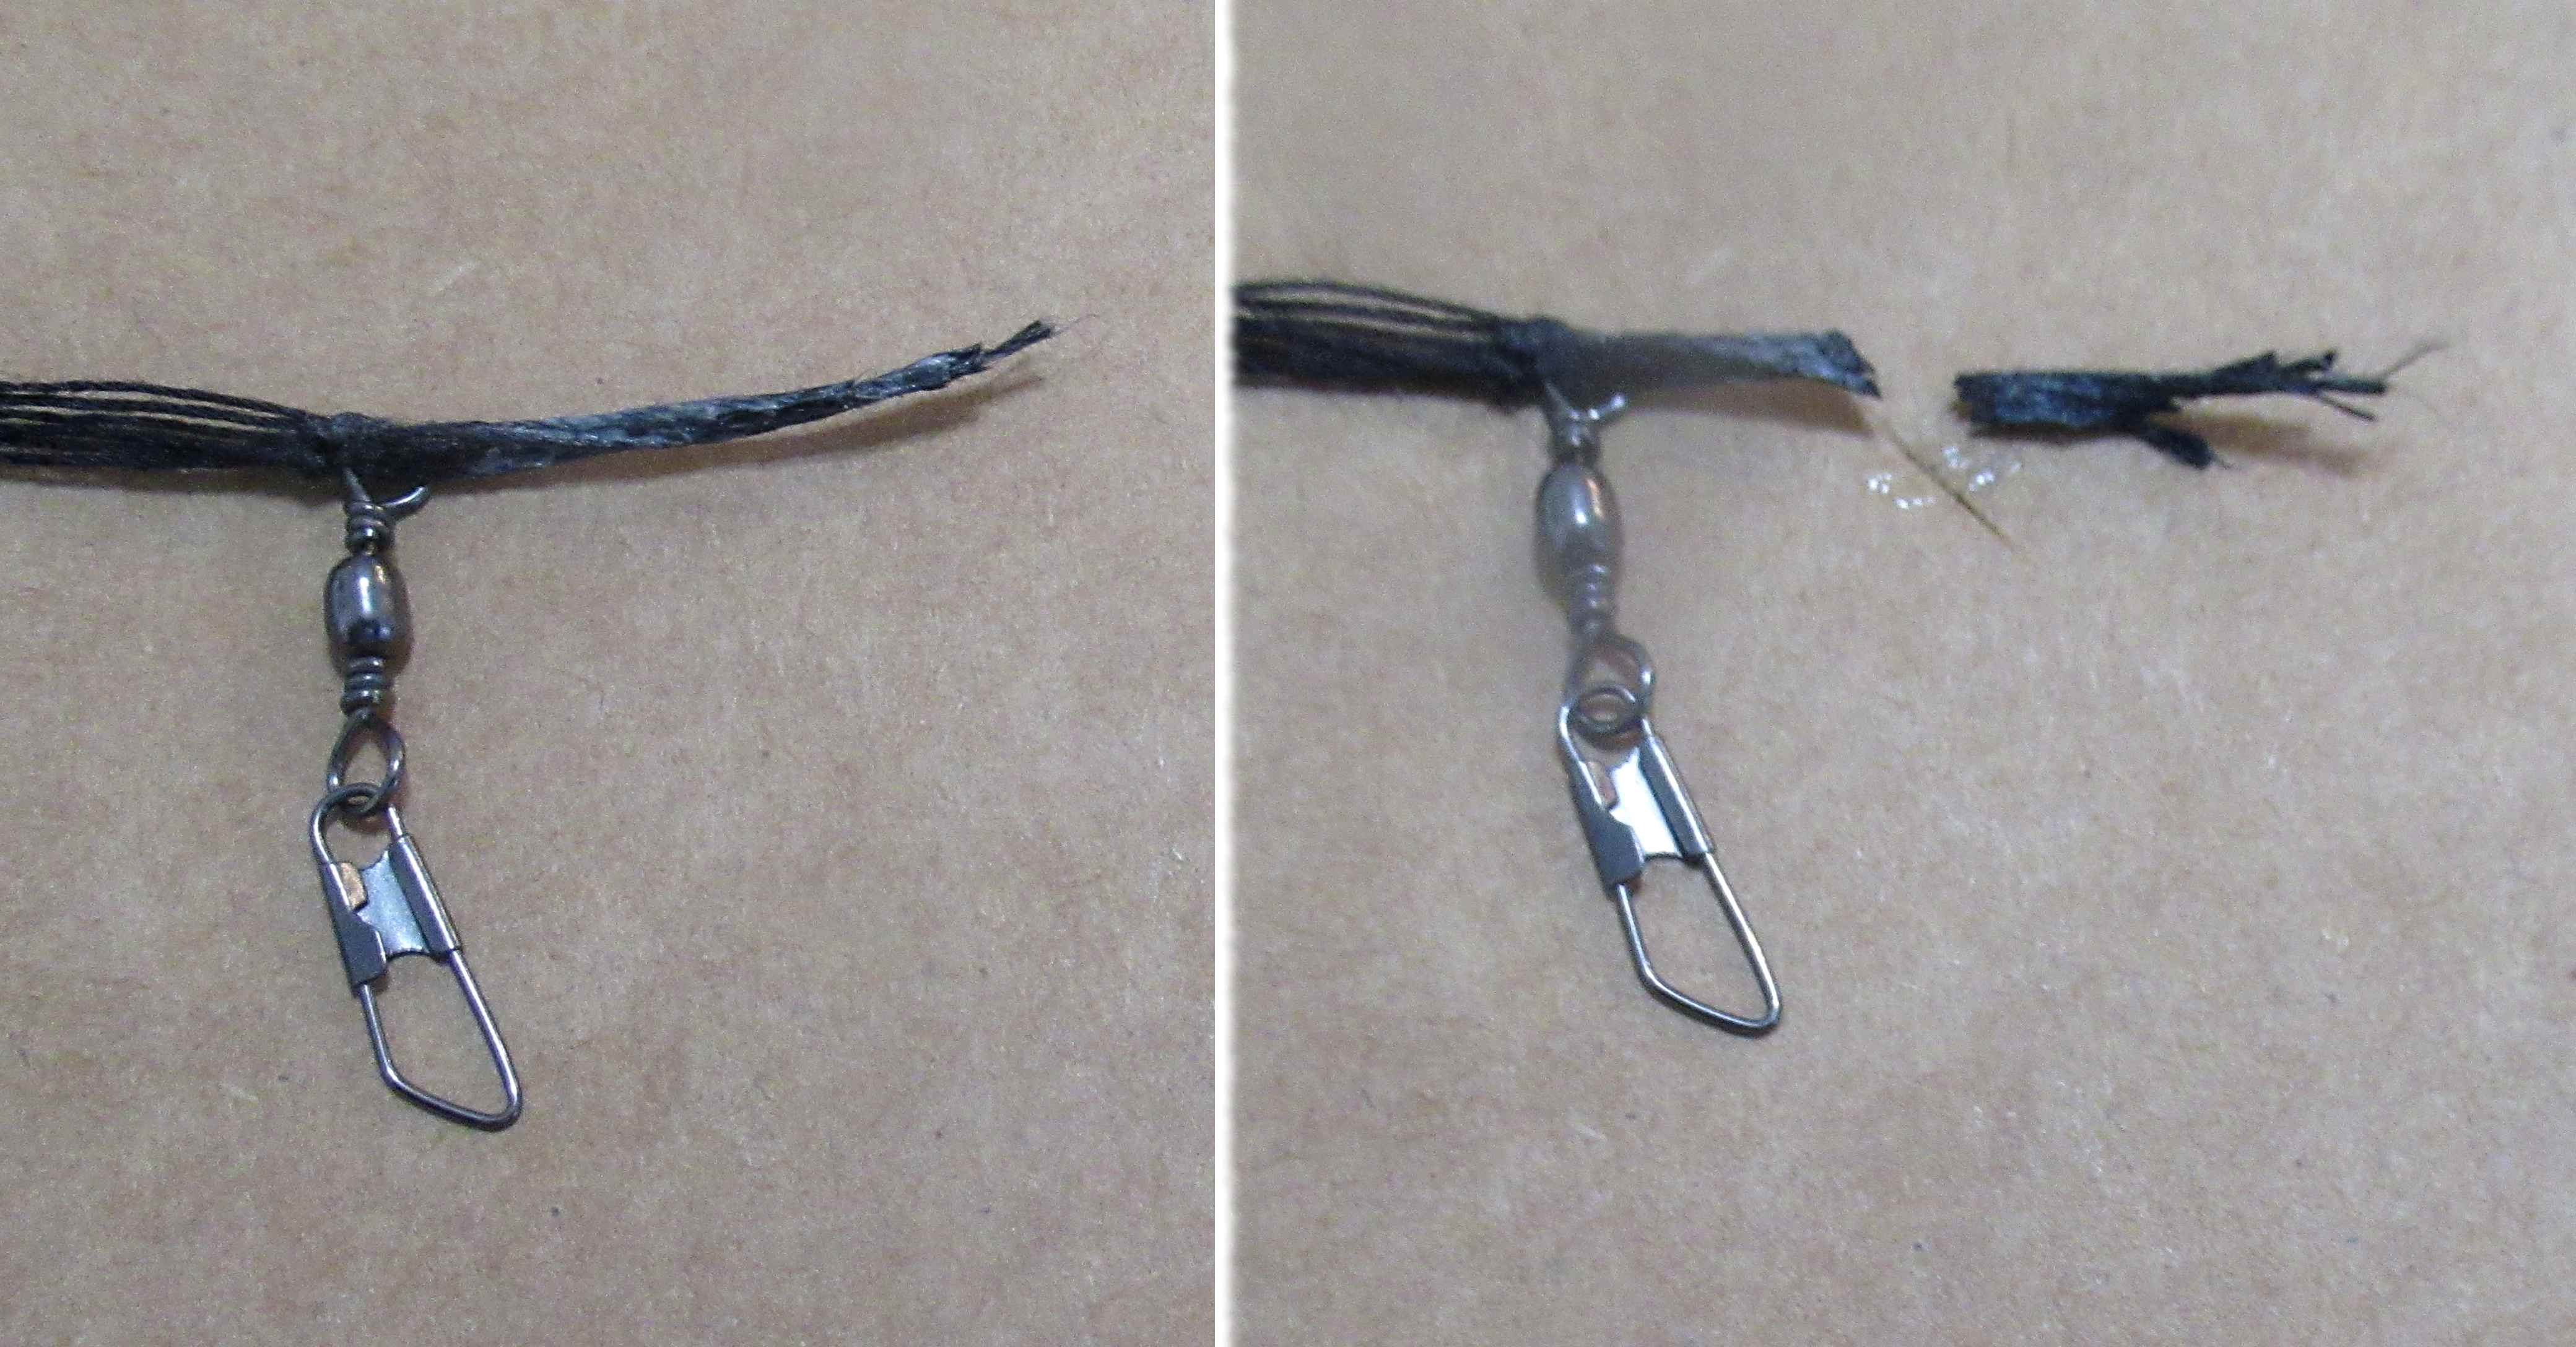
I'm always apprehensive about using pre-made parachute shroud lines.
These broke with a good tug!

I cut them off the chute and replaced them with #10 embroidery thread.


Plastic nose cones and adapters take longer to dry between paint coats.
I waited three days before spraying the yellow and the paint wrinkled!

Sand smooth, wait four days and spray again!


Here's the new Estes self-adhesive shock cord mount.

It's a simple knot, I left a loose tail for some extra insurance.
I'll be checking the adhesion of the mount after a few flights.
Older rocketeers might remember the problems with the Centuri self adhesive mounts - 


Initially claimed to be "permanent", they did loosen and pull loose over time. Later kits would include an addendum to the instructions reminding you to burnish the fastener between launches.

Granted - in 1971 we didn't have the 3M tape that is on the back of the new Estes shock cord mounts. Time will tell . . .  

Monday, October 27, 2025

I Wish Manufacturers Wouldn't Do This, Part 2 . . .


WEAK KIT SHROUD LINES!

They easily break when you give these strings a tug.

I often replace the kit supplied shroud lines with #10 cotton embroidery string. You can buy a large spool at a craft store. 
Try to break cotton embroidery string! Go ahead, I dare 'ya!

Thursday, October 16, 2025

New Way Blade Runner, Part 9, White Undercoats & Parachute Assembly


The main body was sprayed with gloss white.
A little more sanding will follow and then a final coat of white.


The 12" New Way parachutes are  interesting.
The reinforcing rings are jewelry ring price tags made from no-tear Tyvek.
The adhesive is only on the round ends allowing an easy tie of the shroud lines in the middle fold.
The shroud line holder is meant to be easily unfurled.
See the hole on the left side of the black spool?

Hold the "spool" with just your thumb and index fingertips over that hole. This allows the spool to rock back and forth as you pull the string free. No tangles!


Here's how the shroud lines tie into the reinforcements.

As always, I recommend tying the lines on using long tweezers.

Friday, May 2, 2025

New Way Letter - Go Build, Part 10, The Parachute


Gee, where have I seen this parachute design before?

I'd place the reinforcement disks towards the outside corner of the chute.
The printed placement disk outlines are pretty big.


A toothpick is supplied to punch holes in the plastic.

I like a cleaner assembly so I punch a round hole using the rotary punch.

Set some scrap cardstock under the chute plastic for a clean, round punch. 


The shroud line spool is pretty smart.

Hold the side (over the punched hole) with your thumb and index finger. 
As you pull the red shroud line with your right hand, the spool wobbles back and forth releasing the line. 
No tangles!

I actually enjoy assembling parachutes - 
Especially after I started using ling tweezers to tie the knots.

I use a simple square knot - not a "Granny".
Square knots will not come undone. If you don't know how to tie a square knot: CLICK HERE

Monday, January 27, 2025

Estes Black Star Voyager Build, Part 26, General Assemblies


In the shock cord mount instructions, note where the glue is placed. You fold the mount into a pool of glue.


TIP: You'll make a cleaner mount if you apply a thin coat of glue on the section to the right and fold onto the dry section on the left. It doesn't take much glue (a thin skin) when gluing paper to paper.


With the backside of the mount dry, press and form the still wet mount into the inside tube wall to form the curvature of the tube.


This kit was bagged in 2014 or so, when many kit shroud lines were weak. 
A quick, easy pull and the string breaks!


The shroud lines were cut off the parachute.

I used a plastic Avery reinforcement disks to strengthen the tie off points.

New #10 cotton embroidery thread was cut. 
It's easy to re-tie knots using long tweezers.

Saturday, September 14, 2024

Enerjet by Aerotech, Astrobee D Build, Part 33, Ends & Edges


The inside of the interior ring can be roughed up before epoxying to the engine mount tube.
I used one of my diamond files. 

On the right side is the interior ring slid onto the engine tube.


The main body is tied to the larger of the two parachutes.

The upper body gets the smaller chute.

You could do the "loop tie" like on LPR kits, but I tied the shroud lines to the elastic with some doubled Kevlar.

Saturday, May 4, 2024

Estes Condor #0807 Build, Part 8, Parachute Ties


Most instructions show scissors used to cut out the sheet parachutes. 
Use a straightedge and sharp blade to get clean, straight lines.


The shroud lines are old and have bends. 

Run an iron over the lines with the iron on a dry, cotton setting.


NEWBIES:
Try not to touch any stickers. The oils on your fingers could diminish the adhesive. Here I've lifted the reinforcement ring with my knife. Center and position with the sticker still on the blade.


TIP: 
To prevent a tear from starting, punch the hole up against the outside edge of the ring. Rotary punches work great but you've got to have cardstock behind the sheet when punching through the plastic.


Shroud lines can be hard to tie.
TIP: Use long tweezers to tie the knot. On shroud lines, I use a simple square knot.

Saturday, March 2, 2024

New Way Nike Ajax Build, Part 15, Parachute

A 18" diameter parachute is cut from the multi size parachute kit.

These suggested shroud line lengths seem long. Some simple math tell me they are 1 1/2 times the cute diameter. 
Years back there was a NARAM R&D presentation that showed a 1 1/2  length shroud line is the most efficient.  
I'm used to the Estes lengths. I settled for three 40" long shroud line loops.
 
This red shroud line is a fire resistant Nomex.

The "spool" is interesting. 
When you set your index and thumb tips over the hole, the black spool and pull the string and it will teeter tot back and forth to unwrap.
This is a big improvement over the Estes style of a long looped line that usually gets snagged when you try to open it up.


This chute kit had round reinforcement rings instead of the folded jewelry tags normally seen in the New Way kits.

Cut the chute to 18".
TIP: Apply a ring to both sides of the chute material. Both sides is a great way to go, especially if you use paper reinforcement rings.
Punch holes and tie on the shroud lines.
 

Thursday, January 4, 2024

Estes Great Goblin, #9724 Build, Part 19, Chute Ties & White Undercoats


One of the three rip stop nylon chutes was turned inside out. I flipped it around so it looked like the right side picture, with the white shroud lines on the inside.


I tied these up using my no tangle shroud lines. 
This technique allows the chute to fully open with no tangles when tied to the nose cone.

For a full explanation of No-Tangle Parachutes: CLICK HERE


I like to use painting wands. This motor mount required a larger dowel.
I had been hanging onto a broom handle for years. The diameter was around 1 1/8" and fits perfectly into the motor mount tube.


After spraying the white undercoat, the model was allowed to dry wedged into my patio chair.
It is difficult to get good paint coverage on a rocket this large. The body was not sprayed vertically. 
I'd recommend using a handle and spraying horizontally. After spraying, the model (still held horizontally) is slowly turned to prevent drips.

Wednesday, June 14, 2023

NewWay Angled Invader, Part 6, Parachute Assembly & CA On The Tube Edges

The New Way kits don't use the regular Avery style adhesive disks to reinforce the parachute tie points.

These are Tyvek, a reinforced paper you can't tear.
Stick one circle under the chute material, centering it under the pre-punched hole.
Soft fold over the other end and center the second circle on the lower circle. Press in place.
There is no adhesive on the inside middle of the fold. The fold stays open and allows a shroud line to be tied on.
  

Directions are supplied for tying on the shroud lines.
I went with my standard Square Knots for attaching the lines. 
This knot seems pretty complicated for a shroud line attachment.


Here you can see the sanded CWF filler in the inside seam of the outside tubes.

The tubes are strong and thick. I still used a wipe of medium CA to harden the edges and keep the fuzzies down after sanding.

Sunday, November 13, 2022

Estes Odyssey #7235 Build, Part 20, Fillets & Parachute


Here's the forward vanes.
Glue fillets have been applied and a "test" spraying of gloss white has been applied. 
The paint shows any rough fillets or other areas that may need some sanding before more paint is applied. 

I haven't sprayed the entire body yet, just this area around the forward vanes.


These glue fillets don't go down the entire length of the top engine tube. This leaves an open area for the tapered TTW fin root edge to slide in.


I hate testing the shroud lines with a sharp tug.
These broke very easily and should be replaced with something stronger.


The punched hole is ragged on some reinforcement ring locations.
I used my rotary punch to clean up the circle cut holes. 


New #10 embroidery thread was cut and tied on. 

I don't loop the line centers through the nose cone tie lug. The chute will be attached down the shock cord.

On the right is a "no tangle" shroud line tie.

Wednesday, October 19, 2022

Estes Parachute Shroud Line Concern?

Last year on YORF, Bernard Cawley had first launches with his new Green Eggs and Olympus models:
"For some reason I don't really know the Olympus stripped four of six shroud lines on the 18 inch 'chute and so broke a fin on landing. The fins in this particular kit were quite light/soft for an Estes kit."

My response:
If you still have the parachute -
Give the shroud lines a quick pull and see if they break. I've had a few Estes kit chutes with weak shroud lines.
When building an Estes kit, I (reluctantly) grab the line with two hands and give it a good tug. If they easily break, I replace them with #10 embroidery thread.

Monday, October 3, 2022

Estes Space Shuttle Columbia Build #1385, Part 22, More Decals & Chute


The canopy decal is difficult to set around the molded contours. The decals are old and really didn't want to adhere around some of the edges.


Initially, I didn't know how to place the Shuttle hatch door decal. I pulled out my old Dr. Zooch Shuttle for a angle reference.


After the canopy dried, I tried some Micro Sol to lessen the folds in the decal. It worked to an extent but there were still raised folds.
I ended up slicing the raised areas and brushed Future underneath before folding back down the edges. 


I mentioned earlier about some parachute ink sticking to the decals.
I didn't want to scrape the red ink off before transferring the decals. I wanted to keep the clear coat strong while placing the decals on the model.


After the decals were in place and had dried for a day, light scraping with a sharp blade removed the ink. Scrape lightly - you want to remove the red blotches, not the original print of the decal.

The 18" parachute seems large to me. I'll add a snap swivel and probably go with a 15" chute.

TIP: On the left I'm tying some no-tangle shroud lines. The center of the shroud lines get a small overhand loop knot. A separate piece of string goes through the loops and ties the three parachute lines together.
The entire process is shown: CLICK HERE

TIP: The parachute was joined to the shock cord a few inches away from the nose cone. This prevents the nose cone from swinging in and out of the shroud lines after ejection, preventing tangles.

Saturday, April 30, 2022

New Way Mars Snooper II, Build, Part 5, Parachute Assembly


The New Way kit shroud line tie/reinforcements are interesting. They are Tyvek and can't be torn. There is adhesive under the "dots" but not under the narrow folded bridge.
There are holes punched in the white chute plastic.
Center and press the round side directly over the punched hole.


Fold it over and stick the underside centered directly over the the hole.

The folded extension will hang over the edge of the white plastic a little bit. 


When I build a New Way kit, I always try to use the suggested knot. I find it hard to tie so I went with my usual Square Knot.


The shroud lines seemed very long, almost too long. 
I passed the ends through the small loop in the screw eye and tied them off. The excess was cut off.

Thursday, December 16, 2021

Estes Skylab #001973, Build, Part 5, Third Stage Adapter

NOTE: Save the centers from the centering ring for Step 5 of the instructions.
Notice the ring in the right picture. The ring is set inside the edge of the 1 3/8" long tube.
 
GOTCHA: The instructions say cut a 5" length of shroud line. In order to double and tie it easily - cut a length of at least 10".

I used #10 embroidery thread which is much stronger than the current shroud lines supplied in the kit.
Use tweezers to make the knot tie easier.

Here's the fit of the adapter of the in the top of the tube.
I did have to sand the adapter for a better slip fit.

The tube seams were first filled with CWF and sanded to surface.

The picture on the right is a fairly thick coat of Duplicolor Filler/Primer in the second step of the seam fill.

This shows the saved ring center glued in place.

I also treat the low adapter corners (at the top here) with some CA glue applied with a Q-Tip.
After that glue dries, round off the edges with some light sanding.
This makes it easier to slide in the upper section later on. 
If the adapter edge is smooth and rounded it won't wear or peel the inside layers in the lower body tube.