Showing posts with label C Draconian marauder. Show all posts

Wednesday, June 17, 2015

Centuri Draconian Marauder #5336 Build, Finished


It's finally done!
I'm not a big fan of this kit. All the thicker pieces of die-cut card stock had pressure bulges on the underside. It took CA glue and sanding to get every edge smooth and flat.

I don't think the average builder would have felt good about the finished model. Many later Centuri sport kits and the Fighter Fleet had "fibre" fins.
This model has four sheets of the die-cut card stock. The way they are glued together, it would be impossible to get spray paint coverage inside the wing, missile and tail ring surfaces.

It's interesting how Centuri took a television space fighter and converted it to a flying model. We'll see how well it flys.
EDIT: It flew once on June 6 at the monthly Orlando R.O.C.K. launch. Like many winged designs it wanted to fly like an airplane. After leaving the rod it went off at a 45 degree angle which led to a long recovery walk. Heavy and draggy.


Here's the Monogram plastic kit box art.
The plastic kit was molded in coral. The Centuri instructions said to paint it brown.

Enlarge the picture and you could see the layered overall details.
The Centuri kit is closer to a "profile" model, a nice break from the ordinary.

Tuesday, June 16, 2015

Centuri Draconian Marauder #5336 Build, Part 21, Missile Launchers

The missile launchers were fitted to the wings.
Some sanding was required to get the wing edges to contact the round body of the launchers.

The inset picture shows the glue lines.


The missile launchers were painted off the model.
I did some careful scraping down to the body tube for the glue contact lines.

Monday, June 15, 2015

Centuri Draconian Marauder #5336 Build, Part 20, Decals

The old decals with the MicroScale clear coat transferred easily.
TIP: Instead of using a wet brush or paper towel to work out bubbles, use a damp Q-tip to set the decal into place.
Work the air bubbles out by rolling from the center to the edges.

After the decals had set up for a day they got a coat of Future.
I used the Q-tips again. Dip the tip in the Future, wipe off the excess and lightly "roll" on an overcoat.

A canopy decal side is made up of two pieces.
The larger center "B" piece probably wouldn't easily fold over the ridge down the middle. I cut the decal in two.
Set the "B" sides down first.


After it dries set the "C" piece down as an overlay.
Do your best to "mirror" the two C pieces getting an even fit over the top and raised canopy.
After everything dries a new razor blade trimmed down the overhang.

Saturday, June 13, 2015

Centuri Draconian Marauder #5336 Build, Part 19, Paint & Decals

The rest of the body was shot with the Rusto Metallic Brown.
The first picture was taken indoors,
the inset picture was taken outside. I did this to show the reflective quality of the paint.
This model was spray painted in stages. There is so many nooks and crannies that would be impossible to get inside areas covered.
I would probably end up using more paint (trying to get it in every corner and between the wing panels) spraying a fully assembled  model.

This brown metallic isn't as shiny as the other Rusto metallics I've used. It dries like a semi-gloss. Decals adhere best to gloss finishes.

The subtle"pebbled" finish will need to be smoothed a bit where the decals will be placed. I used some very old 400 grit. It had been used and cleaned off a few times. It was probably closer to a 1000 grit by now, just enough to smooth the surface.
After the light wet sanding, polishing compound was used.


There are many small decals squeezed onto the decal sheet.

These kit decals go back to the late 1970s. They might transfer, but I can't take any chances.
TIP: To start and find out how a decal transfers, cut out one you probably wouldn't use or care about ruining.
Held up to a strong light, I could see the very small "Decal #36894" had a clear overcoat border.
It broke apart after soaking! Good thing I didn't start with the larger skull wing decal.


TIP: I rarely use MicroScale Decal Film, but it comes in handy and can save old kit decals.
A coat of the film was lightly brushed over the decal sheet.
It goes on looking fairly thick but after drying you can't see the overcoat.

Thursday, June 11, 2015

Centuri Draconian Marauder #5336 Build, Part 18, Cabin Sides and Canopy


It took some coaxing to get the cabin sides to line up and stay glued down.
Some fillets of Titebond M&TG will hopefully fill any gaps.


The canopy sides were lightly sanded to try to get the unit edges flat.
This helps for a better glue edge and fit against the cabin surface.


The canopy is glued along the front fold of the cabin piece.


The remaining two dowels go along the inside front landing gear cutout. The instructions say they are for additional strength.

Wednesday, June 10, 2015

Centuri Draconian Marauder #5336 Build, Part 17, Top Wing & Cabin


The third top layer of the wing is glued in place.


It took some final trimming to get the cabin sides to fit around the rudder and body tube.To get the

Even after careful trimming the fit wasn't great.


Careful scraping was done with a knife tip to get down to the body tube and bare card stock.


Here's the cabin glue lines.
The top and bottom got glue inside the edge.
The sides got glue right at the edge to act as an internal fillet.

Tuesday, June 9, 2015

Centuri Draconian Marauder #5336 Build, Part 16, Metallic Paint


The middle layer was glued onto the raised supports from the larger wing base.

This second layer had to get color but I didn't want any more paint than what was necessary. The lower wing was masked off.
The middle wing got the first light coat of metallic brown.
After some light sanding the surfaces got some light sanding.
TIP: One way to smoother, shinier finishes is light sanding between coats, especially over any rough areas.
Below the brush you can see some light, sanded spots. Those were small glue drops that were sanded down.
Before the second coat was sprayed, all the exposed surfaces were brushed off.


This is the third, upper fin layer pieces.
I took this picture outside to show how the sun reflects on this metallic paint. It really looks it's best outdoors under bright sunlight.
The engine mount assembly will be sprayed off the model and glued in afterwards.
There is just no way to get the spray paint into the tight areas between the rings. If it were glued in the body tube, too much paint would be needed to get coverage in the inside rings.
The back end of the model might end up with too much paint, and weight.

Sometimes, spraying assemblies separately gives you more control over where the paint ends up.

Monday, June 8, 2015

Centuri Draconian Marauder #5336 Build, Part 15, Inside Surface Spray


JeffyJeep built one of these on TRF. He used a brown marker to get color coverage on all the inside surfaces. A good idea, you'd never get spray paint evenly between the three wing layers.
I decided to spray the layers separately, scrape off the paint and glue it together.


After a dry fit of the first wing layer, pencil marks were made to show where the paint would have to be scraped.

Why not mask with thin strips before spraying?
The card stock glue areas were almost too thin.


Here's some of the glue contact scraped areas.

The middle layer has been glued on and feel very strong.

The third layer was set on the middle layer and trace with a pencil. Enlarge the picture and you'll see the light pencil lines.

I'll try to concentrate the brown spray inside the pencil areas.
Little considerations like this will keep the weight down.

Saturday, June 6, 2015

Centuri Draconian Marauder #5336 Build, Part 14, Inside Surface Spray

Looking at the earlier dry fit of the wing layers -
There is no way you'd get a good paint cover between the wings!

JeffyJeep did a great build of this kit on TRF.
He used a brown marker to get a light color coat between the layers.

The instructions say to paint it an overall brown. Brown on a rocket? How boring.
I did find a better brown for the model.
I had great results in the past with Rust-oleum Metallic paint in the past.
A metallic paint would work well on this one.

This is Rusto Metallic Vintage Copper, #248637.
It's not a full gloss paint, but looks more like a semi-gloss. I hope the water slide decals will be okay on the semi gloss surface.


I decided to lightly spray paint the interior surfaces before gluing it all together.
There will be some glue area sanding and scraping during final glue assembly.

Here the inside surfaces are facing up on a spray board.

Friday, June 5, 2015

Centuri Draconian Marauder #5336 Build, Part 13, Ends and Edges

Many of the edges of the thick card stock were rough and starting to de-laminate. The edges on the thickest card stock were the worst.
No amount of paint will cover up the rough edges.

I had to go back and add a bead of white glue to all the edges.
Light sanding with 400 grit followed.
The edges got a second coat of white glue and more smooth sanding.
This was a time consuming part of the build.

The launch lug is glued to the bottom "keel".
The lug also holds the front landing gear assembly for display.
The kit has a blow molded nose cone.
There is some flash in the shock cord tie slot.

Instead of cutting with a sharp knife, I simply made a rounded oval opening with a small rat tail file.
Using a knife you might cut through the sides of a thin lug slot.
Rounded edges might also be less wear on the elastic.

Thursday, June 4, 2015

Centuri Draconian Marauder #5336 Build, Part 12, Shock Cord Mount


The shock cord mount is a small piece of card stock, a variation of tying the shock cord to a body tube segment. It is glued 1 1/2" from the top edge of the tube.
The supplied card stock seemed too small.
I cut a larger rectangle from heavier card stock and did my best to bend it into a curve.
The piece of tape on the tweezers is 1 1/2" depth gauge. There is 1 1/2" from the top of the mount to the tape.
Glue was applied to the back and the mount set in the tube up to the tape piece.


Press the mount in place with your finger.
You can also use your finger to place some glue under the bottom edges of the mount.
Here, my ring finger is feeling for the bottom of the mount. Remember that position on your finger.


Apply a line of glue where you felt the bottom edge of the mount.
Slide your finger back in the tube without letting any glue touch the tube sides until you get to the bottom edge of the mount.
Roll the glue in place and remove the excess.

Wednesday, June 3, 2015

Centuri Draconian Marauder #5336 Build, Part 11, Wing and Rudder Gluing


The wings and rudder are glued on.


The "landing gear" are glued in place.
The inset picture shows how many of the edges are starting to open up!


The landing gear is glued in the wing slots.

The upper tab supports and gives a glue base for the next wing layer.

Here's a dry fit of the silhouette wing layers.
Inside and underneath the the visible layers are support tabs holding the second and third wing.
The bottom wing is very thick, the middle layer thin and upper layer thinner yet.

Tuesday, June 2, 2015

Centuri Draconian Marauder #5336 Build, Part 10, Canopies

The two canopies are made from thinner, embossed card stock.
There are small glue tabs on the inside.

The shape is strange and needs some attention.
Glue as lightly applied to the tabs and held down with long tweezers.


Before the glue sets up, I did my best to shape and close the open gaps.


You can see the open slot on the upper canopy.
To help close it up, small pieces of 20 lb. paper were cut to make longer tabs inside.


The paper tabs were glued inside with a glue stick.
These tabs won't close up the gaps but give you a "floor" underneath for the filler to sit on.

Monday, June 1, 2015

Centuri Draconian Marauder #5336 Build, Part 9, Missile Launchers Part B

The missile launcher nose cones are embossed with fold lines.
I used my engineers ruler/scale to form the folds all the way to the tip.
I found out later it might look better not to make the fold all the way to the small end. It fits the dowel better if it were simply rounded.
Long tweezers helped to close up the glue tab.
I couldn't see any other way to glue these up.


The interior tab doesn't go all the way to the tip. It'll take some molding to close it up after it is glued over the dowel end.

Dry fit the nose cone and mark the top with a pencil.
Apply a ring of glue on the dowel and a line of glue to the tops of the two heat sinks. slide the cone into place.

The other four heat sinks are glued down the length of the dowel.
Space the root edges evenly down the dowel. The front ends tuck into the folds of the tip piece.

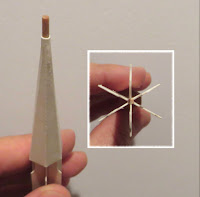
The inset picture shows how some of the heat sinks were miss-cut.
Dry fit all and trim the top angle if needed.

All the rear ends of the heat sinks were lined up even. The angled fronts are covered and didn't need to be even.

Here's a finished missile launcher.

You can see the top of the nose cone cap ends up rounded around the dowel, not creased down the fold lines.
I gave it a coat of CA glue and sanded any remaining folds smooth.

The inset shows the six heat sinks from the rear. They ended up pretty well spaced.