Showing posts with label E Bullpup. Show all posts

Thursday, December 11, 2014

Estes Bullpup #7000, Build Highlights Finished


The Bullpup has been built on the blog before, this time I touched on some different highlights.
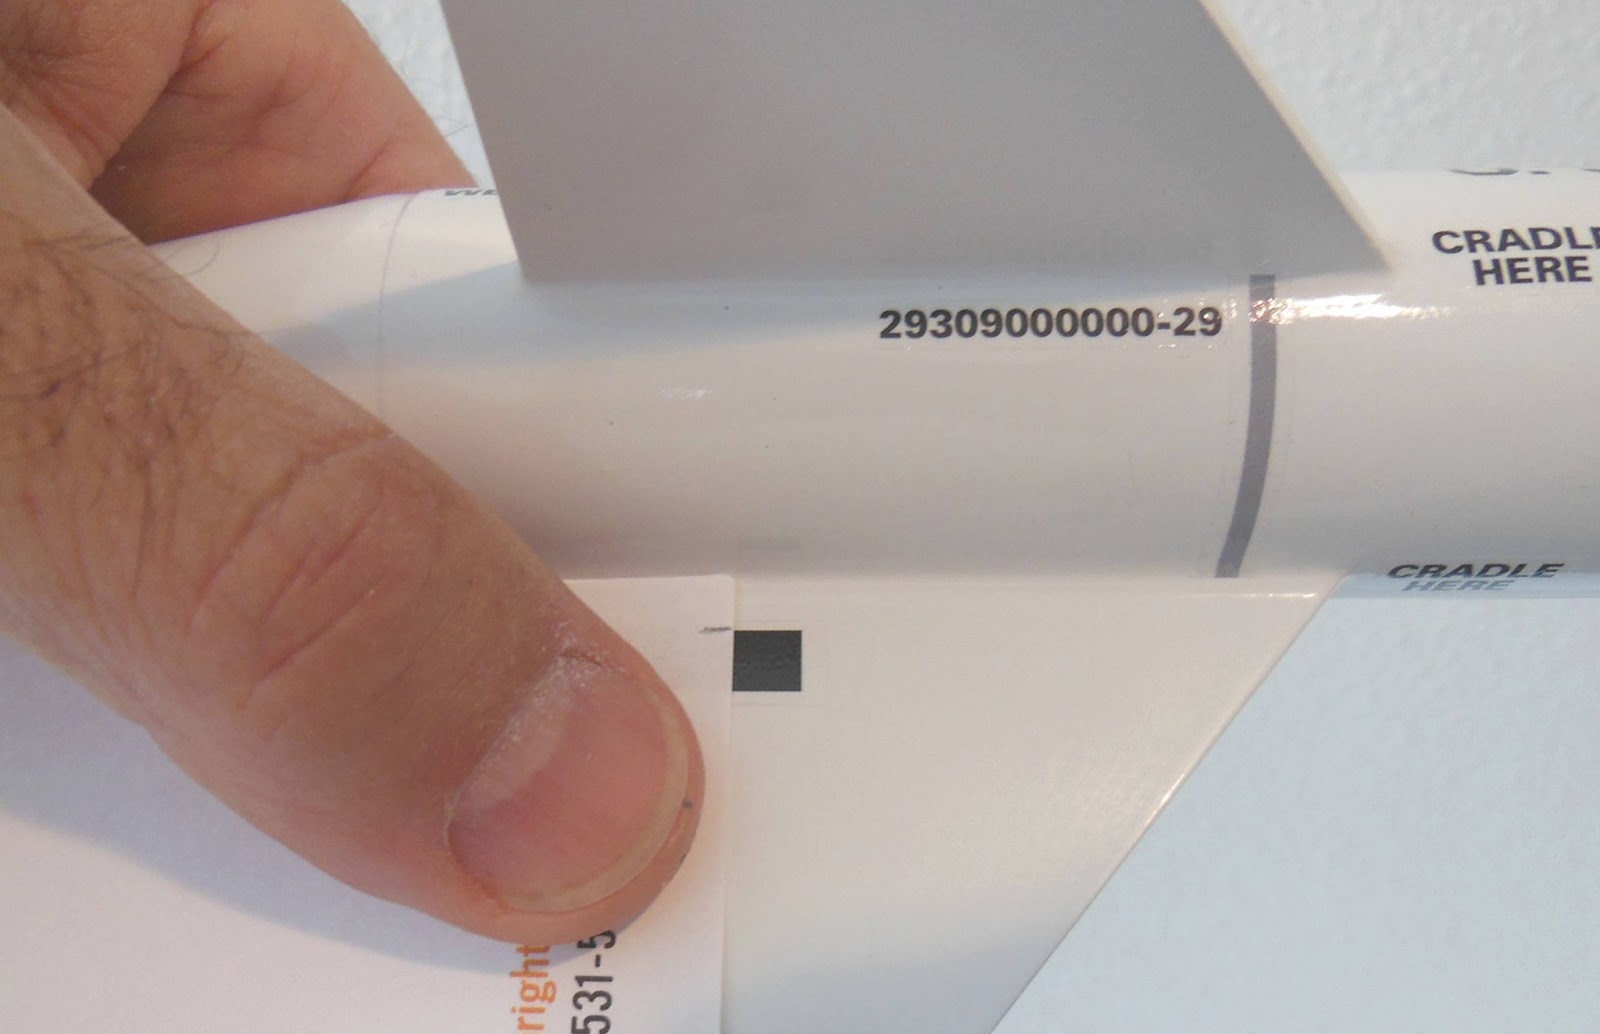
On the lower left you can see the placement of the black and orange circle decals, probably a fill valve.
I was very pleased to see Estes is including water slide decals with the Bullpup again.
Water slide decals certainly look better on scale-like rockets. There is a lot of decals to place and mine were thin.
This finished Bullpup will go up for sale on Ebay soon.

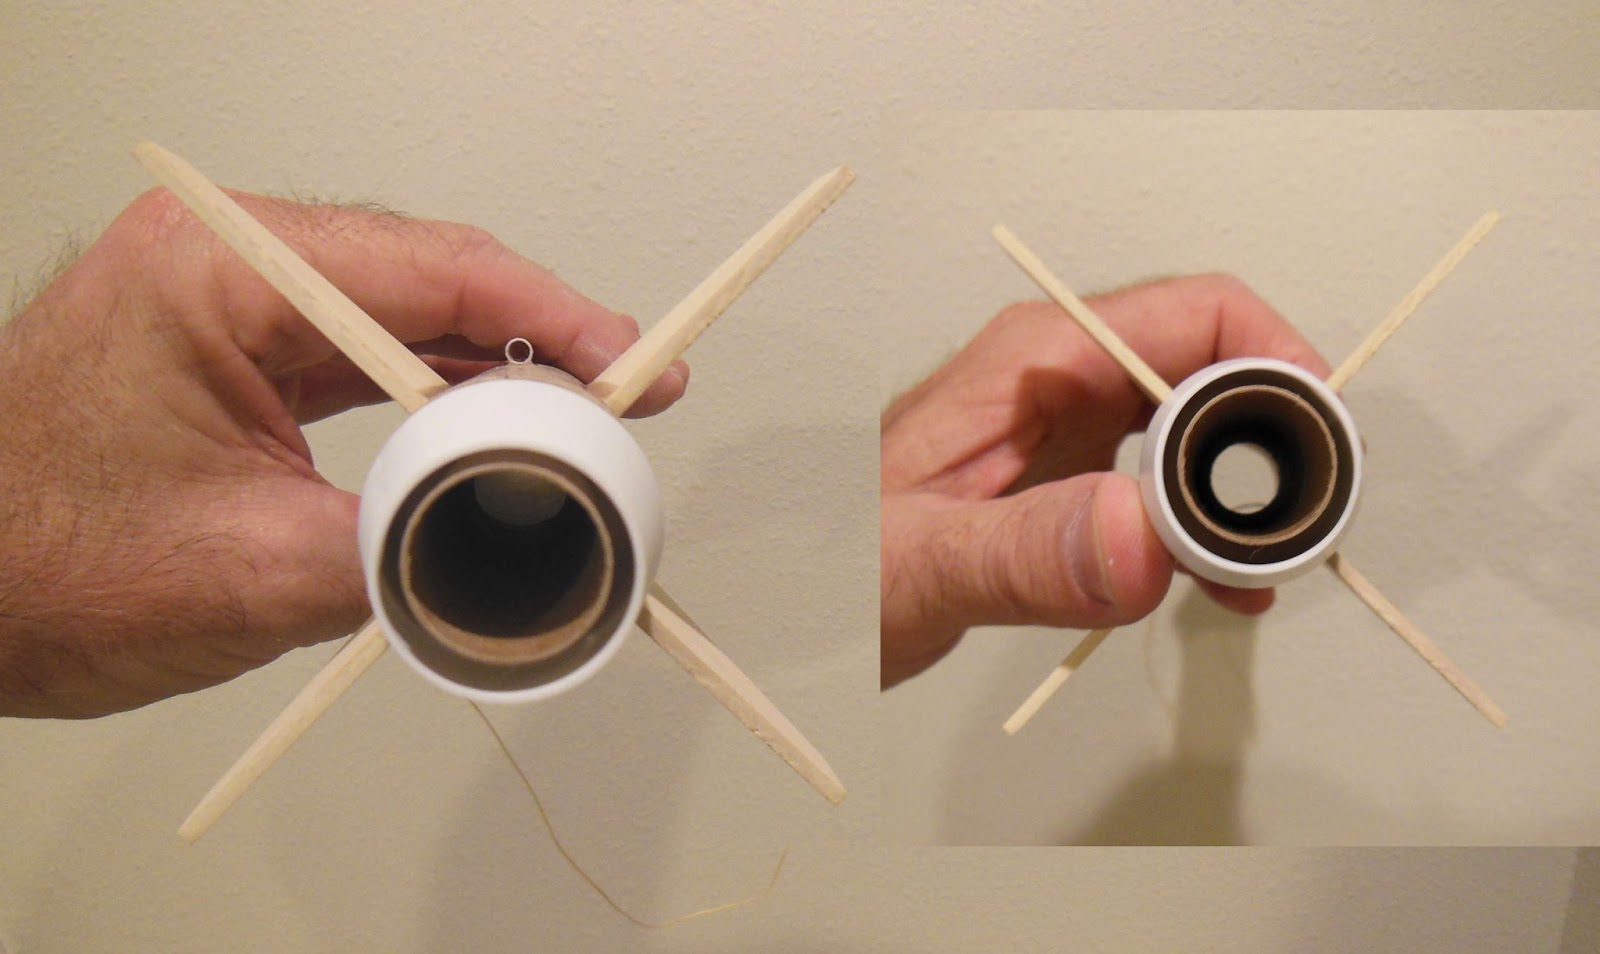
The Estes estimated weight is 1.8 oz.
My empty weight (no engines or wadding) is 2.15 oz. I tend to paint heavy and did add a few feet of shock cord and a snap swivel. I don't know if the Estes weight is from older releases before the second clay weight was added.
My C/G is 9 3/8" from the nose cone tip with parachute, wadding and a C6-5 engine in place.

Wednesday, December 10, 2014

Estes Bullpup #7000, Build Highlights Part 6, Decals

I couldn't see the launch lug on the face card picture. I have to wonder if Estes puts launch lugs on their catalog models.
The launch lug might be in the way of the horizontal gray bands.

You've also got to figure the position of the cradle marks, the orange squares on the silver bands. With the rocket hanging horizontally, these will go on the top.
The instruction picture shows the launch lug at the bottom.


The left side of the picture shows how the orange band was cut for wrapping around the base of the nose cone.
The bottom side was cut close so no clear border would be hanging over the shoulder lip.
The decal was set up just above the lip so it couldn't wear against the body tube end.


The black bands could be hard to line up accurately.
A template was cut out of card stock to check the position.

Looking from the rear, 
For now set just the bands on the right side of the four fins.

With the black band in place on the right side it's easy to lay down the left side decals.
Line up the rear even with the right side bands.

These decals were tough to line up, especially the gray body wraps. They were thin!

Tuesday, December 9, 2014

Estes Bullpup #7000, Build Highlights Part 5, Selective Masking

I didn't get great white coverage on the small forward fins on the Bullpup.
I didn't want to re-shoot the upper fins, the over spray would make a rough final gloss around the fins.
I decided to mask down the root edges and only shoot the fin surfaces. This isn't a different color, the white mask edges won't be noticeable in the root edges.


Scotch tape with marked sides went down the root edges.

The rest of the body was covered with masking tape, copy paper and a grocery bag.


After spraying the tape was pulled.
The model is white overall. Even with a new paint "ridge" you won't be able to see it set into the root edge.

I don't do spot masking very often. This just saves the weight of an additional overall color coat.

Monday, December 8, 2014

Estes Bullpup #7000, Build Highlights Part 4, Tube CCA & Primer/Filler


You can get a evenly spaced CA reinforcement line around the end of a body tube.
Apply with a Q-tip, use your middle finger around and on top of the tube edge for a depth guide.

Some forum posts have mentioned that CA glue could help prevent a zipper.
Kelvar is like a thin, steel cable. The CA'd tube ends might be a bit stronger, but a coat of super glue isn't going to stop Kevlar from cutting through a cardboard tube.


Primer / filler was sprayed on and sanded to surface.
On the left you can can see the "coke bottle" recess below the launch lug. That's the glue inside, right above the upper centering ring.
When the glue dries it can pull in the body tube.

Some of the gray primer was left in the tail cone mold line.
On the nose cone the few low spots remaining in the seams were filled in with the sanded primer.

Sunday, December 7, 2014

Estes Bullpup #7000, Build Highlights Part 3, Tail Cone


Dry fit the tail cone - no glue yet.
TIP: Turn the tail cone until you get an even spacing gap all the way between the engine mount tube and end of the tail cone.
When it's even, mark the tail cone and tube as shown in the inset picture.
Apply glue and turn the tail cone until the marks line up.


The instructions tell you to put plastic glue on the tail cone shoulder and slide it into the tube. This would push glue outside and onto the tail cone lip.
TIP: Put the glue inside the BT-55 as shown in the inset picture.
The printed fin marking guide was off. Lately, kit supplied marking guides don't quite meet up when wrapped around the body tube.

The picture on the left has the fin numbers marked 1 through 4.
After marking the fins in the first position, the marking guide was turned 90 degrees and checked. Another 90 degree turn and you can see the guide is off.
I'll make my own guide.

Saturday, December 6, 2014

Estes Bullpup #7000, Build Highlights Part 2, Nose Cone Eyelet & Engine Mount

The nose cone "lug" is small and weak.
As in the previous Bullpup build, the lug eyelet was cut off and a second hole drilled for the shock cord tie.

You put two puts of clay into the nose cone. The instructions show it being tamped in place with a pencil. the hole was too small for a pencil and had to be enlarged to get all the clay in.

One of the the two centering rings has a notch for an engine hook.
This is a friction fit model with no engine hook. The instructions don't show or mention the notched ring.

I put the notched ring at the top of the engine mount tube. The added Kevlar tie will go through the engine hook relief notch.


The hole was a bit large and I was concerned the Kevlar knot could pull through it at ejection.
I cut a wadge shaped reinforcement piece from the edges of the centering ring card.
A small hole was punched with the rotary punch.
The Kevlar was fed through the small hole and the wedge piece glued on the top of the upper ring.

Friday, December 5, 2014

Estes Bullpup #7000, Build Highlights Part 1, Fins, Decals & Shroud Lines


The Estes Bullpup has been built on the blog before.
I'm building two for sale on Ebay. I was surprised by some of the changes in the kit contents.

The fins are "pieced". You can see the second piece of wood at the rear of the fin.


I was glad to see water slide decals!
This is a newer issue of the kit, the stamped date on the decals is 3/21/13.


The pre-assembled 12" parachute has the weak shroud lines.
They broke with an easy pull.
These will have to be replaced.

Wednesday, May 29, 2013

Estes Bullpup Build Finished


A classic Estes kit, everybody has one in the build pile.
The model shown above is the rebuild of one of the first kits I built when getting back into the hobby.
I wanted to refinish with opaque white paint and water slide decals. "Real" decals certainly look better than the kit supplied stickers.
This one has squared fin edges, the new build is identical except has rounded leading edges.

Tuesday, May 28, 2013

Estes Bullpup Build Nose Cone Lug Fix

An Email from Orlando R.O.C.K. President J. Brian Coyle:

Knowing you, you've probably already finished and flown the Bullpup a few times... ;)
But today's post about the nose lug flash reminded me of a concern.  The Bullpup requires a bit of nose weight.  I don't like relying that tiny piece of plastic to avoid separations. (Especially true if folks don't replace the too short stock elastic).
It's better to drill a pair of holes into the base and make a Kevlar loop to attach the recovery harness.
Can't wait to see this one!  Especially your new decals.

Thanks Brian - good tip!


Taking the suggestion from Brian's email, here's how I fixed it.
On the left is that lug with the shock cord tied on.
On the right - 
I cut a slot into the nose cone shoulder. 
Only one hole is cut in the angled shoulder, the elastic is fed through the already open base hole. 
Start with a smaller hole drilled with a older X-Acto blade.
This hole was enlarged into the rounded slot using the small diamond files.
No sharp corners on this slot, I don't want the elastic to wear through.
Not shown, The old plastic loop was cut off. 

As Brian suggested, you could use Kevlar instead and make the loop.

Estes Bullpup Build Comparison - Old and New


Here's my old Bullpup, refinished with new home printed water slide decals.
The silver stripes (either side of the U.S. AIR FORCE) are more of a grey, no metallic shine at all.
The red stripes should be closer to a dark orange, but that's just how my home print decals turned out.


Above is the new build Bullpup using the water slide decals packed with the kit.
The silver decals have a shimmer to them. The rear fins have rounded leading edges and are slightly larger.

I was pretty happy with the font matches.
The "weight" of the fonts are close but not perfect.
The old build will be part of my active fleet.

The new unflown build will probably be sold on Ebay!

Monday, May 27, 2013

Estes Bullpup Build Part 10, Decals

Here's the address for the Jim Ball Scale Website:
http://www.rocketryonline.com/jimball/jimball/construction/pup/default.htm

This are the decals ones I redrew and printed installed on my old Bullpup build.
The "silver" bands on the home made decals were drawn a little long on purpose.
To help line these up, look over the leading edge.
These will be trimmed up (shown in picture three) after they are dried a bit and are better adhered.


A paper strip was wrapped around the tube to help line up the "Cradle Here" decals. All are at the same distance from the leading edge tip.

Now that the silver strips have set up they can be trimmed to the root edge joint. You'll need to let these dry and adhere better before trimming.

Use a new blade and lightly cut just the decal skin.
If done correctly you won't see the cut line.


Those eight black bars go to the trailing edges of the fins.
I used another paper strip with a pencil tick mark to be sure they were all the same distance from the root edge.


The forward stripe goes right above the nose cone shoulder joint.
After trimming off the clear edge with a razor blade the edge was a little rough.
TIP: I used a red Sharpie to run the red color under the shoulder lip. Now when the nose cone is in place no white or grey primer will show at the top off the body tube.
This doesn't always work, the permanent marker may not match the decal color. Black marker is always a good match. Other colors, not so much.

Sunday, May 26, 2013

Estes Bullpup Build Part 9, Decals Information


The Estes instructions say to use the face card picture for decal placement.
The problem is, it only shows one side. 
Viewing from the rear, we'll call this the right side - the nose cone facing to the right.

I did a web search for pictures and came across the Jim Ball scale site:
HERE
That link will take you to the Bullpup page. At the bottom you can visit the home page - lots of great information there.


Here's the "right" side off my re-finished Bullpup.
Decals are applied as the facecard shows.

If you were to apply the right side decals first with the nose cone to the right -
Set the model on a table top and rotate it 180 degrees so the nose cone is facing to the left.
The decals shown here are now on the opposite side.

This second picture is from the Jim Ball's site shows a (slightly elongated) Bullpup with the decal view from the "left" side.

If the real Bullpup were hanging under the wing of a fighter jet, you could read the warnings and U.S. AIR FORCE (right side up) from both sides of the missile.

Saturday, May 25, 2013

Estes Bullpup Build Part 8, Primer and Paint Sand


After lightly sanding down the gray primer you can see the primer left in the gain pores.

A light coat of gloss white followed.

Hold the surfaces under a bright light and you can see some rough spots.
Lightly sand these spots with 400 grit, dry.
Don't wet sand yet, the paint cover isn't thick enough. The water might get down into the tube and balsa.


This is the same fin after lightly sanding the first light coat of white.

When sanding between coats you just want to dull the surface. You won't need to sand off all the paint.

Estes Bullpup Build Part 7, Primer and Sand

There's one disadvantage to using the Titebond Molding and Trim Glue.
Enlarge the picture and look close at the leading edge tip and ends of the launch lugs.

Even if you try to clean up the ends when smoothing the fillets, the TM&TG leaves small glue blobs. The middle of the fillets are smooth, just the ends need sanding after the primer is applied.


There were some interesting molding ridges on the nose cone that you wouldn't see until the primer was sanded down.

Friday, May 24, 2013

Estes Bullpup Build Part 6, Engine Mount Glue and Alignment


The plastic tail cone is used to push the engine mount to the correct distance inside the body tube.
Continue pushing the plastic tail cone until the shoulder seats against the body tube and remove it.


From the top, I used a rounded end dowel to smooth out and remove excess glue from the fillet on the upper centering ring.


Before gluing the tail cone in place slide it in dry with no glue.
Rotate the tail cone until it it evenly centered around the engine mount tube. Left pic is before, inset pic is rotated and centered.
After finding the center, mark the tail cone and body tube with an pencil.
After applying glue, rotate the tail cone to the center mark.


Look at the instruction illustration at the top:
The instructions direct you to apply plastic cement to the shoulder of the tail cone. If you do this, you'll have glue squeeze out the back when you push the tail cone in the tube.

You'll be best off using a line of epoxy in the back of the body tube. This way the glue is pushed forward inside the tube.
Turn the tail cone to the center marks from the last step.

Thursday, May 23, 2013

Estes Bullpup Build Part 5, Fin Gluing

I'll be installing the engine mount in after the fins are on.
No real reason for this, I just glued the fins on first. With no engine hook on this model I won't have to center it between two fins or opposite the launch lug location.


There were no instructions so I made a fin marking guide out of a strip of paper wrapped, marked the overlap then folded into quarters.

After marking the fin positions with pencil, a straight strip of paper was taped around the rear of the tube, 3/4" from the end. The rear of the fins will be at the 3/4" top of the paper strip.

TIP: I could have simply pencil marked the body tube four times at 3/4" from the rear. I'll make one pencil mark at 3/4" then wrap the strip at that mark. The strip guarantees that all fins are exactly the same distance from the end of the tube.
After the first fin was tacked on, a strip was wrapped around the leading edge tip for alignment of the other three fins.


The same idea is used at the front for the smaller fins.

Estes Bullpup Build Part 4, Plastic Parts Prep


Most every blow-molded nose cone will have a seam.
This one was pretty clean and only needed the ridge sanded off with 400 grit. No filling was required.

The back end lug was closed.


Don't use a knife to remove the lug flash. It's too easy to cut through the lug.
Use a small rat tail file to keep the hole round.
Any rough edges could wear against the tied on shock cord.


I didn't need a razor file to remove the adapter ends.
A few turns with my knife was enough to take them off.
The knife easily stayed in the shoulder grooves while scoring the plastic.

Wrap some 400 grit around an engine casing and sand a more rounded end.