Showing posts with label Research. Show all posts

Monday, February 6, 2023

Centuri Quasar Clone Build, Kit #KC-7, Part 3, Nose Cone Length?

There is some online information about the kit. Tim Morley's upscale build on YORF helped me figure out things with a picture of the original kit nose cone.

I wasn't sure about the length using the online information on the nose cone. Was the 5.5" the total length of the nose cone including the shoulder or 5.5" the exposed length?
Tim posted a picture of the kit nose cone and his upscale cone next to it.

My clone body tube will be a BT-60 at 1.637" diameter. 
Tim's picture was dropped into Corel Draw and the tube end enlarged to the BT-60 diameter.
This stretched out the nose cone length to 5.65" a little longer than the 5.5" length listed at Jim Z's.

The only 60 size, 5.5" long nose cone I could find was the Rocketarium BT-60 HIPS Nose Cone. I didn't want to do any ordering on this build.
Or, maybe I can extend the length of a plastic nose cone I already have - 
The next post shows a technique I've never used before.
 

Tuesday, May 19, 2020

Centuri Vector V #KB-2 Build, Part 3, Those Viking Fins!


You could use the Viking fins, but it turned out they were a little short.
I'm building two different Vector Vs with different fin positions on each. One model will have the longest fin side glued to the lower BT-55 tube.
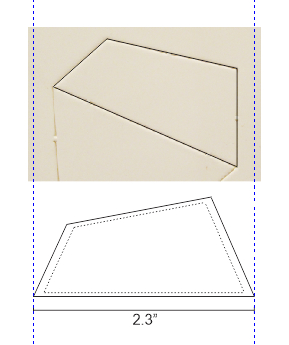
The BT-55 tube on the Vector V is 2.3" long, the Viking fin root length is closer to 2".

I drew up the fin tracing and enlarged it to the correct 2.3" root edge length. The interior dashed line is the Viking fin. I'll use this larger fin template on both builds.

I was curious if the Viking fin shapes were consistent. Older die-cut style fins weren't usually uniform, the blades in the die block could shift over time.

On the right is the back side of the fin sheet. the blades were probably old, they cut didn't go all the way through.


After some careful stacking -
You can see how off the cuts are. You could clean them up with a sanding block. I'll cut new fins using the slightly larger Vector V size.

Friday, May 15, 2020

Centuri Vector V Research, Part 2

The Centuri Vector V was 12.8" tall.
The upper ST-7 tubing above the card stock shroud is 6" long. The engine mount tube was 3" long. The BT-20 tubing is a little smaller in diameter but will work for this build.
The short wider section at the bottom was a ST-13 tube at 1.34" diameter and 2.3" long. An Estes BT-55 is close at 1.325" diameter.


The other question was the height of the Paper Reducer shroud -


Jim Z had a good scan, the Catalog number was PR-7-13. A look at the  1973 Centuri catalog showed it was 1.3" tall. I'll make up a shroud by going to payloadbay.com: CLICK HERE


Piecing it all together, the Viking plastic nose cone (2.85"long) tubes (BT-20s at 3" & 6" exposed) and shroud height (1.3") gave me a length of 12.6". The Centuri kit was 12.8" tall.
My build would have been .2" short, using the shorter Estes Viking nose cone. I'll simply extend the length of the upper BT-20 by .2" to get it to the original Centuri 12.8" length.

Thursday, May 14, 2020

Centuri Vector V Research, Part 1

I had picked up three Estes Viking kits on clearance a few years back. The Estes Viking used the same fin shape idea from the original Centuri Vector-V kit from 1972. Seeing the Viking fins inspired me to build a Vector V.

The groundbreaking thing about the Vector V - It used an interesting fin shape that presented four possible root edges. The Viking added the option of three, four or five fin placements.
To the left is an online picture of the OOP Semroc Vector V reissue kit.
This will be a "compromise" build of the Centuri Vector-V, using Estes fins, tubing and nose cone in place of the Centuri ST tubing.

With four possible different root edges these fins couldn't be cut from balsa considering the root edge / grain considerations. The fins were die-cut from heavy card stock, about double the standard centering ring thickness. Centuri called the "fiber" fins, I called them hard cardboard.
A few years later the variable fin shape was used again in the Centuri Cub Scouts Akela 1 design. The great thing - every Scout could identify his rocket by the number of fins (3, 4 or 5) and the root edge placements.

Bernard Cawley emailed me with a link to research he did on changes in the Vector V / Viking fin shapes: CLICK HERE It's an informative read about kit parts and how they evolve over the years.

Other parts were found by checking the original instructions at Jim Zs: CLICK HERE
The 1973 Centuri catalog page was at Ninfingers: CLICK HERE

Saturday, December 21, 2019

Centuri Argus #KB-9, Build, Background Research


The Centuri Argus was an A.T.R.F. (Almost Ready To Fly) model that used the molded one-piece plastic fin can from the Enerjet 1340 model. This fin unit was revolutionary. Strong and flexible with a launch lug molded between two of the four fins. The Argus was produced from 1973 - 1981.
The Centuri Phoenix Bird and later Estes kits used this fin can. Two that come to mind are the Maniac and Eliminator.
To see this Centuri catalog page, CLICK HERE


Jay Goemmer ("Centuri Guy" on the forums) has put together a great listing of Centuri kit parts. This includes nose cones and body tube lengths for almost all the Centuri line. To see the list: CLICK HERE
This gave me the correct sizes and lengths of the older Centuri ST tubing, nose cone and adapters for the Argus.


The above example shows just a small part of the 14 pages of Centuri kit information. A valuable source for clone builds. Thanks Jay!
Nose cones and body tubes were ordered from erockets.biz, currently the only source for Centuri diameter tubes.

Wednesday, September 18, 2019

Semroc (Centuri) Taurus Build, Part 12, Where'd That Tube Go?

All the balsa is filled, all the tube seams are filled.
Everything is painted and pretty much ready for assembly and decals. Well, almost . . .

I can't find the center ST-8 tube!
It was filled and painted white, ready for the tunnels and decals.
We've all misplaced launch lugs, but I've never lost a tube. I thought about putting in an order for a replacement, but you know what will happen. A day after the order is made, I'll find the original.

Another problem - I don't know what the tube length was. The kit height is 23.5" tall. I can measure the assemblies, subtract that total from 23.5" and I'll have the ST-8 tube length.


The Semroc instructions say the tube is a ST-857. Using Centuri lingo, that might mean it's a ST-8 tube, 5 3/4" long.

The Semroc Classic Kit parts list (CLICK HERE) says the length is 5.75" long.  Under the "Original Part No." listing it says: ST-8?


Then I went to a new Centuri list being compiled by Jay Goemmer. To see the Centuri kit parts list: CLICK HERE
This list also gave me a length of 5.75" long.


To get the model to 23.5" tall, on my model that ST-8 tube ended up at 6" long. Some Semroc reissued kits aren't always exact clones.
I was lucky enough to find an 8" length of ST-8 tubing. My OOP Odd'l Rockets Pipeline kit used ST-8 tubing, a lucky break. Keep your extra rocket parts - You never know!
The new piece of tubing was cut to size, seam filled, filler/primered and shot with gloss white.

The way it always goes - That original tube will show up in a day or so - 

Friday, September 14, 2018

Sandman's Rocket Naming Contest!

On YORF, Gordon (sandmandecals.com) posted that he is selling a lot of unopened kits.
He posted a picture of his clone builds using the PNC-50SP nose cone.

"Actually I heard, I may be wrong but the PNC 50SP cone was actually a Centuri cone but I have no confirmation on that. Below are pics of my clones...well, some of them. Can anybody identify all of the models I have in the pics???
Anyone who can identify all of the models shown gets a free kit with free shipping!!!"


I went to John Brohm's ESTES NOSE CONE / KIT LIST REFERENCE
To see it, CLICK HERE It's a great reference for anyone who builds clones.
I scrolled down to page 15 to the kits that used the PNC-50SP nose cones.
then it was off to Ninfinger's for an hour of catalog searches.

There were only two models I couldn't find. The red/orange rocket on the left turned out to be a scratch build. I recognized the stubby black, gray and orange model in the back row but couldn't remember where I've seen it.

Here's my guesses:
Back row against wall, left to right:
1861 Sky Tracer, 1946 Star Hawk, (Gray, black) Unknown, 1345 Dragon Ship 7, 1339 Patrol Cruise Excalibur
Front row, left to right:
(Red) Unknown, 1371 Starship Nova, 1364 Falcon Commander, 1909 USSF Fireflash, 1933 X-16, 1988 Argosy, 5348 Centuri Spacemaster


5X7 posted: "Along with those, the gray and black one is the rocket from Radar Men in the Moon (Commander Cody)"

5X7 and I both won a kit! Thanks Gordy! It might show up as a build on this blog.

Saturday, September 30, 2017

S.P.E.V.?

On a YORF post, John Boren on Estes gave some insight into how some kits are named:


"Unless it's a scale kit or a bring back that uses a special length tube just about every design I've done for Estes uses Excess Parts or standard 18" long tubes. The name of the rocket can even reflect this such as EPM, (Excess Parts Model) followed by a number that may be the year it cam out. STM ( Slotted Tube Model ). Many time we pick a working name for the model while its going through the design and manufacturing process to have something to reference. Some times this temporary name becomes the final name."
John Boren

Above, on the left is the STM-012 or "Slotted Tube Model - 2012.
On the right, the EPM-10. Many thought that might be a SPEV, there were plenty of plastic 5 sized nose cones in that kit.


And this one - The JBR-013. Maybe not a SPEV, the naming was interesting.
On a forum we found out the JBR stood for John Boren Rocket. The"13" could be the year is came out or the body tube diameter of a BT-55.

Sunday, September 24, 2017

Estes Nova Scout Ship Build #1392, Background


For a client I put together the new, reissued Estes Starship Nova. He also asked about a build of the "sister" ship, the Nova Scout Ship. Both models used the drop down nose cone.

I found the Nova Scout Ship instructions at oldrocketsplans.com
http://www.oldrocketplans.com/estes/est1392/1392_Scout_Ship_Nova.pdf

To find the body tube sizes for this model and all the rest - 
http://www.aeromoe.com/Estes_Body_Tube_List.pdf

Here's the body tube sizes I'll need - 
1392 Nova Scout Ship 030372
BT-50W 9.50"     030324 BT-20G 3.50"     030326 BT-20J 2.75"

Friday, May 6, 2016

Thrustline Arapahoe C, Part 3, Fin Pattern Printing


To get a print of the re-sized fin patterns,
Go to FILE,
Click on PRINT / EXPORT PDF


This window is brought up.
Click on ARAPAHOE, to clear all the boxes,
Then click on FIN TEMPLATES.


These patterns should show up.
This main fin is from Page 3.
Pages 1 and 2 show the long gussets as two pieces.


From that print out, I drew up a fin pattern sheet. I'll print it out on card stock.
The name font is close to the original. The downloaded font took some editing to get it close.

I made a mistake here -
I took the fin pattern from the Open Rocket file. You can't draw fin root edges that curve around a tail cone. I went back and added the root edge curve to my Corel art.

Thursday, May 5, 2016

Thrustline Arapahoe C, Part 2, Background and Sizing


Go to the right under EDIT, go down to SCALE.


At the SCALE FROM line,
change the 1.637" (BT-60 dia.) to 1.325" (BT-55 dia.)
Hit the SCALE button.


Here's the model in BT-55 size, Open Rocket does the work for you.
The model looks bigger in the window, I just adjusted the percentage in the View Type lower window.

Wednesday, May 4, 2016

Thrustline Arapahoe C, Part 1, Background and Sizing

I've always liked the OOP Thrustline Arapahoe E design.
This picture is from Rocket Reviews: CLICK HERE
John McClure did the build and review.

The original kit was made for D and E engines. The main body tube was a BT-60.


I picked up a few Estes Monarch kits in the recent clearance sales.
I'm not too hot on the Monarch design, it reminds me of a three fin Big Bertha or the Quest Big Betty in a BT-55 body.
This was one of those kits where the face card advertises: "Water Slide Decals!" The only decal included is the MONARCH name in a smaller size than shown on the face card. Masking and placement of all those silver pinstripes wouldn't be easy.

I bought the kits for parts or a possible kitbash. A down scaled Arapahoe C might put the Monarch parts to better use. This will end up with a BT-55 body tube and 18mm power.

I downloaded the original (BT-60)RockSim file:
http://www.rocketreviews.com/unknown-arapahoe-e.html
and loaded it into Open Rocket:


Some changes were made and component materials fixed. When you use online RockSim files you do have to double check the parts. This file was missing a launch lug, among other slight things.
Continued in Part 2 . . .

Sunday, February 22, 2015

Centuri Payloader II, Background Part 2

In doing a little search before the build I came across the old Centuri Instructions: CLICK HERE
The Centuri fins are a different two piece glue joint, it's longer down the root edge side. The Estes re-issue kit has a smaller triangle glued onto the upper leading edge.

TRIVIA: Many of the Centuri kits released before 1971 suggested to fill the balsa grain before gluing the fins onto the body tube.
This instruction sheet is dated from 1969.
Maybe that's when I started doing it this way. 
When filling the grain after assembly, I was never happy with the way the balsa looked around the root edge / fillet area.

More stuff to think about:
Some forum posts comment that the water based CWF warps balsa fins. The warp usually goes away when the other side of the fins is treated.
When filled off the model, fins treated with Sanding Sealer also warped! Dope based paints shrink and continue to shrink even after you think the sealer is dry.


In later instructions you are told to mask and paint over the clear payload section.
Many builders will paint the balsa shoulder underneath the ends of the clear tube. It makes more sense (and a better fit) to paint over the clear tube. I've always done it this way.

More TRIVIA: The 1971 catalog CLICK HERE says the Payloader II will reach 2,000 feet with a C6-5 engine.
The 1976 catalog CLICK HERE downgrades the performance stating: "Streaking as high as 1,000 feet!"

Saturday, February 21, 2015

Centuri Payloader II, Background Part 1


I just purchased two Estes (Centuri) PAYLOADER II kits from Ebay.
I had always like this design since first seeing it in the Centuri Catalogs.
These models were not in the most recent Estes clearance sale and are out of stock from some vendors.
The EBAY buy it now price of $9.99 each was a good incentive considering the Estes retail price is $21.79!

The first Payloader was introduced in 1964 and was 15" tall.
It was a ST-7 based diameter model with three fins.

In 1966 the newly designed Centuri Payloader II is now 18.5" tall. The Estes re-issue is 17.0" tall.
The Centuri kit used a ST-10 tube. (1.04" dia.) The Estes kit includes the thinner walled BT-50 tube (.976" dia.)
If this were a true (slight) downscale, the BT-50 sized Payloader II should have been 17.45" tall. But it's close enough. The balsa nose cone in the Estes kit looks to be shorter, like an Alpha BNC-50K style. I have a longer BMS replacement.
My version will be a close to catalog build and including the Centuri logo and PAYLOADER II decal, plus the vertical black stripes between the fins as shown in the Centuri instructions. Estes includes the stripes but doesn't mention where they should go.
The thin walled BT-50 will probably be replaced with a thick walled BT-50.

Tuesday, January 27, 2015

TLP Pershing #K046 Build, Part 21, Face Card Photo


The three shroud seams take extra time to fill.
On the face card you can see a shadow in the middle area, probably the tab of shroud #2.
The instructions show where decals and trim will go.
The face card shows a bold Press Roman serif style. The instructions show an Ariel or Universe style, san serif.

I know there were different color treatments in the Pershing rounds. I'll have to do some searches to see which style font is correct.
EDIT: After some searches and found some paint schemes I haven't seen before. But, there isn't much about the correct "U. S. ARMY" font. I don't have this one in my Alway book, as this is a missile.
Does anybody know the correct font information?

Sunday, January 18, 2015

Estes Kit and Catalog Trends

On his blog, Rich's Rockets - 
Rich Holmes did research into Estes kit and catalog trends.
Graphs show skill level changes and kit production over the years.
In this graph you can see the upswing of Skill level 1 kits (light blue) and the decline of Skill Level 5 offerings (purple at bottom).


It shows a big decline in kit production from about 1998 to 2007. During that time the catalogs were rather thin.
It's interesting and worth a visit to his blog. Thanks for all the hard work, Rich!
Check it all out - CLICK HERE

Tuesday, September 30, 2014

Estes Teros #1285 Upscale Background

The Estes TEROS started as a Coldpower Convertible rocket in 1972 - 1973.
The Coldpower Convertible line used a smaller Vashon style engine that fit into a BT-50 tube.
The ejection was an interesting spring release.

NUMBER: KL-5 or #1105
Introduced: 1972
Final Year: 1973
Designer: Mark Kellner
Type: Pseudo-Scale
Motor Mount: Coldpower
Recovery: Parachute
Length: 13"
Diameter: 0.976"
Weight: 2.01 oz (With Engine)


It was re-released as a 18mm black powder model in 1977


NUMBER: #1285
Reintroduced: 1977
Final Year: 1982
Designer: 
Mark Kellner
Type: Pseudo-Scale
Motor Mount: 1x18mm
Recovery: Parachute
Length: 13"
Diameter: 0.976"
Weight: 1.2 oz


The other models to use the "Ram-Jet"  BNC-50BC nose cone were: #0816 Wolverine and the #1311 Laser Torpedo

Coming up:
I'll be making an upscale of the Teros using the Dollar Tree store champagne flute nose cone with the Quest 50mm tubing.
The outside diameter of the the original BT-50 tubing is .976, the 50mm tubing is 1.97".
This will end up being slightly larger than a 2X upscale.

Saturday, September 13, 2014

Estes Black Brant III, Part 2, Fin Drawing

I found the instructions and fins at Old Rocket Plans HERE


Buzz McDermott submitted the plans and placed a ruler reference below the fins.
TIP: If you ever submit plans to a website, place a ruler in the picture for size reference.

The fin picture was copied and dropped into Corel Draw.
I drew a 1" square box and matched the ruler in the picture to the 1" span.
A fin outline was traced. 
To be sure I was tracing the fin outline and not just a shadow, the original tracing was set on the two other fins. Small adjustments were made, the final fin drawing is on the right.


I had assumed the kit fins were 3/32" thick but JeffyJeep went with 1/16" thick basswood.
Page 344 of Peter Alway's Rockets Of The World shows the Black Brant fins being thin so the 1/16" thickness was probably included in the Estes kit.
As shown in the upper right, the fins will get the scale taper so basswood will be used instead of balsa for strength.

Friday, September 12, 2014

Estes Black Brant III, Part 1 Parts Research

I've always liked the looks of the Canadian Black Brant series.
This one was an Estes kit #1293, now OOP.

The Estes Crossfire ISX uses the same nose cone and tail cone nozzle as the Black Brant III kit.
I bought two Crossfire kits. The engine mount, nose cone / tail cone section and parachute will be used.

This kitbash is inspired by a build by JeffyJeep on YORF: HERE
The kit instructions are at oldrocketplans.com: HERE

Normally you could find the sizes of Estes body tubes at: 
Estes Custom Parts Catalog from 1974 HERE
The BT-50N tube is not listed!

JeffyJeep gave all the information I needed in his first post:
"I've collected all of the parts needed to do the build (except for the decals that should get here this week from Sandman) and I've blade cut three fin blanks from my best sheet of 1/16" Midwest basswood. 
Main BT is BT50 x 14" long. Launch lug is an LL-2B, .125" x 2.375". 
The Crossfire's engine mount tube, thrust ring, and AR-2050's are the same as what the original BBIII kit contained. I'll use an original-type "non-snelled" engine hook for the build, but I'll modernize the guts with a Kevlar shock cord leader and an extra long, elastic fabric shock cord."
Thanks Jeff! You've saved me some legwork.

Thursday, July 24, 2014

Aleene's Tacky Glue Online Chat

Trying to find information about a better white glue, I did an email chat with a representative from Aleene's Tacky Glue:


You are now chatting with 'Rebecca'
You: Hi Rebecca!
You: My name is Chris
Rebecca: Hello, how may I help you?

You: I was using Elmer's white glue on my model rockets. They came out with a new formula and an engine mount can "freeze" up in the wrong positions.
You: Do you make a glue that is similar to the older Elmer's formula? Something that allows a slide of parts before it can possibly lock up?
Rebecca: Unfortunately, I am not sure of the formula for Elmer's, (since they are our competitor)- our Original Tacky Glue is a great craft glue that will allow some re-positioning prior to setting. This glue takes about 30 minutes to set.

You: Elmer's changed to a "New Stronger Formula" that seems watered down. Many model rocket modelers have problems with it, especially with engine mounts and couplers (joining tubes together with a "sleeve")
You: Do you have a formula that is "slippery"?
Rebecca: Generally all of our glues are "tacky"- so they are not that slippery
You: Okay, thanks for your time. It's just a pain to mix up epoxy!

Well, that got me nowhere!
I don't think Rebecca realizes what engine mount or couplers are. She probably gives out advice on how to glue on glitter.

My next glue questions will go to Elmer's!