Showing posts with label Ranger. Show all posts

Monday, September 14, 2015

Not Your Father's Estes Ranger - Model Profile


This isn't the Estes Ranger I remember -
Lonnie Buchanon showed me this one, he picked it up in one of his Craig's List lot buys.
This was kit # 1955, a BT-55 based D engine model. I don't recognize the nose cone shape from any other model.

From the Estes 1986 catalog:
"Big and powerful, with two color decal and huge 18" recovery 'chute, Ranger achieves 1200 altitudes easily.
Length; 22.125", Diam. 1 325", Weight 1.6 oz."


That updated, simplified Ranger didn't have a long run, only available from 1986 - 1989.

Here's the original 3 engine cluster Ranger, #K6 made from 1962 - 1972.
There, that's better!

Friday, August 1, 2014

Ranger Picked for Seattle Museum Of Flight


Jeff Taylor sent me a message at TRF about my submitted Ranger at NARAM . . . 
It was picked for display at the Seattle Museum of Flight Model Rocket Display!
Jeff's Steam Punked ACME Spitfire (featured on this blog) will also be there! 

Thursday, July 4, 2013

Semroc Ranger On SALE on EBAY


The same Estes/Semroc
RANGER
built on this blog
is up for sale on EBAY!

Check out the listing HERE

This is a one week listing - 
Buy a rocket - support the blog!


Saturday, October 13, 2012

New Ranger Nose Cone

Carl McLawhorn posted about the balsa nose cone included in the Semroc Ranger kit.
The original nose cone was taller and more narrow at the top.
The Semroc Ranger kit includes the (correct) BNC-60LV nose cone shown at the right.

My Ranger has the plastic nose cone included in the current Big Bertha and Baby Bertha kits from Estes.

You can see the difference when they are held side by side!
My Ranger clone will soon have the (historically correct) nose cone.
Rocket nerds care about the finer points of the hobby!

Saturday, April 21, 2012

Ranger Clone Finished


The two 12" parachutes have been assembled and have snap swivels added.
One parachute was tied to the shock cord on the lower half.
The other joined to the screw eye on the nose block.

Remember:
With the single plate baffle, you will need flameproof wadding to protect the parachutes.
The nose cone might need screws or a wrap of tape (on the outside) to keep it together at ejection.

Friday, April 20, 2012

Ranger Clone Build Part 29 Engine Mount Gluing

I wanted to center the engine mount between the fins. One motor tube would be centered, the others would fall evenly between the other fins.

Look closely at the base of the yellow fin.
The engine mount was slid in place - no glue yet.
A small pencil mark was made at the center of the fin. Another reference tick mark was made at the middle of one motor tube.

The engine mount was removed.
A ring of glue was applied inside the tube just below where the upper plywood ring would end up.
The engine mount was slid in place.

TIP: About 1/4" out (before the engine mount tubes were even with the BT-60 mainframe) the motor mount was twisted until the tick marks lined up.
By twisting the mount (at the last moment) that inside bead of glue is evened out into a smoother fillet.

Inserting the mount and twisting into position does take some planning.
Don't use too much glue inside the tube. Use enough to allow the mount to be slid into position. White glue shrinks and a large bead of glue might "pucker" a ring around the body tube where the glue was inside.

Check to see the tubes are even. The back side of a ruler was pressed on both ends to be sure.


Some more white glue was added at the rear joints.

Thursday, April 19, 2012

Ranger Clone Build Part 28 Baffle Plate Install

I may have mentioned a few posts back:
This is a single "baffle" plate. It doesn't protect the parachutes from the ejection charge.
It's there to prevent the parachutes (and wadding) from traveling back to the rear of the model during acceleration. The single plate also gives you a place to attach the shock cord.

The Semroc Ranger instructions have you glue the plate 4" from the top of the model.
I decided to go a little deeper at 4 1/2" from the top of the tube.
I felt a little more room was needed for the wadding, parachutes and nose block.

I've laced the loose end of the shock cord back into one of the holes and out the back below the coupler. This will keep it out of the way when gluing in the plate assembly.


I didn't use any glue yet. The coupler fit was tighter than I would have liked.
It was pushed into place using a ruler. This way I knew it was at the 4 1/2" depth I wanted.

After it was in place, a fillet was applied drop by drop using the rounded end of a 1/4" diameter dowel.


After the fillet dried, the shock cord was pulled forward using the end of a bent coat hanger wire.

Wednesday, April 18, 2012

Ranger Clone Build Part 27 Single Baffle Plate


Cut a slot for the 1/4" wide shock cord attachment.

Apply a glue coat to both sides of the disk and let dry.
The glue coat helps protect the card stock from the ejection charges.


Center and glue the disk to the coupler and let dry.
If you cut the disk out on the pencil line it should be slightly larger than the coupler. Sand the disk until the edges are even with the sides of the coupler.

Test fit the coupler in a scrap piece of BT-60 and sand until you get a slip fit.
Fillet the inside joint of the disk and coupler.

Tuesday, April 17, 2012

Ranger Clone Build Part 26 Single Baffle Plate

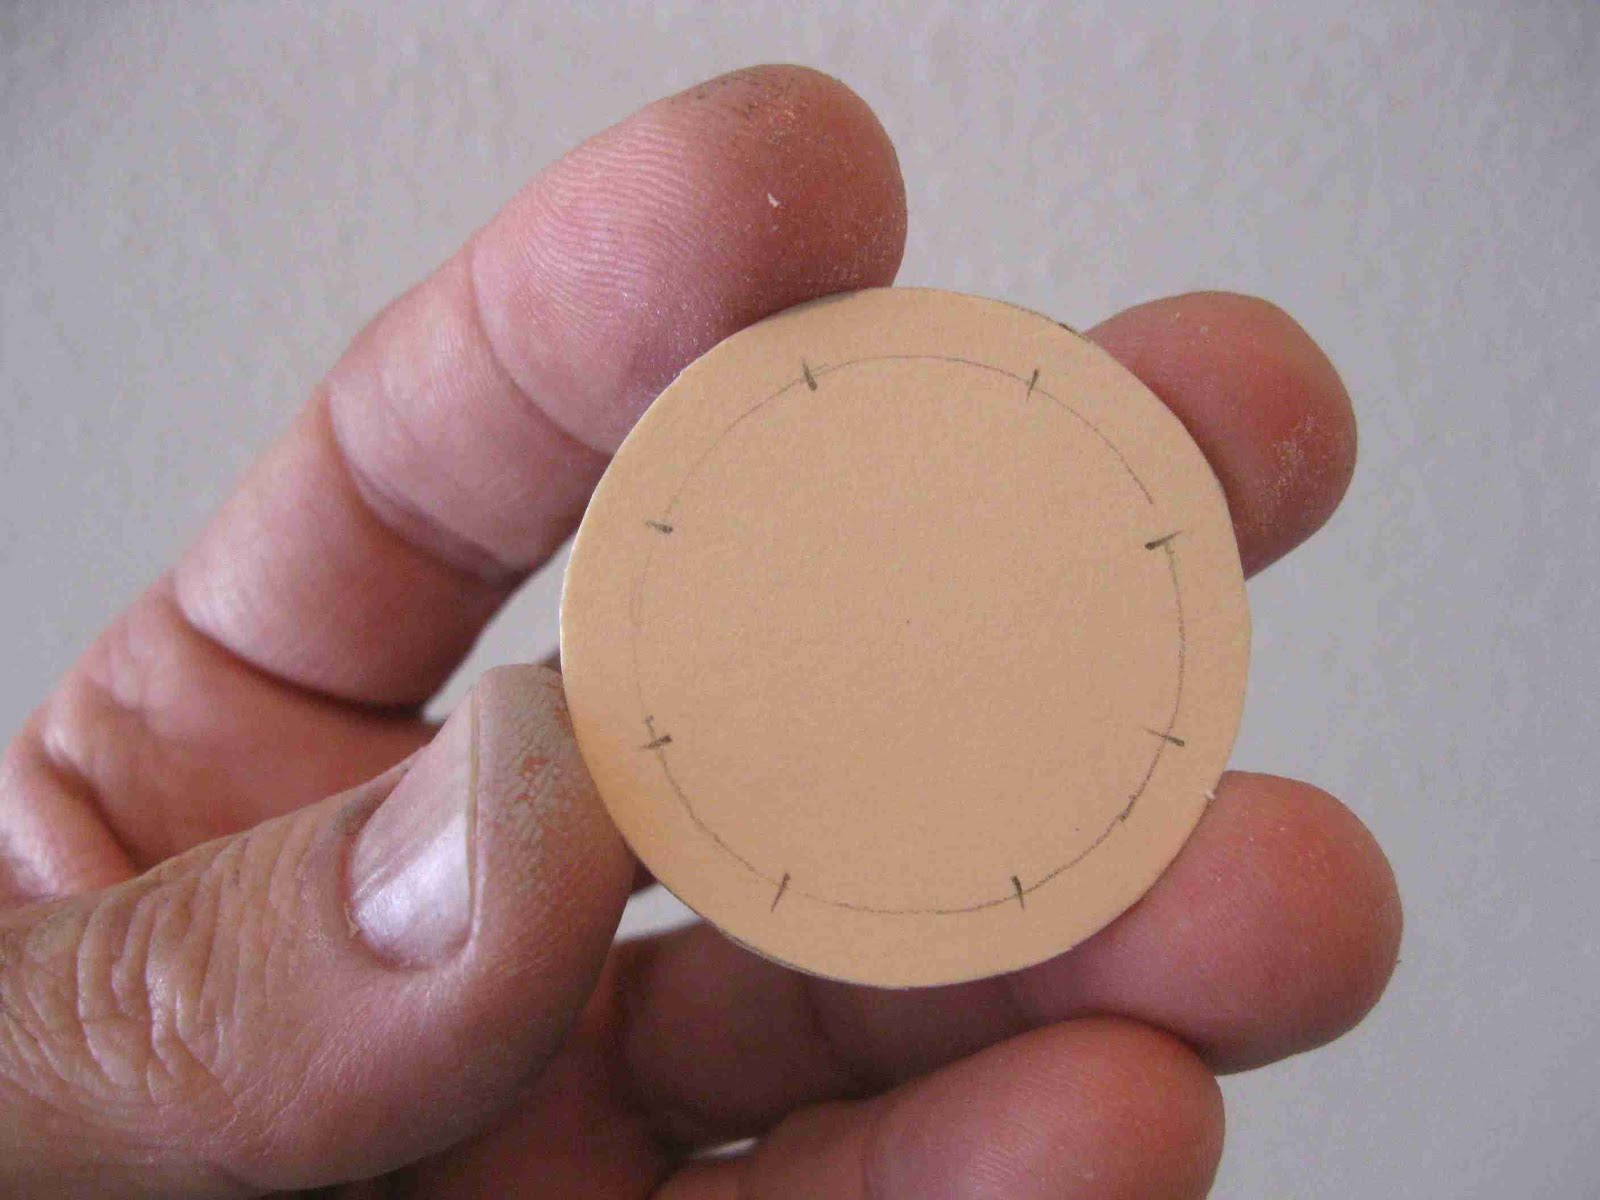
Trace around your coupler onto heavy card stock.
I'm using a very thick mat board material using in picture framing

TIP: Ask for scrap mat board at a framing store. They usually have smaller center pieces left over from custom framing orders. You can buy it for next to nothing or if they have a lot - it's free! Perfect for centering rings and baffle disks as shown here.

Cut the circle out with sharp scissors on the pencil line. If the edge isn't perfect, don't worry about it. It'll be round later when sanded to the coupler edge.


Mark a circle around the outside about 3/16" in. Use the edge of the disk as a pencil depth guide.
Mark the circle in half, quarters then eighths.


Use those marks to punch eight holes with a 1/4 hole punch. The mat board is thick but the hole punch will still go through it.

The smaller center holes were made with my rotary punch. My standard hole punch wouldn't reach the center.

Ranger Clone Build Part 25 Black Body Stripe


There is one black stripe running up the body from the side of the lowest black block to the right of the single black fin.

It's the same width as the upper payload section stripes, just over 5/8" wide.

Notice I've made a small 45 degree cut in the corner. This will lay over the rounded
yellow fin tip.


The stripe is layed down using my aluminum angle to be sure it is running straight up the body.

Notice the overlap of the angled corner cut in the black tape. This helps define the color separation at the fin tip.
The angle cut lets you overlap the tape onto the black paint. In time, all vinyl tapes can shrink so overlap it slightly so you'll always have coverage.


Lay a 1/4" strip around the body tube over the vertical stripe.
That rough end can be taken off with sandpaper on a block.

Monday, April 16, 2012

Ranger Clone Build Part 24 Black Paint Mask


The black area is one fin and the body tube areas on either side of the black fin.

This mask isn't really that hard to do, it just take a few extra minutes to lay the Scotch Tape over the rounded leading edge tip.


The end results were good with very little to clean up on the edge.
Using an X-Acto knife, a little bit of the black was pushed back to make the leading edge tip rounder.

Sunday, April 15, 2012

Ranger Clone Build Part 23 Yellow Paint Mask

The Ranger's catalog paint scheme is a little different.
One fin and one fin only is left white.

This is the mask, covering up the single fin. A second piece of Scotch Tape is on the leading edge curving over the rounded tip at the body tube.
A WalMart plastic bag was cut into squares to cover the rest of the fin.


After the Rustoleum 2X yellow was sprayed, the tape was pulled.
The Scotch Tape gave a sharp, clean edge.

Ranger Clone Build Part 22 Nose Cone Paint

You've gotta' love a simple mask - the nose cone is red.
There's a few things you can do to sharpen up the black and red color separation line.

Mask off the nose cone shoulder just below the stepped lip. You'll be spraying the red a little below the raised lip.
When done this way, if the nose cone is a little out of the tube all you'll see is the red, not a little white edge above the joint.


While the red nose cone is drying,
Blacken the body tube edge with a permanent marker. Go quick, it won't take much.


Before inserting the nose cone, wipe off any excess black with a paper towel.
Keep wiping the edge until no more black comes off.

This will prevent the black ink from transferring onto the shoulder lip of the nose cone.


The finished nose cone and payload section.
The body tube and nose cone color separations are very clean.

Saturday, April 14, 2012

Ranger Clone Build Part 21 Payload Section Roll Pattern

A longer strip just over 1/4" wide was cut.
Wrapped around the top of the tube, it was set over the tops of the smaller squares.

I've learned through past experience, self-adhesive trim can shrink and leave a gap.
It's best to overlap it slightly.

Don't worry about the overhang, just be sure the bottom edge lines up when the strip meets after going around the tube. Trim off the excess end and burnish.


Both ends of the tube are sanded with 400 grit on a block.

The picture shows how the trim material rolls off to the center. You'll want to sand from the outside to the center.
I sanded light enough to remove the trim but not remove the white paint on the tube edge.


With the nose cone in place, here's the completed payload section.
It wasn't that hard to do. The final results were worth the one hour it took to do it.

Friday, April 13, 2012

Ranger Clone Build Part 20 Payload Roll Pattern


After all four long stripes were set down, the stop wrap of paper is removed.

You can see how well the square tops have lined up.


Cut the overhanging ends off the back. Don't cut them close, you'll trim them with a sanding block later.

Keep these, they are used for the smaller checkerboard pieces. They should be close to the correct width needed.

Set them back on the backing sheet and cut them into perfect rectangles about 5/8" high.


Set these smaller rectangles down between the top of the long stripes.

I had two that were too wide. Set them down, mark with a pencil. Trim and re-apply.

Thursday, April 12, 2012

Ranger Clone Build Part 19 Roll Pattern

The entire rocket was painted a gloss white undercoat.
One fin and the payload section got a thicker coat of paint. White is the finish color on that one fin and payload section.

I saved the fin marking guide. It will be used to mark the tube for the upper roll pattern. There are four vertical black stripes running down the payload tube.

The marking guide was folded between two facing fin lines to give the width of the black stripes. The stripe width turned out to be just slightly over 5/8".

Wrap the marking guide around the payload tube and make pencil tick marks at the four fin locations. Using a pencil and angle, extend the lines the entire length of the payload tube.
These marks shouldn't be too dark, you'll only be using them as a guide for lining up the stripes.

At the other end, a straight strip of paper was wrapped around the tube.
This is the "stop" for the upper end of the longer stripe.

On the old Estes pictures, there are lower long stripes, then upper short stripes alternating like a checkerboard.

The paper strip edge was set about 3/4" from the top of the tube. At the 3/4" mark the stripes will alternate.

The black stripes were cut out of my favorite trim material, Contact Paper Blackboard Covering material.
It cuts clean, is very thin and re-positionable.
Try this Contact paper once and you'll agree. It's cheaper than trim Monokote and easy to work with. It's a semi gloss finish, not a shiny gloss.

TRIVIA: The models you saw in old catalogs were often trimmed with colored electrical tape and even colored paper.

TIP: Whenever you apply self adhesive (or pressure sensitive materials) clean off the surface right before you lay down the trim material. Any speck of dust will make a noticeable bump you'll see through the trim material surface.

I've placed the first stripe.
The upper end is square and butts up against the paper wrap stop.
The left edge of the stripe runs down the pencil line.

If you cut the stripes carefully and they are square, you only have to line up the one left side down the pencil line. The other side will take care of itself.

Wednesday, April 11, 2012

Ranger Clone Build Part 18 Primer Over Epoxy Fillets


Before any more primer was sprayed over the epoxy fillets, the inside rear of the body tube was masked off.

I'll be gluing the engine mount in after the painting is finished.


One great thing about the Duplicolor primer is the nozzle. You can turn the tip and spray wide or in a finer line.
I set the nozzle for a finer line and directed the primer specifically at the fillets. the fins and body tube were already primed.

There was some slight dips and bumps in the epoxy fillets. Some of this was taken down with sandpaper wrapped around a dowel.
Be careful not to sand a rut into the (softer) fins. Concentrate on the fillet seam area.


I had to go back after sanding and do another coat of primer on the fillet areas.
Here I've marked the trouble spots with pencil.

Ranger Clone Build Part 17 "Baffle" Coupler Fit

I took a tip from the online Ranger instructions at the Semroc website.
Semroc uses a "half baffle" placed 4" down from the top of the lower BT-60 tube.
This is a single plate baffle glued to the top of a coupler.

This is actually a good idea.
If Kevlar was tied low to the engine mount it might not last long with the hot ejection charges of three engines.
Acceleration of a three engine cluster is fast. This single plate baffle keeps the wadding and parachute from sliding down on top of the engine mount during boost.
The single plate has a slot in it for tying on an elastic shock cord.

This single plate "baffle" still requires wadding to protect the parachutes.


The coupler I had was very tight in the BT-60 tube - not a slip fit for gluing!
This is a brown coupler and thicker than the more common black fish paper couplers.
A very thin layer was peeled off and the outside wall sanded smooth.


For easier insertion in the tube end, the low edge was sanded round, the top is still square for a better gluing edge of the baffle plate.

Tuesday, April 10, 2012

Ranger Clone Build Part 16 Smooth Finish Prep


Before any gray primer was sprayed, the inside rear of the body tube was masked. I didn't want any thick primer on the inside of the tube to interfere with gluing the engine mount in later.


After a primer spray, 220 grit was wrapped around a dowel and ran over any high spots in the epoxy fillet.
Epoxy tends to be "self leveling" but I did have a few subtle high areas on the fillets.


These fillets took a little more time than I would have liked.
Using direct sunlight to better see the fillets, I've marked some low spots with a pencil. Two fillets required another thin pass with epoxy.

Any smooth finished model requires a good surface preparation.
All rough unfilled balsa glue blobs, epoxy strings will show through the color coats.
I'm not usually satisfied with my first results. There's always s second pass of FNF and sanding, then a second or third fillet.
The first primer coat shows all the irregularities that need attention.
More filling then more sanding.

TIP: Before color coats - critically check all your work under direct sunlight.

Monday, April 9, 2012

Ranger Clone Build Part 15 Epoxy Fillets

1. Have everything ready before mixing up the epoxy.

From Crazy Jim Hendrickson:
"Yes, denatured alcohol. Not rubbing alcohol...it can contain up to 20% water."

Denatured Alcohol in a small cup, a clean 1/4" smoothing dowel, plastic gloves and plenty of paper towels.

2. On wax paper, squeeze out small equal amounts of Part A and Part B very close to each other.
Don't make up any more than you might need to fillet two adjacent root edges.
Only do two facing root edge fillets at one time.

3. Mix well both parts well with a small stick.

4. Some use a syringe to apply epoxy on larger models. On a model this size, I simply transfer the epoxy to the root edge joint with a toothpick.
A drop is placed and dragged down the root edge with the toothpick tip.

5. When epoxy has been applied all the way down the root edge, the smooth 1/4" dowel end is dipped in the alcohol. Shake off excess alcohol into a paper towel.

6. Run the dowel end down the epoxy. The excess epoxy will be pushed up and onto the masking tape.
You should have a rounded fillet left on the root edge joint.

7. Wait a few minutes and the epoxy should be starting to set up. I tend to use 15 minute epoxy.
The masking tape "dams" are pulled up, removing the excess epoxy.

8. Put on a disposable latex glove and pull it tight over your fillet finger.
Dip your finger in the alcohol cup, shake off the excess.

9. Run you finger down the fillet. This should remove any ridges of epoxy left from the tape dams.

10. Check the tip of the leading edge where it contacts the body tube.
Use another pass of alcohol to remove any stray lines of epoxy.

Here's the first two facing fillets after smoothing.
Let these two dry, mix more epoxy and repeat for the other fins and launch lug joints.

Be aware - epoxy gets everywhere! Keep an eye out for drops and strings of drying epoxy. Remove them now or sand, prime and fill them later.