Showing posts with label Decal Draw. Show all posts

Thursday, August 7, 2025

Centuri Skylab Build, #KB-4, Part 8, Drawing Up Decals


New decals were drawn up in Corel Draw. 
I probably could have used the decal scan from Jim Z's but I like a challenge. It also looked like the Centuri kit decals were on a sheet taller than 11". Home print decals are a standard 8 1/2" x 11" size.


The original kit had some sort of embossed thermal foil used in attic insulation.
I did a post about it in February of 2020: CLICK HERE

This time around:
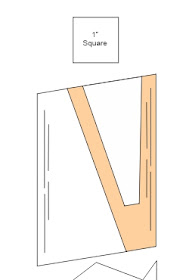
The second decal grid sheet on the right side shows my attempt at the solar panel fin coverings. 
The 3" x 3" square fins will get a chrome Monokote skin followed by the blue grid water slide decal. Results were very good the first time this technique was tried: CLICK HERE

In the lower right of the solar panel decals are the fine ink lines used to finish the Mini Bomarc.

Sunday, July 6, 2025

Estes Mini Bomarc Clone, Kit #TK-5, Part 2, Fins & Decals


The balsa scan was copied, dropped into Corel Draw and traced. There was some resizing to lock into the ruler reference underneath.

The kit used 1/16" balsa. The sheet is 3" x 9".


The decals were redrawn.

These will require some white decal material under the Canadian circle logo and flags.

Wednesday, May 21, 2025

Quest Intruder Kit Bash, Part 12, Decal Print Fit Test

TIP: Before committing yourself and wasting a sheet of water slide decal paper - 
Do a print on plain white copy paper.

I can bet you'll want to make some size and line width adjustments before printing on decal paper.
Cut the paper prints to size and check them on the fins and body.

The model hasn't been shot with a final gloss white yet.


The Interceptor style wing decals (shown above) fit well, but the rudder fin decals were a little tall.

The tops and bottoms will be trimmed back in Corel Draw. 
I've still got to add the white stars to the blue box.


The canopy decal looks good, but is a little large for the nose cone - a simple reduction fix.

Tuesday, May 20, 2025

Quest Intruder Kit Bash, Part 11, Drawing Up New Decals

Here's a shot of the Quest kit decals.
These were peel and stick.

The red and dark blue triangles had to be pieced together with American flags between them.

I didn't like the nozzle or canopy stickers. The canopy is black, looks like a flipped over "U".
The nozzle wrap is all the triangles side by side.
The round windows need some tweaking.


And, the Estes Interceptor decals.

There are a LOT of them! I remember taking four hours to apply them all.

The decals I drew up would be a combination of the two. There will be fewer decals than the Interceptor has.


Here's what I drew up for home print water slides. I hate the looks of thick, shiny stickers.

I've always liked the bold wing decals from the Estes Interceptor.
The nozzle wrap has been redone.
The canopy windows take cues from the Orbital Transport.
The round passenger windows are now rounded rectangles.
I set two sizes of INTRUDER name decals. I may use them depending on the remaining space on the sides.

The stars in the blue blocks still need to be added.

Thursday, April 17, 2025

Estes Advanced Target Drone, Kit #1913, Build, Part 16, Overlay Decals


Sorry I missed a day, I was camping with no internet!

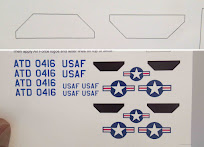
The Air Force logo is centered on top of the white decal set down earlier.
Before doing an overlay decal like this, be sure the white underlay is completely dry.


The USAF letters are centered onto the white rudder stripe.


The ATD 0416 decal was white in the Estes kit, I printed it in blue. 
Set onto the red paint it almost looks black.

To get a good center position of the three white side decals, center and mark the paper template.


At the top of the tube you can see a small piece of masking tape with a center mark. 
Set down the background white underlay decal first,


Let dry and follow with the Air Force decal.
Look close and you can see the white decal underneath. But, it's close enough for me.

Tuesday, April 15, 2025

Estes Advanced Target Drone, Kit #1913, Build, Part 15, Intake & Decal Fixes


The white intake decals ended up being too long, they overhang the wing fillet joint.  

I redrew the decals to a closer fit.

If you build this model, your decals may be too long depending on how your cardstock intake fits.

After the decal dries, it's easy to cut and lift off the excess.


The black intake decals were also too wide and wouldn't fit inside the mouth of the intake.

These were trimmed to fit.


I don't usually use clear coats,
but on these white paint decals I rolled some Future acrylic on the edges with a Q-tip. This is just extra insurance that they won't roll up along the edges.

Monday, April 14, 2025

Estes Advanced Target Drone, Kit #1913, Build, Part 14, More Decals & Lesson Learned


Here's what I meant about trimming the leading edge back.

If the decal sits too close to the rounded fin edge, it can peel back during boost or in handling.


I mentioned earlier about getting a good white paint coverage when spraying. Good coverage but without laying it on too thick.

When I rolled around the upper body tube ring the paint coverage was a little thin. 


I re-cut the strip towards the center of the sprayed sheet.

Two rolled rings were set down, again not right against the end of the body tube.

Sunday, April 13, 2025

Estes Advanced Target Drone, Kit #1913, Build, Part 13, More Adjustments & First Decal Transfer


I set the printed template (white decal) over the printed color decals. With it backlit, I could see the white template was too wide. Adjustments were made to the templates.

I had wondered what this shape was for, I first drew it for a white decal. Turns out these were solid color intake decals.

The intake shadow decals were originally printed in blue, 
I opted to print them in black.


On top is a cut white wing decal, ready for transfer onto the model.

Below it is the template. Cut two of these, flipped and mirrored.


Wet the surface where the decal is going to go.
This goes for all decals, whether home printed or a kit supplied decal.
The white spray paint decals will feel a little slimy, but should slide fine.
Don't allow the white spray decal to fold over, the paint layer can crack.

I use a damp Q-tip to work out air bubbles and water. Work and roll the Q-tip from the center to the outside edges.

Saturday, April 12, 2025

Estes Advanced Target Drone, Kit #1913, Build, Part 12, Template Testing & Adjustments


You should check the template before tracing and cutting out the decal.

The paper template is place over the decal position, in this case on the wing. Make any adjustments to the template, your intake fit over the wing might be a little different. 


This is the paper template fit on the rudder fin.

There is a little overlap on the rounded leading edge.
The leading edge of the template will be trimmed back so the final decal won't be peeling back later.


The pencil tracings are made around the templates onto the white sprayed decal sheet.

This is the rudder decal. Trace once, then flip over and trace again for two "mirrored" decals.

Friday, April 11, 2025

Estes Advanced Target Drone, Kit #1913, Build, Part 11, White Decals?

This model design had large white area decals.
TIP: There is a way to make white decal backings. It's not perfect, but it does work.
Spray painted white decals are set down first as the first layer and left to dry.
The second home print color decals layer are set down over the white spray paint decals.

I spray gloss white paint on a clear decal paper. Try to get complete coverage on the entire sheet. No clear overcoat is needed. The white paint film will seal and transfer onto the model after soaking in water - like a regular water slide decal.


Here is the first drawing of the white decal templates. Revisions have since been made.

These are printed on plain copy paper, cut out and traced onto the sprayed white decal sheet.
Using a knife and straightedge, Cut out the shapes.

This is the second sheet of color overlay decals.
They are set over the white decals already on the model.

The PDF is available to Patreon subscribers.
Email me at oddlrockets@bellsouth.net
and ask for the ATV decal PDF.

Tuesday, April 1, 2025

Estes Advanced Target Drone, Kit #1913, Build, Part 3, Figuring Out The Decals


The original kit decals had a lot of white area.

To check the fit of the online scan, I set a white decal outline on the traced wing pattern.
This was copied and drawn with the other sized decals.

I haven't decided yet whether to print decals on a white decal sheet or:
Spray a clear decal sheet with white paint and cut out the pieces. 

Thee is AIR FORCE, blue numbers and the stars and bas that will be place over the white paint decals.

I'll probably use the white paint decals. Red paint (underneath) would will show through the thin white decal sheet. The white will look pink!

The stars and bars white areas (far left) were simplified in a second drawn version.

Monday, May 20, 2024

Estes Condor #0807 Build, Part 22, Home Print Decal Fix


I was stuck and had to draw and print new decals.
I will keep the larger wrap around decal on the model so I didn't draw that one.

I made double decals.
Here's why I made two of each.
Home print decals aren't opaque and when set over bright white, the red turns to dark pink. This piece will need a two-layer decal.

If the home print red decals are set against some sprayed red paint you can tell the difference. It requires a double layer decal to slightly darken and match the red paint next to it. 
Red decals an inch away from red paint aren't as noticeable.


The red stripe decals on the wing fins are difficult to get straight and evenly spaced.


Notice the decal strip is a little long. It bends and continues up the inside of the wing tip.

To cut the end even with the joint - 
Wait for the decal to dry.

With a new single edge razor blade, cut through the decal extension and peel off the excess.

Saturday, June 3, 2023

Decals On The Second Klingon Battle Cruiser

When I built the two Klingon models, one set of decals transferred fairly easily. The second decal sheet was unusable. I finally got around to drawing up and home printing a second set.


Here's a wing decal from the Estes kit.
These have a white background.


Here's what I drew up.
I think it works, just looks a little dingier.


On the left is the Estes decals.

On the right are the home print.


The red dash decals are close.

My home print (right side) were spaced a bit wider. I don't know why I did it this way.


Comparing the original and new decals - 
The radiator lines are real close.

The bottom is straight, there is some camera distortion.
The new home print decals are in both pictures here.

On the left, some of the black flaked off where the new decal was cut to fit over the raised plastic ridge.
On the right, some black touchup was done using a fine point Sharpie.

FINISHED! Now I can sleep through the night.

Saturday, March 18, 2023

Estes EAC VIPER BT-55 Upscale, Part 2, Decals & Fin Templates

I drew up the BT-55 size decals and fin templates. These will be a very close upscale.
There were some corrections made. By the time I get to applying the decals, I'm sure there will be more edits.

Patreon members - 
Don't request the decals and fin templates yet!
As mentioned in previous builds, you can rarely use the first decal print. Color changes are likely when trying to match available spray paint.

EDIT: Changes have already been made - 
I couldn't find a close Yellow-Orange spray paint. Rusto Tuscan Sun is close, but has to be ordered. The shipping price was more than the can of paint! Most vendors require you to buy a box of six spray cans.
The areas on the decals that are orange (the flipped "E" under the rocket logo) will end up being yellow. This will make it easier for anybody else wanting to build it. A simple yellow is easier to match.

Wednesday, March 15, 2023

New Way N-21 Sky Fighter Build, Part 11, Two-Tone Paint & White Decal Background

The instructions suggest the underside is painted white, the top surfaces light gray. For a brighter look, I decided to paint the top side  Silver/Aluminum.
The instructions mention setting the white side down and carefully spraying gray over the top surfaces. 
I'm sure I could get good results that way but decided to play it safe and do a bottom, underside mask of the white.

The top picture shows the tape edges just sticking out over the wing sides.
The lower picture shows the complete white paint bottom mask.

Results were good with very little touchup.

The Square Stars and Bars logo is great!
All the decals are black. I wanted to make these two stand out a little better.

I sprayed a few inches of a white decal sheet with clear acrylic.
The Stars and Bars were measured. The shape needed was drawn on the decal sheet with pencil.


To check the size - these were cut out and set over the black decal still on the sheet.
I wanted the white area to fall just inside the black border lines. The upper picture shows the white decal when first cut out.


Here's the decal edges just inside the black border after trimming.


The white background decal was set in position on the upper wing first and allowed to dry. 


The black decal was set on top. 
The clear areas allow the white decal underneath to show through. 
It's a subtle change that adds some contrast.

Tuesday, March 14, 2023

New Way N-21 Sky Fighter Build, Part 10, Decals, Final Fillets, Ready For Paint


I did make a few changes to the decals. 
There is nothing wrong with the kit decals. I just printed up some minor changes.

The U.S. Square Force name decals looked a bit small. 

On top are the kit supplied two sets of decals.
A real plus! I've never seen two complete sets of decals included in a kit.

Below the kit decals are the U.S. Square Force decals I printed up, the name is about 1/4" wider.

I made some hatch decals using a thinner outline.


After the first white coat, I noticed some air bubbles in the fillets. 
More glue, sanding and more white paint.


Here's the model after sanding down some glue boogers. 

TIP: I did an overall light sand (800 grit) being careful not to go through to the tube or balsa. This helps get a smoother final finish on the final, heavier spray coat.