Showing posts with label Prototype. Show all posts

Tuesday, December 1, 2020

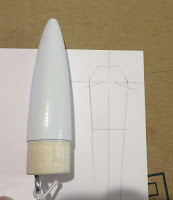
Revisions to the F-18 Hornet Prototype

Trying to design a stable model rocket from a jet will present some compromises.

The two jet engines extend beyond the back end. The front of the intakes are a partial circle. The back of the tubes are full circle and notched to overlap the end of the main body. 
Four tries (and 40" of scrapped BT-5) gave me a workable design. These tubes might also help stabilize the model.

On the next prototype the engine hook will be on the top side, away from the BT-5 tubes.
You might notice the underside of the BT-50H is rough. I've cut off four intake tries and had to sand off some glue.
The decal draws are turning out very well!

Sunday, August 20, 2017

Odd'l Rockets F-104 Fuel Tank Correction

When I posted the first prototype build of the Odd'l Rockets F-104 Starfighter, I heard about it!
Most comments were positive but a few let me know the wing fuel tanks were too small.
To be honest, I didn't have many dowels and grabbed what was handy. I bought larger dowels.

Above is the first prototype. It has quite a few stable test flights.

I cut off the fuel tanks and carved two larger ones. On the left is the size comparison.

The inset shows where the paint was scraped off to glue onto the wing.
Is this better? - hope so!
Compared to the OOP Centuri kit, this version is much closer to the truth.
Now . . . more test flights.

Friday, June 30, 2017

F-104 Starfighter Prototype Fix


On the first F-104 prototype I used some already cut dowels from the F-16 kit. Larger wing tanks will be used on the next build.
These larger tanks will change the C/G, I hope no nose weight is needed.

In the picture the larger new tank is set over the first one.


It's really not very difficult to shape the dowel ends. Each end takes about ten minutes of carving and sanding.

Trivia: Somewhere on line are the original plans for the the Estes Mars Snooper. The fin pods were made from just dowels, not nose cones and tubing.


Monday, June 26, 2017

F-104 Starfighter Prototype


Here's the original Centuri F-104 Starfighter.
Note the rectangular cardstock intakes and wing tanks.
I just finished a prototype There were many changes from the Centuri kit.
The intakes are cut from a BT-20, a split nose cone is in the intake openings.
The tail shape was corrected, redrawn from profile photographs. The wing tanks are closer to the F-104 shape.
This is probably a Level 3 .5 build.

So what do you think - Should it be the next Odd'l kit? Many test flights first -

Monday, October 17, 2016

F-16 Prototype Tweeks

Originally I was going to call this the F-17. It is based on the OOP F-16 Centuri Fighter Fleet model. I went back to the F-16 name after seeing some online F-17 fighter images. Where it is at now, it is closer to the F-16 design, as close as you can get to a model rocket styled jet. It's not a scale F-16 or even meant to be close.

Final kit designs never happen with a single prototype.
You can do ten different drawings, tweaking this and that, then start the first build.
The first attempt doesn't look quite like the drawing. You wish some angles were different, decal placement could be better.

On the left is the first prototype build. On the right notice the slight changes.
Some are obvious. Instead of being square, a trailing edge wing taper was added. The Stars and Bars was changed back to the original, correct five point star after I found out I could use it without paying to use it. U.S.A.F. stayed as the U.S.F.F. The "missile" wing lugs were cut at an angle.

The air intake was made larger without the long taper to the back end. This was changed for easier construction. The new cut easily slips and "locks"over the main BT-50H body tube against the wing root edges. It spreads out a bit and ended up more of an oval shape. 

I wanted this model to have a lot going on visually. Pieces overhang and under hang.
The nose cone will probably be plastic, longer and closer to the size used in the Centuri kit.

Now if I could just get the right thickness of clear plastic for the vacu-form canopies!

Tuesday, May 3, 2016

New Kit Prototype - Odd'l Rockets F-17, Finished


Here's the finished prototype.
More tweaks are coming!
For now more flight testing . . . 

The finished model is smaller than I would have thought, about the same size as the Centuri original.
This version has a circular air scoop on the bottom and the card stock canopy. The Centuri kit didn't have a air scoop, just a long profile fin. If this becomes a kit I might offer both options for those who don't like cutting and fitting body tubes.
There are no plastic detail ends for the bombs. The main tube is a heavy walled BT-50.
In the end, the model does capture the feel of the original Fighter Fleet.

Monday, May 2, 2016

New Kit Prototype - Odd'l Rockets F-17, Part 2, Canopy


Draw, adjust, then draw and adjust again.
The first tries were too square and didn't fit the contour of the nose cone. It took six revisions to get a good fit.


To glue on the canopy it was traced and the paint scraped off the already painted nose cone.


The rocket has already flown once with a B6-4. It was sprayed white overall. It was just a test flight before I took the time to draw up the decals.

Sunday, May 1, 2016

New Kit Prototype - Odd'l Rockets F-17, Part 1 Decals and Canopy

This won't be a full build thread but a quick insight into making a prototype.

I'm playing around with a new Odd'l Rockets kit based on the old Centuri fighter Fleet series. To see the Fighter Fleet, CLICK HERE

I had to draw decals from an online scan. After this first attempt there were four revisions. No matter how you try, the first decal print will be thrown away. Most details end up too large.
The Centuri kit was the F-16, mine will be an F-17.
You can't sell a decal with the name "US Air Force" without paying for the rights so I settled for "US FIGHTER FORCE".


The Centuri kit had a clear canopy, this one will be card stock.

There's no real trick to drawing a canopy, you just have to dive in knowing it'll take a few revisions to get the shape to fit.
On the left is the first try.


After cutting it out the glue tabs were held down with long tweezers while the glue dried.
TIP: One trick to gluing small tabs like this is to use very little white glue.

Saturday, April 14, 2012

Centuri Vulcan Prototype and Production Kits


The top picture shows the Centuri Vulcan as seen in the 1971 catalog.
The bottom picture is my finished clone.

Look close and you can see the differences in the body graphics.


After building the clone, the catalog picture above is obviously a prototype.
Centuri used the same prototype picture throughout the kit run from 1972 through 1981.

I'm not comparing the difference in the two nose cones.
My model used a slightly longer, hollow plastic nose cone.
And, I chose the rounded canopy.

Not a big deal, I just found it interesting.

Tuesday, November 30, 2010

LAUNCH! Schoolyard 11/30/10


Two MicroMaxx downscales, one prototype and a new downscale flew this morning.
There was no breeze, but it was overcast and a very light mist of rain was falling. Good thing I clear coated the carded models.

Here's the newest downscale, plans will be released for free! Follow this blog and I'll let you know when it's available to print out and build.
It's the classic Estes PATRIOT built around a BT-20 body tube. It stands 11 5/8" tall. First flight was with a 1/2A3-2t. Stable with full streamer recovery.


This is the smaller 13mm UP! CUP. It flew pretty high (considering the drag) on an A10-3t. It just takes an extra moment to connect up the igniter leads.


Third up was the MicroMaxx CLOUD HOPPER. Flight was vertical with a slight tail wag on boost. It looks like I'll have to touch up the whiskers, nose and mouth with a fine point Sharpie pen.

Finally the SKY WRITER MMX downscale flew for the 15th time! I've been trying to include it at every schoolyard launch.
In all four launches I used re-cycled MicroMaxx bare nichrome igniters with my six volt controller. A 12 volt controller would probably burn thru these igniters.

You might be asking - Why bother to fly the small stuff?
Large, adequate flying fields are hard to come by. These schoolyard launches are on a soccer field. The small sessions keep me active between flying larger rockets at our Orlando R.O.C.K. and Bunnell N.E.F.A.R. group launches.

Tuesday, November 9, 2010

LAUNCH! Schoolyard Stuff Nov. 9, 2010


I now have 60 MicroMaxx engines to fly.
This morning had perfect weather - blue skies, cool with just a slight breeze.

First up was the carded GOBLIN with a MMX engine.
With a BT-20 main frame, it doesn't get a great altitude.
But the Goblin is a old, reliable favorite.


The SKY SNOOP is one of the downscale Gooneys I haven't flown very often. It got surprising altitude with a MicroMaxx in it's tail.


Here's a new prototype - The UP! CUP.
It's like the Birdie's evil twin.

Sure, it's just a styrofoam coffee cup with an engine in it.
The engine mount and lug placement took a bit of work to get right.
It flew very well with lots of smoke!

First test was with a 1/2A3-2t. Straight up with featherweight recovery.
It made a strange "roaring" sound during boost.
It's second flight was on a A10-3t. Very stable, but I didn't notice the "roar" this time.

I read some "flying cup" reviews on EMRR. One builder made his out of a 20 oz. cup and noticed a lifting body style "glide" during recovery.
That's something to think about and work towards.

Thursday, November 4, 2010

New Engine Designation Idea

I've sent a email to Rick Piester at Estes with this suggestion.

This idea was inspired by the old Centuri engines. I wanted to make an additional improvement.
The Centuri engine power designation was printed eight times (horizontally) around the lower third of the engine.
At a glance you could pick the appropriate engine for your rocket.
But, once installed, the printed engine power was out of sight, covered by the engine mount tube.

My idea:
Typically, the nozzle end of the engine extends 1/4" out the back of a rocket.
I'd like to see the engine type designation at the bottom rear of the engine.
This way it can be seen after the engine is loaded into the motor mount.

Even experienced fliers have been known to load the wrong engine power or delay.
With the engine name visible out the back of the mount, it could be identified all the way up to when the micro clips are connected.

Some of the advantages:
  • More successes for first timers, more return fliers.
  • Less mistakes and much less impacts before ejection.
  • Safer for the consumer and manufacturer.
The engine power and delay band is printed in the appropriate color for it's intended use: GREEN = Single Stage, PURPLE = Upper Stage and RED = Booster engine.
In the picture you can see the engine name once, it's actually printed three times around the nozzle end of the engine.
What do you think?

Saturday, October 16, 2010

The WHISTLER! - that didn't! Part 1


Recently there has been forum posts about whistling rockets.

Rockets with split fins like the BSD THOR do whistle. I've heard the THOR whistle at N.E.F.A.R. launches. Bullpups have also been known to whistle.

Estes had their SCREAMIN' MIMI design.
It didn't whistle loud enough to be heard over the engine. There wasn't enough directed airstream to activate the whistle.
The Mimi rocket had tubular plastic "Whoopee" whistles attached to the outside edges of small fins.
You can hear a "Whoopee Whistle" HERE


Two years ago I experimented with split fins trying to get a good whistle. The WHISTLER fins had opposite and angled trailing and leading edges. My hope was to direct and split the airstream over the angled leading edge of the lower fins.
Look closely at the leading edge of the lower yellow fin. You can see the angle cut.

On the BSD THOR, the upper trailing edge and lower leading fin edges are square.

It was launched a twice with a B6-4 and C6-5. No whistle was heard.

Someone would have to build a prototype where the distance between the split fins could be adjusted.
For example, one flight with 1/4" space between the fins. On the next flight, the upper fin moved up to 5/16" between the fins. Adjustments could be made until a possible whistle is loud enough and consistent.

Monday, October 11, 2010

Flying Frisbee - FLOP!


I'd bought a $.99 Frisbee at WalMart for my daughters to play with.
They weren't that interested so I thought I'd put it to better use.


The central 18mm engine mount tube has centering rings on either side of the Frisbee top. The plastic surface was roughed up and a epoxy fillet ring went on both sides. The central engine was a C6-0.

On the outside rim engine was a 13mm A10-P plugged engine. It was mounted at an angle to provide spin.


I'd had some good experience with the Art Applewhite Monocopters so I knew to use a very short rod. Monocopters spin quickly at launch. A short rod is used so there isn't any chance of rod whip.
I didn't have a short rod with me so it was set up high on a 1/8" x 36" rod.

In the middle picture, you can see how simple the engine mounts are. Quest Q2G2 igniters were used, the best igniters made for clustering.
This launch picture makes it look better than the flight actually was. Roger Smith took the picture.

There was some launch rod whip. The flight wasn't vertical and didn't get enough altitude to waste two engines on. I should have had a very short launch rod to get a vertical boost.
The outside A10 engine did give it quite a bit of spin and I think there could be other possibilities for this odd ball rocket.
Oh well, live and learn!

I'm certainly not the first, or last person to put an engine under a Frisbee. George Gassaway has had better success with his versions. I remember seeing a video on YouTube of a saucer being launched from a fast, spinning turntable.

Friday, October 8, 2010

New Odd'l Rockets Prototype - PIGASUS!


Odd'l Rockets is a small rocket company "specializing" in rockets that are a little different.

The one thing I don't have is a Goony!
This newest rocket is based on a model I designed back in the 1970s - PIGASUS!

My first version of the Pigasus was closer to the Estes GoonyBirds in size and engine power. The old GoonyBirds were BT-60 based and the largest recommended engine was the A10-3t. I had built and flown a few Goonys back then.

This time around I wanted to do it right, maybe even make a kit out of it.
This new version is the size of the Semroc Groonies. It's bigger and could fly on standard 18mm engines.
Pigasus has quite a history:
  • Pigasus was the Yippies Presidential candidate in 1968. Nixon won.
  • Pigasus was John Steinbeck's personal stamp.
  • James Randi gives out the Pigasus award to the best paranormal frauds.
  • Dorothy Gale encountered a phychic, poetic Pigasus in the book "The Wishing Horse of OZ"
While some claim the Pigasus should only fly under bat wings, I went with the more traditional feathered wings.

On this build, you won't see the finished design until I finish it!
The next time somebody says: "Yeah, when Pig's fly!" - stick a B6-4 in this one and prove them wrong.
Get ready, go find that can of pink spray paint.

Tuesday, July 27, 2010

New Saucer Design - Model Profile


Occasionally I'll post some pictures of something I've worked on from the past.

Here's my version of a Saucer, very loosely based on the old Centuri design without the blind embossed surface. It's 7 1/2" in diameter and 3 1/4 inches high.

The top was drawn on my laptop and printed to cardstock. that print was glued to thin foamboard making it light and very strong.
The "Landing Lights" were printed in yellow, but I alternated with some Monokote Chrome Trim dots, punched out with my rotary punch tool.

The four underside fairings were tough. Even though they are the same width from side to side, they would pull in when glued giving it a scalloped effect.

To correct this, the fairings would be drawn to "bow out" a bit in the middle. Next time, the outside edges of the internal fins will be cut shorter.


It'll fly again on a C6-0 at the N.E.F.A.R. launch in Bunnell, Florida on August 14.