Showing posts with label QE Minotaur. Show all posts

Thursday, February 17, 2022

Quest/Enerjet Minotaur Q5015 Build, Finished


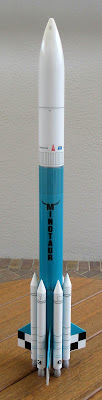
The Minotaur is the most detailed of the Quest Advanced rocketry line.

This one reminds me a little of the old Centuri Orion kit - the Orion had three fuel tanks. It was the same diameter at around 2", but a few inches shorter.


Here's the low end with the six SRBs. There were a bit tricky to line up and space evenly.

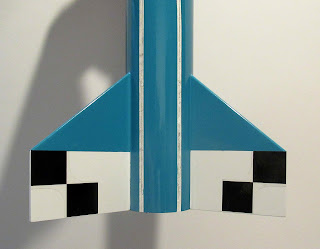
If your tube and fins surfaces are smooth, the sticker thickness isn't that noticeable. Just try not to touch the underside of the stickers when placing them on the model.


The mid section with all the wider wraps.


The nose cone tops off a well detailed model. 
With all the SRB wraps it turned out to be a good challenge.

Wednesday, February 16, 2022

Quest/Enerjet Minotaur Q5015 Build, Part 12, SRB Gluing

Before gluing on a SRB - Check the last picture below

Note the pencil line down the SRB gluing area. The pencil line also goes underneath, around the end edge of the body tube. This will help with alignment.

I also extended the pencil line down the main body under the edge of the body tube.

Look close at the picture on the right - those two pencil marks line up.

Here's the first SRB in place.
The instructions recommend using the "Double Glue" technique to place these assemblies. I'd recommend using the double gluing.

It's hard to see the pencil lines down the body tube when the SRB covers it. 
Look down the side to see how even the space is between the SRB and the fin root edge.

On the right - I used my aluminum angle to check the alignment.


I checked the Delta Rockets information in my Alway Rockets Of The World trying to figure out were the specific numbered SRBs go around the main body.
This didn't help much, the Delta II has nine SRBs, this model has six.

The box picture helps a bit - 

Between the fins, going from left to right - 
SRB 6 (Left) and SRB 1(Right), rotate the rocket to the left.
SRB 4 (Left) and SRB 2(Right), rotate the rocket to the left.
SRB 5 (Left) and SRB 3(Right), rotate the rocket to the left.

Tuesday, February 15, 2022

Quest/Enerjet Minotaur Q5015 Build, Part 11, More Stickers


Before the SRBs are glued on, the "A" sticker wrap is placed.
The top of the SRB nose cones overlap the sticker.

I placed a wrap of masking tape around the bottom position for a guide so the ends of the wrap will meet.

I tried to center the trapezoid shapes between the fin positions.


The instructions show the vertical MINOTAUR sticker centered over the #1 marked SRB. I decided to set the name over a fin opposite the launch lug on the back side.

The S, N, R and P stickers roll around the body tube near the blue/white color mask.
The "M" sticker wrap goes beneath the top of the body tube. 
The small "T" dot stickers go beneath that.
The sticker placement illustration shows only two of the T stickers. I applied four of them spaced evenly around the body tube circumference.

A paper strip was wrapped, marked and folded into fourths to give me even positioning. Four extra T stickers are provided.


The "G" stickers go near the top of the nose cone. A wrap of masking tape gave me a top position for equal placement.

Monday, February 14, 2022

Quest/Enerjet Minotaur Q5015 Build, Part 10, Fin Stickers


Here's the mask lift after the Teal was sprayed.

I got some clean lines this time.


The black squares are grouped in twos.

Notice the clear border area. This could overhang the outside and trailing edges of the fins so I cut off the clear border before lifting them off the sheet.


Here's the fins stickers in place.

The tape strips for the SRB gluing lines have been lifted.

Sunday, February 13, 2022

Quest/Enerjet Minotaur Q5015 Build, Part 9, Paint & Masking The Fins


Here's the main airframe tube with the fins glued on.
Note the strips of masking tape for gluing on the SRBs. This time I masked off the glue lines.

The instructions do tell you to mask off the upper 4 1/2" of the body tube.
GOTCHA: They don't mention masking off the white areas on the fins. If you look close, you can see they are masked in the illustration.

It doesn't come up until you see the "B" sticker placement. 


To find the height of the fin masks - 
I measured the height of the two squares and found it to be right around 1 5/8" high.


The initial edge mask was done with Sharpie marked Scotch Tape.

The bulk of the white center mask area was filled with brown masking tape.

Saturday, February 12, 2022

Quest/Enerjet Minotaur Q5015 Build, Part 8, SRB Glue Strip, Nose Seam Fill

Well, I should have followed the directions and masked off a gluing strip down the inside of the SRB tubes before painting. Here's one way to remove the paint down to the bare body tube.
Set down a 1/8" wide strip of masking tape down the tube. Note the end doesn't go all the way to the top of the tube, this is the length of the glue line to the main body.
Trace around the edge of the tape with your knife, lightly cutting into just the paint coat.

When you lift the tape, you might see some of the paint lifting inside the scribed line.


Scrape away the long rectangle of white paint. If you are careful, you will only scrape off the paint inside the scribed line.


Before gluing the nose cone in place - The final small sticker goes on the inside surface of the nose cone. Not gluing the nose cone allows you to perfectly slide around and center the sticker.

I marked the inside center line at the top of the tube and nose cone lip.
The small sticker was placed visually towards the top of the nose cone. 

The nose cone molding seam was noticeable towards the top.
I did my standard bead of medium CA glue and allowed it to fully dry. Do one side at a time and set the nose cone on its side so the glue won't run as it dries.

Sanding with 220 then 400 followed before spray paint.

Friday, February 11, 2022

Quest/Enerjet Minotaur Q5015 Build, Part 7, SRB Sticker Placement


I wish this instruction sticker placement drawing was full size. You don't have any measurements to place the ring wraps. 
I enlarged the instruction drawing to fit the length of the BT-20 SRB tube. The inset picture shows a full-size drawing I made so I could place the bands consistently through all the six SRB tubes. Set the SRBs over the upper line drawing, use the extended lines to set the wrap around sticker lines. 

PATREON: If you are a blog supporter through Patreon, I can send you this PDF to make your Minotaur build easier. A new revision now includes the SRB number positions. 
Email me at oddlrockets@bellsouth.net and ask for the Minotaur SRB Template.


Here's how some of the horizontal bands lay using the template. 
That masking tape strip marks the main airframe glue line later on.


At the bottom of the PDF is a tube wrap so you can center the box on the top of the body tube.
Center on side of the wrap over the tape strip, the mark on the other side of the wrap gives you a center for the top box or low number sticker. The center wrap shown here is rough because of water from the sticker placement.

Thursday, February 10, 2022

Quest/Enerjet Minotaur Q5015 Build, Part 6, Nozzle Fix

GOTCHA: I had a heck of a time trying to get the centering ring evenly into the body tube. There was too little of an edge to get it even with the tube end.

A simple fix was to use a engine block as a slide in coupler.
Glue short engine blocks centered on the flat ring.


I was concerned about the extra weight of six engine blocks so I peeled out a few layers from the inside of the engine block to lighten  it.

On the right is the block before - on the left is after peeling out a few layers.


The flat ring should fit inside the SRB tube edge.

This required some sanding.
I also rolled over the inside edge of the tube for an easier slip fit. 


After applying a ring of glue on the inside of the tube - 

I used the flat edge of my sanding block to press the ring even with the end of the body tube.

Wednesday, February 9, 2022

Quest/Enerjet Minotaur Q5015 Build, Part 5, Nozzle Assembly


The small nose cone nozzles had some mold flash shown on the left.

This was shaved off with a knife and sanded smooth.
To fit into the SRB tubes, a single centering ring is glued onto the small end of the nozzle.

I used some medium thickness CA glue, transferred onto the joint with a toothpick.
Look at the dried ring from the side to make sure it is on straight.
To spray paint the nozzles silver - 
Set them on a scrap cardboard on masking tape with the sticky side up. 
Notice the "X" cut into the cardboard to allow the nose cone tip to go into the surface and let the ring sit on the tape.  

Many people recommend spraying silver over a black undercoat for better contrast.
I was curious to see if there was any difference as the nose cone was white and the ring black. I didn't notice any difference in the silver color on the two different parts.

Tuesday, February 8, 2022

Quest/Enerjet Minotaur Q5015 Build, Part 4, SRB Primer & White


After sanding down the nose cone sides, 
the lip of filler overhung the body tube.


Sanding down from the sides of the body tube - 
gave me the squared lip showed on the right side picture.


The tubes and nose cones got a shot of filler/primer.
Sanding followed.

The right side picture shows two tubes after the first white undercoat.
Most of the six tubes looked okay. Two of the tubes developed a mottled surface, requiring sanding and a few more coats until things smoothed out.

Monday, February 7, 2022

Quest/Enerjet Minotaur Q5015 Build, Part 3, SRB Prep


The glassine wrap seam was very tight - I couldn't even find it in some places.
I won't have to do my first pass of CWF. 
This will only need a good shot of filler/primer and sanding to fill the seams.
I wanted a sharper edge on the nose cone shoulder.
Start by sanding and squaring up the tube edge with 220 grit.

Slide in the nose cone and turn against the roughened tube edge. The rough tube edge will "sand" and sharpen up the shoulder corner.
Next - 
Brush on CWF over the low half of the nose cone. This gives you a clean nose cone tip to hold onto for the next step.
Brush the CWF over the shoulder lip and a little onto the coupler side, shown in the left side picture. Brush on CWF like this all the way around the lower half of the nose cone. 

Press the nose cone down onto the tube edge and  turn.

Leave the bead of CWF that forms on the shoulder, shown above on the right side. That will be sanded down after it dries.

Sunday, February 6, 2022

Quest/Enerjet Minotaur Q5015 Build, Part 2, More Parts


The model can be flown using 29mm motors.
A 24mm adapter is included in the box.

The purple tube is a spacer slid into front of the mount if a shorter D motor is used.
An addendum sheet is included to show the construction of the 24mm adapter.
Any experienced builder would have no problem figuring it out from the illustration. No real instruction copy is included.

GOTCHA: In the assembled view - Notice the rear black ring is shown even with the lower end of the 24mm motor mount tube. This won't allow any flex of the engine hook.
TIP: I'd recommend gluing the lower centering ring about 3/4" up from the rear of the tube.


Kevlar and 1/4" wide elastic is provided as the shock cord.

Two 3/16" diameter launch lugs are included.

Saturday, February 5, 2022

Quest/Enerjet Minotaur Q5015 Build, Part 1, Parts


This is the most detailed of all the Quest Advanced Rocketry kits.
Six detailed SRBs between three fins.

2" diameter and 28" tall.


It looks like the design might have been inspired by the United Launch Alliance Delta II rocket.
All the SRBs and that recognizable Teal color on the body.


Lots of parts for the six SRBs
The SRB tubes are lengths of BT-20s, not something you'd usually see in a Quest kit which normally uses Metric diameter tubes.

There are two big sheets of pressure-sensitive decals (stickers).
The box advertises a 18" fabric chute, my kit included a 16" parachute.

On the right are the parts for the SRBs.
The instructions says vacu-form nose cones - my kit had balsa nose cones.
To the rear, a small nose cone becomes a convincing nozzle bell. It is glued to a black ring and slides into the back of the BT-20 tube.