Showing posts with label E Interceptor. Show all posts

Tuesday, August 30, 2022

Inspiration - Don Thomas' Inter-X-ceptor ... E Power Intergalactic Rocket.

From the Estes Model Rocket Facebook page:


Here's Don Thomas' take on the Estes Interceptor - 
Inter-X-ceptor . . .  Power Intergalactic Rocket.

Sometimes throwing out the face card paint suggestions are a good thing!

Tuesday, December 11, 2018

Interceptor - It's Coming Back!


Dan Winings posted the news on the NAR Facebook page:
Estes knows their best sellers - To see the the Estes Website listing: CLICK HERE

Looks like Estes might be using some old-style Sci-Fi catalog descriptions:
"Envisioned by Estes designers to be operational by 2050, the Estes “Interceptor” is an ultra-sophisticated rocket that could patrol our galaxy for possible aggression by hostile aliens. Highly advanced defense systems, which includes photon and laser armaments as well as ION drive for extended tours around the Milky Way only enhance the rocket!"

Along with the Saturn V #1969, it's slated for a January arrival. 
If I build another, I'm not looking forward to the four hours of decal placement. 
TRIVIA: The Estes Interceptor was the 50th Estes "K" kit, introduced in 1971. 

EDIT: As mentioned in the comments, In the new reissue kit the "U.S." is missing from the U.S. AIR FORCE decal. The "F" is missing from the USAF wing decal.

Thursday, September 15, 2016

No Wonder I Didn't Get Any Bids!

I got a message asking about the shipping cost for the Interceptor I have on auction at Ebay -

"I wanted to check the cost of shipping: eBay is showing $67.60 to Seattle, WA.
Is this accurate?"


What?

I went back and changed the shipping method to something much more affordable.
In the past I passed on bidding when the item had outrageously high shipping.
Anyway - it'll run for another week.

Wednesday, September 14, 2016

Interceptor Auction Finishing Up!


So far, no bids!
I thought this one would be more popular. This is a clean build with a smooth finish.
Upgrades too!
This auction finished up Wednesday night around 11:00 p.m.
Stop by and support the blog - CLICK HERE

Thursday, September 8, 2016

Finished Estes INTERCEPTOR for Auction on Ebay


A finished, Estes INTERCEPTOR is up for auction on Ebay.
This is one of the two Interceptors built on the blog.
To see the listing or make a bid: CLICK HERE
Stop by, make a bid and support the blog!

Friday, July 8, 2016

Estes Interceptor Build #1250, Finished


This was and still is a great design. While the overall look is strong, the decals really make the model.
I was surprised, my finished weight was 3.8 oz. a little less than the face card weight of 3.85 oz.
It's another one I can scratch off the list of models I couldn't afford as a teenager.

Thursday, July 7, 2016

Estes Interceptor Build #1250, Part 24, Misc. Details Part B


This was interesting, I didn't notice until the clear coat was being applied.
The recommended engines are set into a decal. You'd have to look twice to find them.


I used the Beacon Fabri-Tac glue to attach the tailcone and antennas.
It seems to work very well, almost better than some of the plastic glues you buy in a tube.

The only disadvantage is it's messy. There's always a long glue "string" when you pull the bottle away from the applied glue area. It's gummy when dried, sometimes you have to roll off the excess so be careful how much you use.

This glue seems to be good for nose cone bases, tail cones and parts like the antennas shown here. I wouldn't use it for a Redstone or Little Joe tower. Too messy! 

NOTE: I went back and forth on whether to glue on the tail cone or not. This model was built with removable Kevlar. There's not much open area inside the tail cone to grab the Kevlar tail and pull it out. I played around with long tweezers and could get the Kevlar line. It takes a little more effort but can be done. The tail cone was glued on.

Wednesday, July 6, 2016

Estes Interceptor Build #1250, Part 23, Misc. Details Part A

Sometimes I build two models at a time. The better of the two will be sold on Ebay, the other becomes part of my active fleet.
I'll be keeping the model with this wrinkly nose cone.

TIP: Paint on plastic takes longer to fully dry. Paint on balsa and Kraft tubes dries faster, those surfaces "breathe" more than smooth plastic.
The spray paint on the nose cone crinkled pretty bad. It was sanded down and got another shot of primer/filler.
After a longer drying time the next coats of gloss white went on without problems.


I wanted to show the difference between two wing pods before and after the Future clear acrylic coat. The orange fluorescent spray dries flat and needed a clear coat before the decal wrap was applied.
On the left is the pod before the clear coat, on the right the pod has been clear coated and the decal wrap applied.

I thought the clear coat would have darkened the orange color. It did, but only slightly.

On the second Interceptor I didn't get a full white coat on the upper end of the body tube. Not wanting to shoot the entire rocket again, I did a mask where the yellow decal band would go.
The decal should cover the paint ridge after some careful light sanding.

Tuesday, July 5, 2016

Estes Interceptor Build #1250, Part 22, Pod Decals

The wing pods were painted fluorescent "Rocket Red". The spray paint came from Ace hardware. As mentioned earlier, I thought the color was more of an orange than a red.
Looking at the catalogs, I always thought these pods were a red color, but the instructions do say to paint them fluorescent orange. I got it right without even knowing it.


There is a problem though, fluorescent paints are a flat finish. The wrap-around decal won't stick to a flat finish.


I applied some Future floor finish acrylic with a Q-tip "brush". This glossed it up pretty well.

Be sure to wet the surface before applying the decal. It seemed to grab the clear coated area quickly.
The decal was a little wider than the circumference of the pod. I centered the second bar from the end over the pod joint. This put the ends of the decal towards the center of the trailing end of the wing. You can see the spacing is tighter where the decal ends meet. Placing the ends at the middle will hide the tight spacing joint.


I doubt you'd want to place all the decals in one sitting. I kept track and it took FOUR HOURS to place all of them.
It would have gone a little quicker if repairs weren't needed.

Monday, July 4, 2016

Estes Interceptor Build #1250, Part 21, Canopy Decals and a Fix

I sure some are thinking - "Why so many posts on the Interceptor decals?
The decals were one of the big features of the kit - two big sheets. Next to the Citation Patriot, few kits had this many water slide decals.
When the kit first came out, everybody talked about how long it took to apply the decals.
Then they'd talk about how cool the design was.


The canopy decals didn't look like the ones in the decal placement picture. I thought the decal on the left would have to be flipped over to match the shape of the instruction picture.

These would to be cut apart, the clear coat "bridge" on the center decal goes over both sides of the cockpit canopy.


The two triangle pieces are left together and rolled over the high point of the canopy. The rear piece has to be cut an placed separately.

On the right is the canopy decals in place.
On the left you can see the back decal has the raised "point" forward. On the model the flat side goes forward for the best fit.
Before I clear coated the flaking decals, a "patch" decal was set down. This rear panel decal had a broken line.

Luckily the lines on this nose cone decal were the same width. I cut a piece out of the rectangle. Because this decal patch is small, cut enough clear border to help with placement and bonding.


Here's the same decal with the patch in place.

There are so many decals on this rocket nobody will miss the small rounded rectangle on the nose cone side.

Saturday, July 2, 2016

Estes Interceptor Build #1250, Part 20, Oops, More Decals!


I couldn't figure out why this decal was so tall. It didn't make much sense why it would roll over onto the sub fins.
I set it place and made a fingernail crease at the lower fillet. The decal was cut on that crease so it would stop at the sub fin root edge.
Here's how the back end looked with the decal cut short.

I must have been tired, all these decals take a while to apply.
I should have looked up the older Interceptor instructions at JimZs - CLICK HERE. If you go to page 5 and 7 you can better see the decals. You can't see this placement on the new instructions.


I kept the halves I cut off and added them back later.
The longer decal does look better, you can't see the cut. Next time when in doubt I'll look up some older, more detailed instructions.

Friday, July 1, 2016

Estes Interceptor Build #1250, Part 19, More Decals


From the Estes instructions you can see how the long decal splits by the yellow bar. Neither side is actually centered at the word space.
I probably should have set the yellow band down first, then applied the long "U.S. AIR FORCE FC-803" decals. This way I could cut the decal and center it on either side of the yellow band.


Here's how the decals were set. One of them was cut and I did my best to have them line up on both sides.


After a little bit of shifting from side to side I probably ended up with a better centering than the instruction picture.

Thursday, June 30, 2016

Estes Interceptor Build #1250, Part 18, Oh, Those Decals!


The instructions say to start applying the bottom decals first. The Bottom View was a bit confusing, the image was flipped. You'll definitely want the USAF and stars and bars decals on the opposite side.
I'd recommend going to the older Interceptor instructions on JimZs: CLICK HERE The decal pictures there might answer some placement questions. 


Previous builds on RocketReviews.com talked about the decals being thin. They were right!

The lower left vertical line broke and had to be reassembled. I've learned through past experience - don't start with the largest decals!
TIP: Start with smaller decals set in an area that won't be seen. If you have problems with them, these flaked or folded first decals might not be noticed.

This bottom front decal flaked at the upper left vent corner.
I couldn't fix it so the bottom vent was cut off to match the upper broken vent.

Before proceeding, both decal sheets got a spray of Krylon UV acrylic clear.


The underside of the wing has large decals that go over the root edge fillet and up the body tube.
After the decal was centered on the wing the line in the decal didn't meet at the root edge.

Roll a wet Q-tip to press the decal into the fillet area.

Estes Interceptor Build #1250, Part 17, Antenna and Tail Cone Painting


You can paint the tailcone off the model. This will save you from any masking around all the raised vanes.

Some masking tape was rolled around the shoulder. The overhanging tape was slit a few times and bent outward to tape to a spraying board.


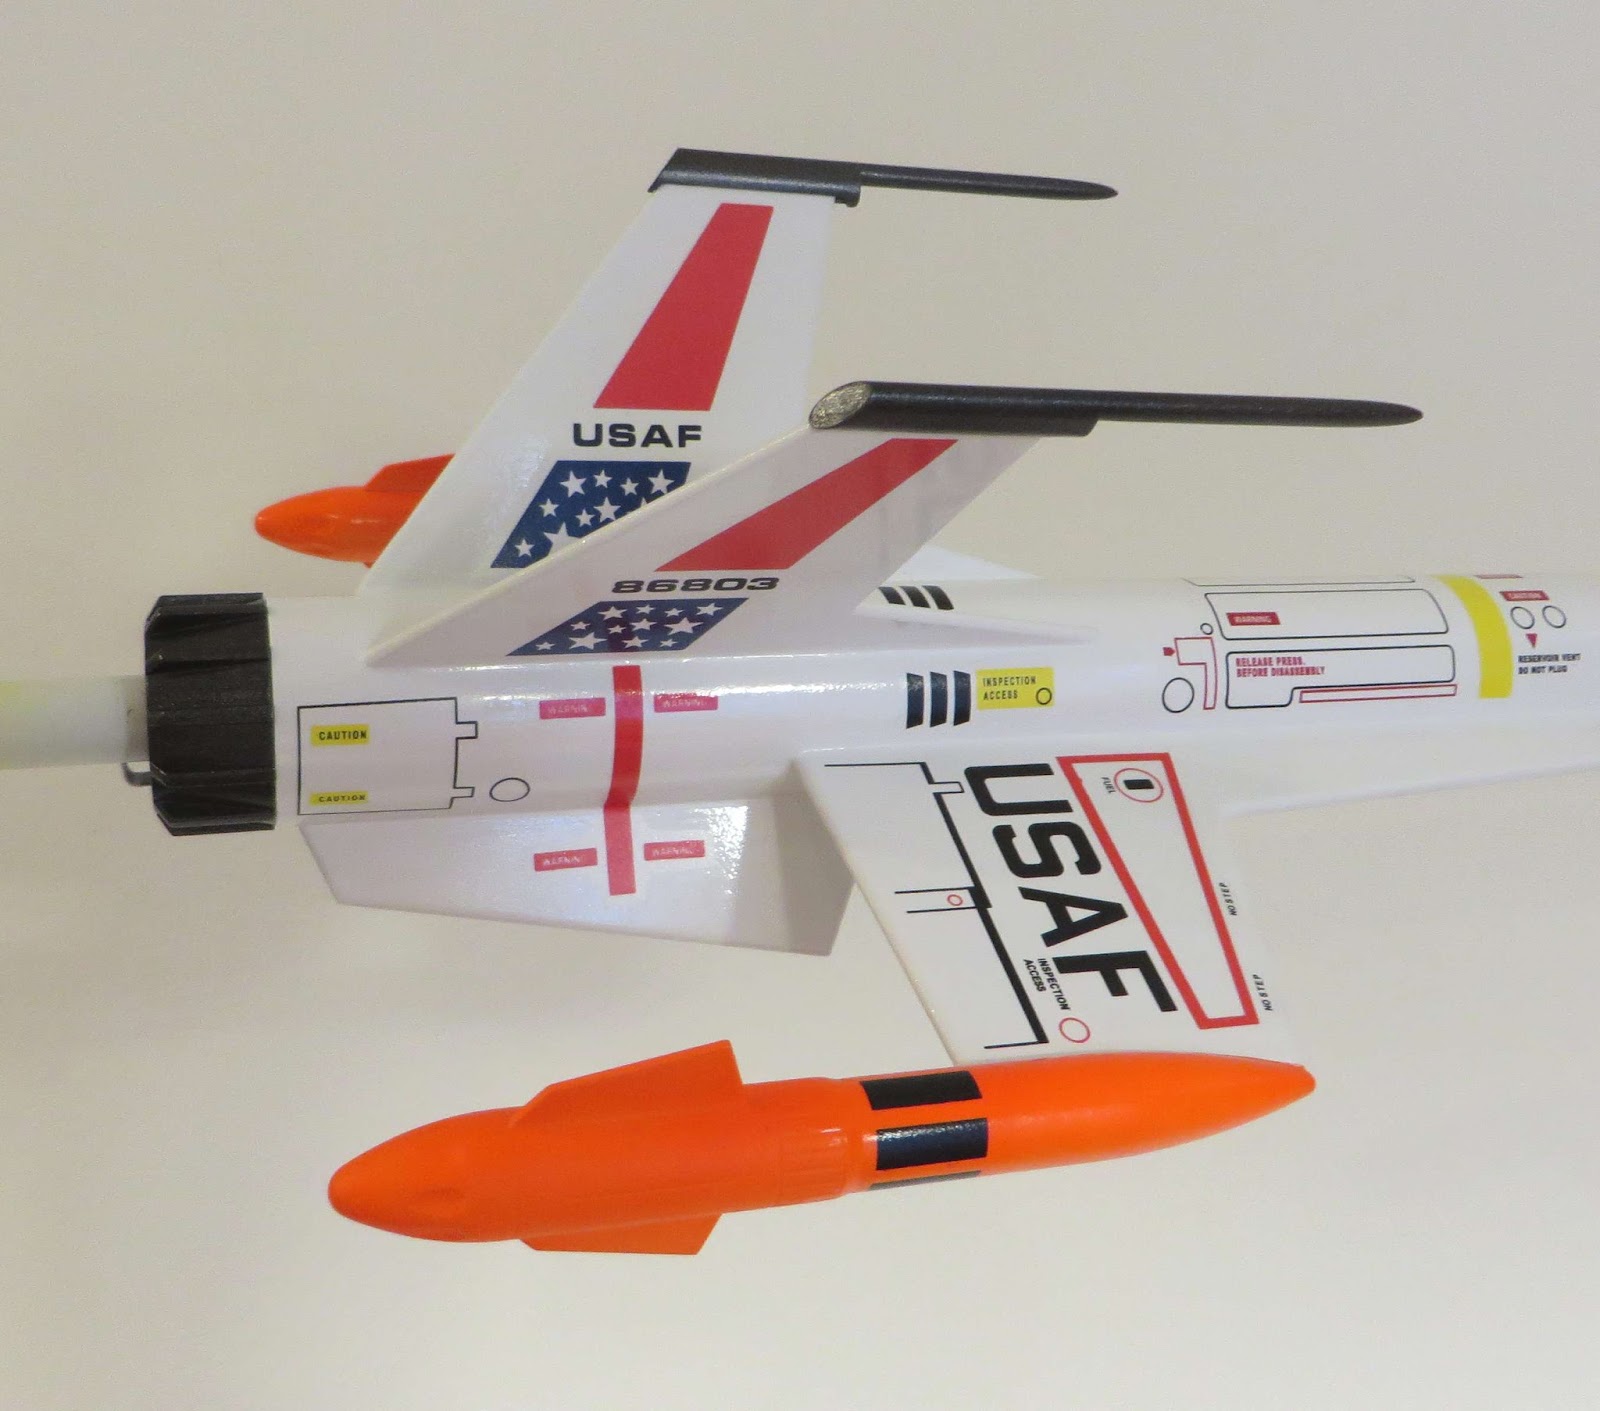
Somewhere I saw a picture of a finished Interceptor where the antennas were painted black. I wish I could find it again and give credit to the original builder. To me the Interceptor could use a little more black detail for a stronger contrast.

To spray these black off the model some of the 1/8" scrap balsa strips were thinned to 3/32", the same thickness as the upper fins. The antenna slots were wedged in over the ends.

The tail cone and antennas were all painted with Rustoleum metallic black.

Wednesday, June 29, 2016

Estes Interceptor Build #1250, Part 16, Painting The Wing Pod


Plastic grocery bags were used to cover up the rest of the body.

Near the pods you can see the brown masking tape that goes on after the Scotch tape and holds the bags on the body.

Here's one of the pods after the tape was pulled. A little back push with a knife tip evened out the paint line where the Scotch tape overlapped.
While the instructions called for fluorescent orange, this Ace Hardware "Rocket Red" fluorescent came out a red/orange. Compare the can lid to the color on the pod. I can live with this color.
Fluorescent paints do require a white undercoat. This final color would have been darker if a colored undercoat were used. Then again, that might have made it too dark.

Tuesday, June 28, 2016

Estes Interceptor Build #1250, Part 15, Masking The Wing Pod


There are a lot of root edges and nooks to get paint on evenly.

As careful as I was to get full coverage there was still a few spots near the wing pods that didn't get enough white paint.
Rusto 2X touch-ups blends in pretty well. Paint was sprayed into a cup and a Q-tip used to roll on some gloss white.
It would have been easier to paint the wing pods separately off the model.  But there would have been that joint gap on the upper part of the pod. The face card model was probably painted that way. The same reason you paint the tail cone black, off the model.

The mask of the wing pods was interesting but not hard to do.
Scotch tape was set down on my patio door glass.
The wing pod was set over it and a pencil tracing was done right around the outside edge of the nose cone. The side of the pencil was set right on the nose of the pod.


Cut down the pencil line first then mark down the drawn line with a permanent marker.
Cut with just enough pressure to cut through the tape. Press too hard and you could scratch the glass.

Trace and cut two right sides and two left sides.


A small thin strip was set over the top.

The curved piece cut in the previous picture is set down the pod/wing joint in the middle of the fillet.

Monday, June 27, 2016

Estes Interceptor Build #1250, Part 14, Wing Pod Gluing


The two piece wing pods were glued on with the Beacon Fabri-Tac Glue.
If any of this thick glue squeezes out, wipe it away immediately. It is a bit gummy going on and dries hard.

After drying, the wing pods seem strong and very well adhered.
Notice the gap at the front of the pod/wing joint.
The gap was filled in with two fillets of Titebond M&TG.
After a small spray of gloss white, any fillet marks and glue boogers were sanded down for the next color coat.

Sure it'd be easier to paint the pods separately and glue them on afterwards, but I wanted to get rid of the gap at the pod/wing joint.


I had to dry fit the antennas on the vertical fins and see what the model profile looked like.
This was a very cool design in 1971 and is still impressive 45 years later.

Sunday, June 26, 2016

Estes Interceptor Build #1250, Part 13, Parachute Fix Tips

After a good tug, the shroud lines on the pre-assembled parachute seemed pretty strong.
The reinforcement disks were peeling off! They also tore easily telling me they were paper.
The disks will be replaced with Avery plastic disks.
I didn't want to replace the shroud lines. There is a way to work around them.


Cut a line through one side of a plastic disk.
The inset picture shows how the disk will sit with the cut facing away from the shroud line.

Fold over the parachute corner and open up the shroud line loop at the tie.
Slip the cut ring through the open loop being careful not to touch the sticky back to the plastic chute. It's a little tricky but can be done.
It may take a few tries to get the disk into position. In the end this takes much less time than tying on new shroud lines.


It's hard to see in the picture but the cut ring line is to the center, opposite any stress of the shroud line pulling on the parachute.

Saturday, June 25, 2016

Estes Interceptor Build #1250, Part 12, White Paint Sanding


After filling with CWF and sanded down primer/filler I had a lot of raised grain. This really shows up on the first white undercoat.

In addition to the raised grain there was some open grain pores throughout.


Light sanding will get rid of the raised pore lines. This is pretty much dry sanding. A wet sand might get into the thin coat of paint and swell the wood. The open pores got a fill with more CWF. The excess was taken off with a razor blade so there will be very little to sand off.


The white undercoats act as a final filler when sanded down.
Look close around the upper launch lug. much of the Titebond M&TG fillet "boogers" have been sanded to surface.