Showing posts with label TTW. Show all posts

Thursday, May 1, 2025

New Way Letter - Go Build, Part 9, Fin Gluing

I applied wood glue to the root edge and to the sides of the TTW (thru-the-wall) fin tabs.
The name letters should read clockwise, to the right.

Note how the letters lean down, like a down swept fin.


I drew an arrow to show how the fin should intersect the centerline of the body tube. 


Here's all five fins viewed from the rear, spelling my first name.
I tried to fill the nose cone seams using medium CA glue and sanding to surface.
Well, the CA glue doesn't stick to this polystyrene plastic!
Filler/Primer and paint doesn't adhere to this plastic either.

Rough up the plastic surface before spray painting with color. 

The upper picture shows a painting "handle" using a wrap of copy paper.

Wednesday, July 3, 2024

Enerjet by Aerotech Initiator Build, Part 9, Fin Locking & Engine Mount Gluing


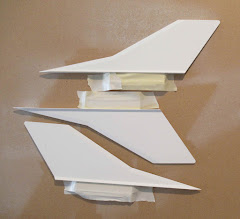
The thru-the-wall fin tabs are masked off so the fins can be painted before being attached.
Notice the tabs are taped down to the backing cardboard for spraying.

Spray one side, let dry.
Flip over and spray the other side.


The pre-cut fin and launch lug slots are removed.

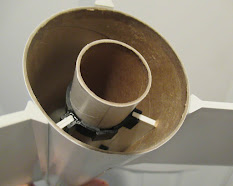
Now you can slide in the engine mount making sure the fin locks around the engine mount are visible through the slots.

The contact areas of the TTW root edges get a bead of CA glue. The fins are slid in with the TTW tabs snapped into the fin locks.


From the rear - CA glue is applied to all reachable joints locking the mount in place. 

Through the front - Apply a wood glue fillet around the outside of the front centering ring/body tube joint.


Thursday, November 17, 2022

Estes Odyssey #7235 Build, Part 24, Gluing On The Wings


I only applied wood glue to the tapered root edge of the TTW wing and the forward and rear wing tip root edges.

No glue on the center strip yet - 
That will be added afterwards at the BT-80 slot joints.


The right wing in place.
The tapered root edge is tucked between the inside tubes, the outside root edge tabs are in full contact with the large scalloped tube slot.

Now flue fillets can be applied to the outside tube slot joints. 
I didn't bother trying to fillet the inside joints. Those are too hard to reach.


Looking from the back -

If your TTW slots were cut accurately, the wing angle dihedral angles should the same.
The inside engine engine assembly is in place for the picture - no glue yet. 

Wednesday, November 16, 2022

Estes Odyssey #7235 Build, Part 23, Gluing The Rudder Fin

The top Rudder fin wasn't making contact with the inside tube. A close look showed me the BT-80 tube was a little out of round.

Wrapping a rubber band over the top of the rudder pressed things down and brought the root edge onto the inside tube.
Visually check the alignment before the glue sets up.


After the root edge glue dried, I added some slight root edge fillets applied and smoothed with a Q-tip.


Before the root edge of the wing fins were glued in, 

The inside surfaces between the tubes were roughed up using the sides of a round diamond file. This was just enough to rough up and remove some gloss white paint that got into the tight tube joint.

Thursday, November 7, 2019

Estes Little Joe 1, #7255, Build Part 13, Nozzles & Fin Fitting


I didn't use tube cement.
The two halves were held together and liquid cement was brushed on the inside seam.

The nozzles then snap into the motor housings. It takes a good push to seat them. Be sure to line up the notch so the nozzle angle is correct.
The tab on the base fits into the rectangle cut into the low centering ring.


All the nozzles and housings were set down on tape for a spray of flat black.

A fin was slid into the slot and the root edge traced with a pencil.

The remaining filler/primer was sanded down to the tube for a better gluing edge. The sanding went a little outside the pencil line for the fillet.


Three of the fins fit tight against the body tube, the fourth fin had a little gap along the root edge. This happens occasionally with TTW fins. You just have to sand the tab a bit, where it butts up against the engine mount tube.

Friday, November 1, 2019

Estes Little Joe 1, #7255, Build Part 8, Cutting The TTW Fin Slots


I extended the printed cut lines to give me more to align the straightedge on.


The fit of the cutting guide was good around the tube.
TIP: The engine mount is not glued in place yet. It was slipped into the tube for support while the notched are cut.
The cut lines were traced with a sharp pencil.

The base notches were cut first. These will be cleaned up later.
The inside corners were done as follows:

Look close at the upper left of the fin slot.
In the four corners I did a small punch with a sharp knife. The knife blade is flipped over and a punch slit was made from the right side joining the two cut lines.
Why do it this way? A sharp knife can get away from you and cut a longer line than you might have hoped for.

TIP: I used my aluminum angle to cut the sides. Even with this large tube diameter, the angle still helps with a straight cut.

Again, notice the engine mount in place for support. Be sure you aren't cutting into the centering rings underneath.

Tuesday, August 13, 2019

Estes Sasha Build #7271, Part 7, Booster Fin Fit & Glue


This doesn't normally happen doing my regular two-step balsa filling practice.
After the filler/primer dried there were a few balsa grain pores left. I rubbed some CWF into the pores and sanded it to surface at the same time I took down the filler/primer.


The fin tab fit was a little long. There is a gap at the root edge.

In the picture I've marked the area with a pencil that will be sanded down. Sand a little, check the fit then sand a little more.


On the booster body tube the filler/primer has been scraped down to the rough tube for a better glue bond.
NOTE: The primer has been scraped where the glue fillet be down the root edge joint.


The booster fin fit is much better. This is a dry fit before gluing the fin tabs to the interior motor mount tube.

Sunday, July 14, 2019

Centurion Project, Part 8, Fin Gluing

These pictures are of the Estes Cosmic Explorer, the slightly down scaled version of the Centuri Centurion.
The Estes Cosmic Explorer (BT-55) has through the wall fins, the root edge of the fins glue to the engine mount tube.

Looking inside the pre-cut fin slot you can see the black electrical tape I used around the engine hook. The black tape also holds the tube for the replaceable Kevlar mount.

In the above left picture the fin doesn't quite seat against the outside body tube. The electrical tape is wider than the slot recess that would have fit the Mylar retention ring.

I've marked the tab with pencil where the notch needs to be wider. I carefully shaved off the pencil area to fit over the tape wrap.

The right side of the first picture (above) shows a better fit of the root edge.


Back to the larger Centurion:
These fins are surface glued onto the body tube - no fin slots.

After the fin lines are drawn, the primer paint is scraped off a little wider than the 3/32" thick fins.
The pencil line is scraped off, but redrawn before gluing the fins on.


From the back end - 
At the edge of the fin you can see a pencil line drawn around the end of the body tube.
These fins totally cover the pencil line at the back. The small pencil "tic" mark gives you something to center the root edge on when you can't see the line.

Inside is the engine lock strip, centered between two fins.

Saturday, March 16, 2013

Centurion Project Part 5 Cosmic Explorer Fin Primer and Gluing


The fins are test fitted in the TTW slots.
Even with the slight thickness of sanded wood filler (CWF) it was a tight fit getting the fins seated.

I'm not gluing the fins in place yet. The slots will hold the fins in place for primer spraying.

By not gluing the fins in the slots I can remove them to sand the primer down. It's easier to sand the primer when you are not dealing with the angle of a root edge.

In the picture you can see I have an automatic mask - no primer is on the TTW tab or the root edge gluing area on the body tube.


After the primer coat it took even more forward and back wiggling to get the fins seated.
Check the root edges of the slot to be sure they sit squarely against the fin sides.

Friday, August 10, 2012

Estes V2 Build Part 10 Fitting the Fins

With the engine mount dry fitted in place, the thru-the-wall fins were slid into their slots.
You can see there is gaps at the root edge between the fin tabs.

Note at the rear of the fin (at the body tube end ) the root edge is touching the tube. The easiest way to fit a fin is to sand where the root edge is making good contact. This lowers the fin in the slots and makes the gaps smaller.

Don't forget the inside where the tabs make contact with the engine mount tube.

The notch in the lower tab needed to be made deeper to fit around the coupler.
Sanding down the tab a light amount also helped lower the root edge for better contact with the body tube.

Here's the fin after fitting the TTW tabs.
There is still a very slight gap but it is much less than before.

I fit each fin to it's own location on the boat tail.
There is a number 2 penciled on the slot below the fitted fin.
Fin 2 was fitted to that lower location. All the fins are numbered on the root edges.

Tuesday, May 8, 2012

Estes Phoenix Bird Build Part 9 Gluing On Fins


After all the trimming and adjustments to the root edges here's the final fit of one fin.

Enlarge the picture and you can see how the front and rear of the fin (root edges on the body tube) are slightly raised but still making good contact.

The rear of the fin is flush with the end of the main ariframe tube.


I waited to fillet the rear centering ring.
Glue was added drop by drop and spread with the end of a rounded dowel.

Any excess glue (on the inside body tube wall and flat surface of the centering ring) was picked up with a Q-Tip. I was also able to remove the excess glue from the fillet to lessen the chance of the body tube "puckering" when the glue dried.

TIP: If you don't have Q-Tips on your workbench, go raid the bathroom cabinet. Q-Tips are indespensible for removing glue where your finger can't reach.