Saturday, November 30, 2013

Carded BANDITO Build Part 3 Body Tube Skin


The 24 lb. print body tube skin is cut to size.
Look for the small tic marks on the outside. The color bands are oversize on purpose for full coverage at the joint seam.

Be sure your hands are clean before applying the body skin. If glue gets on the outside of the skin dirt and oils will stick to it.
Draw a pencil line down the body tube to align the body side. (See the next picture)

Set down some clean copy paper before applying the glue stick coat.

The inset picture shows the body skin turned over and an even glue stick coat being applied.


Set the long side of the skin down the pencil line on the body tube.
Note the body tube was rough cut a little long and will be cut to size afterwards.

Roll the paper skin around the tube using the side of a finger.
Make it smooth with no wrinkles.
You have a few minutes to apply the skin before the glue starts to set up.
It's enough time but don't wait to roll the skin in place.

The back end of a Sharpie was rolled over the seam to set it in place.

Ty-Wrap Retainer Ring? Part 2

I could see where ty-wraps could be used to hold the engine hook in place.
I'd never use masking tape again and now use black electrical tape.
Electrical tape can get gummy and could loosen up.


I found some narrow ty-wraps that were long enough to get around the engine mount tube.


Here's the engine hook with one ty-wrap in place.
Don't over tighten, you could bend the tube.

The wrap is too narrow and the engine hook can slip to the side.
Most Mylar retention rings are 1/4" wide.

Two ty-wraps side by side prevent the engine hook fro side to side movement.

You probably couldn't use a ty-wrap on a 18mm mount in a BT-50 tube, there just isn't enough room between the tubes.
The 18mm mount would be fine on a BT-55 or 60 size tube.

Friday, November 29, 2013

Carded BANDITO Build Part 2 Fins

After "soft folding" to be sure your crease is right down the center line,
burnish the fold using the back end of a Sharpie to make a sharp crease.

Your wedge fin should look like the inset picture.
Notice the fin hasn't been cut out yet.

Open the creased fin to cut the details.


Score the glue tab (upper center) before cutting.

Cut the small retaining ring notches first. You can freehand cut the small cuts and use the straightedge for the longer ones.
Cut the glue tab and fold on the dashed lines.

Finally cut out the fins on the outside lines.


When the fin is first creased the root edges will be rounded.

Pinch the upper end of the creased leading edge to coax it into a sharper wedge shape.


New Sandpaper!

I've seen this paper at Home Depot but didn't buy it until recently.
It was more expensive than the old garnet style sandpaper. This package holds three pieces, the older style paper package had four or five.

It was advertised as the "World's Best Sandpaper".
Oh sure, World's Best? How could one sandpaper make such a claim?
Home Depot was out of the older style garnet 220 and I was stuck.
I was pleasantly surprised.
This sandpaper doesn't load up as much. What does get stuck to it is easily knocked off under water with a soft brass brush. I used a single piece again and again.

World's best? Who knows. But it is a good sandpaper.

Thursday, November 28, 2013

Carded BANDITO Build Part 1 Fins

I recently released a new carded model PDF for a downsized Centuri BANDITO. The big Bandito design feature were the wedge fins.
This build does require some extra care, especially when forming the wedge fins.

Patreon members can email me at: oddlrockets@bellsouth.net and ask for the Bandito PDF.
Make two prints of the PDF, one on 20 or 24 lb. paper for the body wrap. 24 lb. paper will look better.
You'll need a BT-5,  just under 8.6” long. The printed body wrap goes over that.
The second print is 110 lb. cardstock for the fins. There are plenty strong when made from 110 lb. stock.
The Nose Cone is a Semroc BC-522P, 2.14” tall. This is the closest profile available for the downscale.

The fins are printed out on 110 lb. white cardstock.
Don't cut them out yet! You'll need to score them first.
BE SURE YOUR HANDS ARE CLEAN BEFORE ANY FOLDING!

I'm using the rounded metal back side of a single edge razor blade to score a line down the dashed centerline. Put a few layers of masking tape over the sharp edge (now facing up) so you won't cut yourself.
I'm not cutting halfway through the cardstock to make the fold. The backside (not sharp side) of the blade is pressed into the cardstock, embossing a line for an smooth rounded fold.
Carefully place your straitedge down the center before using the blade back.
Score all three fin centers before cutting them out.


After scoring the centerline:
Cut the fins out oversize, outside the border lines.
It's easier to fold the fins with some extra card stock outside the sharp tips.

Don't fold a sharp crease yet.
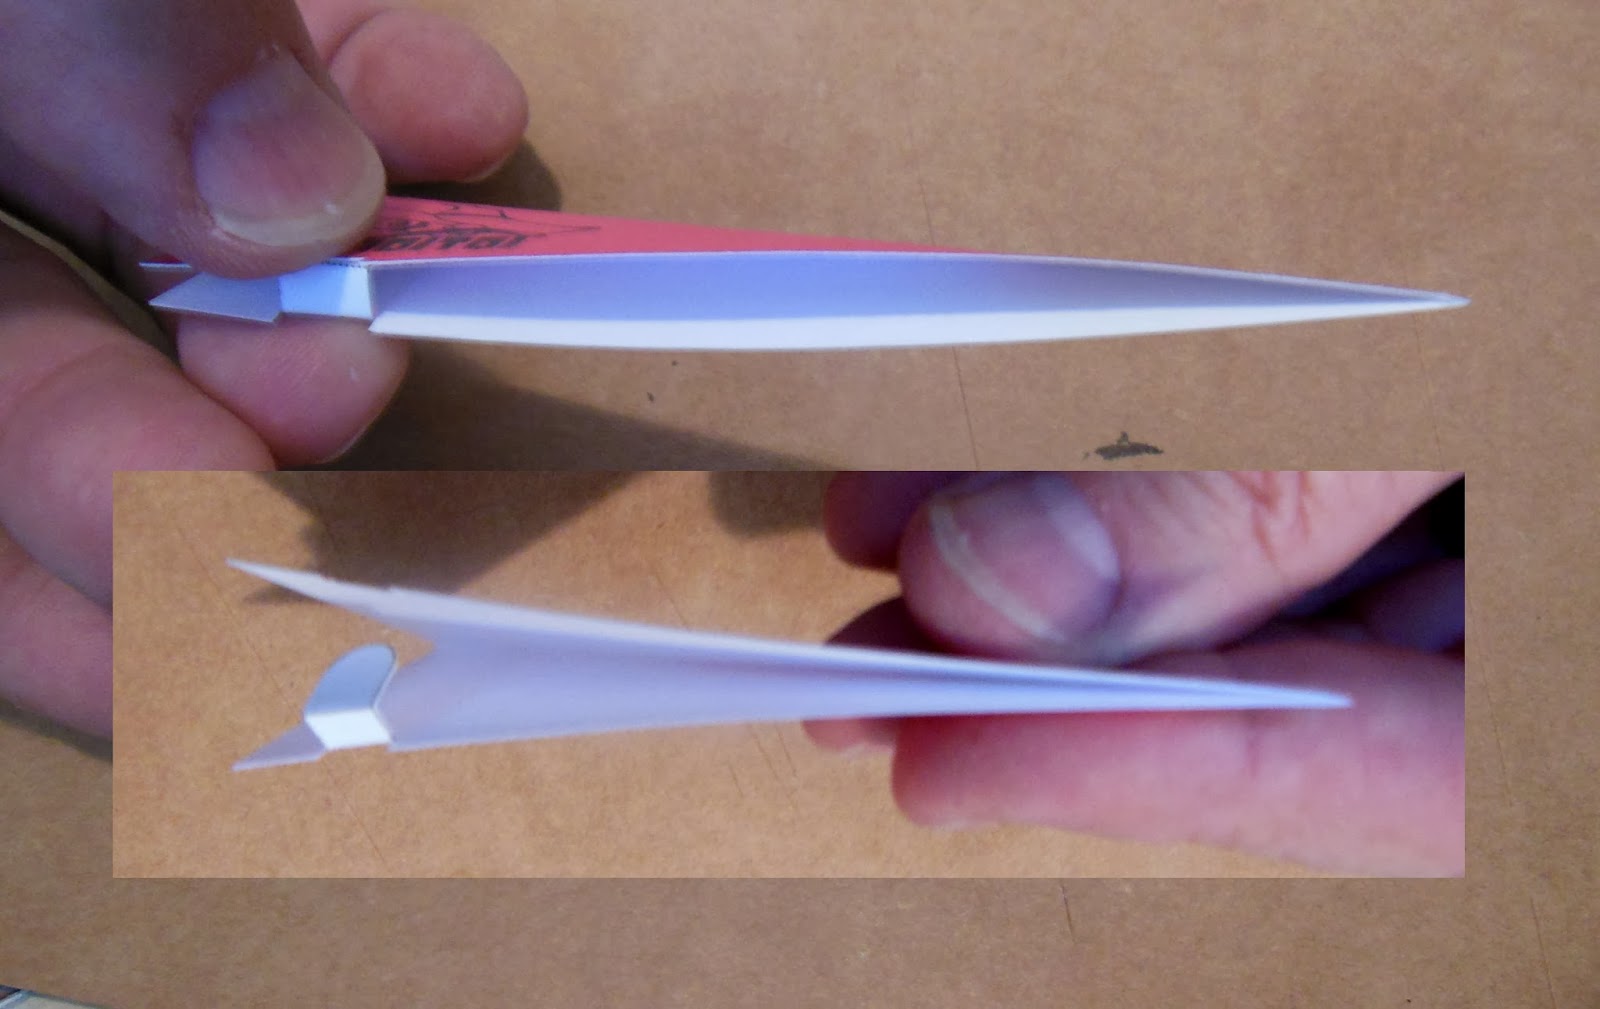
Using just your fingertips lightly fold down the scored line making sure your fold is centered.
The sharp fold comes in the next post.

Ty-Wrap Retainer Ring? Part 1


Jeff Gortatowsky (gdjsky01 on TRF) posted this first picture before he added Kevlar wraps (instead of a tape wrap) around the engine hook.
"... as you'll see I wrapped the hook in CA impregnated kevlar string. You can see I filed a spot on the hook. The string is both around the hook/MMT and over and under the hook. Not just across the top. I've done this before and never had a motor rip the hook away. The ty-wrap was temporary and cut away later."

My response:
Hey, using a small ty-wrap in place of a retaining ring is a great idea!
I do like the use of wrapped Kevlar, but I would think the ty-wrap would be enough and work on LPR models if the upper bend of the hook is under the upper centering ring.

Jeff added:
"Hi Chris, be careful and experiment first. You don't want to pull it too tight or you could constrict the tubing."

Wednesday, November 27, 2013

FlisKits Tartar Build Finished


The tail cone was sprayed with aluminum before gluing in place.
The nose cone was sprayed white, off the model.
The body was painted gloss red. Then all three painted assemblies were assembled.
The engine hook and outside shroud seam was lined up under a fin.
I was happy with the way the nested "Super Shroud" turned out. Very smooth and strong.
All the card stock reinforcement pieces still aren't as smooth as I'd like, even after all the sanding between coats.

With its BT-60 size and almost 22" length it could have been a 24mm rocket.
This is a sharp looking model and a great addition to the fleet.

The Fliskits website says it weighs 3.8 oz.
My finished Tartar weighs             3.58 oz.

DIY Estes Style Wadding!

Apastusak on TRF found a link on how to make your own recovery wadding.
"Just found this on instructables.com
http://www.instructables.com/id/Model-rocket-recovery-wadding/
Not much to it, except a little time and patience.

Saucer, Wax paper
Toilet paper (as many sheets as sheets of wadding you want)
Borax or baking soda 
Water, Measuring cup, Spoon


The TRF posts that followed basically said: "Why bother when there is crepe paper and dog barf?"

Making your own tissue paper wadding seemed like a little too much effort. Still, it's another option.

I make my own from flame resistant crepe paper cut into 4" squares:
http://modelrocketbuilding.blogspot.com/2011/02/tip-budget-wadding.html
http://modelrocketbuilding.blogspot.com/2013/02/wadding-alternatives-tip.html
or the extra Estes and Quest wadding pulled from bulk packs of engines.

After a flight session, I pick up wadding (clean up the field) and reuse it when I can. 
It's the piece of wadding closest to the engine ejection that's burned through. The upper pieces are rarely burnt.

Tuesday, November 26, 2013

FlisKits Tartar Build Part 15, Fillets and Launch Lug


Always a favorite part of a build is the dry fit.
The models always look different in person.
The strakes are long so apply the fillets 1/2 the length of the root edge.
Smooth one half side then do the other side. Go from the center to the end of the fin strake.

If you were to apply glue all the way down the root edge of this long strake, too much glue would pool up on your finger before you got to the end. The fillet would get wider at the end of the glue swipe.
Applying fillets on half the fin keep the amount of glue manageable.


The ends of the fin covers are open at the ends.
I decided to fill the edges with CWF.

The fin on the left hasn't been filled, the fin on the right is filled and ready for sanding.


Titebond Molding and Trim Glue fillets were applied on both sides of the launch lug.
At the ends the excess glue was rolled off with a tapered Q-tip.

Estes Xarconian Cruiser Finished


This was rated a Skill Level 5 build probably because of the tube cutting..
It wasn't that hard to put together, the wing pods and masking were the most difficult.
The build was time consuming.
It's an impressive model and should perform better with the D engine mount modification.

The Estes website says the rocket weighs 3.7 oz.
My finished model weighed in at              4.85 oz.
Good thing I adapted it for the larger 24mm engines!

Monday, November 25, 2013

Cherokee D On Sale On EBAY!


The CHEROKEE D built on this blog 
is up for bidding on EBAY!
Check the listing HERE

The model is finished and ready for flight or display.
Perfect for a collector. If you follow the blog, why not place a bid?

Estes Xarconian Cruiser Build Part 32, Engine Hook Relief Notch

I installed a 24mm engine mount in place of the standard 18mm mount.
This put the engine hook too close to the edge of the plastic tail cone. It would be hard to slide an engine in without the notch shown here.

I used a combination of small files and a hobby knife to get a square cut.
The hook now moves enough to allow an engine in the motor mount tube.

After handling the tail cone some of the paint wore off. I'll have to spray it again with black. It'll be epoxied into the rear of the air frame tube later.

A longer shock cord was tied to the Kevlar leader from the forward centering ring.
The elastic shock cord was attached to the nose cone lug with a Duncan Uni Knot shown HERE.
The parachute snap swivel was attached 1/3 the way down from the nose cone on a loop knot tied in the cord.

FlisKits Tartar Build Part 14, Fin Gluing


I like to keep templates complete for any repairs down the road.

The fin marking guide was transferred onto 20 lb. copy paper.


Here's the fin guide in place for marking.

After the fins were marked the holding tape was lifted and the guide rotated 90 degrees to be sure the pencil marks were even.
The rear fins hang over the and off the tail cone.

My sanding block was set against the the trailing edge tip to be sure it was even with the end of the tailcone.

The tailcone and engine mount isn't glued in place yet.
The tailcone will be painted silver before gluing the attached mount in the body tube. Trying to mask around the rear of the fins would be hard. It's simply easier to paint the nose cone, body and fins and the tail cone assemblies separately and then assemble everything.


A thin strip of paper was taped around the tube to give a straight line to rest the trailing edges of the strakes.

The strakes are long and take extra time to glue on straight.
The fins and strakes are different thicknesses so I couldn't line them up with clamped on craft sticks. Just do the best you can by eye.


Sunday, November 24, 2013

Estes Xarconian Cruiser Build Part 31, Intake Detail


I wanted to darken the inside of the rear intakes.
It'd be too hard to paint them now so I'll use some electrical tape.
The electrical tape will stay in place and is a matte finish.

While the picture shows the width to be 1 3/16", in the end the width was 1 1/8".


Use your long tweezers to center and set the piece of tape.
The tape can stick out of the tube a little.
After burnishing down the tape with a dowel, cut off the overhang with a razor blade.


Here's the rear intake after trimming the tape piece.

Crazy EBAY Prices!


Here's another ridiculous listing on Ebay.
A finished Baby Bertha, ready to fly!

Buy it now for $24.99, add $8.00 for shipping.
Total is $32.95
I occasionally sell finished models on Ebay, but I wouldn't let this one out of the house!

Maybe it's a kid trying to make some extra money. I can't fault him for that. But then again, I have seen some models built by adults that rival this one.
It looks like it was dragged through the dirt!

Saturday, November 23, 2013

Estes Xarconian Cruiser Build Part 30, Nose Cone Decal

The instructions don't give any directions on how to set the nose cone decal.
It overlaps the joint of the body tube and nose cone.

Tape the shoulder of the nose cone for a tight fit. You don't want the nose cone to rotate when the decal is being set down.

Look down from the front and center the canopy.
These decals took one minute of soaking and another minute sitting on a paper towel to release from the backing sheet.
Check again and press the nose cone tight against the body tube joint.
Place the decal. It's long and thin, keep the area wet until you are sure of its position.

When the decal is about half dried, cut it at the joint crack using a sharp blade.
I pulled the break-off blade out of the handle a bit for a longer cutting tool.

Pull the nose cone out slightly and rub the edges down with a damp fingertip. After cutting the joint the cut decal edges will lift. Press them back down.


Spray the black tail cone piece off the model.

Here's how the tail cone and engine hook line up.


Quest / Aerotech Holiday Specials

I went to the Quest website HERE to check the availability of the Q2G2 igniters. I read on a forum that they were on back order.

The opening page had specials:
A Big Dog kit with a "Free" Aerotech F30-4 engine for $44.99
The price for the Big Dog kit (alone) is $38.24
The Grunt kit with a "Free" E15-7 engine for $24.99
The price for the Grunt kit (alone) is $21.24
The engines aren't actually "Free" but still a fair price for the combo.

The D5-0 engines are in stock again.

It looks like the merger of Quest and Aerotech is in full swing!
Quest had always hinted about Aerotech engines being sold from their website long before the merger.

Friday, November 22, 2013

FlisKits Tartar Build Part 13, Tight Sanding TIP


I wanted to sand close to the reinforcement pieces but folding a piece of sandpaper in half could cause scratches at sharp edge.


Another use for a Q-tip:
The cotton tip was dipped in water and the excess shaken off.

The round tip was flattened with my thumbnail.
Wrap some 400 grit sandpaper around the flat tip.
The cotton gives more support with less chance of scratching.


The inside edges of the reinforcement pieces are sanded.

Estes Xarconian Cruiser Build Part 29, Added Detail

Those little nubs on the nose cone side need some detail. No decals are included for this.
They should have a gun detail or suggested nozzle decal.
I'll use black electrical tape to make small circles.
You could use a decal from another kit, but I wanted to show a quick solution.

A piece of electrical tape was stuck down to the yellow decal backing sheet. This makes the small tape detail easy to remove after punching.

My rotary punch was set on the smallest hole.
I tried to punch through the tape only.
You can lift and position the black dot on the nose con with the tip of your hobby knife. Don't even try to use your fingers, it's just too small.


If the small dot stays in the rotary punch tube, pick it out with your knife tip. Again, leave it on the tip for placement on the model.


Here's the dot in position.
It's a small detail but adds a lot.

Thursday, November 21, 2013

Estes Xarconian Cruiser Build Part 28, Masking the Canopy


The rest of the nose cone was masked off using small pieces of brown masking tape.

The inset pic shows the paint results after first pulling up the tape.
It's okay, but the edges are a little rough. This was expected and will be cleaned up.


While the paint is still a bit pliable, some of the rough blue edge was lightly scraped off.


A small spot on the edge didn't get the blue paint.
A small brush and the same Rusto 2X Blue was used for a touch up.

I spray some paint into a small mixing cup and pain.
Throw away the cup when you are finished.
TIP: Did you ever see "Micro Brushes" for sale in a hobby store? They are expensive! In this instance you can get the same results using a Q-tip.

Spray the tan Rusto 2X in a disposable mixing cup.
Dip and wipe off the excess.
Roll the Q-tip over the edge covering up any remaining rough line.

Perfect? No. But much better.
Look close at the Estes built model on the instruction sheet. It looks like the builder had some problems with the canopy, too.