Showing posts with label E Constellation. Show all posts

Thursday, December 26, 2024

Estes (Semroc) Constellation Finished


A real classic, now available from Estes as the K35 Astron Constellation.

I finally got the landing pods right this time!
I was never happy with my first attempts carving them out of balsa layers.
The white edged "1" decal looks good against the single black fin. It was worth the extra effort.

The nose cone shoulder is well hidden behind the black bands.

There are a few decals left over, some black rounded rectangles. I'll save them for another build. This model shared many of the same decals as the two-stage Shrike kit, CLICK HERE


Tuesday, December 24, 2024

Estes Constellation Build Part 18, White Trim on the "1" Decal TIP

Before soaking the trimmed red decal -
Have a sheet of decal paper sprayed with gloss white paint. This will be used for the white edge. Spray a clear sheet with white getting full coverage. Let dry thoroughly. No clear coat is needed on the white sheet, the white paint seals the surface. You'll be making a composite decal, the red "1" set on the white border base.


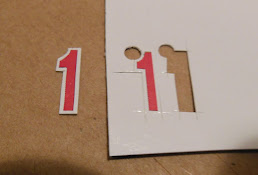
On the left is the two trimmed red "1"s.

You'll need tweezers to hold onto the decal when soaking.

Dip the decal for 15 seconds and remove from the water.
Change the position of the holding tweezers so the entire decal is soaked.

Set the decal on the sprayed white decal sheet.
Use you rotary punch to get the upper left round edge cut.
This punch sets the thickness of the white border.

On the left is the trimmed decal with the new white border.
On the right is the second decal being trimmed.
Be sure your straightedge is perfectly positioned before cutting the white border.
You get one chance to get it right. Use a new blade.


I was surprised how well the red stayed on the white backing during the re-soaking. It didn't shift when sliding off the backing paper.


The "2" and "3" decals are wider than the "1".
It was set between the pencil lines.


And finally, the engine hook was scraped clean of paint and polished with some 400 grit
.

Monday, December 23, 2024

Estes Constellation Build Part 17, White Trim on the "1" Decal TIP


The Semroc clone kit didn't have any white ink on the decal sheet.
The original Estes kit had a black fin that needed a white border on the #1 decal. Here's how I made a white border so the red decal would show up against the black fin. 

The "2" and "3" decals were applied.
I drew up a simple paper wrap that folded over the leading edge for easier positioning. This folded piece and pencil marks are identical on both sides.

These numbers were set down a bit, closer to the landing pads as shown on the catalog page.


Now the tricky part: 

The black border is cut off the "1" decals.
The top of the "1" isn't really rounded but nobody will notice the difference.
I'll never get a smooth round cut with my hobby knife, so I selected the appropriate size barrel on the rotary punch.
Just punch off the black edge.


Carefully set your straightedge and trim off the remaining black borders.

Just leave the smaller red "1" in the center.

TIP: Notice the straightedge is turned over. Sometimes I want the edge closer to the surface of the cut without the cork backing raising it up.

Sunday, December 22, 2024

Estes Constellation Build Part 16, Single Black Fin Mask

I wanted the model to match the old catalog pictures. The Semroc face card shows all three fins in white. One fin should be black. For the red and black "1" decal to show up on the black, I'll add a white edge to the decal in the next post. This is not not easy to do, plan your finish after reading the next post.


I used marked Scotch tape for the mask. It takes a lot of straight pieces to round the airfoiled leading edge shape.


The rest of the model is covered with cheap masking tape and grocery bags.


TIP:
 Another use for the Q-tips-
They make a good cushioned burnisher for the taped mask lines.
No scratching, just a well set tape edge.

Saturday, December 21, 2024

Estes Constellation Build Part 15, Masking The Clear Payload Tube

The face card shows the upper and lower ends of the clear payload tube painted black.
The black paint will cover up the balsa shoulders on the nose cone and nose block.
On the left is the line mask using the marker drawn Scotch tape.

The center was covered with masking tape.
It's hard to see the exposed clear tube ends, you can see the reflected light on the upper right.
Small pieces of masking tape are in the top and bottom, sticky side out.
Two rolled up pieces of paper (yes, those are Sudoku puzzles) were stuck in ends.


After the tape was pulled, here's what I was shooting for.


The black paint just covers the exposed balsa shoulders.
The clear payload tube plastic accepts the spray paint very well.


Easy red mask -

Tape the shoulder of the nose cone and paint it gloss red.
Instant, sharp color separation.

Friday, December 20, 2024

Estes Constellation Build Part 14, Fin Gluing


There is a light paint ridge where the fillet area was masked.

Lightly sand the ridge line with 400 grit sandpaper.


The fins were glued on using my prototype Odd'l Rockets FinTool. 
(The Fin Tool never went into production and is not for sale.)

The fin trailing edge is even with the back end of the body tube.
The rear end of the launch lug is even with the front edge of the fins.

Thursday, December 19, 2024

Estes Constellation Build Part 13, Fin Prep


Before spraying a white coat to check for flaws, a small bit of the root edge was masked off.
This was to keep some of the fillet area clear for a stronger glue joint.


After a light coat of gloss white the tape was removed.
You can see the fillet area is clear of white paint.


The pencil fin lines on the body tube were roughed up with 220 grit on a block.
After sanding off the lines they were drawn on again.

Wednesday, December 18, 2024

Estes Constellation Build Part 12, Primer Sanding


Here's the body tube and nose cone after the primer filler was sanded down.
The nose cone was slipped into the body tube for primer painting.
The clear payload section will be trim painted later.


The fin and fin pod transition joints looked pretty good after spraying with the primer filler.
The primer was sanded with 400 grit
.


There is plenty of inside edges that need to be sanded.

TIP: Here's another use for the Q-tip swabs.
Roll a piece of 400 grit around the cotton tip.


This gives you a small, round cushioned sander with no sharp creases in the rounded end of the sandpaper.

Monday, October 3, 2016

Semroc (Estes) Constellation Auction Ending


This is a catalog quality build of the classic Estes CONSTELLATION.

Bidding ends Monday night, October 3, at around 10:30 p.m. CLICK HERE

Check out the build, make a bid a support the blog!

Saturday, August 24, 2013

Estes Constellation Finished


A real classic, available from Semroc as an X Kit.


I finally got the landing pods right this time!
I was never happy with my first attempts carving them out of balsa layers.
The white edged "1" decal looks good against the single black fin. It was worth the extra effort.

The nose cone shoulder is well hidden behind the black bands.

There are a few decals left over, some black rounded rectangles. I'll save them for another build. This model shared many of the same decals as the two-stage Shrike kit, HERE

Friday, August 23, 2013

Estes Constellation Build Part 18, White Trim on the "1" Decal TIP

Before soaking the trimmed red decal -
Have a sheet of decal paper sprayed with gloss white paint. This will be used for the white edge. Spray a clear sheet with white getting full coverage.
Let dry thoroughly. No clear coat is needed on the white sheet, the white paint seals the surface.
You'll be making a composite decal, the red "1" set on the white base.

On the left is the two trimmed red "1"s.
You'll need tweezers to hold onto the decal when soaking.

Dip the decal for 15 seconds and remove from the water.
Change the position of the holding tweezers so the entire decal is soaked.

Set the decal on the sprayed white decal sheet.
Use you rotary punch to get the upper left round edge cut.
This punch sets the thickness of the white border.

On the left is the trimmed decal with the new white border.
On the right is the second decal being trimmed.
Be sure your straightedge is perfectly positioned before cutting the white border.
You get one chance to get it right. Use a new blade. 


I was surprised how well the red stayed on the white backing during the re-soaking. It didn't shift when sliding off the backing paper.

The "2" and "3" decals are wider than the "1".
It was set between the pencil lines.


And finally, the engine hook was scraped clean of paint and polished with some 400 grit.

Estes Constellation Build Part 17, White Trim on the "1" Decal TIP


The "2" and "3" decals were applied.
I drew up a simple paper wrap that folded over the leading edge for easier positioning. This folded piece and pencil marks are identical on both sides.

These numbers were set down a bit, closer to the landing pads as shown on the catalog page.
Now the tricky part: 
The black border is cut off the "1" decals.
The top of the "1" isn't really rounded but nobody will notice the difference.
I'll never get a smooth round cut with my hobby knife, so I selected the appropriate size barrel on the rotary punch.
Just punch off the black edge.


Carefully set your straightedge and trim off the remaining black borders.
Just leave the smaller red "1" in the center.

TIP: Notice the straightedge is turned over. Sometimes I want the edge closer to the surface of the cut without the cork backing raising it up.

Thursday, August 22, 2013

Estes Constellation Build Part 16, Single Black Fin Mask

I wanted the model to match the old catalog pictures.
The Semroc face card shows all three fins in white. One fin should be black.
For the red and black "1" decal to show up on the black, I'll add a white edge to the decal in the next post.
This is not not easy to do, plan your finish after reading the next post.


I used Scotch tape for the mask, it takes a lot of straight pieces to round the airfoiled leading edge shape.


The rest of the model is covered with cheap masking tape and grocery bags.


TIP: Another use for the Q-tips-
They make a good cushioned burnisher for the taped mask lines.
No scratching, just a well set tape edge.

Estes Constellation Build Part 15, Payload Tube Painting


The face card shows the upper and lower ends of the clear payload tube painted black.
The black paint will cover up the balsa shoulders on the nose cone and nose block.
On the left is the line mask using the marker drawn Scotch tape.
The center was covered with masking tape.
It's hard to see the exposed clear tube ends, you can see the reflected light on the upper right.
Small pieces of masking tape are in the top and bottom, sticky side out.
Two rolled up pieces of paper (yes, those are Sudoku puzzles) were stuck in ends.


After the tape was pulled, here's what I was shooting for.

The black paint just covers the exposed balsa shoulders.
The clear payload tube plastic accepts the spray paint very well.


Easy red mask -
Tape the shoulder of the nose cone and paint it gloss red.
Instant, sharp color separation.

Wednesday, August 21, 2013

Estes Constellation Build Part 14, Fin Gluing


There is a light paint ridge where the fillet area was masked.

Lightly sand the ridge line with 400 grit sandpaper.


The fins were glued on using my prototype Odd'l Rockets FinTool.

The fin trailing edge is even with the back end of the body tube.
The rear end of the launch lug is even with the front edge of the fins.

Estes Constellation Build Part 13, Fin Prep


Before spraying a white coat to check for flaws, a small bit of the root edge was masked off.
This was to keep some of the fillet area clear for a stronger glue joint.


After a light coat of gloss white the tape was removed.
You can see the fillet area is clear of white paint.


The pencil fin lines were roughed up with 220 grit on a block.
After sanding off the lines they were drawn on again.