Thursday, October 31, 2013

WHITE GLUE! Part 1

"Elmer's Glue-All now contains 30% more glue solids for a stronger bond on paper, wood, cloth, pottery, and all porous materials. It washes easily from brushes, clothing, and fingers."

Why did Elmer's Glue mess up the formula?
IF IT 'AINT BROKE . . .

I remember reading about the "New Stronger Formula" glue too years ago on the forums. Too many experienced builders were having couplers and engine mounts freeze up before they were slid into the right position. The new formula Elmer's doesn't give you a second chance, things grab way too fast.

A bottle of glue lasts me for quite a while. I found some bottles with the old label ("Bonds Strong") and I bought a four.

My old original formula bottle ran out. I grabbed a new bottle of old formula.
As it turns out, it's an old bottle label with the new formula glue inside!

The new formula is different. Thinner, like more water is in the mix.
Think of whole milk (old formula, white opaque) compared to skim milk (new formula, translucent.)

The new formula runs. It's useless for fillets or even making Zooch Funky Glue Putty.
As thin as the new glue is, I can see how a coupler could grab in the wrong place. It probably soaks into the surrounding pieces too quickly.
I usually use white glue for LPR builds. I'll have to try School Glue instead.

I'm surprised the big two rocket manufacturers have never commented on the new glues. Elmer's was the rocket building standard for years. I wonder if Estes has gotten complaints about problems from a builder using the new "stronger" formula Elmer's.

Check out this older blog post with quotes from dissatisfied builders HERE

Wednesday, October 30, 2013

Old Estes Nike Apache Kit #1957 Engine Mount Fix

I found this unfinished kit in a storage box. It was probably bought in the late 1980s. Back then I was curious to see what Estes was up to after being away from the hobby for years.
The kit was available from 1998 through 1989 and still made in the U.S.

There were reasons why I didn't finish it.
Right out of the bag, the lower BT-55 tube had a dent in the back. I didn't have easy access to replacement tubes then and set the model aside after making the engine mount and sealing the fins.
Another reason to replace the BT-55 now, I had glued in a tri-fold mount and the kit supplied shock cord was only 12" long!


The engine mount was cut out of the bent BT-55.
I had used two wraps masking tape over the engine hook.
Out of curiosity I lifted the engine hook - the tape cracked!
This model was stored indoors in an air conditioned room and the masking tape still deteriorated!


It reminded me of tape left too long on a window.
The tape residue flaked off the engine mount with a light scraping with the back of my hobby knife.


I'll add the removable Kevlar to the mount.
The rotary punch won't fit over a centering ring already glued in place.
These holes for the small tube were drilled with the tip of an old knife.
The hole was widened using a sharpened dowel point.
I'm installing a replaceable Kevlar mount. See HERE
The small blue cotton swab tube was glued in place and the Kevlar loop fed through.
I was surprised the mount didn't have an engine block.
A block was in the spare parts box and it was glued above the engine hook.

I actually have another of these kits and will do a full blog build on a later date.

Honest John K-27 Decals

I was thinking about building a clone of the Estes Honest John, K-27.
Years back it was a challenge to build with the nose cone shroud,
diamond tapered fins and spin nacelles.

I found a scanned decal sheet online but there wasn't any reference inch measure to check the size accuracy of the PDF.

I'll use the BT-50 tube diameter for a base size. The BT-50 is .976" diameter.
Looking at the decal sheet the three bands at the upper right go over some card stock joint bands around  the circumference of the BT-50 tube.

For the first check, multiply the BT-50 .976" by Pi (3.14) to get the circumference of 3.064"
The length of the band on the PDF is 3.172" wide.
Is the extra .10" inch the allowance for a slight overlap of the band? 

It would seem so. The .10" overlap is equivalent to about 3/32". That's consistent with other decal bands applied around finished (painted) body tubes. These decals go over the 110 lb. cardstock bands already on the body tube so the circumference is a little wider.
Will the middle wrap with the circular bolts be evenly spaced when the ends meet up?
No way to know until the decals are applied.
First I've got to order the parts from Semroc!

Tuesday, October 29, 2013

Filling Body Tube Seams TIPS

For filling body tube seams, I was mixing the CWF a little thicker than what was used for balsa grain filling. The thicker filling didn't seem to chip out of the seams when sanding to surface.

I had two separate containers of CWF, one thinner for balsa and a second a little thicker for body tube seams.
In the container (with the thinner CWF for fins) I noticed the filler at the top of the tub. This is what was left when I would wipe off the excess off a brush. This filler was slightly dried and a little thicker than the filler in the bottom of the jar.

This drying filler turned out to be just right for the body tube seam filling, a bit thicker than the brushable balsa filler.
I dipped just the tip of my knife into the thicker CWF at the top.


Set the blade into the seam and drag the CWF drop down the trough.
The blade helps guide the CWF right into the seam.
You can only do about an inch at a time, then remove the excess.


A razor blade is lightly dragged over the CWF while it is still wet.
Don't press hard on the CWF, you want to leave a "skin" of filler over the seam. Don't press hard or you'll pull filler out of the seam.
This will be sanded down to surface after drying with 400 grit.
TIP: It's easy to see the seams on the white tubes. On the brown tubes sometimes you can't see them.

Use a sharp pencil and draw a light line down the seam.
Use the pencil line to set the CWF drop and drag it down the pencil line.

I'm aware many builders use thinned auto body filler for body tube seam filling. Right now I'm using the CWF with good results. I know it sticks better but I'm concerned about fumes from the auto body filler.

TIP: When sanding the CWF to surface, sand from side to side down the length of the tube, opposite the spiral direction. This helps leave more of the filler in the seam.
If you were to sand around the tube, directly following the seam, you could knock some of the filler out of the seam trough.

The Discontinued Quest Kits?

On TRF there were questions about the thrust and ejections of Quest engines.
This last year, Quest discontinued some larger 18mm kits:


Quest Aerospace One and the Stiletto

A guess on my part:
I have to wonder if many of the larger Quest kits were removed from the product line because the Chinese made C6 engines couldn't keep them in the air until ejection?
On the other hand, it could have simply been slow sales.
These two Shrox designs are larger (35mm diameter and about 24" tall) and were featured in the 2010 catalog when the remaining 18mm German made engines were still sold.
The large MLAS is still for sale but the only recommended engine is the Quest B6-2! The thrust of a Quest B6 engine isn't a problem. I have to wonder if the Quest C6 has enough oomph!

In the right model, the Chinese made Quest engines are great!
Here's my TRF post:
I don't recommend Quest C engines in any high drag or larger heavy models.
But I do use some Quest A6-4 and B6-4 engines in shorter or minimum diameter models.

In a Alpha style model (smaller diameter and not too tall) the A6-4 is sometimes better than an Estes A8-3.
The China made Quest B6-4 is great in the old Estes Mini Shuttle or a BT-60 based Cherokee Goon.
Both are short models with less area to pressurize at ejection. 
These two have centering rings to isolate a hot engine casing from paint or glue fillets.

You can pick out the louder Quest engines at a club launch without knowing if it was Estes or Quest.
For some small field variety I just bought 24 more Quest A6-4s.

Monday, October 28, 2013

Hard To Find Scale Colors

If you've ever made a Nike Smoke, to paint the fins you'll need:

Fluorescent Yellow and
Fluorescent  Red / Orange

I had already bought the Rustoleum Fluorescent Orange at Home Depot.
I couldn't find the Fluorescent  Red / Orange until today!
I'm returning the fluorescent orange.


I know, it's Krylon. Some Krylon paints have been terrible. But to get the color right I'm willing to take a risk.
The back of the can label says: "3101, Red Glowing Orange Fluorescent.
Here's two other hard to find colors:

For Saturn V engine bells, you'll need Gunmetal.
That's the Testor Model Master #1455

For a Soyuz look for Euro 1 Gray #FS 36081

The Testors Model master paints are more expensive. But, it's a smooth spraying paint that covers very well.

Estes Xarconian Cruiser Build Part 20, White Undercoat and Wet Sand

Right now I'm in Singapore.
I've used up all the build drafts on the Xarconian Cruise and will finish up the paint and decals when I get back home around November 4.
Until then, I've got some generic blog posts to get by.

BUILD TIME
Spray First White Coat: 5 minutes
Wet Sand: 60 minutes
Total Build Time so far: 9 hours, 55 minutes

Sunday, October 27, 2013

Estes Xarconian Cruiser Build Part 19, New 24mm Engine Mount

The model already feels heavy without paint!
The only recommended engine is a C6-3. That doesn't make for much variety, or respectable altitudes.

From the Estes website:
"The Estes C6-3 engine is a single stage engine designed for model rocket flight. This engine is a standard engine designed for flights in rockets weighing less than 4 ounces, including the engine."

The face card says the estimated weight is 3.7 oz. A C6-3 engine weighs .87 oz. for a total weight of 4.57 oz. That's heavier than the recommended launch weight for a C6 engine.
I've been converting larger models for 24mm engines. Usually that's a BT-55 or 60 model around two feet tall. This one fits that criteria.

To convert to a larger engine mount the model was loaded with the largest recommended engine, a C6-3. The parachute, shock cord and wadding were also in place to find the center of gravity.

The rocket was balanced. The balance point was 7 1/2" from the rear of the tail cone edge.


A standard 50/55 engine mount was made.

I won't be able to use a replaceable Kevlar mount now, the plastic tail cone will be in the way.

A notch was filed for the Kevlar to pass through.


A fillet was applied and the Kevlar loop pressed into the drying glue.

After that dried, more glue was applied and the loose Kevlar tail was pressed into the joint.
This will keep the tail end out of the way when the mount is glued into the BT-55 main air frame tube.

With the new slightly heavier mount and engine installed, 1/2 oz. of clay weight will be pressed inside the nose cone. The 1/2 oz. of clay moves the center of gravity forward to the older 7 1/2" mark.

BUILD TIME
Load and Find CG: 10 minutes
Build New 24mm Engine Mount: 20 minutes
Total Build Time so far: 8 hours, 50 minutes

Saturday, October 26, 2013

Estes Xarconian Cruiser Build Part 18, Detail Assembly Filling


The dowel end seams were filled with CWF and sanded.

It's easier to do any fine filling off the model.

The CWF joints were probably rough after sanding.
I've taped the end pieces to a dowel for a shot of primer/filler.

BUILD TIME
Filler on Joints: 10 minutes
Sand Filler: 5 minutes
Total Build Time so far: 8 hours, 20 minutes

14 Card Stock Downscale Centuri Hornet Finished


Install a 5/20 engine mount and streamer.
The finished model looks great and flys very well. A clean down scaled classic.

If you haven't tried a carded model yet you are missing out on a great side of rocketry.
Covering a standard body tube makes for a very strong model. The laminate fins are stronger than you might think.
These are perfect models for a small field when flown with a 1/2 A3-4t engine,  fast and high!

Friday, October 25, 2013

Estes Xarconian Cruiser Build Part 17, Intake Tube Prep an Glue

Sorry about the lack of blog posts over the past few days.
I'm at the mercy of the ship's internet which is the worst it's ever been.
Were just pulling into Vietnam and the signal is strong - for now.


Before gluing the intakes you can clean up the cut edges with some medium CA applied with a Q-tip.
Let dry and sand smooth with some 400 grit.


The instructions tell you to apply fillets after the intake tubes are applied.
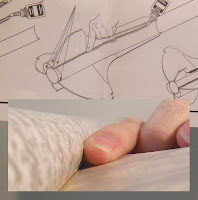
The inset picture shows my finger in the gap - the gap is too wide for a fillet! Bubbles would form even if I used Titebond M&TG.
I don't think the fillets are even needed.
A glue line was run down the root edge and smoothed out with a fingertip.
The intake tube was set into the fillet.

To remove and smooth any excess a Q-tip was rolled between my thumb and forefinger for a more pointed end.
This tip was run down the joint to smooth any excess glue.

BUILD TIME
Glue on Intakes: 15 minutes
Smooth Fillets: 5 minutes
Total Build Time so far: 8 hours, 5 minutes

Building The Card Stock Downscale Centuri Hornet Part 7, Lug cover


This model uses a 1.25" long LL-2A launch lug.
Cut out the yellow square from the 24 lb. printed page.


Again use the glue stick.
Try for an even coverage all the way to the edges.


On the lug wrap start from the center and roll on to the outside edges.

The inset picture shows the covered lug and seam side.
The seam side will be glued down on the body tube lug line.


The wrap is oversize.
After the glue dries, sand off the overhanging paper.

Wednesday, October 23, 2013

Building The Card Stock Downscale Centuri Hornet Part 6, Fin Gluing


The edges of the black fin can be blackened with a quick pass of a permanent marker.
Be careful and quick. The marker ink will probably be darker than the ink from your printer.
Run a thin line of white glue down the cut fin edges.
This seals the edges.

After it dries, lightly sand just the glued edge with 400 grit.
Apply another line of glue, let dry and sand again.

If done correctly, you'll seal the edges and end up with a rounder outside and trailing edge.


An engine casing was slipped into the body tube for cutting support.

Cut off any excess tube using the wrap edge as a guide.
Sand smooth any rough edge.


Glue the fins on the lines printed on the body wrap.
The black fin sits on the black line extending down from the Hornet name on the body wrap.

The top of the line is the leading edge intersection.
The lines extend a little beyond the back of the fins to help alignment.

Tuesday, October 22, 2013

Launch! Schoolyard October 21, 2013

I leave for a two week cruise on October 22, China to the Philippines!
The blog could be irregular for the next two weeks, be patient with the poor internet.
Before leaving I got in a quick Soccer field launch.


The new carded downscale model, the Centuri HORNET had a stable fast ride on a 1/2A3-4t engine.
The inset boost picture is just a blur!
I would guess the altitude on this BT-20 based model to be about 350 feet.


I rarely lose rockets, two were lost today.
The Semroc BATROK was launched with a Quest A6-4 engine.
At about 75 feet up it turned and flew to the West!

The parachute ejected over the edge of the field and the model landed in someone's back yard. I wasn't going to knock on doors, it was 7:45 a.m.
Before releasing a new carded PDF, I had to check stability with an A3-4t engine.
This downscale Centuri BANDITO had already flown well with a 1/2A3-4t.
With the A3-4t, this BT-5 based model was very stable with no added nose weight.
I would estimate the altitude at 600'.

The streamer ejected and the model landed in the backyard of the home at the upper right in the picture.
No biggie, print and make another.


My battered Quest TOMAHAWK flew to 325' feet with an Estes B6-4 engine.
I made sure the Quest crispy parachute was dusted with talcum powder to insure it opened.
There was a small corkscrew during boost, probably because of the open intake on the side.


I wasn't able to catch this one, I wish I had.
A second fin was torn at the root edge.
It's a simple fix on this well-worn model.

Other reviews have complained about trouble trying to match blue paint and the color on the upper decal. You can see the difference where the tail cone meets the body.

Also Flown:
MMX CLOUD HOPPER. Up and down - nose blow recovery.

Estes Xarconian Cruiser Build Part 16, Launch Lug Gluing

The instructions are vague about the launch lug position.
The nose cone flares out slightly so the lug needs to be a little away from the body for the launch rod to clear it.
The inset picture shows the alignment guide with the lug offset on the wing.
The lower illustrations looks like the lug is glued right in the root edge fillet.


I had to remove some primer for a better glue joint.
Some 400 grit was wrapped around a Q-tip for a soft controlled sander.


This shows the offset lug about 3/16" from the root edge of the wing.

BUILD TIME
Sand and Glue Launch Lug: 10 minutes
Total Build Time so far: 7 hours, 55 minutes

Monday, October 21, 2013

Estes Xarconian Cruiser Build Part 15, Fin Detail Gluing


The rudder tip pieces were glued together.
The ends match the curvature of the lower, larger piece.

CWF filler was applied to the matching joint edges.
After drying, the two ends were sanded smooth.


The dowel was cut into three 1" lengths.
TIP: Roll back your blade 1/2 turn then roll forward. This prevents the blade from running down and away from the cut line.
The dowel pieces are to be glued  to the rudder assemble and small fin under the model.

Seal the dowel and sand smooth before gluing onto the rudder and small fin.


Try gluing the dowels by eye first then check it with the straightedge.
You might be surprised that they'll probably be off a slight bit.

Use your straightedge to check the dowel extension on both sides.


Titebond Molding and Trim Glue was used for fillets.

1/2 of the root edge was done at a time. These fillets are long!
Do the rear half first, then the front half.

You won't want a fillet "pooling up" on your fingertip by the time you reach the end of the fin.

BUILD TIME
Cut and Glue Dowels: 15 minutes
Titebond M&TG Fillets: 20 minutes
Total Build Time so far: 7 hours, 45 minutes

Building The Card Stock Downscale Centuri Hornet Part 5, Cutting Fins


Cut the fins out on the root edge marked side.
The thin black line is your cut line.

You only have to cut the root, outside and trailing edges.
The leading edge is the folded round side.


Here's all four cut out fins.
The fin on the left shows the open three layer laminate.

The cut sides will have a sharp edge on them.
Rub over just the raised edge with the back end of a Sharpie.

While this doesn't give a full rounded outside and trailing edge it does take off some of the squareness.
You can lightly burnish over the root edge but leave it square for a wider gluing area.