Showing posts with label MR Mach 10. Show all posts

Monday, January 2, 2017

More Rockets Mach 10 Finished


This kit was an interesting challenge.
The kit supplied ST-7 sized nose cone couldn't be used with the BT-20 engine mount tube.
White decals had to be hand cut. The dull coat was sprayed over the clear Future decal areas and isn't noticeable now. A challenge, but a good result in the end.
The small red lights on the wing tips were cut from trim Monokote.
The customer is responsible for test glides and the clay weight that goes into the "tank" under the canopy. The remainder of the clay goes into the plastic nose cone.
Check out the Centuri catalog page - CLICK HERE

Sunday, January 1, 2017

More Rockets Mach 10 Build Part 12, White Trim

More Rockets was correct to print the decals on a white backed sheet. But, the white backed decals aren't as opaque as I would like.

The canopy decals on the Huckebein are shaped differently than the Centuri Mach 10 canopy.


This is what I came up with. It still fits the kit supplied canopy but the glass shape is closer to the Huckebein.


The "7" at the front had to be hand cut.
Notice the fillet on the tank. It doesn't go all the way around the end nosecones. The rear nose cone comes off so clay weight can be added..

Saturday, December 31, 2016

More Rockets Mach 10 Build Part 11, White Trim


The white crosses were going to take some extra time.
Before cutting any decals, a cross was drawn on paper to be sure the visual balance was right.

The Olive Drab paint is a flat finish. Water slide decals don't stick well to flat paint.
I applied a light coat of Future to smooth out the decal areas. After the decals are on and dried a light dusting of dull coat should re-flat the finish.


I didn't use a white decal sheet to cut the white strips. That wouldn't be opaque enough. A clear decal sheet was sprayed with gloss white.
Thin strips were cut. A strip of masking tape was used to space the white lines evenly.


After the strips dried a new single edged razor blade was used to cut through the intersections of the tic-tac-toe pattern cross.
The centers were carefully lifted leaving the cross.

In the light reflection you can see some balsa grain. I didn't do an entire grain fill to deep the glider as light as I could.

Friday, December 30, 2016

More Rockets Mach 10 Build Part 10, Paint!


The customer wanted a different look than the Centuri Air Force silver.
The German Huckebein looks a lot like the Mach 10 design.


I started with an overall olive drab. I used Testor's Model Master spray paint.


The yellow wing tips and nose ring were masked with Scotch tape.
The tape line on the left was wrapped over the bottom. Another piece of tape joined the ends of the bottom mask.


The rest of the model was covered with a plastic grocery bag and the gloss yellow was shot.

Thursday, December 29, 2016

More Rockets Mach 10 Build Part 9, Engine Mount Gluing

I didn't take a picture of gluing in the engine mount.
It's not easy to do, it tends to roll around a bit.

Here's the instruction illustration to show how it is glued.
To see the old Centuri Mach 10 instructions: CLICK HERE


Here's the model up to this point. I have yet to glue on the bottom tank assembly.


Along with the copy of the Centuri instructions is a generic page showing how to swing test a rocket. It isn't needed and would confuse a first time builder. You couldn't swing test the Mach 10 if you wanted to.

This has to be one of the stranger illustrations I've ever seen in a kit. I believe it was lifted from Sunward instructions.

Wednesday, December 28, 2016

More Rockets Mach 10 Build Part 8, Canopy Forming


The lines on the canopy should be scored.
Score them, don't try to cut halfway through the card stock.

I used the back of my knife to score the lines. the rough break-off edge was filed a bit to smooth out the edge.
After filing, run the back of the blade on some card stock to check if it is smooth. If not, file some more.


Use your straightedge and emboss the canopy lines.


Emboss the scored lines before cutting out the canopy.
It's just easier to score the lines when the piece is larger with the border areas.
Pre-bend down the embossed lines then cut out the canopy.
Use very little glue making sure glue is completely covering the tab area.
Hold the tab closed for a minute while the glue sets using long tweezers.

Before gluing onto the body tube, do a dry fit and draw a pencil line around the canopy for easier positioning.

Use a small line of glue around the inside edge and set the canopy using the pencil lines.

Tuesday, December 27, 2016

More Rockets Mach 10 Build Part 7, Stabilizer Gluing


The instructions tell you to glue on the stabilizer and align by eye.
I think you should at least use an alignment line.


A line was drawn down the tube using the aluminum angle.
The pencil line in the picture doesn't look centered, but it is.


With the wings flat on the table I set my sanding block on it's side to be sure the stabilizer was at a 90 degree angle to the wings.

Monday, December 26, 2016

More Rockets Mach 10 Build Part 6, Lug Supports

Mentioned earlier, one lug was longer than the other. Before filling or gluing on the model the longer lug was cut to the length of the shorter one.

The launch lug wing support seams were filled as normal with CWF.

The lugs will tuck into the wing/body joint so glue lines are made small and thin. Glue could end up on the wing or body tube.


The lugs were set into the joint using tweezers for more control. It would be very hard to place them using just your fingers.


After the glue dried a fillet was added using Titebond M&TG. You certainly can't reach that fillet with a fingertip to smooth it out. A Q-tip can help.

Saturday, December 24, 2016

More Rockets Mach 10 Build Part 5, Wing Gluing


The two wing halves are glued together.
No dihedral angle on this wing! It is one flat piece.


Under the canted stabilizer are two support pieces.

I made sure they were flat with the leading edge of the rudder by setting my sanding block against them.
Here's how the support pieces ended up. Once the top was lined up they did overhang the back. After the glue dried the overhang was sanded even with the back of the rudder edge.


On the left the canted stabilizer is not glued on yet. I set it there to check the position and fit of the supports.


Draw a line down the body tube before gluing on the wing to help with alignment.
The instructions don't mention this but it does help keep the wing straight.

The back of the wing is glued 1 3/8" from the rear of the BT-60 tube.

Thursday, December 22, 2016

More Rockets Mach 10 Build Part 4, Lighter Wood Fill

For a decent glide you've got to build this one light!
I've had a tube of HobbyLite Filler for a few years and rarely use it.
It weighs nearly nothing. It's like the ultra light wall spackle you find at a home improvement store.

I told my client the balsa grain would be filled but not by using my regular CWF and primer/filler. I've got to keep it light.
This "glider" will get one filling of the HobbyLite and sanding. Assembly follows then right to the olive drab paint.


Here's all the balsa parts before filling with the Hobbylite.
The wood weighs in at .39 oz.
After sanding down the single application of HobbyLite, all the balsa weighs .42 oz. This would be much lighter than the CWF and primer/filler would be.

The HobbyLite filler does work but is harder to apply than the CWF. I wouldn't recommend it for normal rocket building.

Wednesday, December 21, 2016

More Rockets Mach 10 Build Part 3, Tank Assembly


I changed out the poor fitting plastic nose cones for balsa cones. Balsa was used on the early versions of the Centuri Mach 10 kit.


The tank tube holds some glide trimming clay. To make more room in the tube, some of the nose cone shoulder was cut off.

The front nose cone is glued in place. The rear nose cone is left loose so you can take it off to adjust the clay weight.


A brown coupler is glued into the front of the BT-60 tube to strengthen it and add some weight.
The coupler was too tight and had to be sanded for a slip fit.

Tuesday, December 20, 2016

More Rockets Mach 10 Build Part 2, Engine Mount


Here's the kit supplied engine hook.
A flex of the hook easily bent it. I threw it away.


Here's the replacement hook made from the metal strip inside a windshield wiper blade.

The split tube spacer wasn't cut flat on one end. I ended up using a yellow Estes spacing tube to set the engine block.


As shown in the Centuri instructions, two Mylar retaining rings are used over the engine hook.


A Estes 20 sized plastic nose cone was used in place of the too large Centuri cone.

Monday, December 19, 2016

More Rockets Mach 10 Build Part 1, Parts


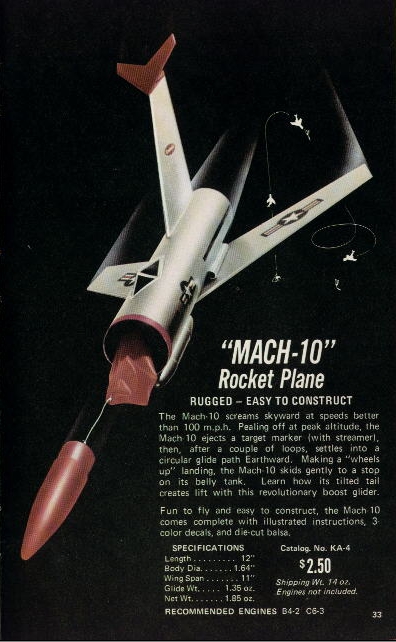
I had an original Centuri Mach 10 years ago. I don't remember how it flew or if I even launched it.
This is a clone kit from More Rockets to be built for a client.
Most of the parts were good quality, Some parts were questionable.
The instructions were copies of the old Centuri art. I don't know how clone vendors get away with this. Unless a Copyright has run out, these materials are still owned by Estes.

The fit of the nose cones in the bottom "tank" assembly was poor. The base of the nose cones were wider than the BT-5 diameter. I've never seen this nose cone before.

The two launch lugs were two different lengths.

The engine hook isn't spring steel. The upper bend isn't a 90 degree angle.

The engine block spacer was a split BT-20, a clever idea for an easy slide into the BT-20 central tube.


The nose cone was an original Centuri part made to fit the slightly larger ST-7 tube.
The kit includes a BT-20 central engine mount tube. The shoulder of the Centuri nose cone won't fit the supplied tube!
I'll have to substitute an Estes 20 sized plastic nose cone with the correct shoulder diameter.

The decals are printed on a white decal sheet.

I wouldn't want to use the stars and bars decal in the center. The star isn't symmetrical.