Showing posts with label Dullcoat. Show all posts

Saturday, January 15, 2022

Estes Skylab #001973, Build, Part 31, Finishing Up

Before the Dullcoat can be applied, 
You'll have to mask off the silver on the fairings and fins.
Dullcoats (and gloss clearcoats) will turn Silver paint into a dull gray!

I made some covers out of folded paper to cover most of the fins.


Here's the back end covered for the dull coat.

Before spraying, brush off any dust with a soft brush. Any dirt could be locked under the dull clear coat.


Well - this was disappointing!
The dull coat shriveled up a few of the small camera target decals. Not all of them, just two.
I don't think I went too thick with the clear. 
TIP: You might want to try some Micro-Sol to be sure the decals are sitting IN the corrugated surface and do light mist coats of the clear.


The last things glued on were the Solar Array Panels.
Mentioned earlier - You'll find it easier to glue these on after the painting is done.

I won't be covering the shock cords and parachute assembly. The shock cords use a standard tri-fold mount. Parachute assembly is normal - just larger in diameter.

Monday, November 8, 2021

Quest Lil' Grunt Build #Q5014, Part 8, Touch-Up & A Dull Coat TIP


The body tube edges didn't get a full coverage of the olive Drab spray paint.
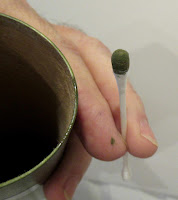
A baggie was pressed into a small cup and a puddle of olive drab was sprayed in the bottom.
Roll a Q-tip in the paint puddle and wipe off some excess paint. Roll it over the tube edges.
Simply lift the baggie (with the paint at the bottom) zip it closed and throw it away. 

The look of the clear stickers against the flat olive drab paint bothered me.
Maybe a dull coat could even out the sheen.

I first tested compatibility using Krylon Acrylic dull coat on a corner of a left over sticker sheet. On the left is before, on the right is after the dull coat was sprayed.

TIP: The upper picture shows the reflection of the glossy sticker set down on the satin finish paint.

The clear areas on the sticker look glossy and transparent.

The lower picture is after the flat finish acrylic was sprayed.
Under direct light and in the photo you can see a subtle difference. It looks better in person. Now, that gloss sticker against the flat finish isn't as obvious.

Sunday, November 22, 2020

Estes Asteroid Hunter #3224, Build, Part 21, Recess Area & Additional Mask


Here's the finished recess area mask. 
The paint is gloss - for now. I wasn't happy with some of the finished wood areas so a dull coat will help cover them. 
TIP: Flat finishes don't show the irregular surfaces like gloss paint does. Flat finishes are a great way to visually smooth things out.


On this model there will be some gloss and some flat finish areas. It makes for a very interesting finished model.
I decided to go for broke and do some additional masks. This small rectangle on the top of the nose cone will get gloss dark gray.


I had a small area of overspray showing after the tape was pulled.

TIP: I wetted the corner of a Magic Sponge, then rolled over a Q-tip  transferring some cleaner onto the Q-tip. This removed the overspray with some light rubbing.


Here's the finished nose cone mask.
The model will get an overall dull coat after the decals are applied. The glossy dark gray rectangle will be masked off before the dull coat is sprayed.

Tuesday, August 20, 2019

Estes Sasha Build #7271, Part 14, Upper Stage Paint & Decals


TIP: To keep the decal placement consistent on all sides of the fins, make a tracing with a cutout for the star. I also drew a box for the fin flap decal.


The fin flap decal wraps underneath the low edge of the large fin.


I missed some paint on the body tube ends.
Some green was sprayed in a cup and the paint rolled on the edge with a Q-tip.


After all the decals, the green body was hit with an acrylic dull coat. The nose cone and tail cone will be left glossy.

TIP: Before spraying on the dull clear, a moist paper towel picked up all the water spots left after the decals.


The screw-on engine retainer ring was glued on using the Beacon Fabri-Tac glue.

Tuesday, July 2, 2019

Estes Saturn V #1969 Build, Part 52, Finishing Up!


Here's the silver detail after it was hand painted again following the dull coat. Much better!


I didn't glue together the upper assembly so the service module could stay separate (and silver) after the dull coat.

The decals were thin. After the dull coat was sprayed the clear decal edges disappeared!


GOTCHA: The wire anchor ends were about 1/16" too long! I couldn't slide the capsule and adapter shoulders all the way in without bumping into the wire. I had to trim the card stock, carefully bend out  and cut the wire.


GOTCHA: Cut the piece of shroud line to about 15", not 13". You'll need a little more length to have an end long enough to go under the coupler and tie things together.


Here's why you need the longer length -
The line tie has to end up below the bottom of the coupler. The rubber shock cord tie should be below the coupler.

39:30 minutes previous
    :45 this post
41:15 Total Finished!

Monday, July 1, 2019

Estes Saturn V #1969 Build, Part 51, Silver Trim and Dull Coat

Normally I'd paint and leave a Saturn V with gloss paint. Flat paint is a dirt and finger oil magnet! Flat finishes are also hard to clean. Estes requested these builds to have a dull, no gloss finish.

I hand painted these small motors on the 3rd Stage with bottled Silver paint.
The sheen was good - but look what happened after it was hit with a dull coat! It is now a dull gray and the brush strokes are very evident.


For a test, I sprayed some silver on card stock.

On the left is the sprayed silver.
On the right is the same silver after a shot of dull coat. I didn't want this gray look on the fins, and the silver on the fairings.


Oh boy - MORE MASKING!

I had to mask the silver on the fins and fairings to protect it from the dull coat.
A strip of tape was cut with a notch to fit around the low end of the fin.
A tracing was made of a fin and cut out. Notice the bent outside edge hinge. These mask covers are wide but still fit close over the root edge of the fin. Three more covers were traced and cut.

The cover is folded over the fin and taped closed.
Now the lower tube assembly can be sprayed with the Krylon Matte spray.

Krylon Matte Finish is considered flat - but does have a very slight sheen to it.

Assembly time so far:
38:45 minutes previous
    :45 this post
39:30 Total so far

Thursday, June 28, 2018

Estes Dragon Ship 7 #1345, Part 20, Fin Decals, Fin Fit and Parachute


The removable fin was slipped on to align the rivot decal lines with the other fins.

I used a dry strip to check the angles so they were consistent with the other fins and straight out from the lines on the body tube.

In a June 15 comment, Scott Johnson asked for pictures of the detachable fin off and on the body.

Here's the hook fin by itself, it was masked off to allow the gloss finish to remain. The smoother paint makes it easier to slide on the fin.


The bottom in place. Decals and a dull coat applied.


I took an 18" parachute from one of the Estes clearance kits I bought a year ago. These newer parachutes have a vintage look.

This model might be entered in the NARAM Classics event. Even though the original kit had a 1980s print chute, I wanted the parachute to look more traditional.

Wednesday, June 20, 2018

Estes Dragon Ship 7 #1345, Part 17, Almost Finished

My California trip threw a wrench in my build and blog post schedule. Here's where the Dragon Ship 7 is right now.
That bottom "hook" fin is being sprayed gray. The instructions don't say anything about rivet decals, but they'll be added to matche the other fins.
The model will get a overall dull coat. The silver engine mount will be glued in after that.


I hope to keep the nose cone gloss black. The black area on the front wrap decal should also be gloss black to match it. The launch lug guns won't be glued on until after the dull coat so they will remain gloss black.
I'll follow up with finished pictures soon.

Wednesday, August 30, 2017

Estes Starship Nova #1371 Build, Part 26, Matte Finish TIPS

On Jim Z's website the old instructions say to paint the model with a flat black paint. TIP: Water slide decals won't stick well to a flat finish paint. Paint with gloss, apply the decals then follow up with a flat clear coat. TIP: One great thing about flat paint - it covers a lot of small imperfections, especially over gloss black.

Before spraying on a dull coat, wipe off any water spots with a damp paper towel.


After that, dust off the model. Any spec of dust will be locked in under a clear coat.


The only Krylon paint I use is their clear acrylic coats. Krylon hasn't changed their acrylic clear coat formulas.

TIP: I only have a few spray cans of flat paint. If I need a flat finish I'll spray a gloss coat then hit it with a matte finish clear.

Using a clear flat overcoat you don't need a heavy coat. You can do a light dusting spray. Just that will dull the finish.