Showing posts with label ASP D Region Tomahawk. Show all posts

Friday, February 23, 2018

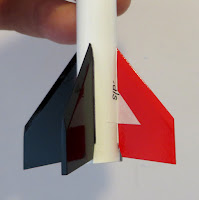
ASP D Region Tomahawk Build,Finished


All my experiences building and launching ASP kits has been very positive.
The D Region Tomahawk has always been a favorite, very clean lines.
This BT-5 based model should perform well even with a 1/2A3-4t engine. Sure, it would look best with a flat finish but I want to keep the model clean.

Thursday, February 22, 2018

ASP D Region Tomahawk Build, Part 17, Nose Cone Tip Paint


Just the very tip of the nose cone is brown.
The instructions say you could dip the nose cone tip in paint, it's worth a try.

The same brown from the nose cone base was sprayed into a baggie set in a mixing cup.


The nose tip was dipped in the paint but I couldn't get an even line.

I came back with a paint brush trying to straighten out the edge. That only made the paint surface uneven.

After the brown completely dried the high spots were lightly sanded with 400 grit.
I sprayed more paint in a cup and brushed again. This time it came out better.

Wednesday, February 21, 2018

ASP D Region Tomahawk Build, Part 16, Fin Plate Setting and Streamer


The backs of the card stock fin plates were sprayed with 3M 77 adhesive spray.
Here's how the plates fit around the curve of the tube and with the folds tucked into the fin root edges.

The great thing - the fin plates covered the bad and touched up mask lines.


A Q-tip was used to gently press the fold into the root edge. You won't scratch the print using a soft burnisher.
There is a 1/8" wide aluminum band at the rear edge of the body tube. Instead of masking and painting, a strip of Trim Monokote was cut and applied. It took a few tries to tuck it into the fin base but it was easier than masking.


The streamer is thick yellow plastic, 3" wide X 24" long.
The streamer is taped to the shock cord, 1" from the end of the streamer. Fold the end over the shock cord and tape it again.

ASP D Region Tomahawk Build, Part 15, Fin Plate Forming and Adhesion


Bend the long (already embossed) sides over a straight edge.
You should be able to set the metal edge of a ruler into the embossed line. Press up with your fingertips. Crease the entire length of the fold.


You'll have to go back and curve the bottom again after folding the sides.
Here's the underside and outside of the fin plates.
Set them into the space between the fins to be sure you have the curve and folds right. Re-form them if needed.


Set them on a scrap piece of cardboard for adhesive spray. Here they are set on masking tape with the sticky side up.

The backside of the plates were lightly sprayed with 3M 77 spray.

Tuesday, February 20, 2018

ASP D Region Tomahawk Build, Part 14, Folding and Cutting the Fin Plates


Emboss the fold lines before cutting out the fin plates. It's easier to make the fold lines while the pieces are still on the larger paper.

I'm using the tip of a butter knife, the flat area above any serrations on the cut side of the knife.


Most of the straight lines were cut with a new X-Acto blade and a straightedge. Cut and leave the black edge border lines.

The shortest lines were cut with a single edge razor blade.


Here's the four plates ready to be formed.
Notice the bolt head circles - They alternate three bolts then four bolts.


To wrap around the body tube, form a curve in the plate in the heel of your hand. Use a 1/4" dowel or the rear of an X-Acto handle.

ASP D Region Tomahawk Build, Part 13, New Fin Plates

I looked back at the Estes Tomahawk instructions and Peter Alway's Rockets Of The World for more information on the fin plate shape.
The plates are slightly raised above the body tube so I decided to print them on 60 lb. card stock. This lighter card stock will also allow the plates to be folded and glued into the root edges.


Below: 1" reference lines were added to the kit decals. The decals were scanned and dropped into Corel Draw.

Above: The outside lines were .5 width. The 3 ridge "flats" were drawn with gray lines. This will visually imply the raised sections.

Monday, February 19, 2018

ASP D Region Tomahawk Build, Part 12, Fin Plates

I probably could have sanded and shot the black root edges again but thought I'd take the easier way out.

Most of the root edges will be covered by a fin plate decal so it doesn't have to be perfect.
I used a fine point Sharpie right down the root edge fillet. It took a few passes to get a dark black to match the paint coat.


Here's the decal of the fin plate from the kit. It was inkjet printed on white decal paper.

My only concern is sometimes the white backed decal paper isn't as opaque as I'd like. The paint color underneath the decal can show through.


To check how dense the white paper decal was I cut off a corner and transferred it onto the model.

Over the red fin you can see it's a bit pink.
While these decals are usable and would look good, I wanted to try an upgrade.

Sunday, February 18, 2018

ASP D Region Tomahawk Build, Part 11, Fin Masking


The D Region Tomahawk has three black fins and one red fin.
Here's the mask for the single red fin. On the left is the Scotch tape surrounding the root edges.
In the second picture a grocery bag is taped covering the rest of the model.


This is the mask for the three black fins.

I had good lines on some fins, not on others.

I might have waited too long to pull up the tape. There was some lifting and tearing of the paint.
The fix is coming up.

Friday, February 16, 2018

ASP D Region Tomahawk Build, Part 10, More Masking

A brown band goes on the base of the nose cone, 7/32" above the  shoulder lip.

On the left the nose cone has been lightly marked with pencil in four locations around the nose cone. I use more than one single mark, it makes alignment of the tape line much easier.

To the right is the Scotch tape mask and brown tape above and below it.


The only drag of this kit was I had to buy a can of brown spray paint! I've never used brown on a model before.

Yes, I know, it should all be flat paint.

ASP D Region Tomahawk Build, Part 9, First Mask


Here's the D Region Tomahawk picture from the ASP website.

Three black fins, one red fin.

The upper body tube has two red sections. Above the nose cone shoulder is a brown band. The nose cone gets a brown tip.

On the left is the Scotch tape mask.

The wide red band goes down 1" from the top of the tube.
There is a white band 1/4" wide, then a 1/8" wide red band.

On the right is the mask after the paint was pulled.
A brown band 7/32" wide will go on the nose cone above the wide red band.


Thursday, February 15, 2018

ASP D Region Tomahawk Build, Part 8, Paint and New Paint

I've finally given up on Rustoleum 2X paint!
Over the past year, their gloss white has been iffy - some cans seem to be fine, others spatter or spray a rough coating. Even if you wait for the paint to totally dry you can still get crazing wrinkles.
Maybe they've changed their formulation. It was pretty good a few years ago.

I've been using Duplicolor gray Filler/Primer for quite some time now. It does fill any remaining grain or tube seams. I've never got a bad can. The spray nozzles are a better quality than the Rusto cans and they don't clog before the can runs out of paint.

Why not use Duplicolor car paint? Some of them are lacquers.
I did find this gloss white acrylic enamel. It's more expensive, but would be worth it if it is compatible and doesn't spit and craze the paint underneath!
I used it for the first time on the D Region Tomahawk.
It doesn't cover as quickly as the Rusto 2X so it probably took another spray coat for an opaque cover.

It is smooth but the gloss isn't as high, but certainly good enough!

Wednesday, February 14, 2018

ASP D Region Tomahawk Build, Part 7, Fin Gluing and Fillets


The rear root edge fin cut is set 1/4" up from the rear end of the body tube.

To make it easier to line up, a pencil line was drawn at the end of the root edge.


Fins and the launch lug were glued on.
Notice the fins aren't even with the end of the body tube.


On a small model like this I used wood glue for the fillets.

The launch lug fillet left bubbles as it dried so Titebond M&TG was used on the lug fillet.


The glue at the end of the lug fillets can be "rolled off" using a pointed to Q-tip. Roll the tip between your fingers and you can remove the glue at the tight end. Use this pointed tip just on the ends of the lug.

Saturday, February 10, 2018

ASP D Region Tomahawk Build, Part 6, Filling the Nose Cone and Fins


Both the tube and nose cone got a good single coat of Duplicolor Primer/Filler.

Before sanding is on the left, after sanding is on the right.


The fins were set on a piece of cardboard. Hold them down on some masking tape, sticky side up. The root edges are together to keep the paint out.

Basswood fins don't require any CWF, there isn't much grain to fill. A good shot of primer/filler should take care of it.


Here's a fin after the primer/filler was sanded down.

Note the grey primer/filler is still on the high edge of the fin taper. If sanded properly with a block the remaining filler can help define the tapered edge. You must use a sanding block to retain the edge tapered line.

Friday, February 9, 2018

ASP D Region Tomahawk Build, Part 5, Seam Fills


The nose cone is lightly sanded before filling.
TIP: Don't round off the tip! Press the nose cone tip into your fingertip so the sandpaper can't roll over the top.


TIP: A bit of the CWF was brushed over the shoulder edge all the way around the base of the cone. For now, just brush CWF near the base so you can handle the dry nose cone top.
While it is still wet, press the cone into the body tube and turn the cone. This makes a raised lip at the base of the nose cone. When this is sanded down you'll end up with a sharper lip at the base of the nose cone.


It's hard to see the body tube seam, especially on a white tube.
To see the seam better, a sharp pencil was dragged down the seam recess.

I dip the tip of a old X-Acto knife blade into thinned CWF. This leaves too much on the blade so wipe the excess CWF off the back side of the blade.
Set the loaded blade into the seam and go back and forth working the filler into the seam. Don't press to hard on the blade, you don't want to cut into it.
Once you get the technique down, a 12" tube only took three minutes to fill.


Launch lugs take CWF better than body tubes.
I set the lugs onto a Q-tip for a handle.

Brush on, let dry and sand off.

Thursday, February 8, 2018

ASP D Region Tomahawk Build, Part 4, Fin Shaping

When sanding a fin taper it's hard to see the edges on basswood or balsa. Here's one way to give a high contrast for a sharper sanded  line.

You'll be using a permanent marker on the leading edge. You don't want the ink to go deep into the wood, so the edges are sealed with CA glue applied with a Q-tip.
Cover the leading edge and down the sides a little below the pencil line.


Now you can apply permanent marker on the leading edge and down the sides. The ink stays on the surface and can be sanded off. If the wood wasn't sealed the ink would show through the finish paint.


Use a sanding block with 220 grit sandpaper.
Here's how the fin looks after a few passes. With the black ink it's easy to see the width of the sanded line.

As always, sand a little, check and sand a little more.


Here's the shaped fin, there is still a bit of black ink on the leading edge and sides. This ink is easily sanded off.

One small bonus of the CA coating, it strengthens the leading edges. This can be important if these were balsa fins.


All four fins, shaped and ready for a shot of primer/filler.

Basswood fins don't have a grain that needs filling. It's just slightly heavier than balsa. Many builders will cut and substitute basswood fins for balsa supplied in kits.

Wednesday, February 7, 2018

ASP D Region Tomahawk Build, Part 3, Fin Shaping


Here's two fins, one right off the sheet and the second after light sanding with 400 grit on a block. The laser "smoking" should be taken off.
You can round the leading edges but I'm going for the scale wedge tapers on the leading edges.

TIP: To make the fin marking easier, extend the lines beyond the instruction sheet illustration with a pencil and straightedge.


Tape the basswood fin down to the full size drawing.

With a straightedge and sharp pencil, mark the fin taper line.


You can flip over the fin to mark the other side.

Use just the leading edge in the drawing and the extended lines drawn earlier.