Showing posts with label E Xarconian Cruiser. Show all posts

Tuesday, November 26, 2013

Estes Xarconian Cruiser Finished


This was rated a Skill Level 5 build probably because of the tube cutting..
It wasn't that hard to put together, the wing pods and masking were the most difficult.
The build was time consuming.
It's an impressive model and should perform better with the D engine mount modification.

The Estes website says the rocket weighs 3.7 oz.
My finished model weighed in at              4.85 oz.
Good thing I adapted it for the larger 24mm engines!

Monday, November 25, 2013

Estes Xarconian Cruiser Build Part 32, Engine Hook Relief Notch

I installed a 24mm engine mount in place of the standard 18mm mount.
This put the engine hook too close to the edge of the plastic tail cone. It would be hard to slide an engine in without the notch shown here.

I used a combination of small files and a hobby knife to get a square cut.
The hook now moves enough to allow an engine in the motor mount tube.

After handling the tail cone some of the paint wore off. I'll have to spray it again with black. It'll be epoxied into the rear of the air frame tube later.

A longer shock cord was tied to the Kevlar leader from the forward centering ring.
The elastic shock cord was attached to the nose cone lug with a Duncan Uni Knot shown HERE.
The parachute snap swivel was attached 1/3 the way down from the nose cone on a loop knot tied in the cord.

Sunday, November 24, 2013

Estes Xarconian Cruiser Build Part 31, Intake Detail


I wanted to darken the inside of the rear intakes.
It'd be too hard to paint them now so I'll use some electrical tape.
The electrical tape will stay in place and is a matte finish.

While the picture shows the width to be 1 3/16", in the end the width was 1 1/8".


Use your long tweezers to center and set the piece of tape.
The tape can stick out of the tube a little.
After burnishing down the tape with a dowel, cut off the overhang with a razor blade.


Here's the rear intake after trimming the tape piece.

Saturday, November 23, 2013

Estes Xarconian Cruiser Build Part 30, Nose Cone Decal

The instructions don't give any directions on how to set the nose cone decal.
It overlaps the joint of the body tube and nose cone.

Tape the shoulder of the nose cone for a tight fit. You don't want the nose cone to rotate when the decal is being set down.

Look down from the front and center the canopy.
These decals took one minute of soaking and another minute sitting on a paper towel to release from the backing sheet.
Check again and press the nose cone tight against the body tube joint.
Place the decal. It's long and thin, keep the area wet until you are sure of its position.

When the decal is about half dried, cut it at the joint crack using a sharp blade.
I pulled the break-off blade out of the handle a bit for a longer cutting tool.

Pull the nose cone out slightly and rub the edges down with a damp fingertip. After cutting the joint the cut decal edges will lift. Press them back down.


Spray the black tail cone piece off the model.

Here's how the tail cone and engine hook line up.


Friday, November 22, 2013

Estes Xarconian Cruiser Build Part 29, Added Detail

Those little nubs on the nose cone side need some detail. No decals are included for this.
They should have a gun detail or suggested nozzle decal.
I'll use black electrical tape to make small circles.
You could use a decal from another kit, but I wanted to show a quick solution.

A piece of electrical tape was stuck down to the yellow decal backing sheet. This makes the small tape detail easy to remove after punching.

My rotary punch was set on the smallest hole.
I tried to punch through the tape only.
You can lift and position the black dot on the nose con with the tip of your hobby knife. Don't even try to use your fingers, it's just too small.


If the small dot stays in the rotary punch tube, pick it out with your knife tip. Again, leave it on the tip for placement on the model.


Here's the dot in position.
It's a small detail but adds a lot.

Thursday, November 21, 2013

Estes Xarconian Cruiser Build Part 28, Masking the Canopy


The rest of the nose cone was masked off using small pieces of brown masking tape.

The inset pic shows the paint results after first pulling up the tape.
It's okay, but the edges are a little rough. This was expected and will be cleaned up.


While the paint is still a bit pliable, some of the rough blue edge was lightly scraped off.


A small spot on the edge didn't get the blue paint.
A small brush and the same Rusto 2X Blue was used for a touch up.

I spray some paint into a small mixing cup and pain.
Throw away the cup when you are finished.
TIP: Did you ever see "Micro Brushes" for sale in a hobby store? They are expensive! In this instance you can get the same results using a Q-tip.

Spray the tan Rusto 2X in a disposable mixing cup.
Dip and wipe off the excess.
Roll the Q-tip over the edge covering up any remaining rough line.

Perfect? No. But much better.
Look close at the Estes built model on the instruction sheet. It looks like the builder had some problems with the canopy, too.

Estes Xarconian Cruiser Build Part 27, Masking the Canopy

The nose cone canopy is painted blue. Blue is a good choice, the model needed a third small accent color.
The "canopy" is recessed which will help in cutting the mask.


Two pieces of Scotch tape were laid over the canopy area at an angle from front to rear.
The lower edge of the tape sits right on the edge of the raised bubble.
This was the only way I could get the tape to sit flat over the edges of the recess curve.


A new tip was broken off of my break-off blade knife.
The mask edge was cut using the raised edge of the recess. Rest the blade tip on the edge and follow around it trying to make a smooth a cut as possible.


Here's how the center looked when pulled up.
The cut curved edge of the tape wasn't great, that's what the mask will look like after spraying. I'll cut it again.

Tuesday, November 19, 2013

Estes Xarconian Cruiser Build Part 26B, Decals

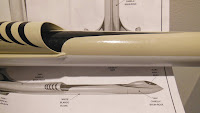
Look at the instruction sheet below the model in the picture.
I couldn't figure out why the instructions had you set the black intake decal so far forward.
At the instruction position you could easily see the end of the black decal inside the intake tube. I set it farther back inside the tube.
The curve from the decal better matches the curved lines of the intake tube.


After setting the first long intake decal down, a wrap of masking tape was set around the tube at the tip end. This gives me something to line up the other decal tip.

Sight down from the front to make sure both decals are straight and evenly spaced.


The wing and rudder decals are the most difficult to place.
Set the decals down dry to get an idea of the spacing along the leading edges. Note: These decals don't really match the curves of the leading edges!
All four decals are long and thin. Have a soft brush handy and be ready to keep the decals wet when re-positioning.


From the previous X. Cruiser post - another change:
I didn't use the largest wing decals. They were just too big filling up most of the wing area.

These smaller decals were meant to be used under the wing. I just thought they looked better. Less is more.

Monday, November 18, 2013

Estes Xarconian Cruiser Build Part 26A, Decal Fix


On the left is the first try at the X. Cruiser decals.
I'd already used the smaller logo spots on the top off the wing.

I pieced together parts of the larger decals and made the Xarconian EE decal on the left.
Looking at the model it needed something more.

I had already scanned the larger wing decals and reduced them down to the smaller size used on the upper wing. These were printed out on decal paper and applied, shown on the right. DONE!

Sunday, November 17, 2013

Estes Xarconian Cruiser Build Part 25, Decals

These kit decals took one full minute of soaking before they started to release from the backing paper.
I let them sit for another minute on a paper towel before they slid easily enough from the backing.
The decals stuck well and the clear edges almost disappear after they dry.


TIP: When cutting out the decals, don't cut too close to the edge especially on those with the long thin tails. It'll be easier to position if the decal ends have more clear edge "body".
TIP: At the inside of the "V" decal, round off the inside point to prevent tearing.


I'd always felt these kit decals were too much, some of them too large.
This decal goes on the rear of the intake tubes.
Three arc bands were cut off to position the decal closer to the rear of the tube.


Here's how they ended up. In this case, less is more. 
Below is the instructions showing the suggested decal position. Those three extra bands weren't needed.


Another change -
I reversed the decal under the front of the body tube.
The arc on the decal is the same as the masked line. I thought it fit the flow of the curved mask better.

Saturday, November 16, 2013

Estes Xarconian Cruiser Build Part 24, Mask Reveal and Ceanup

The mask turned out better than I thought it would.

Along the front edge a knife was scraped down the tan paint to sharpen up the edge. This was just some light scraping to straighten out the line.
There was a little slippage of the masking tape between the application and spraying.
Scrape lightly! you are just removing a little of the tan paint before it sets up. Don't scrape down into the white paint underneath.


Here's the front end curve. A little of the pencil center line is visible and will be erased after the paint has fully dried.
Enlarge the picture to see the color separation down the trailing edge.

I'm glad to be done with the masking, it was harder to do than most.

Next up: Almost all the decals!

Friday, November 15, 2013

Estes Xarconian Cruiser Build Part 23, The Mask!


Here's the front end circle mask in place.
On the sides is more tape strips joining the circle to the fin strake.


This had to be the clumsiest looking mask I've ever done!
Copy paper and masking tape covered the open areas under the wing.
Look close at the front wing edge and you can see the marked Scotch tape right down the middle of the rounded leading edge.

This is one of those "Cross your fingers" mask jobs.

Thursday, November 14, 2013

Estes Xarconian Cruiser Build Part 22, The Mask!


This was a tough mask, I put if off for a while trying to figure out how to do it.

Enlarge the picture at the right to see the instruction paint picture.
The bottom of the wing is white with a circular mask at the top.
Where and how do you separate the tan top and white underside along the wing edges?
It would be easier if the leading and trailing edges were left square and not rounded.


The only way I could see to it is to run a thin piece of tape down the middle of the wing edges. This was frustrating to get right.

I marked the tape with a wide permanent marker before placing it on the model. This is the only way to see the edge.

The front curved mask was about 1 5/8" from side to side.

Scotch tape was set down on my sliding patio door. It took four pieces of overlapping tape to get the width.
In the center of the taped area are three square pieces of tape. This gives something for the center point of the compass to set on.
It took four tires to get the cheap compass arc drawn at 1 5/8" wide.


The tape was cut with a sharp knife.
Mark over the cut line with the wide point marker.
Lift off the outside of the tape.
Use a single edge razor blade to knock off any high bumps and make the circle line smoother.

Tuesday, November 12, 2013

Estes Xarconian Cruiser Build Part 21, Decal Fix?

Okay, I'm back working on the Xarconian Cruiser again. Let's finish this one up!


There are a LOT of decals on this one. In my opinion, some decals are too large.
On the top of the main wing are the large XARCONION and mirrored "E" circle decals. These take up most of the wing area.
Under the wing are the same decals but about half the size. The smaller decals would look better on both sides of the fins.
Some of the other decals might also be trimmed back. I won't know until some of them are in place.


Here's the two half page decals included in the kit.
TIP: I scanned the larger decals and will reduce their size to the smaller set.
Why scan the larger of the two sets? 
When you reduce a larger scan the edges will be sharper.
I did have to go into the scan and redo the lettering.

Sunday, October 27, 2013

Estes Xarconian Cruiser Build Part 19, New 24mm Engine Mount

The model already feels heavy without paint!
The only recommended engine is a C6-3. That doesn't make for much variety, or respectable altitudes.

From the Estes website:
"The Estes C6-3 engine is a single stage engine designed for model rocket flight. This engine is a standard engine designed for flights in rockets weighing less than 4 ounces, including the engine."

The face card says the estimated weight is 3.7 oz. A C6-3 engine weighs .87 oz. for a total weight of 4.57 oz. That's heavier than the recommended launch weight for a C6 engine.
I've been converting larger models for 24mm engines. Usually that's a BT-55 or 60 model around two feet tall. This one fits that criteria.

To convert to a larger engine mount the model was loaded with the largest recommended engine, a C6-3. The parachute, shock cord and wadding were also in place to find the center of gravity.

The rocket was balanced. The balance point was 7 1/2" from the rear of the tail cone edge.


A standard 50/55 engine mount was made.

I won't be able to use a replaceable Kevlar mount now, the plastic tail cone will be in the way.

A notch was filed for the Kevlar to pass through.


A fillet was applied and the Kevlar loop pressed into the drying glue.

After that dried, more glue was applied and the loose Kevlar tail was pressed into the joint.
This will keep the tail end out of the way when the mount is glued into the BT-55 main air frame tube.

With the new slightly heavier mount and engine installed, 1/2 oz. of clay weight will be pressed inside the nose cone. The 1/2 oz. of clay moves the center of gravity forward to the older 7 1/2" mark.

BUILD TIME
Load and Find CG: 10 minutes
Build New 24mm Engine Mount: 20 minutes
Total Build Time so far: 8 hours, 50 minutes

Saturday, October 26, 2013

Estes Xarconian Cruiser Build Part 18, Detail Assembly Filling


The dowel end seams were filled with CWF and sanded.

It's easier to do any fine filling off the model.

The CWF joints were probably rough after sanding.
I've taped the end pieces to a dowel for a shot of primer/filler.

BUILD TIME
Filler on Joints: 10 minutes
Sand Filler: 5 minutes
Total Build Time so far: 8 hours, 20 minutes

Friday, October 25, 2013

Estes Xarconian Cruiser Build Part 17, Intake Tube Prep an Glue

Sorry about the lack of blog posts over the past few days.
I'm at the mercy of the ship's internet which is the worst it's ever been.
Were just pulling into Vietnam and the signal is strong - for now.


Before gluing the intakes you can clean up the cut edges with some medium CA applied with a Q-tip.
Let dry and sand smooth with some 400 grit.


The instructions tell you to apply fillets after the intake tubes are applied.
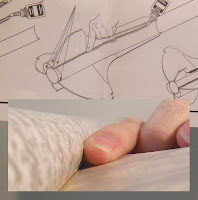
The inset picture shows my finger in the gap - the gap is too wide for a fillet! Bubbles would form even if I used Titebond M&TG.
I don't think the fillets are even needed.
A glue line was run down the root edge and smoothed out with a fingertip.
The intake tube was set into the fillet.

To remove and smooth any excess a Q-tip was rolled between my thumb and forefinger for a more pointed end.
This tip was run down the joint to smooth any excess glue.

BUILD TIME
Glue on Intakes: 15 minutes
Smooth Fillets: 5 minutes
Total Build Time so far: 8 hours, 5 minutes