Showing posts with label E Puma. Show all posts

Sunday, September 24, 2017

Estes Puma #7256 Build, Finished


For such a small model, this is a detailed build with many small parts. The paint mask would be difficult for a younger builder.

I wouldn't have bought this kit but it was on clearance at Hobby Lobby. I like a building challenge, this was a good one!


Saturday, September 23, 2017

Estes Puma #7256 Build, Part 14, Engine Pod Gluing and Decals


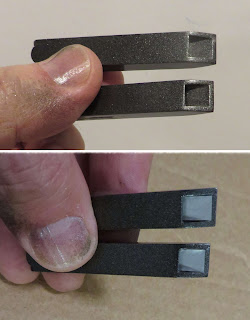
You can still see the top of the tabs going into the top of the engine pods.


You can camouflage it a little bit with a fillet of white glue. Mentioned earlier, use white glue for an external fillet over the paint. White glue dries clear, yellow glue would dry yellow.


The clear glue fillet blurs the joint a bit. Not perfect but better than it was.


The gun dowel ends are hit with a permanent marker to give them a black end.


This is the best fit I could find for the canopy window decals. They don't match the face card decals.
Because of the curved surface the decal was coaxed around the nose cone with a wet Q-tip.

Is it just me or does it look like an angry duck?

Friday, September 22, 2017

Estes Puma #7256 Build, Part 13, Decals and Engine Pod Gluing


There is white ink on the decals but it is pretty much invisible until you slide it off the backing paper.

TIP: Before cutting out the decals, hold it up to a bright light to see where the white it is. Those dashed black lines are very close to the white ink.


The front winglets get mirrored black decals.
After all the decals were applied the engine pods were glued in place. This was a tip picked up on TRF from a build by Scigs30. Getting a good mask on that inside joint under the wing would be hard to do.
On the left is how I applied the white glue. On the right is a Q-tip to smooth out the glue on the inside joints.
TIP: Use white glue for joints that will be seen on the outside of the model. White glue dries clear, yellow glue dries yellow.
The clear white glue fillet also blur the wing tabs that can still be seen when the engines are on place.

Thursday, September 21, 2017

Estes Puma #7256 Build, Part 12, Nose Cone Mask

This is actually a picture from the second time I had to mask the nose cone canopy.

A 1/8" wide strip of marked Scotch tape was set around the edges. Start the strip in the mid point at the side of the curve, It would be very hard to start at the small front tip or back end curves.
Masking tape went above that and was closed along the top.


Here's the first mask.
The right side was fine -


The left side had a white paint lift. Dang! 
I tried a brushed touch-up but the results weren't good enough.
The lift area was sanded smooth and shot again with grey primer/filler. Sanding and another coat of white.


Then the second mask was done, shown in the first picture.
This time the tape lift was fine.


Both sides are clean and just need the black canopy decal to finish up the model.

Estes Puma #7256 Build, Part 11, Touch-Up


Before painting I cleaned up a touch-up brush in a drop of dish soap and water in my palm. A little bit of grey came off. Good thing it was removed here and not transferred onto the model.


Paint was sprayed in a baggie pressed in a mixing cup. spray enough until you get a puddle of paint in the cup.


This touch-up went well. You'd really have to look close to see it.
The Rusto 2X paint have their problems but the touch-ups easily blend.


After you are finished, zip the bag shut and throw it away - No mess!

Wednesday, September 20, 2017

Estes Puma #7256 Build, Part 10, Masking Reveal


Here's the mask after the tape was pulled.

Everything looked great on the back end.

I've mentioned before, you can use Scotch tape to mask if your surfaces and fillets are smooth.


There was a small bit of orange pulled up on the left side of the strake.
On the underside of the winglet was another paint lift!
Touch-ups are needed. I don't want to mask and shoot this again.
That small smudge of dirt on the winglet will be cleaned off with a Mr. Clean magic sponge.

Tuesday, September 19, 2017

Estes Puma #7256 Build, Part 9, Masking For The Orange


This is NOT an easy mask. Take a close look at the face card. I'd make a bet it was touched up in Photoshop!
Notice the mask line down the vertical stab and the step down from the wing to the body tube.

The inset picture shows the very small piece that went over the front tip of the strake.
Scotch tape was used for the mask. Notice the square end piece to go into the step at the front of the wing.


The small forward winglets had the root edges masked with a strip of Scotch tape. The rest of the winglet and rest of the vertical stab was covered with brown masking tape.

Most of the model is sprayed with gloss orange.

Monday, September 18, 2017

Estes Puma #7256 Build, Part 8, Engines Paint


Two balsa pieces were cut to the width of the tab openings on the top of the wing engines. This gave me something to hold onto while spray painting.

The engine mount centering rings were masked and a dowel slid in for a painting handle.

I learned from another forum build by Scigs30 to paint the engines before gluing them onto the wing extensions.

Instead of just black, I used Rusto Metallic Black for a little extra shine.


UPGRADE: To add a little more detail, I cut some small squares of aluminum Monokote trim. These were stuck into the front end of the engines.

Sunday, September 17, 2017

Estes Puma #7256 Build, Part 7, Vane and Strake Gluing


Now that the grain in the small engine vane pieces have been filled, they are glued on the pencil lines made earlier.

Don't use much glue so you can adjust the equal spacing when all the vanes are in place.

Check the spacing and make any adjustments before the glue sets up.

The back view shows the vanes on either side of the engine hook.


Here's the vertical stabilizer in place with the third dowel glued on the top.

The engine mount is glued in with the engine nook on the bottom. The rear centering ring is even with the back end of the tube.


The forward strake is glued onto the front of the stab and down the body. There will still be more filling of the notch where it contacts the wing.

Saturday, September 16, 2017

Estes Puma #7256 Build, Part 6, Wing Gluing, More CWF Filling


Be sure to clean out the glue out of the slots on the wing before it sets up. The vertical stabilizer needs to fit all the way into the slots.
The even bead of glue from the last post makes a cleaner glue joint underneath the wing. It's nearly impossible to get a glue fillet under the wing at the body tube joint, so I don't even bother with it.

I will do a "fillet" at the front at back at the top without going too far out from the center.


The small forward wings, engine vanes and forward strake were stuck to a piece of masking to brush on some CWF. They are too small to be held in your hand.

Let them dry, flip them over and paint the other side.

Estes Puma #7256 Build, Part 5, Dowel Guns and Wing Glue Line

GOTCHA: The instructions say to cut the dowel into 1" section. They should be cut into 1 1/2" long pieces. The outside edge of the wing is 1" wide, if the dowels were 1" long the dowel wouldn't extend forward beyond the joint.
In a blog comment, BAR Geezer mentioned this mistake in the instructions. Scigs 30 also found the error on his TRF build.

The tabs on the wing joint needed filling.
After sanding and another shot of primer/filler the dowel was glued on under the joint.
The dowel serves as a gun detail but also strengthens the joint.


The primer on the wing glue line was scraped off for a stronger glue joint.
On the left a line of glue was set down the line.
TIP: On the right side I'm evening out the line by pinching my thumb and forefinger together making a upside down "V". Run this down the glue line making an even bead of glue.

The center line of the wing was pressed into the glue bead.

Friday, September 15, 2017

Estes Puma #7256 Build, Part 4, Rudder and Engine Fit


The vertical stab is two piece. Probably a good idea for strength, the balsa is 1/16" thick.
The downward wing extension goes into the two slots at the rear of the engines. The tabs on the down piece should have been made a little longer so whatever sticks out the bottom could be sanded flat with the bottom surface. There will be gaps underneath.

Here's how the tabs interlock with the outside edge of the wings.

I decided to fill the gap with some 1/16" strips of balsa.
These were thin but I still had to sand the down piece tabs to shorten them a little bit.


After the fill pieces dried they were sanded to surface.
More CWF followed and a shot of primer/filler.

(I know, way too much work for an assembly like this.)

Estes Puma #7256 Build, Part 3, Engine Mount and Vanes

The engine construction mount is pretty standard.
Before you glue it together, check the next step.

UPGRADES: I cut the finger tab off the engine hook and added a Kevlar line beneath the upper centering ring.

GOTCHA: The instructions say to glue the lower ring 1/2" from the bottom of the engine tube. The small vanes are only 7/16" long and according to the instructions they should fill the space to the end of the tube.

To properly fit the length of the vanes, glue the lower ring 7/16" from the bottom of the engine tube.

The vane marking guide is cut from the instruction sheet and slid over the low end of the engine mount. Mark the locations with pencil.
On the Lynx build I glued the ring onto the centering ring.
You can see the low end of the tube was hit with primer/filler and sanded.
I'll glue on the vanes later after the grain has been filled with CWF, primer/filler and sanding.

Thursday, September 14, 2017

Estes Puma #7256 Build, Part 2, Wing Engine Sub Assembly

I don't know what to call these so they'll just be named "engines" for the purpose of the blog build.
There are two, on the left are the parts for one engine.

Look close and you can see some CWF filler already brushed on. These areas are the interior surfaces that can be seen when the model is finished. There would be no way to fill the grain once is it all glued up.


On the left is how the top and bottom pieces were glued.

The center front and one side is glued in on the right.


Like the built up intakes on the QCC Explorer, there were some gaps in the tab areas.

I cut a thin slice off the balsa sheet and glued it into the gap.


The fill pieces were cut of. There were eight shims on each engine.

Wednesday, September 13, 2017

Estes Puma #7256 Build, Part 1, Parts


This is a detailed BT-20 based mini engine model. It looks to be designed to go alongside the earlier released Lynx and Scorpion models. I picked this up on clearance at Hobby Lobby.

You don't find many kits with 1/16" thick balsa anymore. The balsa is thin to construct the wing engine boxes.
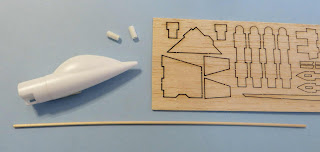
The parts of interest:
That bulbous canopy nose cone
Two small 3/8" long launch lugs
The multi-pieced laser cut balsa
The dowel was curved, a bit of a warp


The engine vanes are very small. One had come off the laser cut sheet and was at the bottom of the bag. It'd be easy to lose, I put it into a small zip lock bag.