Sunday, January 31, 2021

Estes Twin Factor #7250, Build, Part 9, Engine Blocks & Launch Lugs

The instructions show the two yellow spacing tubes taped together. They are pictured pushing the lower engine block in place.

I simply glued the lower engine block in the bottom, even with the end of the BT-5 tube without using the yellow tubes..
With the lower engine block glued into the bottom of the booster stage - 
Slide in the two taped together yellow spacer tubes into the booster stage. Slide the upper stage body down on the top half of the taped yellow tubes. 

The upper engine block is slid down from the top until it butts up against the yellow spacer tube. I applied a glue fillet around the top joint.


Here's one of the short launch lugs glued into the root edge fin joint.
Both the top and bottom lugs are glued towards the top leading edge of the adjacent fin.
Here's a step that isn't really needed, but I did it anyway hoping for a smoother final finish.

Some CWF filler was directed into the joint seams with the tip of a dull knife blade. After it dried, the bottom was sanded with 400 grit.
One shot of filler/primer and sanding followed, filling any remaining seams.

Saturday, January 30, 2021

NARCON Manufacturers Forum

The "virtual" NARCON is actually a great value at $25.00, considering you usually pay for gas, hotel and food. 
The Zoom style broadcast had some issues. The format is fairly new to all of us, the bugs are understandable.

Here's what I was able to write down and remember watching the session. 
Since the blog deals with Model Rocket Building, I'll be covering the LPR news.

ESTES:
1.The BIG MARS SNOOPER kit (upscale) will be available the end of April.
2. STARTERS (Igniters) are now called "Startec". They have a new exo-thermic dip tip that has more of a heat flash in comparison to the clear tips.
3. A upscale ORBITAL TRANSPORT upscale is in the works.
4. A new Destination Mars kit called the DARC-1 is coming. It features a fairly large blow-molded conical top. It looks a little like the old Centuri X-24 Bug but is not a glide recovery model.
5. Negotiations are in progress for production of BLUE ORIGIN and SPACE X models.
6. C5-0 motors are coming.

NORTH COAST
1. A smaller 24mm Sport Scale ARGO JAVELIN is being developed. This will more affordable than the big Argo Javelin. This smaller version uses the Quest Nike Smoke fin can and Big Betty style nose cone.
2. The new SCORCH was shown. Matt described it as a colorful Big Daddy with plenty of vinyl body wraps and very little painting.
3. The 2.6" CORPORAL is coming back along with the QUASAR, PHANTOM and BIG BRUTE models.
4. New design 3D printed NOZZLES that will thread onto the Estes half already glued onto the engine tube.
5. An R/C version of the new F-117.

A.S.P.
1. A new 13mm BLACK BRANT III
2. A new 1.9" diameter Aerobee 150
3. More Micro Maxx kits are coming.

APOGEE
1. New ROCKSIM PRO updates featuring "LV" Launch Visualizer with 6 degrees of freedom. LV is a visual flight simulator where you see a Google Earth 3D view of the launch from all sides.

AERTECH/QUEST
1. New F52 Enerjet "Classic" motors slated for a Spring 2021 release.
2. New 24mm Q-JETS, the D22W and E26W. Both can be shipped via USPS. Spring 2021.
3. Quest reissued kits with a 24mm engine mounts to use the new 24mm Q-Jets. The 30mm diameter SPORT and LIGHTNING. The ICARUS reissue kit has a 35mm body. All three kits will include an 18mm adapter.

I hope I got all the information correct, there was a lot to see in a small monitor window.

Estes Twin Factor #7250, Build, Part 8, Rings & Fin Gluing


After the glue has dried, sand the top joint to even things out.


Here's the assembled two saucer sections, 
the tops -


And the bottoms.


This is one of those instances where I extend the fin pencil lines under the bottom of the body tube.
TIP: The trailing edge of the fins is even with the bottom of the body tube so the pencil alignment lines will be covered. With the lines drawn around and onto the base edge of the tube you can better line up the low end of the fins.


As mentioned earlier,
the upper and lower stages are identical assemblies, except for the engine block positions.

This is a dry fit - no glue yet.

Friday, January 29, 2021

Estes Twin Factor #7250, Build, Part 7, Shroud Gluing


It takes very little glue to adhere card stock to card stock.
Just be sure there is glue on all the contact points.


After the edge sanding/tapering in the last step,

Notice the fit of the tapered disk fitting into the outside shroud edge. 
Pinch and slide your fingers around the sides until the glue takes hold. Try to get the fit as even as you can. 

If I didn't do the tapering, the disk might end up being an "end to end" edge instead of sitting inside the shroud lip.


While the glue is still wet, 
Run a burnisher around the edge smoothing out the joint. Go all the way around the rings applying a light even pressure.


Double check the fit at the shroud joint and smooth it out.

Thursday, January 28, 2021

Estes Twin Factor #7250, Build, Part 6, Disk Bevels & Lunch Lug Prep

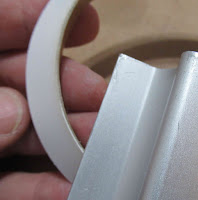
You'll get a better fit of the shroud if the low disk edge is angled.

On the left I'm not sanding. The shroud is just sitting on the ring and base - no glue yet. I'm using the shroud to get an idea of the sanding block angle.

On the right, notice the masking tape on the tube to prevent any sanding of the tube edge. I'm just sanding an angle on the disk edge.


The base angle has been sanded. You can see it in front of my fingertip.


The launch lug is evenly cut in two.
If the launch lug is stiff, you can cut through it with a single edge razor blade. 
If it feels like it is being crushed, slip a dowel inside the lug for support when cutting.

Round out the ends with a sharpened dowel.


Sand the lug ends flat,

Round out the ends again with the sharpened dowel.

Wednesday, January 27, 2021

Estes Twin Factor #7250, Build, Part 5, Leg Prep


Be careful when doing test fits of the card stock fins. Look close at the tab, the outside layer of the cardstock has peeled back.

I put a little bit of glue on the tab ends and burnished them down.


The laser burnt edges had already been lightly sanded with 400 grit.
A bead of white glue is set on the exposed edges. Even out the bead with a fingertip. 


After the glue bead dries, sand it with 400 grit. This gives the card stock sides a smooth, rounded edge that will really show when painted.


There is plenty of left over card stock.
Hang onto it - you'll find a use it down the road.

Tuesday, January 26, 2021

Estes History Video

On YORF, Scott Hansen posted:
"Here's a great video that was just released on 01/25/21 that gives a nice history of the company. There are a number of photos and videos I've never seen before in this as well."

To see the video: CLICK HERE


Vern and Gleda

The video was created by Max of Max's Models.

Estes Twin Factor #7250, Build, Part 4, Saucers Assembly


A test fit of the tube in the ring gave a loose fit. 


A bead of glue was set on the inside edge to make the diameter a bit smaller and the fit tighter.

Don't glue the tube in yet, the dried glue bead will make a tighter fit of the tube segment.


To strengthen and smooth the rough inside of the tube, a bead of white glue was smoothed out with a fingertip.


After the glue dries, lightly sand the interior with 400 grit.


The tube was glued into the ring,
Fillets were done in short segments, an inch of glue at the 12, 3, 6 and 9 o'clock positions. 
After the short fillets dried, the rest of the joint got fillets to finish it out.

Monday, January 25, 2021

Estes Twin Factor #7250, Build, Part 3, Saucer Bases


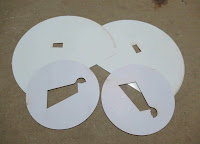
The saucer bases have many holes to keep it lighter and slots for the fin tabs.
Cut through the hold down tabs and remove the dots and rectangles.

Some probably might think I go overboard trimming and smoothing things out. I actually enjoy working on the small details.

A small diamond file took down the tabs.
With a twist of a (rough) sharpened dowel, any remaining tab was compressed and the hole rounded out. 


TIP:
Sometimes you can remove some laser cut discoloration with an eraser.
Use a white eraser. A pink eraser might leave some pink color.


On the left, I'm sanding some of the laser burn off the fin edges.

On the right - Leave the rectangular hold down tabs. The tabs give a tighter friction fit against the fin tabs.  

Saturn 1B Build Book Available!

A disadvantage of a blog build is it goes from finished model back to start!
If you wanted to follow and build along, you'll end up scrolling back to the first post.

But . . . 
If you are a Patreon Supporter you can have the new Estes SATURN 1B BUILD BOOK
Sent to you via DropBox! 
There are over 190 pictures and 37 blog posts.

You aren't a Patreon Supporter?
You can join and support the blog for as little as $1.00 month.
Most members subscribe with a $2.00 a month pledge.
You'll have access to many carded downscale models, decal re-draws and build templates.
Decal placement and masking template PDFs for a new Estes kit (yet to be released) is coming soon! 

If the blog has helped you through a tough build or if you've learned a thing or two,
Please consider joining and supporting through Patreon.

If you are a current Patreon supporter,
Email me at oddlrockets@bellsouth.net and ask for the Saturn 1B build book. 
The Build Book is in a Word Pad or .docx format.

Estes Twin Factor #7250, Build, Part 2, Forming The Shrouds


The cardstock shrouds have a separate inside glue tab for a smooth outside joint.

Rough up the glossy surface with some 400 grit sandpaper before applying glue.


With a sanding block, square up the laser cut edge for a cleaner matched joint.

One thing about gluing paper to paper, you need very little glue. Just be sure the glue covers the entire area covered by the glue tab.


This shows a pretty good match of the shroud ends. The glue tab is inside, underneath the seam.  

In this model you construct two identical stages. Every step in the  construction is doubled.

Sunday, January 24, 2021

Estes Twin Factor #7250, Build, Part 1, Parts


Here's an interesting model. High drag saucer shape. 
It could be a great two stage rocket for a small field.

The kit face card says it will reach 150 feet!
I'd probably fly it with the A10-0t booster and A3-4t for the sustainer.


No balsa, lots of laser-cut cardstock!
The main body tubes are BT-5s.


Parts of interest:
Lots of decals, many separate pieces to fit around the top of the saucer body.
Four sheets of laser-cut cardstock. Heavy card stock for the fins and "saucer" base. Thinner card stock for the angled top saucer shrouds.
The two 1/2" tall tube segments, almost 3 1/2" diameter.

Saturday, January 23, 2021

Semroc Laser X, KV-33 Build, Decal Fix


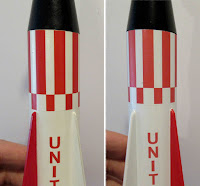
I mentioned I wasn't happy with the opacity of the decals. It's especially noticeable on the upper red roll pattern decal. The vertical lettering doesn't look as bad. 

I could have drawn and printed up a decal, but I thought I'd try something different.
I bought a sheet of self-adhesive red vinyl at Hobby Lobby. I don't have a Cricut machine - this will be done "old school".


It's easy enough to remove a decal that was just applied a day before.
Set some masking tape on the decal and pull up.

If you are lucky, it'll come up in one piece. This one didn't.
I was able to grab a lifted corner and pull up most of the decal in one piece. 


I picked up the older Laser X build and measured the vertical red band widths.


Strips were cut using a straightedge.


These were stuck them down without touching the sticky back, using my knife blade. I can position them easier with a blade than I could with my fingertips.


It came out pretty well.
It's not perfect but a whole lot better than the pale, peeled off decal shown below the new vinyl in the picture.
I can sleep tonight.

Friday, January 22, 2021

Estes Der Big Red Max Now Available


The new 3" diameter 
Estes DER BIG RED MAX is now available from the Estes Website: CLICK HERE

Visit the "Technical Specifications" below the pictures for more kit information.


Semroc Laser X, KV-33 Build, Finished?


Except for the "pink" decals, this new build turned out pretty well.
The lower fins are thicker and stronger, the fin strake toothpicks are a better diameter.
This wasn't built to be an exact clone. I sometimes like to make personal improvements hoping it will make it through more launches with less repairs.

I'm not happy with the pink decals. It's really apparent on the large roll pattern decal. A fix will follow . . .


Thursday, January 21, 2021

Semroc Laser X, KV-33 Build, Part 13, Comparing Old & New

It's always interesting to look back on an older build and evaluate your work over time.
Throughout this post - On the left is the older build, the right side the new build.

Here you can see the difference in the decal opacity. I really don't like that pink look next to the full red color on the fins.
Also notice the thicker fins on the right side or newer build.


On the lower body - 

I like the wider fin spikes which better fit the thicker fins.
On the left you can see some fin grain and seams in the launch lug. I was probably using sanding sealer then.

My fit and finish of the engine vanes is much better. This time I centered the engine hook in line with the launch lug. The Semroc instructions place the lug and hook as shown on the left.


The shroud is smoother and the paint gloss better. 

On the left side is the original build. It looks like I used super glue to adhere the fins. This time I scraped off a line of paint and used white glue.


This was interesting.
I now attach the Kevlar to the elastic shock cord inside the lip of the body tube edge. I probably wouldn't get a zipper on this model, but why take the chance!