Showing posts with label E Antar. Show all posts

Friday, June 11, 2021

Estes Antar Leading Edge Trim - TIP

I'm a little embarrassed -
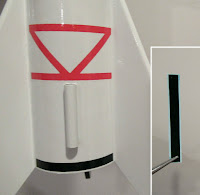
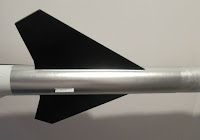
I built a few Antars for Estes and didn't notice the silver line running down the leading edge of the wings. I tend to follow the instructions and plan ahead, but didn't see the silver trim.
The Antar is a difficult model to mask and paint. I wasn't excited about another thin mask down the wing edge so I decided to try something new.
Sprayed decal trim has it's place and has worked in the past. But, this trim strip rolls over the round leading edge of the wing. It'll have to be wide enough to hold on when set onto the top and bottom.

This is not an easy technique and might be avoided if you aren't comfortable using water slide decals.
 
I sprayed silver paint on a scrap piece of white decal paper. White decal paper will show off the silver better than a clear decal sheet.
The spray paint seals the surface, no additional clear coat is needed. After the paint dries, you can go right to cutting and a water soak for transferring.

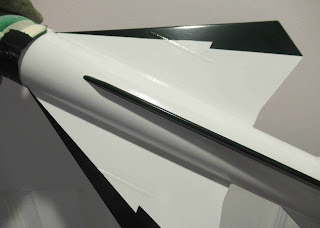
The strip is about 1/4" wide. The front end is rounded to roll around  the leading edge. I was surprised how the rounded edge of the decal disappeared into the fin tip fillet. 


The decal strip was cut a little long and will overhang the the end.

After the decal is fully dry, the overhang was trimmed off with a new single edge razor blade. Try using a back and forth sawing motion.
The decal strip held well but might curl and lift over time.
I don't like clear coats but used a little Pledge clear acrylic on this one. 
It won't take much. Dip the brush and wipe off the excess.
Run the brush over the edge of the decal, only covering about an inch at a time.


Immediately wipe off the shiny excess. 
There will be some of the Pledge that will run ender the decal edge helping it adhere to the surface.

That silver trim line adds a lot to the finished build.

Tuesday, May 25, 2021

Estes Antar #7310 Build, Finished


This is a big model, I had to take it outside to get a full, finished picture.
It's impressive! I'm glad the C5-3 engine is now available for it.

I mentioned before, those black nose cone dots are tiny, smaller than the box illustration shows. This model was a difficult masking job.


The back end - 
This was a pre-production kit, the kitted decals now have a darker red ink, almost a red/brown color.

This will be a popular kit for Estes. I'm curious what upcoming Designer Series rockets might be.


James Duffy has just posted and ANTAR unboxing video with some history and great paint ideas. To see it: CLICK HERE

Monday, May 24, 2021

Estes Antar #7310 Build, Part 18, More Decals

The low ends of the fins get these black decals.
The picture on the right shows about the best fit I could get.
I don't like setting decals all the way to the edge. That can lead to peeling up and cracking of the thin decal edges.

You are provided with three sets of these decals in black. Set over the upper dark green fin, the black decal is very hard to see.

The "T 01" and "ANTAR" black decals go on the top white areas of the wings.

On the bottom, the white "01" and "FT" decals go over the green. 

TIP: Notice the paper towel wrapped around the top of the model. This protects the silver paint from oily fingerprints. Fingerprints can dull the silver. 
After all is complete, you can finally glue in the pre-painted engine mount.

With a mount like this you can apply a ring of glue up inside the tube. Slide the engine mount about halfway in, not up into the glue yet.
Apply a second ring of glue just inside the edge of the tube. Slide the mount all the way in. The mount will stop when the overhanging crescent vane tips touch the end of the tube.

I like to line up the engine hook with the launch lugs.

Sunday, May 23, 2021

Estes Antar #7310 Build, Part 17, Decals


This picture is from the Estes website, it shows the two red boxes on either side of the longer green top fin.
That leaves the wrap band with the single red box to be placed around the top of the body tube.

Your kit will have darker red decals. My builds were pre-production kits. Estes wanted the kit decals to reflect the colors on the original G. Harry Stine model.
The three rear green bands will have to be cut close to their edges so they can be placed nearest to the tube edge. 
TIP: I don't like to lay a decal right up on the edge. A little clear border will help prevent the decal from peeling up or cracking.

The launch lug is actually centered. Sometimes I focus pictures to the left to allow inset pics on the right side when editing. Positioning pictures to the left can cause some distortion.

Again - 
The top (single red box) wrap band goes at the top of the body tube.
The wrap with the two red boxes goes towards the rear over the silver/white color separation line

Saturday, May 22, 2021

Estes Antar #7310 Build, Part 16, Silver Body Mask

This post could have been presented earlier, before the small wing pieces were glued on - In the pictures below, the glue mask strip for the K pieces hasn't been lifted yet.

TIP: Do all silver masks last - Never lay masking tape over a metallic paint! The sticky tape can mar the reflective paint surface.
   

After the green has been sprayed, you've still got more masking! Most of the upper body tube is sprayed silver.

On the left, the picture shows the mask around the rounded leading edge of the wing. After the root edges are masked, the rest of the wings are covered.
The green top fin and forward extension are also masked.


After the silver was sprayed - 
Here's how the top looks after the tape was pulled.

I have some rolled paper slipped into the top of the tube to keep out the paint.


And the bottom view . . . 

Friday, May 21, 2021

Estes Antar #7310 Build, Part 15, Mask & Glue The Wing Details


Masking down the leading edges of the "K" pieces is tricky.
One side is white, the other side is green.

Again I used Scotch tape down the center of the leading and trailing edges. They are set down on a piece of cardboard for controlled spraying. The white underside was fully masked off to keep the green out.

After the tape was pulled.
On the other side, the root edge is still bare balsa for a stronger glue bond on the wing.


The glue strip mask is pulled up from the wing.

The strip of tape is a bit narrower than the 1/8" root edge thickness.


The "K" pieces are glued in place.

You'll have to visit the next post to see the Silver mask shown on the left.

TIP: Do the silver mask last - You don't want to lay sticky masking tape over any metallic paint! The tape can mar the reflective paint surface.

Thursday, May 20, 2021

Estes Antar #7310 Build, Part 14, Spray & Tape Pull


Ace Hardware Premium Enamel Hunter Green is a perfect match for the dark green on the decal sheet.

Here I'm wiping off the nozzle after the first base coat spray.

Most of the larger full cover mask has been removed.
Here the center wing mask is being pulled.

The Scotch tape masks will be removed next - Fingers crossed!


The mask lines were very clean.
There is some spots that will need cleaning up.
It seems there is always a bit of paint that sneaks under the tape edges. I like to remove the mistakes before the paint fully dries. You wouldn't want to remove over spray a few days later.

On the far left is a Mr. Clean Magic Sponge. Wet the sponge and wring out most of the water.
On the right the green has been rubbed and removed.

Wednesday, May 19, 2021

Estes Antar #7310 Build, Part 13, Wing Mask


Here's the first draw of the wing mask.
After printing the PDF, it is cut down the zig-zag mask line.

One half of the full size mask template is set on the fin, matching up the ends.

The picture on the right shows a very faint pencil line for the masking tape placement. If you trace a pencil line on balsa, go light! You don't want to scar the soft wood.

I use Scotch tape for masking.
To see the tape edge, I mark it with a wide tip permanent marker. 
After the black ink dries, wipe over the line with a paper towel to remove any extra that might be transferred onto the model surface.


The other half of the template is used as a cutting guide for the zig-zag color separation line. 


Here's the mask for the green paint. The open white areas of the body will need to be covered before spraying the green.
Notice the many smaller pieces at the upper tips to fit the rounded leading edges.

Tuesday, May 18, 2021

Estes Antar #7310 Build, Part 12, Nose Cone Decal Dots

Those 12 black dots are tiny!

I drew up three circle templates to help with their placement.
A final set of computer drawn templates are available to Patreon supporters. It would be difficult to place these dots without them.
Write and request the Antar PDF at: oddlrockets@bellsouth.net


Tweezers! You'll need long tweezers to pick these decals up after soaking. They also help with placement on the nose cone. 
Here's what the templates look like on the final home print.
Cut out the centers and place over the nose cone tip. Make sure the card stock template is level.

The dot decals are placed directly in line with the dots printed on the templates.


Here's the finished nose cone.

Sunday, May 16, 2021

Estes Antar #7310 Build, Part 11, Nose Cone Tip Mask

On the left is the nose cone tip decal. It is an arc to fit the nose cone tip taper.

On the right side was my first attempt. I painted the silver too low. The decal wouldn't meet and didn't cover up the silver/white mask line.
The silver had to be sanded down and the mask repeated in the right location.
Wrap the arc decal around the nose cone tip before painting to find the correct height.


The instructions don't tell you how far down the silver mask goes.
I found the right depth to be 15/16". 

This should set the red arc decal width right over the mask line.


I cut an arc out of marked Scotch tape. This could take a few tries to get the line smooth.


Look close to see a few pencil marks going around the nose cone tip to set the tape edge on. 

On the right is the mask in place ready for spraying. The area below the mask also needs to be blocked off.

Saturday, May 15, 2021

Estes Antar #7310 Build, Part 10, K Piece Mask


If you want to mask the gluing line for the root edge of the K pieces -
The ANTAR templates for the masking and decal placement are available now for Patreon members.
Email me at: oddlrockets@bellsouth.net 
and ask for the Antar templates.

The wing masking template has this masking rectangle. Cut out the rectangle.


Set the template on the wing.
Cut a strip of masking tape and set it inside the cut out strip. 


Leave this masking strip on the wing  as you spray the white and hunter green.
For me, it's easier to mask the wings and K piece separately then glue on the K pieces after painting.


Some masking tape was placed around the inside of the tail end to keep the paint out. A rolled up paper towel fills the low end mask.

The body got an initial spray of gloss white. The white paint shows any rough fillets or glue blobs to be sanded smooth with 400 grit before the finish coats.

Friday, May 14, 2021

Estes Antar #7310 Build, Part 9, Wing & Fin Gluing


Notice the pencil mark on the tube edge. I like to continue the fin alignment lines over the edge when the fin is even with the tube and covers the pencil line.


Notice the fin fillet. 
TIP: On a long fillet like this, I only do half of the length at a time. Smoothing too long a line of glue causes it to build up under your fingertip and increase the width of the fillet.

Do about half of the fillet, smooth with a fingertip. Then do the other half of the fillet.


The wings are large, I'd recommend using the "double-glue" technique.
The two fins on the underside are set at an angle using the supplied template.


I found I needed to tape the template in place to coax the fins to the correct angle.

Thursday, May 13, 2021

Estes Antar #7310 Build, Part 8, Filler/Primer & Fin Marking Guide


Whoa, that's a lot of balsa! I was building four kits.

This is right after shooting the CWF filled balsa with Duplicolor Filler/Primer. 


This was pretty good balsa, the filler/primer didn't need much sanding.

Look close and you can almost see the slot fill lines.


The provided fin marking guide matched up perfectly! 

On the right I've sanded the filler/primer down the fin root edge lines for better adhesion. Sand off the primer to the body tube surface. There is no need to sand into the tube. Sand until you see the brown tube peeking through the gray paint. 


TIP: Round off the corners on the assembly jig where it could contact a fin fillet.

Wednesday, May 12, 2021

Estes Antar #7310 Build, Part 7, Nose Cone Weight


The two clay squares were weighed and came in at little over 1/2 oz.
You'll have to widen the hole in the base of the nose cone shoulder to get all the clay weight in.
Initially open the hole with you knife. Widen and round out the hole with 220 grit wrapped round a dowel.

The first pat of clay was molded into a tall cone. When this is dropped in it should fall into the nose cone tip.


You'll need a long dowel to tamp the clay all the way forward.

After the first pat of clay is pushed forward and the base flat, 
The second clay piece is inserted and pressed into place.

Check against a bright light to get the clay evenly in place.