Showing posts with label E Blue Origin. Show all posts

Wednesday, February 1, 2023

New Estes Blue Origin Changes - Follow-up


I received three new Blue Origin, New Shepard builds for Estes yesterday.
I had already built two of the original, first kits. Changes have been made. I was curious what the stability changes were. 

The nose cone gets one pat of clay weight. 
A single clay pat typically weighs around .25 oz. 

Inside the nose cone, the top surface is fairly flat. Time will tell if the clay stays stuck to the top wall.

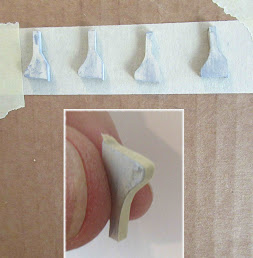
The fin span is wider now.

Measured from the root edge to the outside edge, the fin is 2 3/32" wide or 2.10".
The leading edge height is the same, 2 3/32" from top to bottom.

I have to wonder with the nose cone diameter  wider than the BT-60 body tube - 
Is the airstream spread out by the nose cone and splayed outside the smaller fins?


I would think the first (smaller finned) model could fly fine with a B6-4 motor. It might be unstable with the heavier C6-5 motor.

Sunday, December 11, 2022

Estes Blue Origin New Shepard Build, Finished


This was a good challenge, getting the tunnel fillets smooth.
Positioning that first upper tunnel top piece is critical for correct placement of the feather decals.
My kit was a pre-production model, I haven't seen the final released kit. Mentioned in the previous post, the fins are larger and nose weight has been added.
A historic, sport scale model.
 

Saturday, December 10, 2022

Estes Blue Origin New Shepard Build, Part 11, Old & New Kit Versions


On this blog, I was building the original version of the kit that was pulled because of some stability issues. I haven't seen the revised version of the kit.
According to messages from Ron (Ronz Rocketz), who has the new version of the kit:
A pat of nose weight clay is included.
These usually weigh around .25 oz.
Here's a picture of the old kit fin.
Ron wrote the fin root edge is still 2" tall.

FIN SPAN:
The original kit fin span (measured from the root edge to the outside edge) is 1 3/8".
See EDIT below - Ron said the new kit fin span is 2". That seems pretty wide but might be necessary when the airstream is spread out by the wide diameter nose cone.
In another comment, Metalhead1986 said the fin span is 2 3/32".  
EDIT: Ron agreed with Metalheads fin span. The correct fin span measurement is 2 3/32". 

If you have the new version of the builders kit, double check the fin span measurement for me and please leave a comment below.

Friday, December 9, 2022

Estes Blue Origin New Shepard Build, Part 10, Decals


The three piece feather decal rotates around the rocket body.

Here's the top piece. Notice how it is cut out. No inside sharp corners.
I did cut the sides close to the black ink. The sides fit right up against the tunnels.

Set the nose cone in place in the correct position. This first decal is set on the same quadrant above the launch lug. 


Rotate the body by 90 degrees. The second decal goes to the left of the first.

Visually, let the feather "flow" and roll around the body.


Again, rotate the body 90 degrees to the left and apply the smaller tail of the feather.

The BLUE ORIGIN name reads "up" on both sides of the model.
The second BLUE ORIGIN (shown below) is on the other side, just above and in line with that fin. 


The American Flags are positioned above the leading edge of the fins on opposite sides.

Thursday, December 8, 2022

Estes Blue Origin New Shepard Build, Part 9, Parachute & Engine Retainer


Here's the finished nose cone with the upper tunnel ends filled and painted.
I was happy with the results.

Note the position of the tunnel top position to the right.
Oops! The tunnel top should be closer to the left, at the edge of the black paint feather edge. 
This was my mistake. It didn't really effect the look or position of the feather decals (by much) that go down the body.


The engine retainer is screwed in place. 

Note there is no white paint on the screw threads. The threads were masked before spraying the white.
I tugged the shroud lines and they easily broke. These were replaced using #10 Embroidery Thread.
The parachute was tied as a "no-tangle" chute. To see how a "No-Tangle" chute is tied, read the Apogee P.O.F. article: CLICK HERE

A snap swivel was added.
The chute was not tied to the nose cone, but attached a few inches down from the nose cone. This helps prevent the nose cone from swinging in and out of the shroud lines, tangling the chute.

Wednesday, December 7, 2022

Estes Blue Origin New Shepard Build, Part 8, Tunnel Top Fillets


Glue fillets were applied using a Q-Tip.
Force the glue into the cracks. Pick up as much of the excess glue as you can. 
You'll want these inside surfaces smooth.


Here's a closeup.

I'd recommend using white glue. 
White glue will dry clear.


After the fillets,

I masked off the upper (pre-painted) nose cone and the shoulder below the tunnel tops and recess ring.

I needed to spray paint the tunnel tops and whiten the yellow glue fillets.

The paint was sprayed and showed there was still some fillet bubble gaps.
This time less glue was directed into the holes with a toothpick tip.

Again, use a Q-Tip to remove excess glue. 
After the glue dried, another mask and gloss white spray painting followed again.

Tuesday, December 6, 2022

Estes Blue Origin New Shepard Build, Part 7, Gluing The Top Tunnel Ends

This photo illustration is hard to understand.
A single tunnel top is glued into the recess just at  the right edge of the black painted feather. 
I wouldn't call the nose cone windows and feather a "decal". It's a very well painted nose cone detail.
Enlarge the picture to the right for better detail.

Glue the first tunnel just to the right side of the feather edge, then slide the nose cone into the tube. Line up the first single top with the tunnel to the right of the launch lug.

This first tunnel top location is critical for the placement of the large Feather decal.


This shows a dry fit of an upper tunnel.
The fit is very good. I was deciding whether or not to make fillets to fill in the gaps.


After gluing in the first tunnel top - 
Tape the nose cone so the positions won't shift.

Align and glue the remaining three tunnel tops.

Sunday, December 4, 2022

Estes Blue Origin New Shepard Build, Part 6, Tube Marking and Fin Gluing


The tube marking guide fits!

The fins and tunnels were glued in place.

These are the tops of the tunnels that fit into the recessed band at the base of the nose cone.

They actually fit very well thanks to laser cutting. I can't imagine cutting these out by hand and having them fit as well.

Before spraying gloss white (off the model) the root edge was masked with a strip of tape. The balsa pores should be open to better absorb the CA glue.

The lower body was sprayed with gloss white - no masking!

This shows the lower body after the first coat of gloss white and light sanding of any rough areas.

Saturday, December 3, 2022

Estes Blue Origin New Shepard Build, Part 5, Tunnel, launch Lug & Fins Fill


The leading, trailing and outside edges of the fins are slightly rounded.

The sides of the fins are not flat, but slightly curved! Don't sand the edges flat with a block.


The launch lug gets a standoff to clear the wide nose cone.

All the balsa pieces got a coat of CWF and sanding.


After that, all balsa got a shot of filler/primer and sanding.

Here's the tunnels with the low ends glued on. These are hanging over the edge of the scrap cardboard for spraying.


All the pieces were sanded with 400 grit to remove most of the filler/primer, filling any remaining balsa grain.

Friday, December 2, 2022

Estes Blue Origin New Shepard Build, Part 4, The Tunnel Length Fix


I continued the laser cut lines on the balsa sheet outside the laser cut lines to get a fill piece the same width as the short tunnel top.


The extension piece was glued on the end and allowed to thoroughly dry.

The sides were shaved almost to the tunnel width with a single edge razor blade.


After the razor blade, a sanding block with 400 grit got the extension width even with the tunnel width.


Here's how the extension looks in position.

It's too long now, but I can trim then sand the extensions even with the top edge of the body tube.

Thursday, December 1, 2022

Estes Blue Origin New Shepard Build, Part 3, The Tunnels -Gotcha!


There are some small balsa pieces in the kit.
Play it safe and store them in a zip top plastic bag until you need them.


I used a new #11 blade to cut through the hold down ticks and remove the tunnels and ends.


I'd recommend using a sanding block to lightly remove the ticks for a better fit of the ends onto the long tunnels.

TIP: I decided to glue the bottom ends onto the tunnels now to get a flat alignment. It would be easier to fill the joint and wood grain before gluing to the model. The instructions show the ends glued on later.
Here's a dry fit - The tail cone isn't glued in yet.
The low end fit is good.

On the top side - 
GOTCHA! The tunnels were short by about 1/16"! The tunnel should be long enough to reach the end of the tube. A fix is coming up in the next post.

These two kits were probably pre-production. These things are usually taken care of before kits are sold.

Wednesday, November 30, 2022

Estes Blue Origin New Shepard Build, Part 2, Engine Mount


The rings were very tight so I widened the inside diameter with some sandpaper.
This could have been a pre-production kit - there was an engine hook relief slot in one of the 20/60 centering rings. There is no engine hook on this mount.
The instructions don't mention it, but I set the upper ring a bit lower than the illustration showed. This allows a slightly larger glue fillet on both sides of the ring.

Don't apply a ring of glue for the lower ring. Press the ring up the tube (no glue yet) using the tail cone and inner retainer ring. 
If you are new to the retainer rings, there is an inside ridge that will stop the slide against the end of the BT-20 tube. Keep sliding up until you hit the ridge.   


Remove the retainer ring and tail cone.
While the instructions said to apply a ring of glue 1" from the rear, My lower ring spacing was a bit longer than 1". 

With the ring in position, now apply a glue fillet on each side of the lower ring.

An engine block is glued in even with the top of the engine mount tube.


Here's what the engine mount looks like, pretty simple.
The tail cone and screw retainer ring are not glued in place yet.

Tuesday, November 29, 2022

Estes Blue Origin New Shepard Build, Part 1, Parts


"Named after Mercury astronaut Alan Shepard, the first American to go to space, New Shepard is our reusable suborbital rocket system designed to take astronauts and research payloads past the Kármán line – the internationally recognized boundary of space."
 
"The Blue Origin feather is a symbol of the perfection of flight. It represents freedom, exploration, mobility and progress. For thousands of years, we humans have been looking up at the birds and wondering what it would be like to fly. Now, we look up to the stars and pursue a bright future for all of us."


The builder's kit parts are clean. The model is BT-60 based.

Parts of interest:
Your Vision In Space Postcard
New print parachute
Half round Tail Cone
18mm Screw on motor retainer rings
3/32" thick laser cut balsa.


Here's a closeup of the new nose cone.
The windows and feather print are very clean with no fuzzy edges.
The shoulder seems long to me.


A new print parachute.
I assume this is the print pattern from the first launches. Recent launches have three blue and red chutes.

Monday, November 28, 2022

Estes Blue Origin New Shepard Build, Background

Late last May, I received two of the Blue Origin kits to build for Estes.
As the kit was going to be on sale in June, I started work on them right away.
Two weeks passed, the fins and tunnels were all in place. A few white coats were sprayed.
The kits were recalled! 

It seems there was a stability problem, probably with the heavier C6-5 motors.
Estes has released a updated kit. I haven't seen it yet, but I assume the fins are slightly larger and nose weight has been added.

So - the builds were put on hold - until I read where the kits are available again. I restarted, working on paint and final decals.


A postcard was included where you could 
"Draw, write or create your idea on how rockets will change humanity."

The postcards were to be flown in space and returned to the sender.

Thursday, June 2, 2022

Estes Blue Origin New Shepard #7315 Build, Part 3, Engine Mount

I won't be able to finish up this blog build. 
Estes is working on a stability issue with the Blue Origin, New Shepard. I'm sure they will be rereleasing this kit when the concerns are worked out.
Here's the last build post - for now.


The centering rings are laser cut. 

The fit was too tight around the BT-20 motor mount tube and a little loose in the BT-60 main airframe tube.

I wrapped some400 grit around my finger to widen the inside hole a bit.


There was an engine hook notch cut in one of the rings. I place that notched ring at the bottom where no ejection charge could escape.

The lower ring spacing is set by sliding on the tail cone and pressing the inside of the engine retainer over the BT-20 tube.

The lower ring ends up about 1 1/32" from the bottom edge of the tube.
But - use the tail cone and retainer ring to set the distance.


Here's the finished mount, the tail cone and retainer aren't glued on yet.

There is a green engine block even with the top of the engine tube.

Wednesday, June 1, 2022

Estes Blue Origin New Shepard #7315 Build, Stability Issue?

From Matt Ryan on the Estes Model Rocket Facebook page:
"Just got my Blue Origin New Shepard in the mail yesterday, then got this email:
Thank you for purchasing the #7315 Estes Blue Origin New Shepard Builder's Kit. Our team has recently become aware of a stability issue with this model and is working to resolve it as quickly as possible. For your safety and the safety of those around you, please do not build or fly the kit. We strive for 100% customer satisfaction and are asking you to return the item to us for a full refund as well as free shipping to return the item.
Please contact the customer service team at (719) 372-6565 or email us at service@estesrockets.com before June 31st to receive your return shipping label and full refund.
We apologize for the inconvenience and will keep you on a list to be the first to know when the kit is ready to launch again. Please accept this 30% off promo code for your next purchase on our website.
I opened the box but haven't built it yet - anyone know what the "stability issue" is and why it couldn't just be fixed with some well placed ballast?"
_____________________________________________________________

Estes Blue Origin New Shepard #7315 Build, Part 2, Parts Of Interest

These parts should get a closer look - 
Notice the "Club For The Future" postcard.
Draw or write your idea on how rockets will change humanity. Send the card to the Club For The Future and it will be flown on Blue Origins New Shepard rocket then return it to you stamped "Flown In Space."

The screw on 18mm motor retainers are molded in white. Below that is the tail cone.

There are some small pieces on the laser cut balsa sheet.


Here's the pre-painted nose cone.
The work is very clean.


A nice surprise is the new 15" diameter Blue Origin parachute.