Showing posts with label Sanding. Show all posts

Saturday, March 8, 2025

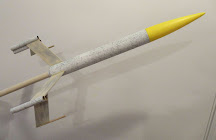
Estes Star Seeker BT-50 Upscale (Tri-Pack) Kit #0866, Part 9, Sanding & White Paint


The assembled model ready for white paint.


After the first coats dried, glue boogers and glue fillets were sanded.

Here you can see where the uneven glue fillet was sanded.
The paint fills some of the voids.

The Apogee nose cone is molded in yellow. This plastic color seems to show through light paint.

I sprayed white first, still too much yellow.
Then another shot of gray filler/primer.

You can still see some yellow tint showing through.


All gloss white paint, no masking!

Decals application were covered in the earlier small model build.

Monday, February 3, 2025

Estes Black Star Voyager Build, Part 31, Sanding the Black Paint


I'll be spending the next few days smooth sanding the black paint.
Concentrating on the fillet ridges, I'm light sanding with a well worn piece of 400 grit.
I don't want sanding scratches to show in the final coat of paint.
This model will be sprayed with gloss black. It will show every spot of glue, balsa grain and speck of dust.

Sunday, June 16, 2024

Semroc Wac Corporal Build, Part 13, White Undercoat & Sanding


It never fails -

I think I've done a good job making smooth fillets. I think I've picked up all the excess glue before it has dried.
The first white undercoat usually brings attention to all the flaws.

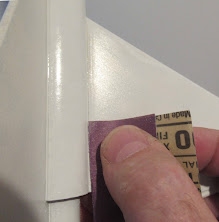
On the left is an uneven glue fillet.
On the right is after careful sanding with some older 4000 grit. 
You can sand yellow wood glue.


A before and after of the flue fillets on the upper launch lug.

Sand under a bright light. Sanding dulls the gloss white. Low areas that need more sanding will still be glossy.


Here's a noticeable glue booger near the leading edge of a fin.
On the right is after sanding to surface. 

In 48 hours, another white undercoat and probably some more sanding.

Thursday, March 28, 2024

Estes Skytracer Clone #1361 Build, Part 13, Mask & White Paint


I masked off the glue line for the thruster assemblies. Look close and you can see the thin masking tape line.


The model is ready for the first white coats. In the front end a rolled up paper towel keeps paint out of the tube.

Easy paint - most of the model is an overall gloss white. The small nose cones in the thruster units aren't glued in yet, they will be painted black separately off the model.


Enlarge the picture and you can see some ridges down the fillets.


The glue fillet ridges can be lightly sanded with some 400 grit.  Don't sand into or dip into the balsa! Just knock off the high glue spots.
 
In the picture you can see the paint and fillet have been dulled with the sandpaper.

Thursday, December 21, 2023

Estes Great Goblin, #9724 Build, Part 7, Rounding Fins

This was a bit confusing.
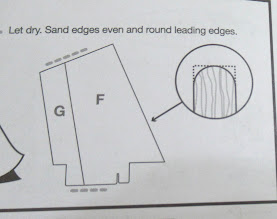
There is an arrow pointing to and saying to round the leading edges of the fin. Leading edges? There's only one leading edge. The back is the trailing edge. 
The root and outside edges have a dashed line. Sand edges even. I assume that means to sand them square.

The old BT-55 based Goblin kit has you round the leading and trailing edges. That's what I'm going to do.


The forward fin shows the brushed on coat of CWF.

The fin in the back has the CWF sanded smooth. The pencil lines show where I need to apply more CWF and re-sand. 
Ideally, you should have left a thin skin of CWF after sanding. The pencil outlined areas were sanded down to the bare balsa.


TIP: To reduce saw dust -  
I sand in my lap, over on old dish towel. 

As I go I wipe the fin and sandpaper block off onto the towel. This traps most of the saw dust until I can shake it off outside.

Tuesday, December 19, 2023

Estes Great Goblin, #9724 Build, Part 5, Two Piece Fins


Mentioned in the last post - 
You should sand and square up the edges. Sand enough just to remove some burnt ash. 

On the left is a fin piece right off the sheet showing the laser cut ash.
On the right is a sanded, squared fin edge.


This shows another angled laser cut. 
On the right the edge was sanded.

This is a root edge TTW tab and doesn't really need sanding like this. I use it to show the laser cut diffused angle. 
You will get a better glue bond when some of the dark brown ash is removed. 


Here's a 90 degree sand. 
Using a sanding block makes it easier to visualize.

Sometimes I'll look at an edge like this to ensure things are square.

Wednesday, January 11, 2023

New Estes Catalog Sanding Block

On page 82 of the new 2023 Estes catalog - 

THE ULTIMATE SANDING BAR - $14.99

This is very similar to my favorite OOP Great Planes Easy Touch sanding block. It's the same price as the comparable Du-Bro Kwik Sand Block. Sure the price seems high, but these are the BEST sanding blocks

The Estes Sanding Bar comes with some 120 grit sandpaper. That's pretty rough for sanding balsa. I have two Great Planes blocks. One has 220 grit for shaping, the other has 400 grit for smoothing.

The great thing about these blocks are the raised hand grip running down the back. The self adhesive sandpaper holds strong to the flat bottom face. You can concentrate on shaping a fin without having to grip the sandpaper at the same time.  

For more information and TIPS for this style sanding block: 

Tuesday, October 18, 2022

Good Sanding Blocks?

On YORF, Don A. asked:
"I have two Great Planes Easy-Touch hand sanders that I use all the time.
I would like to get some more but it appears that these are OOP now.
Any ideas for anything similar? Something that has a smooth metal surface that self adhesive sanding paper can be attached to and that has a comfortable handle."

Tigerhawk answered:
"The DU-BRO company sells the aluminum sanding bars."


CJU gave a link:


These look identical to the OOP Great Planes Easy Touch Sanders. 
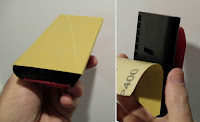
On the right is the profile view. That raised hand grip is comfortable and affords a lot of control.
For me, they are the best sanding blocks out there.
I have two - one loaded with 220, the other with 400 grit. If I don't have adhesive backed sandpaper, I can adhere it to the flat bottom with an even coat of a glue stick.

For a post about good, cheap self adhesive sandpaper rolls - CLICK HERE 
Making sandpaper last much longer: CLICK HERE

They are twice the price of the older, OOP Great Planes blocks, the 5" X 2" long block at $14.99, before shipping! But I would pay that much for them without hesitation.
These blocks are that good!

Saturday, September 24, 2022

Estes Space Shuttle Columbia Build #1385, Part 13, Sanding Between White Coats

One way to get a smoother final finish is light sanding between coats.
You can sand the Ace Premium Enamel 30 minutes after spraying.
Recoat times are still within one hour then after 48 hours.

Here's the Shuttle after light sanding the first white coat.
Closeups below will show the sanding areas of concern.


Here's some rough areas on the cardstock side/wing glue fillets. Knock off the high points between the white under coats. 
I use 800 grit when dry sanding between coats. Some 400 grit sandpapers will show scratches under your paint.


Enlarge the picture to see some areas around the nose cone "notch" recess. These were slightly raised areas in the plastic that needed to be smoothed out before more paint.

Another example of glue fillet ridges around the launch lug.
Sand and knock down the ridges. It's not necessary to sand down the fillets, just the ridges that were left after the glue dried.


Around the raised flap - 
Forward of the flap were some glue dots that were carefully shaved off then lightly sanded.
It's hard to get good paint coverage with a painting wand dowel slid into the engine mount. 
First to paint just the end - 
A expended engine was slid into the mount. Notice the casing isn't slid all the way in. This allows no paint to get inside and easier to remove the casing without touching much wet paint.
For now, only spray the back end of the engine mount.

Remove the engine casing without touching the wet paint on the model. You might get a bit of paint on your fingers from the back end - the front of the model had no new paint yet.
While holding onto the unpainted front end of the model, Slide in a painting wand with engine casing set on the front of the dowel. Now you can paint the rest of the model.

Monday, June 21, 2021

Estes Indicator #7244 Build, Part 8, White Undercoat & Kevlar Mount


I only did glue fillets where the root edges contact the body tube.
No wood glue will go on the adapter area. There is little chance of the low end of the fin making any contact with the ground or breaking off.

TIP: When applying glue for a fillet - (left side picture)
Squeeze the bottle to start the fillet, then stop squeezing and simply let the glue flow as you draw the nozzle down the root edge.

The right side picture shows the same glue line smoothed out.


The entire model got hit with it's first gloss white undercoat.

Light sanding follows with some 400 grit. The outside of the glue fillets are usually rough and will need some smoothing.

A second white undercoat followed, with even lighter sanding with an older piece of 400 grit.

Notice the reflection on the flat side of the fin. I was just knocking down the tops of  the slight orange peel.

I should have tied some Kevlar to the engine mount, but this engine mount had thinner cardstock rings.

The lower body tube section is a BT-50. 
Some Kevlar was tied around a notched 20/50 centering ring.
This was pressed into place using the base of the 20/50 plastic adapter.
A glue fillet was applied around the top joint of the ring.

Tuesday, November 10, 2020

Estes Asteroid Hunter #3224, Build, Part 11, Trimming Up The Skins


Here's where the main body stands now - 

Note the overhang is a little longer on the back, larger end shown on the bottom. This overhang will be trimmed then sanded to the flat faces of the balsa.


Viewed from the side - 
These long side edges will also be trimmed and sanded.

Use a new, sharp single edge razor blade to cut down the overhang.

Don't cut into the balsa face!
It is very easy to veer off a straight line and cut into the flat balsa sides.

Notice there is still some card stock edge left above the blade in the picture.


With most of the overhang gone, the cardstock is now stiffer near the edge and easier to sand.

Sand the remaining cardstock down to the balsa with 220 grit and finishing with 400 grit on a block.

Wednesday, November 20, 2019

Tools - The Essentials, A Decent Sanding Block, Part 2


Here's the bottom plate.
I wish there wasn't holes in the bottom, these didn't seem to effect the tools use. The sandpaper is stiff enough that it didn't "dimple" into the holes.

The pressure clamps hold sandpaper fairly well, not as good as the older wing nut clamp.
But - Using the sticky back sandpaper from Home Depot, the sanding block works very well. It easily peels off!

Without the open ends of the sandpaper wrapped around the edges and under the top clamp, the red handle top wiggles a slight bit.
I took two strips of the sticky backed sandpaper and set them under the clamp top. The top is snapped in place and the handle doesn't move.


If I didn't have the OOP Great Planes blocks, this would be a good second choice. I would probably have two - One with the sticky backed 220 grit sandpaper and a second block with 400 grit.

Tuesday, November 19, 2019

Tools - The Essentials, A Decent Sanding Block, Part 1


Here's the sanding block I used for a few years before finding the Great Planes Easy Sander. This is the Warner #436, made for drywall work.
The upper block and wing nut clamped down and tightly held a quarter piece of sandpaper.

They don't make the wooden blocks anymore.
This is the new Warner block, #34436. It's plastic now, the wing nut is replaced with black plastic clamps.
I picked this one up at Lowe's for about $3.00.


The two black clamps are pinched towards the center and the top lifted about 1/4". The sandpaper sheet can be slid out and replaced.
That weird shaped red knob at the top fits the hand comfortably.
More in the next post - 

Sunday, June 16, 2019

Estes Saturn V #1969 Build, Part 35, White Base Coats

Mentioned earlier -
This is a large model, hard to get even coverage using a spray can. Spray it in sections.

Here's the 4" diameter lower body. Look to the low end cutouts. There is masking tape, sticky side out, to keep paint out of the engine mount area. There is also tape inside the open top end of the tube.
Normally I'd use a painting wand (a dowel with an engine casing glued on) to paint, but this model is too large for that.
My free hand can go inside the tube on either side to hold the body while spraying.
TIP: Place a plastic grocery bag over your free hand to keep off the paint.

TIP: While the instructions say to paint the model with flat white, I'd recommend a gloss white. You'll be handling this model a lot when masking for the black. Flat paint is a dirt and finger oil magnet. Gloss paint can be cleaned if needed.
Also - Decals stick better on a smooth, glossy surface. Decals will "silver" on flat paint. The clear coat border (over all decals) will be seen. You can always spray a flat clear coat after the model has decals and is finished.

To the left: The shoulder of the Command Module was masked off. A piece of rolled card stock gave me something to hold on to.
Notice the escape motor tube was already seam filled, primed and sanded.

In this new version, the 3rd Stage Wrap totally covers the 3rd stage tube.
TIP: Allow more time before re-coating the white on the 3rd stage wrap. Sprayed on the flat plastic, the paint can't breathe and dry like paint would on a Kraft body tube - from the outside and inside.

I thought I gave it enough time but had three small areas wrinkle up! This slowed down the build as it had to be sanded, sprayed with filler/primer, sanded and sprayed again with the white.


Spray some white, let dry and sand down any glue boogers or rough areas. Spray more white.

On the left is the final (gloss) white before the time consuming black masks.

Assembly time so far:
21:00 minutes previous
  2:30 minutes this post
23:30 Total so far

Friday, September 14, 2018

Streamer D Rocket Build, Part 3, Tube Smoothing & Nose Cone Shoulder Fit


The seams on this BT-5 tube were almost non-existent. I didn't fill the seams. I did lightly sand with 220 grit and polished with 400 grit.


The shoulder of the nose cone was a little wider than the outside diameter of the body tube.
With the nose cone in place you can use the sanding block to take the lip down to the tube diameter.
Sand lightly, then run a finger over the joint to feel for any raised "step".


Before the fins were glued on, the tube and nose cone got a shot of filler/primer and smooth sanding to surface. I don't use the filler/primer as a "primer", but more as a filler for any remaining seams or balsa grain.

Tuesday, June 5, 2018

Daniel The Rocket N00b, Sanding Block Tip

I love my Great Planes Easy Touch sanding block.
Problem #1, Great Planes is owned by Hobbico, recently bankrupt. I hope somebody picks up and produces this sanding block. It is the best available. There are still a few blocks for sale on Ebay. I do recommend picking one up. (I have two in use and two more unopened extras.)

Problem #2, Great Planes doesn't sell adhesive backed 400 grit sandpaper rolls for it. The only sell 80, 150 and 220 grit sandpaper rolls.

Daniel (The Rocket N00b) told me about some 400 grit adhesive backed sandpaper imported by Klingspoor. CLICK HERE It is a very fine 400 grit.
Problem #3, the Klingspor adhesive sticks too well! It's difficult to peel off and leaves sticky gunk on the block.
Daniel suggested peeling off the sticky sandpaper under running water, making removal much easier. You might have to use a little Goo Gone after the paper is peeled off.

Here's the best solution as suggested by The Rocket N00b.
For a more detailed description of this tip stop by his blog: CLICK HERE


Some 3" wide masking tape is placed (sticky side up) onto the bottom base of the sanding block.

The 400 grit Klingspor sandpaper is then stuck onto the bottom of the block, onto the masking tape.
The Klingspor sandpaper is now stuck onto the masking tape, not directly on the flat aluminum base of the sanding block.
To remove the sandpaper, just lift and peel!
Both the Klingspor sandpaper and masking tape layer come off together.

TIP: Extend the life of your sandpaper many times over by removing off any loaded up gunk with a soft brass brush under running water. Use a circular motion when cleaning off accumulated glues and sealers.