Showing posts with label E Honest John. Show all posts

Thursday, December 8, 2016

The BIG Fix, Estes Honest John, Part 2

I'll have to make a coupler that will fit around the TTW fins tabs right above the cut engine mount tube.

A short segment of BT-50H was cut into quarters. The sides were trimmed more to allow space to fit between the sides of the TTW fin tabs.
These were glued around the new extension piece with equal spacing between the pieces.
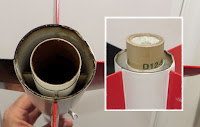

Look close at the bottom left and you can see the lower open space around the fin tab.

A D engine was slid in to make sure the tube ends were aligned.
Remove the engine before the glue starts to set.

The centering ring was pressed into place and rested against the back of the interior tube segments. Here I'm applying a glue fillet with a Q-tip.

The middle ring of the retainer was glued over the end with epoxy.
Perfect? No. Launchable? - YES!

Wednesday, December 7, 2016

The BIG Fix, Estes Honest John, Part 1

I hope I'm not the only one who has done this!

My first D12-5 flight of the Estes Honest John looked great! I picked it up and walked it back to my car.
I didn't notice this until I got home.

It was a D12-5 flight . . .
I didn't put the 1" orange spacer in before the engine was installed.
At launch the engine flew forward and hit the engine block. The flame was hitting the low end of the engine mount and melting the plastic retainer.


The last inch of the engine tube was pretty well charred through. It was worth making a repair. This was one of those fixes I let sit for a while as I figured out the best way to do it.

The last inch or so of motor mount needed to be cut off. With a sharp knife I cut the cleanest, straightest line possible.
Those TTW fin tabs won't allow an outside coupler to hold the new body tube on.
More time . . . more thinking.


A length of BT-50H was cut about 3/4" long. I guessed at the length.
That's the inside ring of the engine retainer. It wasn't burnt and will be re-used.

Thursday, December 3, 2015

Wednesday, December 2, 2015

Estes Honest John, #7240 Build, Finished


As kits go, this was a good one.
Impressive size but still manageable on a display shelf.

I made two, the better on is up for bids on Ebay. The other Honest John will be part of my active fleet.

The center band has rounder holes, worth the extra time it took to punch it out.


The nose cone was very well molded. The kit supplied decals really set it off.


Here's how the Estes Engine Retainer (included in the kit) fits onto the back end.
On a forum post, John Boren said he designed it so the model will stand on the tube end with the outer ring removed. Remove the ring for display, screw it on for flight.

Tuesday, December 1, 2015

Estes Honest John, #7240 Build, Part 17, Decals and Trim


Here's how the nose cone decals were cut apart.
Note the top piece on the right has a very slight curve to it to fit around the nose cone taper.


The bottom was set down first.
A damp Q-tip was used to set the decal into the rut. Just roll over the edge to coax the decal into the recess.


I had another decal that wouldn't release from the backing sheet.
A small area needed a patch.
A small wedge shape was cut from the Estes decal and set over the white area.


After the patch and a light touch of Future you can't see the repair.


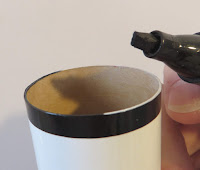
A Sharpie marker was run over the edge to cover the white and define the black band top.

Monday, November 30, 2015

Estes Honest John, #7240 Build, Part 16, Decals


I was curious about the gap between upper fin root and the tail cone. I saw this cover picture on the November/December issue of Sport rocketry.
This is Jon Stenberg's Argo D4 Javelin model.
Enlarge the picture and you can see the the fin root gaps. So maybe I got it right this time.
With the HoJo fins and tail cone you could probably use them on this model.


Here's the model before decals.
It looks pretty good without them.

On this rocket you've got to do a little pre-planning before soaking the decals.


The top edge of a black band wrap is even with the end of the body tube.

Cut close to the black top edge. You can leave a little more clear border on the bottom.


The nose cone decal is set over the recessed line around the cone.
I'll cut this decal in two so there won't be a raised gap over the rut.

Sunday, November 29, 2015

Estes Honest John, #7240 Build, Part 15, Fin Can Paint


Here's the fin mask for the red.
Each fin side took two separate pieces of Scotch tape because of the wedge taper. Even the bottom of the body below the fin was masked, the trailing edge is a little above the bottom.


I'm building two HoJos, on one - Uh, oh!
The plastic tail cone was too slick and some white paint was lifted.
Be sure to lightly rough up the plastic so the paint has something to grab.
I'll have to sand this, mask and shoot primer and sand that smooth. then more white and red if needed.


The other fin can turned out fine.
This one is up for auction on Ebay right now.


After the red had dried, the black was next.
This is after the black paint was shot, before the mask was pulled up.


After the black mask was lifted I have a small touch up along the red fin root edge.

Saturday, November 28, 2015

Estes Honest John, #7240 Build, Part 14, Nose Cone Paint - Oops!


The paint instructions are vague.
I masked around the circumference of the notched rings.
BIG MISTAKE!
I assumed this was the right height for the black decal squares.


Don't assume -
I should have double checked against the black decals.


The upper square block is just about 5/8" tall.
Check out how close the date stamp is - almost on the decal itself.


Well, it'll have to be re-shot white then masked again for the red.
The pencil mark is 5/8" above the upper recessed ring. I might mask it a hair short of the 5/8" mark so there won't be any white above the black decal top.

Friday, November 27, 2015

Estes Honest John on Ebay


One of the two finished Estes Honest John models is up for auction on Ebay.
This is painted in the face card test round colors. The fins are fully tapered from the root edge to the tip. This is the same model being built on the blog right now.
To see the finished model or make a bid, CLICK HERE
Stop by, make a bid and support the blog!

Monday, October 19, 2015

Estes and Kevlar?

Here's the top centering ring on the new Estes Honest John.

There is a laser cut hole into the centering ring.
Many builder's have asked why Estes doesn't drop the tri-fold mount and switch over to Kevlar. This hole might be a compromise allowing the builder to add a Kevlar leader under the ring.
The hole is illustrated in the instructions but is not explained.

We've seen this type of thing before. The Estes Bullpup 12D kit had a notch for the engine hook but no hook is included in the kit. Maybe this ring is an existing part from another kit? I don't think so. These rings are made to fit inside the Honest John tail cone.

Anyway, I found it interesting. While I could have used the Estes hole for the Kevlar line to pass through, I still punched a hole closer to the engine mount tube. That's where I usually put it anyway.

Wednesday, October 30, 2013

Honest John K-27 Decals

I was thinking about building a clone of the Estes Honest John, K-27.
Years back it was a challenge to build with the nose cone shroud,
diamond tapered fins and spin nacelles.

I found a scanned decal sheet online but there wasn't any reference inch measure to check the size accuracy of the PDF.

I'll use the BT-50 tube diameter for a base size. The BT-50 is .976" diameter.
Looking at the decal sheet the three bands at the upper right go over some card stock joint bands around  the circumference of the BT-50 tube.

For the first check, multiply the BT-50 .976" by Pi (3.14) to get the circumference of 3.064"
The length of the band on the PDF is 3.172" wide.
Is the extra .10" inch the allowance for a slight overlap of the band? 

It would seem so. The .10" overlap is equivalent to about 3/32". That's consistent with other decal bands applied around finished (painted) body tubes. These decals go over the 110 lb. cardstock bands already on the body tube so the circumference is a little wider.
Will the middle wrap with the circular bolts be evenly spaced when the ends meet up?
No way to know until the decals are applied.
First I've got to order the parts from Semroc!