I'm going to be taking a break on the Saturn 1B build for a while.
I will come back to it later.
I don't like to suspend a build, but to be honest, I need a break!
We've all been there, we get halfway through a kit and move on to something else.
This kit is very involved. I've explained how to get through the hardest steps, the capsule tower and all the small detail work.
If you are doing the entire build -
TIP: Pre-paint the black and white alternating H-1 engine tubes before gluing it all together. It's difficult to mask the tubes when they are side by side.
I've rarely done this on the blog, only the Centurion Project and the Estes Klingon were stopped before final assembly and finishing.
The Klingon was beyond frustrating to get a good fit of all the mixed vacu-form, wood and paper parts. The Centurion was stopped when I couldn't decide on the best way to lock in the interchangeable motor mounts.

Showing posts with label S Saturn 1B. Show all posts
Showing posts with label S Saturn 1B. Show all posts
Wednesday, December 19, 2018
Tuesday, December 18, 2018
Semroc Saturn 1B, Build, OOP #KS-1, Part 48, Central Engine Mount Assembly

Two thick walled ST-9 tubes run through the center line of the model.
The two 9" tubes are joined by a black coupler. An alignment line is drawn down the joined tubes.
 The larger TR-115 ring is glued on top of the "clover shaped" cluster bulkhead.
The cluster bulkhead and TR-115 ring assembly is glued to the top of the four engine cluster tubes.
Note the picture on the right. The fit of the cluster bulkhead doesn't totally reach over the edge of the engine tubes. You can see light at the edges. I am concerned about ejection charge leaks charring the inside of the rocket. I may have to make some old style "tissue glue putty" to fill the corner gaps from the inside.

From the instructions -
The top illustrations show the four engine cluster, the bottom is the single 24mm engine mount.
The end of the joined ST-9 tubes are glued into the TR-115 ring. The line drawn down the ST-9 tubes is set at the small notch in the cluster bulkhead.
 The bottom "star" alignment piece is slid down from the top and glued to the top of the TR-115 ring.
Be sure the small notch on the inside of the star piece is in line with the line drawn down the ST-9 internal tube.
The top star is glued at the top of the mid joint of the two joined tubes. Be sure the inside small notch is also on the long pencil line.
Build time this post: 0 hour, 20 minutes
Total build time so far: 42 hours, 20 minutes
Monday, December 17, 2018
Semroc Saturn 1B, Build, OOP #KS-1, Part 47, Engine Mount
Backtracking to the start of the assembly instructions:
You have to decide whether to use a 18mm four engine cluster like the original kit or go with the simpler 24mm engine. According to the face card, a D12-3 will get it to 220', a D15-4 to 325'. 220 feet seems low and then have time for a chute to open.
The four engine C6-3 engine tops out at 600', a safer bet if you can get all four engines to ignite. I'm going with the four engine cluster option.

Semroc chose the thicker walled (Centuri) ST-7s for the engine mount tubes.
A small knife stab was made at the vendor for the upper engine hook bend. I always widen the small cut from the opposite side squaring it off and making the notch stronger.

A 60 lb. card stock piece is glued over the upper end of the hook to hold it in place. TIP: While the instructions mention you can use masking tape, I wouldn't recommend it. Masking tape can degrade and flake away over time.
The engine mount tubes will be glued side by side so the width of the retaining paper piece is important. It shouldn't overlap onto the adjoining tube. Cut the four pieces to 1/2" X 1".

Set the tubes side by side with the two engine hooks at 90 degrees to each other. Draw a line down the tube where they touch.
Apply glue down the line and tack the tubes together.

You can use the lower cap ring to help align the tubes while the glue dries. Don't glue the cap ring to the engine tubes, just use the four hole cutout dry as a guide to hold the alignment.
Build time this post: 0 hour, 30 minutes
Total build time so far: 42 hours, 00 minutes
You have to decide whether to use a 18mm four engine cluster like the original kit or go with the simpler 24mm engine. According to the face card, a D12-3 will get it to 220', a D15-4 to 325'. 220 feet seems low and then have time for a chute to open.
The four engine C6-3 engine tops out at 600', a safer bet if you can get all four engines to ignite. I'm going with the four engine cluster option.

Semroc chose the thicker walled (Centuri) ST-7s for the engine mount tubes.
A small knife stab was made at the vendor for the upper engine hook bend. I always widen the small cut from the opposite side squaring it off and making the notch stronger.

A 60 lb. card stock piece is glued over the upper end of the hook to hold it in place. TIP: While the instructions mention you can use masking tape, I wouldn't recommend it. Masking tape can degrade and flake away over time.
The engine mount tubes will be glued side by side so the width of the retaining paper piece is important. It shouldn't overlap onto the adjoining tube. Cut the four pieces to 1/2" X 1".

Set the tubes side by side with the two engine hooks at 90 degrees to each other. Draw a line down the tube where they touch.
Apply glue down the line and tack the tubes together.
You can use the lower cap ring to help align the tubes while the glue dries. Don't glue the cap ring to the engine tubes, just use the four hole cutout dry as a guide to hold the alignment.
Build time this post: 0 hour, 30 minutes
Total build time so far: 42 hours, 00 minutes
Sunday, December 16, 2018
Semroc Saturn 1B, Build, OOP #KS-1, Part 46, Capsule Coupler

TIP: Coupler edges are typically cut at a slight angle. For a stronger glue joint, sand one side of the coupler flat.
TIP: The other side can be rounded for smoother insertion and less chance of peeling the inside edge of the BT-70 tube below it.

I use very little glue to initially tack the coupler in place. If it ends up off center that little bit of glue is easier to cut and reglue the coupler.

Test fit the coupler in the BT-70 tube to be sure it is centered. After you are happy with the coupler positioning, then you can apply a glue fillet on the inside joint.
Build time this post: 0 hour, 15 minutes
Total build time so far: 41 hours, 30 minutes
Semroc Saturn 1B, Build, OOP #KS-1, Part 45, Capsule Details

The seven lines were cut from some adhesive backed paper from an Avery CD label.
Using self-adhesive strips is just cleaner and easier, no glue.

Here's a dry fit of the tower.
Look below and you can see the subtle tape on the seven lines and the hatch cover. It's not a lot of detail but I think it's better than the old hand drawn print of what was under the protective cover.

Under the the escape rocket, four small circles were scraped exposing the balsa under the paint.
On the left -
Four white glue drops were set on the tower tops. The glue drops are consistent in size. When the escape rocket is pressed in place the glue will squeeze out around the tower side struts making automatic fillets.
Build time this post: 0 hour, 45 minutes
Total build time so far: 41 hours, 15 minutes
Saturday, December 15, 2018
Saturn 1B Designations

The Saturn 1B had changed a bit in it's history.
I'm basing my build on the AS-205 Apollo 7 version.
This one had the most detail and still kept the alternating black and white H-1 engines in the low end.
The earlier AS-201 and AS-202 missions had the white service module, like the Estes kit. The Apogee kit is based on the Apollo 7, AS-205.
Friday, December 14, 2018
Semroc Saturn 1B, Build, OOP #KS-1, Part 44, Capsule Details

You knew I'd get back to the capsule and tower sooner or later -
The instructions have you use the tower assembly jig to mark the capsule top for the tower leg ends. If you use the assembly jig, punch out the center hole. The tabs should be trimmed and the open circle lightly sanded so you don't scar up the balsa.

I ended up pressing the tower ends into the balsa top. Make sure your tower is straight before making the impressions.
I went back and made the dents deeper and the edges cleaner.

I wanted to add some details to the capsule cover.
Page 282 of Alway's Rocket of the World has an overhead drawing.
There are seven lines running evenly out from the center.

The Alway drawing was blown up and the lines extended outside the BT-70 diameter.
Set the capsule assembly over the blown-up drawing and pencil mark the seven divisions.
This picture shows some of the "test" tape lines.
More in the next post -
Build time this post: 0 hour, 30 minutes
Total build time so far: 40 hours, 30 minutes
Thursday, December 13, 2018
Semroc Saturn 1B, Build, OOP #KS-1, Part 43, Service Module Paint Pattern

Here's the drawing from page 284 of Peter Alway's Rockets of the World.

It was enlarged to fit the circumference of the BT-70 and re-drawn.
Here's a test wrap, a simple print onto 20 lb. paper.
It's a great fit with a very small overlap seam.
If you would like a copy of the wrap, Patreon members can email me at: oddlrockets@bellsouth.net
and ask for the Service Module Wrap PDF
Along with the service module wrap, I'll send the previous escape tower decals and upcoming capsule detail template.
Build time this post: 1 hour, 30 minutes
Total build time so far: 40 hours, 00 minutes
Wednesday, December 12, 2018
Semroc Saturn 1B, Build, OOP #KS-1, Part 42, Attitude Control Nozzles
You'll need 12 nozzles, I made more.
I'll pick the best ones and group them into sets of four.
TIP: Keep your small parts in zip-lock bags until you need them

I rolled a piece of tape sticky side out to do a test fit.
I set it below the instruction illustration.

To be sure I got the size right, an elnlarged picture of the taped assembly was set below the drawing. The top nozzle is the right length, the other three will be shortened at the narrow end. This will give a slightly larger gluing area.
Build time this post: 1 hour, 15 minutes
Total build time so far: 38 hours, 30 minutes
Tuesday, December 11, 2018
Semroc Saturn 1B, Build, OOP #KS-1, Part 41, Attitude Control Nozzles

I haven't seen a sharpener like this in a while. Most are housed inside a plastic housing.
I tried getting an even nozzle shape using a pencil sharpener but the cut cone shape ended up crooked.

I had better luck spinning the dowel between my fingers against a sanding block.

Sand the angle up to the 1/4" pencil line. Don't sand the tip to a point, leave it a little flat for a gluing surface.
Cut the end off 3/16" from the tip.
TIP: Roll a razor blade around the tip, cut almost all the way through. Trust me, if you press too hard or try to cut all the way through, the tip will pop off and fly across the room.

Sand off the nub with 400 grit on a block.
This first nozzle took ten minutes to shape and cut to length.
Build time this post: 0 hour, 10 minutes
Total build time so far: 38 hours, 30 minutes
Monday, December 10, 2018
Semroc Saturn 1B, Build, OOP #KS-1, Part 40 Notching the H-1 Tubes
Mark the tubes for a slot 3/8" wide by 2 7/8" tall.
The long sides were marked in pencil using the aluminum angle.
The top mark was penciled using a wrap of masking tape to be sure it was square.
Use the aluminum angle as a knife guide to make the vertical cuts.

Here's four of the eight fuel tube engines, cut to fit around the four engine mount.
Build time this post: 0 hour, 30 minutes
Total build time so far: 38 hours, 20 minutes
Sunday, December 9, 2018
Semroc Saturn 1B, Build, OOP #KS-1, Part 39, Primer Filler Sanding the H-1 Tubes
Wow! I mentioned before, there are a lot of tube seams to fill. On this post I concentrated on the eight BT-51, H-1 engine tubes.
The CWF was already applied in the tube seams. After the filler dried it was reduced with 220 grit followed by 400 grit sanding the filler beads even with the body tube surface.
Next all eight tubes got a fairly heavy single coat of Duplicolor Filler/Primer.
I could only shoot two tubes at a time, so this added 30 minutes to the build time.
After the filler/primer dried -
The bulk of the filler was removed with 220 grit. Sand until you see the white tube wrap starts to show.
I didn't sand all the way to the ends of the tubes. These BT-51 tubes are thin, I didn't want to round over the ends.

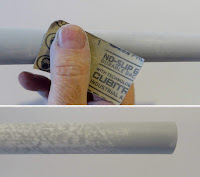
TIP: Stick your thumb into the tube to act as a "bumper". With the base of your thumb skin bulging out, the sandpaper shouldn't get close to the end of the tube. Notice the gray primer left around the lip of the tube end.

The remaining primer on the end was taken down using 220 grit on a sanding block.
Notice the lower half of the tube end is white, the upper half is yet to be sanded.

The upper picture shows the tube after sanding with 220 grit. Most all the filler/primer has been sanded off.
Here's the tube after following up with 400 grit sandpaper.
Gray filler/primer is left in some tube recesses and what didn't get filled in the CWF seam treatment. Each tube took 15 minutes to sand.
Build time this post: 2 hour, 00 minutes
Total build time so far: 37 hours, 50 minutes
The CWF was already applied in the tube seams. After the filler dried it was reduced with 220 grit followed by 400 grit sanding the filler beads even with the body tube surface.
Next all eight tubes got a fairly heavy single coat of Duplicolor Filler/Primer.
I could only shoot two tubes at a time, so this added 30 minutes to the build time.

After the filler/primer dried -
The bulk of the filler was removed with 220 grit. Sand until you see the white tube wrap starts to show.
I didn't sand all the way to the ends of the tubes. These BT-51 tubes are thin, I didn't want to round over the ends.

TIP: Stick your thumb into the tube to act as a "bumper". With the base of your thumb skin bulging out, the sandpaper shouldn't get close to the end of the tube. Notice the gray primer left around the lip of the tube end.

The remaining primer on the end was taken down using 220 grit on a sanding block.
Notice the lower half of the tube end is white, the upper half is yet to be sanded.

The upper picture shows the tube after sanding with 220 grit. Most all the filler/primer has been sanded off.
Here's the tube after following up with 400 grit sandpaper.
Gray filler/primer is left in some tube recesses and what didn't get filled in the CWF seam treatment. Each tube took 15 minutes to sand.
Build time this post: 2 hour, 00 minutes
Total build time so far: 37 hours, 50 minutes
Saturday, December 8, 2018
Semroc Saturn 1B, Build, OOP #KS-1, Part 38, New Vector Control Housings & Capsule Cover

Just under half of the dowel back was carved off.
Leave a little more than half the dowel diameter so a body tube curve can be sanded on the underside.
My old sanding block has a curved side. The 220 made a concave dip on the underside.

Here's the fit of the housing on the large kit tube.
The housings were then cut to length.

Changing the model over to the SA-205 configuration means more changes.
I never liked the drawn details on the capsule wrap. The SA-205 had a white protective cover that was jettisoned with the escape tower after launch.
This printed wrap looks more like the capsule after the tower and cover were gone. The wrap was peeled off and the glue cleaned off.

I printed off another wrap and flipped it over with the print on the inside.
I'll be adding some subtle raised details later on.
Build time this post: 0 hour, 30 minutes
Total build time so far: 35 hours, 50 minutes
Friday, December 7, 2018
Semroc Saturn 1B, Build, OOP #KS-1, Part 37, New Vector Control Housings
Because I'm changing the model to the SA-205 design, the Vector Control Housings will also be changed. The shape is much simpler than the earlier SA-2001 shape.

I tried to make the vector control housings out of a 5/16" diameter dowel. The angled top was simply sanded with 200 grit on a block.
The problem was, I couldn't get the base line straight and consistent.
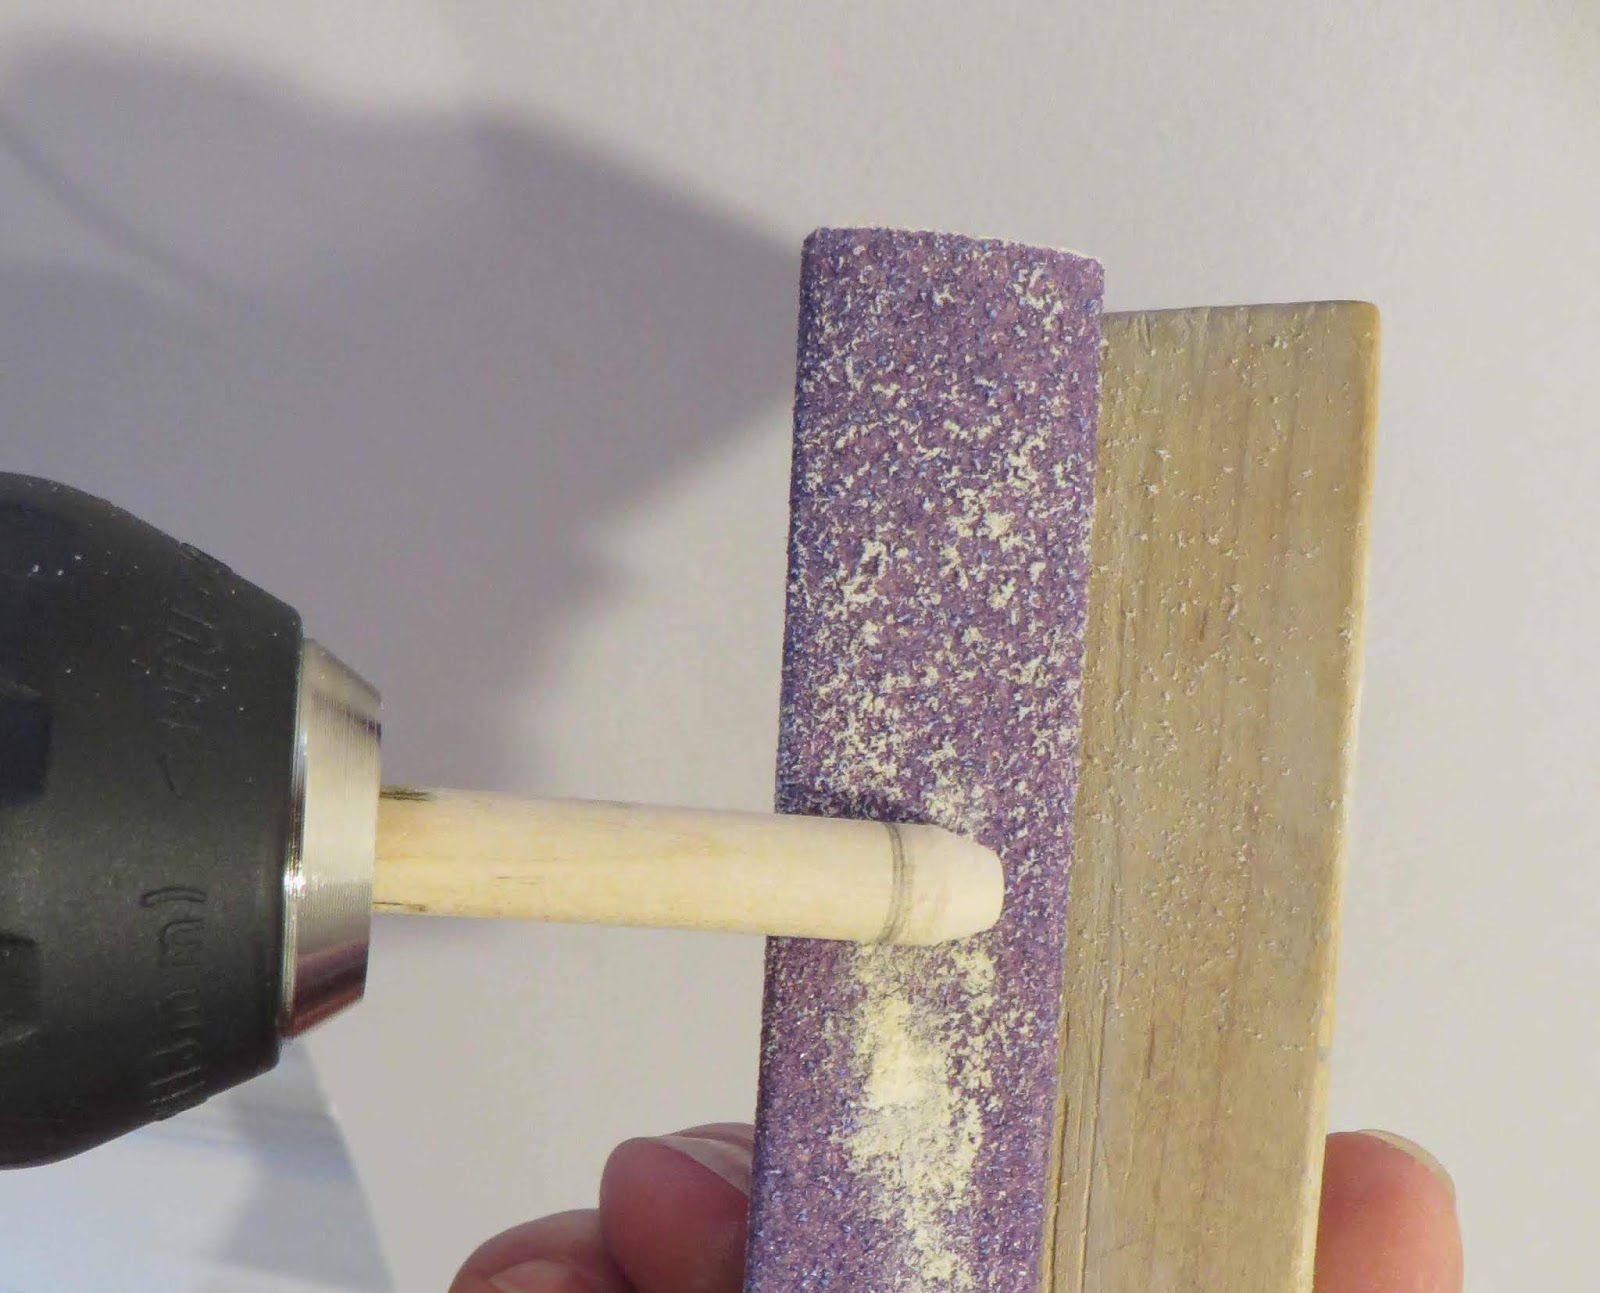
 I put a longer than needed dowel in my electric drill for a makeshift lathe.
TIP: You can also make small nose cones this way.
The dowel had to be chucked a few times to be sure it was in straight. Tighten it down and run the drill. If the dowel wobbles, re-set the dowel and check it again.

With the drill spinning, a pencil line was drawn.
The top angle was shaped on some 100 grit on an older sanding block. Follow and smooth with 220 and 400 grits.

Make two dowels with the tops tapered.
Build time this post: 0 hour, 20 minutes
Total build time so far: 35 hours, 20 minutes

I tried to make the vector control housings out of a 5/16" diameter dowel. The angled top was simply sanded with 200 grit on a block.
The problem was, I couldn't get the base line straight and consistent.

TIP: You can also make small nose cones this way.
The dowel had to be chucked a few times to be sure it was in straight. Tighten it down and run the drill. If the dowel wobbles, re-set the dowel and check it again.
With the drill spinning, a pencil line was drawn.
The top angle was shaped on some 100 grit on an older sanding block. Follow and smooth with 220 and 400 grits.

Make two dowels with the tops tapered.
Build time this post: 0 hour, 20 minutes
Total build time so far: 35 hours, 20 minutes
Thursday, December 6, 2018
Semroc Saturn 1B, Build, OOP #KS-1, Part 36, Retro Rocket Housing Shape

I looked closer at the Saturn 1B finished model on the Apogee website.
This is a beautiful build by Phillip Gore.
Check the vacuform retro rocket housings. I realized the tops angle in to a tip, not flat like I had assumed.
I'm also using the Alway book, Rockets Of The World. The illustrations in the book are small and it is hard to make out the shape.

Here's what I had made earlier.
I marked the top with some pencil lines before trimming with a razor blade.

On the right is the flat backs.
I'll have to shoot these with paint to make sure the shaping is accurate and even.
Build time this post: 0 hour, 30 minutes
Total build time so far: 35 hours, 00 minutes
Wednesday, December 5, 2018
Semroc Saturn 1B, Build, OOP #KS-1, Part 35, Vector Control Jet Housings

You can also to this to make recesses for screws on scale models.
This idea is based on something from an old CMR D Region Tomahawk kit.
The end of a 1/8" brass tube was filed to a sharp edge towards the inside diameter.
This was polished on 220 grit on a block.

Here I'm practicing on some scrap basswood.
Press and turn the sharpened end in the wood.
Knock out a thin layer of wood with a sharp knife.

Dampen the blunt end of a dowel, the tip is about the same diameter as the recessed hole.
Press and rotate the dowel tip compressing and smoothing the middle of the recess.
Let the wood dry before proceeding.

With a Q-tip, apply a bit of medium CA in the recess.
Quickly press and rotate the blunt dowel tip again. Don't let the dowel tip get glued in the recess. You are just trying to "set" the shape of the circle recess.

Here's the finished recess. Practice a few times before working on the model jet housing pieces.
Notice there is some CA glue outside the circle. This will be lightly smoothed with 400 grit.
Build time this post: 0 hour, 30 minutes
Total build time so far: 34 hours, 30 minutes
Subscribe to:
Posts (Atom)