Showing posts with label Escort. Show all posts

Monday, December 26, 2011

Quest AS-1 Escort Revisited

I've only flown the Quest Escort AS-1 one time.
I looked back on my July 7th flight on RocketReviews.com.

Here's what I wrote:
Not very stable. The rocket flew off at an angle with some wiggle in the back end.
The recommended Quest A6-4 delay was too long. The rocket was coming in nose down for a second before the parachute blew. An A8-3 would be a better choice.

I'll add some weight to the nose cone. 1/10th an ounce of clay should do it. (Who knows, I'm making a guess.)


A hole was drilled in the base of the one piece molded nose cone.
The clay was "wormed" into place and tamped into the tip with a dowel.

This time around, I'll test it with an A8-3.
You can see the finished Escort model HERE

Monday, August 8, 2011

Quest AS-1 Escort FINISHED!


Even with a few hang ups during the build, this is a sharp design when finished.


The landing gear door decals were too long to fit near the center of the wings, so I let them overhang and trimmed off the excess. I don't know if this is the correct location for the decals, I just guessed.

From the rear, you can see the simple but complex arrangement of the offset tubing.

Quest AS-1 Escort Build Part 21 Canopy Decal

After pulling off the yellow and red "wing" decals I figured I'd just place the remaining decals wherever they felt right. Heck, it's already missing two sets of stars and bars.
After all the frustration building this kit, I didn't feel like using up a sheet of decal paper fixing the mistakes.

I thought the nose canopy would be a problem, but it actually went on pretty well. Sometimes rolling a decal around a nose cone can make wrinkles. I only had one wrinkle show up.

I purposely set the decal in place with the nose cone slightly out of the body tube. I figured It would give me a little more leeway when the decal had to be cut in two at the nose cone/body tube joint.
The instructions make no mention that the decal would have to be cut in two.


Even after letting it dry and careful trimming, some of the aluminum paint showed through.
I used a blue gel pen to color over the spec of aluminum.


Here's the finished canopy decal after cutting and touching up.
The blue window has a candy color transparency over the aluminum paint.

Sunday, August 7, 2011

Quest AS-1 Escort Build Part 20 Decals

The decal instructions are vague!
The pictures are small and it's hard to tell where the decals go. The face card art didn't help much either.
If you are building this model, be ready. The decals adhere quickly!
Have a small brush handy so you can keep the decal edges wet for repositioning.


The decal wraps around the jet engine have to be pieced together. They aren't long enough to fill the area between the fins.


Here's the wrap pieced together.
The edge that rolled up the side of the rudder was trimmed off with a razor blade.


I added the "wing" decals to find they weren't printed with a white background.
They were translucent and looked terrible. This had to be an oversight, other decals on the same sheet had a white undercoat.
I ended up leaving them off the model.

Saturday, August 6, 2011

Quest AS-1 Escort Build Part 19 Decals

This kit just gets more and more interesting.

Mistakes, measurement errors, misspellings, no strake piece, badly cut parachute, thin gap cap stock - the list goes on.
Don't get me wrong, I have had great experiences with other Quest products.

I called Quest when I realized there wasn't enough decals to match the cover art.
The decal sheet is missing two USAF and two stars and bars decals. You need four of each to match the face card picture.
I was told that Quest is no longer sending out additional decals.

Oh well - I'll probably scan what was included and print out what is needed.

Here's the rear end of the Escort with the rudder fin painted black.

These fins black rear fins were masked off and the body sprayed aluminum. While the instructions specify silver, aluminum is close and doesn't show oily fingerprints as much.

Thursday, August 4, 2011

Quest AS-1 Escort Build Part 18 Black Paint

A plastic grocery bag was used to mask off most of the model.
Cut off the bag handle, Stick over the nose cone end and tape in place.

I'll have to go back and paint the black rudder underneath the model. At first glance I thought the only black was only on the rear tail fins.
At the front of the fin the mask wasn't perfect. This little flub will hopefully be cleaner with the silver coming next.


It's interesting that Quest has you paint the black first, then paint the silver second. My experience has shown that putting masking tape over (curing) silver paint makes a mess of a final finish.
Quest got this one right!

Quest AS-1 Escort Build Part 17 Scotch Tape Masking

I won't buy the expensive specialty masking tapes. I use Scotch Tape with good results.

Before I get too far on masking, remember -
You'll never get a clean masking line and color separation if the surface under the mask isn't smooth! Preparing the surface (smooth fillets, filling seams and balsa then priming and sanding) will give the best results.

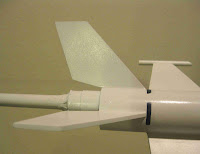
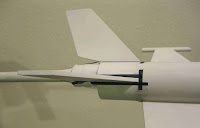
This Quest Escort has already had the white undercoat applied.
When using clear Scotch tape it's hard to see the tape edge.
I set the tape on glass (my patio door glass) and mark a wide line down the length of the tape with a Sharpie pen. My metal straight edge is set down the middle of the line and a new edge is cut. This cut bisects the width of the pen line and gives me a clean, new edge. Sometimes the sides of a sticky tape roll can pick up dirt and dust.


This picture shows the take set down on the square front of the leading edge. You can see how the black pen helps to visually position it.


Marked tape strips are set down both sides of the leading edge.


Masking tape is used to fill in the areas between the Scotch tape edge masks.

Notice the pointed dowel. I use the sharpened dowel to press and seal the Scotch tape masked edges.
The sharp dowel tip is lightly rounded with sandpaper so nothing gets scratched.

TIP: Before setting the masking tape (note I said masking tape, not the clear Scotch tape. Scotch tape is used as sticky as it comes off the roll) I press it on my jeans pant leg and remove a few times. This picks up some jean fibers on the tape and reduces it's adhesion. You'll have less chance of lifting up base coat paint when the tape is less sticky.

Wednesday, August 3, 2011

Quest AS-1 Escort Build Part 16 Priming and Filling


Here's the nose cone after priming and sanding.
You can see just a bit of the molding line left with primer filling the shallow areas.


From Step 21
The wing tip tubes are glued and place and fillets applied.

Both the tubes and launch lug seams were filled and sanded smooth using CWF.


Even after and primer a white undercoat I still had to go back and smooth out some root edge fillets.

In this case I used CWF. It stayed in place after sanding even though it was applied over the white paint.

Tuesday, August 2, 2011

Quest AS-1 Escort Build Part 15 Strake? What Strake?

Step 20
You are directed to glue the Strake on the center line of the nose tube. There is no Strake piece on the laser cut balsa sheet!
I did my best to cut one out using the cover art picture.
The back edge of the piece was cut to a 45 degree angle to match the angle of the mitred nose tube.

It did take some extensive filling to get the wing root edge gap smooth. I ended up using some epoxy then CWF to get the job done. You can see the launch lug in place from Step 19.

Note I hadn't glued the (launch lug) wing tip tubes in place yet.
This wasn't any special plan, I just forgot to glue them on before priming. This oversight led to more fillet work later on.

Quest AS-1 Escort Build Part 14 Gluing Wings and Fins

Step 16
Before gluing the fins to the body tube, all balsa grain and launch lug seams were filled with thinned Carpenter’s Wood Filler and sanded smooth.

The angle of the wing fins will be hard to glue to the body.
I sanded an angle to the root edge for more gluing surface but it didn’t help much.
The best solution is to lightly glue the wings on the rear tube as you normally would, with the fins sticking straight out and away from the center of the tube.

When the glue is starting to set up, set the wing tips down on your work area and press down on the tube using the setting glue as a “hinge”. Press down on the intake tube until the bottom is touching the flat surface. The wings will bend at the glue hinge and assume the correct angle.


The illustration at the bottom of step 16 isn’t really accurate. The root edges of the wing fins are glued lower on the body tube than shown.
The lower pencil lines to show the real angle of the wings.

The two tail fins and underside rudder fin were glued in place as shown in Steps 17 and 18.

Monday, August 1, 2011

Quest AS-1 Escort Build Part 13 Wings and Fins

This small front wing piece had to be cut down the middle. There was no laser cut line down the center of the two pieces. I drew that center line with a pencil and straightedge.
This missing laser cut wouldn't be a problem for an experienced builder, but a first timer would be scratching his head.

The Technique Tip for the “double Glue” method should have been moved down before Step 16. It doesn’t apply to gluing together the two wing pieces.


Step 15
I prefer to use thin CA to glue the strakes onto the wing pieces.
I know, I should have wax paper under the balsa.
The side of the angle piece (or any straightedge) keeps the root edges aligned.


This step is not in the instructions, but should be done.
Sand the two root edges square using a sanding block.
Every time I’ve made two piece fins like this, they have always been a little off. This root edge sanding will insure they are both flat and in line with each other.

Sunday, July 31, 2011

Quest AS-1 Escort Build Part 12 Mitre Tubes Fit


Here’s a test fit into the nose tube. You can see in the picture it is too large for a slip fit. As explained in the previous step, applying CA glue will stiffen it up enough to be sanded with 400 grit on a block.


It did take a little sanding to get a good fit. The CA coat did help make the gap caps strong enough to be hit with a sanding block.


Step 13
And finally, the fit of the two tubes together.
I was surprised how well they lined up. When glued together it should be plenty strong.


Before gluing, I’ll fill the exposed seams and be sure all the tube ends are squared up and smooth.
Here I’ve masked off a body tube with just the seam exposed.
While the picture just shows the one tube, both tubes were seam masked at the same time. I’ll lay on a thick coat of gray primer, directed in the seams between the masking tape lines.

Saturday, July 30, 2011

Quest AS-1 Escort Build Part 11 Gap Caps


Step 12
The instructions have you mark the front end of the center tube 1/8" from the top of the miter cut.
Without making this miter cut, I have no reference to make this mark. Using the center tube miter guide I found this mark point to be 7/8" from the front of the center tube.


Wrap a straight strip of paper around the center tube at the 7/8" mark. Draw a pencil line all the way around the tube.

This gap cap piece is thin, flimsy and frustrating. You’ll need that line around the circumference of the tube for better alignment.

I found it easier to tack the gap cap ring in place with thin CA.
Tack it in place with small drops of CA to get it in good position for a white glue fillet to follow. If you use too much CA, the white glue fillet won’t stick very well.

Apply a white glue fillet and let dry.
Then, after the white glue is dry, apply some CA to the gap cap ring. This will stiffen it up for sanding. You will have to sand this ring for it to slide into the nose tube.

Quest AS-1 Escort Build Part 10 Gap Caps

Step 11
TIP: Make a center mark on the gap caps before cutting them out. You’ll need it as a reference to get it on the center tube center line.
I wish the gap caps were die cut from heavier card stock. This thin card stop was to floppy. You are given a spare though. I should have cut out both and laminated them together.
A single thickness gap cap was cut out as directed.

After reading about a build of this kit on YORF, the builder mentioned there was no reason make a miter cut on the interior tube. It’s under the cover of the nose tube, it would never be seen! So I didn’t bother making the additional cut.

Edit after build: The inside tube mitre cut would give you a little more room for the wadding and parachute. There is enough room to pack the parachute the parachute the way I made it (without the cut) but the extra 1/2" of room would help.

Friday, July 29, 2011

Quest AS-1 Escort Build Part 9 Tube Gluing


Steps 9 and 10
Here's what you should have after gluing. While the instructions say to feed the shock cord and Kevlar through the front of the tube, again set it out the back, away from any glue and so it won't bind between the tubes.


The motor mount tube is marked and glue applied. In the picture the glue line has been applied.


A side view of the finished step.

Quest AS-1 Escort Part 8 Engine Mount Gluing


The seam still showed after the CA treatment. I applied some Carpenter’s Wood Filler and sanded smooth. Ideally, I should have did the seam filling before the coat of CA for better adhesion of the CWF. Still, it stayed in the seam.


Step 8 has you apply the glue ring, then thread the Kevlar and shock cord though the front of the tube. Then -
You are told to use a “twisting motion” when sliding in the motor mount assembly.

By the time you’d thread the shock cord through the body, you’ve got white glue all over the shock cord. The glue is already starting to set up. You’d be lucky to get the mount all the way into the center tube in time.

You’d be better off feeding the Kevlar and shock cord out the back of the motor mount tube. Don’t worry about lining up the engine clip on the center line. Just get the mount in and up to the ½" pencil mark.
Here’s the CA treated motor mount tube glued in place with the tape wrap already removed.
After the motor mount was glued up to the ½" line, I wrapped the tube wrapping guide and lined up the center line with the motor clip.

Thursday, July 28, 2011

Quest AS-1 Escort Part 7 Engine Mount

Jumping ahead to Step 8
Don’t glue the mount in place yet!
Here’s what the engine mount looked like when trying to slide the mount in with the tape wrap. I use black electrical tape. Believe me, this wouldn’t work with a wrap of masking tape either. The tube sizes are just too close.

I carefully removed the tape and still pulled off some of the yellow outer layer!

As mentioned earlier, these yellow tubes are thin with a rough outside yellow layer. I wanted to smooth and strengthen the tube.


A drop of the cheap Dollar Store CA was set on the back of scrap sandpaper. A cotton Q-tip was dipped into the CA and “painted” on the back ½" of the engine mount tube.


I also put a line of CA on the around inside back end of the yellow tube.
After drying, it was sanded down with 400 grit. It’s now much smoother and stronger. I only put a coat of CA on the last ½" of the yellow tube that will be exposed out the back of the model. This way, white glue will still permeate and stick to the paper inside the 20mm tube.

Wednesday, July 27, 2011

Quest AS-1 Escort Part 6 Tube Cutting

Step 7
The only tubes that require a miter cut are the two outside exposed tubes! The center tube (motor mount tube) is under the two other larger tubes. Why bother cutting an angle in the front of it?

Wrap, pencil mark and cut with a sharp knife.


I’ve read where builders have had problems making these angled cuts. If you have a block with 220 grit sandpaper, you can always clean up a rough cut.
Look at the top of the tube and you can see the white tube edge pushed up and hanging on.


Roll this edge over with your finger and sand down to remove it.
Follow up with 400 grit.
I’d also recommend some thin CA around the edge to strengthen the tube ends. With the CA on the edge it’ll be stronger and smoother after a little light sanding.

Tuesday, July 26, 2011

Quest AS-1 Escort Build Part 5 Tube Marking

Step 6
Don’t mark the center tube (20 mm engine mount tube) for the fin lines yet!!!
Wait until after the motor mount is glued in place. This way you won’t have to worry about lining the engine nook up with a drawn pencil line. It seems you never have enough time to get a mount in place while the glue is setting up!

These two steps (6 and 8) should have been reversed. Glue the mount into the center tube up to the pencil line, then mark the tube using the engine clip to line up the center tube marking guide.


You can cut out the tube marking guides and mark the other tubes now.


I would recommend marking the names of the center line and fin locations on the tube with pencil for identification later on.

The wing and fin layout on this model is different. You'll find it easier to pre-mark all the locations for later gluing.

Quest AS-1 Escort Build Part 4 Engine Mount

The Kevlar and elastic shock cord is tied together with a simple overhand knot.


Step 4
The Kevlar is tied to the blue thrust ring.

I’d recommend notching the blue thrust ring before tying the Kevlar to it. The kit includes some thick Kevlar. Without cutting a notch into the ring it would bulge out the side of yellow motor mount tube when glued in place.


Step 5
Here’s what my engine mount looked like with the instructions recommended tape wrap, before I realized that tape wrap wouldn’t fit in the rear tube!