Showing posts with label Card Stock Forming. Show all posts

Monday, May 27, 2024

Carded Mini Goblin Build, Part 4, Fin Gluing


Fold the fin skin down the embossed line you made in the last step.

I'm using my favorite burnisher, the Sharpie barrel, to get a sharp crease.


I use the color changing glue sticks to adhere the fin and body tube skins.
You've got to work fairly fast - when the applied glue turns from purple to clear, the glue has almost dried.


Set the crease fold over the rounded cardstock edge then lay the the sides down.

Try to get the leading edge fold right down on the cardstock edge. Lay the fold on first, then follow adhering the sides.


On this fin, I probably could have got the left tip a little father down onto the cardstock center. It should be okay as is.

Sunday, May 26, 2024

Carded Mini Goblin Build, Part 3, Fin Prepping


One side of the cereal box (central core) has printing on it.
Sand down and rough up the inked side with some 400 grit.

Be ready, that dust can get everywhere.


Using a straightedge and sharp knife, cut one edge straight and square. This will end up being the leading edge of the fins.

Roll over the flat leading edge with some 400 grit sandpaper.
This rounding will give you a tighter fit of the folded 110 lb. printed skin cover.


Before cutting out the fin cover skins, 
Spray the printed side of both the 20 lb. and 110 lb. with clear acrylic. Paper skinned models can get dirty from handling.

Emboss a fold line down the leading edge with a straightedge and a non serrated tip of a butter knife. 


Here you can see the embossed line down the leading edge fold.
The emboss line helps get a sharper, straight fold.

Note one side of the fin skin is wider than the other. This guarantees full color coverage when the fin is cut out.
 

Wednesday, April 12, 2023

Estes Klingon Battle Cruiser, #1274, Step 22, Gluing On The Card Stock Engineering Hull Top

Oh Boy - you need three hands to pull this off!

The cardstock was dry fitted many times. You have to double check all sides to make sure it is evenly spaced.
Look close, you can see a pencil line traced on the outside of the long straight fold. That gave me a guide line to sand off the filler/primer (under the tab glue area) for a better glue bond.

With the glue tabs folded underneath - I noticed the piece wanted to raise up off the wing surface.

To prevent some of the rise, I glued the rear small tabs down onto the underside. The rear tab area is flat against the wing anyway.
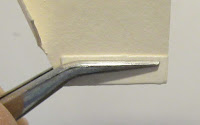
Tweezers held the glued tab closed as it dried. 


TIP: Don't try to glue the entire card stock top all at once!
You will be better off gluing in sections. 

First - The front of the lip was glued to the balsa edge underneath about halfway down on both sides. After it dries, this lets you lift the "shell" and apply glue to the underside tabs. for the next glue step 
Second - Apply a line of glue to the tabs under the sides.
When gluing card stock, you don't need a lot of glue! More glue takes longer to dry. A (full tab coverage) skin of glue grabs and dries quicker.

It's a balance. Enough glue for lining up and working time, but no so much glue that will make the cardstock pucker when dried.        More on this step tomorrow - 

Sunday, January 15, 2023

Estes BOSS Kit #7316, Build, Part 8, Prepping The Round Index Dish


On the overlay disk cardstock - 
The hold down tics should be cut, then sanded smooth with 400 grit.

With sandpaper rolled over your finger, 
sand around the burnt edge to remove the brown soot.
I used a glue stick to adhere the cardstock disk to the balsa. Glue sticks allow you to apply an even coat. You do have to work quickly as the glue dries fairly fast.

One of the three kits I was building had some shipping dents in the cardstock.

Earlier, I turned them over and tried to raise and smooth them with a burnisher. 
This helped but I was concerned the slight dents would show up on the finished model.


Some CWF was applied using a single edge razor blade to fill the dents and remove the excess. 

Some smooth sanding followed.

Friday, October 28, 2022

Estes Odyssey #7235 Build, Part 5, Sealing Cardstock Edges


This shows the wiggled laser cut lines on the front edge of the "O" pieces.
On the lower right, notice the arcs of the laser cuts on the "R" disks aren't perfectly in line. I'll have to round out the circles.


I stacked "like" circle disks on the supplied dowel and gang sanded the sides with a block.

On the left is the before - on the right is after sanding and shaping.


Here's a three ring stack (no glue yet) being rounded and evened up with 400 grit on a block.


The edges of the cardstock pieces will look better after painting if they are sealed.
Apply a narrow bead of wood glue around the edges. Smooth out the glue bead with the side of a fingertip. Try to keep the glue off the flat face, just on the edge.

On the right is the same ring after the glue dried.
Sand the glue bead smooth with 400 grit.

These are all the "Y" pieces.
Oh boy - More edges to seal!

There are 18 Y pieces. They are small and easy to loose. Keep them in a zip-lock bag until they are needed.

You can apply a sandable wood glue bead to the sides that you will see (facing out) on the finished model. On the left, a glue bead has been applied to the exposed edges only. Keep glue off the flat side surfaces. Sand smooth after the glue dries.

Thursday, October 27, 2022

Estes Odyssey #7235 Build, Part 4, Prepping The Cardstock Pieces


I know - you're tempted to punch out the cardstock pieces.
Use a sharp knife to cut through the hold down tics.
You might find it easier to erase some of the brown before removing  the pieces from the sheet.
The sides of the laser cut pieces have some browning. If you clean some off you'll have an easier time getting even coverage with the white paint. Some Gloss White spray paints aren't very opaque.
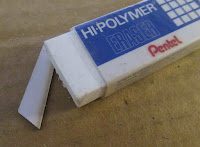
Use a white eraser. Don't use a white eraser meant for erasing ink, ink erasers are too abrasive.


Here's a before on top,
After using the eraser is shown on the bottom.

You might not remove all of the brown, just get it as clean as you can.


A few of the straight laser cut lines had a wiggle. These could be seen on the finished model.

Sand the crooked lines square with 400 grit on a sanding block.
Much better!
 

Friday, September 23, 2022

Estes Space Shuttle Columbia Build #1385, Part 12, Fairing Top Gluing

With the fairing back slightly "splayed" out and the glue tabs dried,
The tops get a light even film of glue. The ends are rolled over onto the body tube.

Note the ends didn't end up evenly spaced beside my rudder placement line. Not a real problem.


The rudder is glued on centered between the rolled over cardstock tops, directly over the centered engine hook. The rudder was set down just to the side of the original pencil line. It did end up visually centered.


I did a dry fit of the OMS Pods and found the back slightly raised sitting on the cardstock. The ends of the fairing were trimmed back in a straight line so the bottoms can sit flat and into the root edge of the rudder.


The OMS Pods were glued on, 1/4" back from the front edge of the rudder.
The back of the pods overhang the end of the body tube.

Wednesday, September 21, 2022

Estes Space Shuttle Columbia Build #1385, Part 10, Wing Gluing & Cardstock Fuselage Sides


Dry fit the wing before gluing onto the body tube.

Notice how the front of the wing overhangs the BT-60 body tube and onto the notch running across the bottom of the nose cone.
 
GOTCHA: The instructions say there is a space of 1 1/8" from the back of the body tube to the edge of the wing extension. 
With the wing all the way forward and against the recess notch in the nose cone -  my rear spacing was at 1 1/32".

The back of the wing extension is straight, there is some camera distortion.

The instruction drawing does not show the nose cone in place. Glue the wing on with the nose cone seated in the tube to be sure the wing front is far enough forward. 

Pre-bend the cardstock sides. Be sure your two pieces are "mirrored".


With the nose cone in place - 
Do plenty of dry fits.


Note how the cardstock fairing sides are slid all the way forward and stop in the side notch on both sides of the nose cone.

Sunday, July 10, 2022

Estes Blackhawk #2053 Build, Part 9, Canopy Forming


The canopy is made up of three pieces.
The two sides and the many folded top.

Do a few dry fits (no glue) to be sure you are lining up the the right tab to the right cut on the side piece.

One of the tricks to gluing cardstock like this is not to use too much glue on the tabs.
Apply some glue to a single center tab and spread it around, especially towards the outside edges. You should have a light overall "skin" of wet glue.

Joint the top tab to the side piece. 
It helps to have a long, smooth jawed tweezers to pressure hold the tab in place. 

Continue doing single tab gluing until both sides are glued to the top.

Look on the inside. If one of the tabs is raised, you can sneak some glue under the tab using your knife blade.

Here's the finished canopy, 
Inside and outside.


I thought the canopy shape would be more like a rectangular box shape with the bottom side open. I found out later the sides flare out and have a wider span than the top - more of a trapezoidal shape.

Friday, June 10, 2022

New Way Boxie Birdie, Build Part 3, The Top Cap


I sanded the top and bottom of the engine block for a flatter gluing surface.

The engine block is glued to the top piece of the cap.


The four sides were hit with the white eraser and cleaned up. Not really necessary as the entire top is covered with red vinyl.

All four sides are glued together in a square form.

I used the top and engine block assembly to align the four side pieces square. No glue on the top yet! 

When the sides are dry, you can glue on the top with the engine block on the inside.

Wednesday, May 4, 2022

New Way Mars Snooper II, Build, Part 9, Doubled Super Shrouds

The kit supplied shrouds were a little big, loose on the BT-50 tube. Kit supplied shrouds don't always fit. There can be slight differences in different production lots of the "same" body tubes.
The supplied shrouds looked to be copies of the original Estes art. There can be changes in sizes when second generation scans or copies are made.
I went to Payloadbay.com and printed off new shrouds. These were loaded into CorelDraw and the vane and fins lines added.
I wrote an article for the Apogee Peak Of Flight Newsletter on SUPER SHROUDS. For a better explanation: CLICK HERE
    
"Super Shrouds" are simply a double "nested" shroud. Two layers of 65lb. cardstock. They are so much stronger than a single layer card stock. When the glue dries, they feel like hard plastic.

TIP: I don't put wet glue on the glue tab. Instead, I rub a glue stick onto the opposite side of the shroud. This gives me more control over where the glue goes and ends up when the shroud is formed.

This is the lower "Vanes" shroud. 
On the left - I don't use much glue, I don't want to oversaturate the card stock. The picture shows the applied glue before it was smoothed out with a fingertip. 
YOU'VE GOT TO WORK FAST - smooth the glue and press the glued shroud into the outside shroud before the glue starts to set up.

There will be some overhang of the inside shroud.
This is cut off AFTER the glue has dried using a single edge razor blade. Cut carefully along the bottom edge of the outside shroud.

Sand and clean up the doubled cut edge with a block.

You don't have to worry about the inside of the narrow end of the shroud. The doubled shroud lip is "stepped" giving you a second edge to better fit around the body tube.

Wednesday, March 16, 2022

Estes Delta Wedge Clone #1931 Build, Part 8, White Undercoats, More Fillets & Cleaning Up


After the white undercoats are shot - 
All the imperfections show up!

Fillet bubbles around the launch lugs and another bubble at the body tube/wing joint.

More glue applied and smoothed. Another coat of white is shot.

Some of the folds raised fibers on the canopy card stock.


The wing edges are also fuzzy.

TIP: Run some medium CA glue over the fuzzy edges. Lightly apply the CA with a Q-tip. After it dries, the glue stiffens up the fuzzies and allows it to be smooth sanded with 400 grit.

Tuesday, March 15, 2022

Estes Delta Wedge Clone #1931 Build, Part 7, Canopy Gluing


Set the canopy over the center raised crease line 3/4" forward of the top wedge fin.
Trace around the edges with pencil.
Again, it doesn't take much glue to adhere cardstock to cardstock. After applying a line of glue around the inside edge, remove any excess and even out the glue with a Q-tip.

Using the pencil line, center and press the canopy onto the wing. Hold until dry making sure the sides stay down against the wing surface.


On the left is the glue applied.
On the right is the finger smoothed fillet.

Saturday, March 12, 2022

Estes Delta Wedge Clone #1931 Build, Part 4, Fitting The Parts


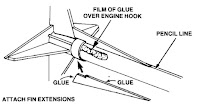
Note the glue line down the tube in front of a wedge fin. You really don't need much glue to adhere the internal fin extension ribs.
The instructions better show this part of the build.
Before the ribs are glued in, the engine hook was placed and a retainer ring glued on top.
The notch under the long support ribs goes over the Mylar ring.

There isn't an engine block, some kits from this era didn't include them.


Here's the view from the back plate.

The wedge fins are glued to the tube and overhang the face of the rear plate.
The tabs on the plate slide into the wedge fins.


Another test fit of the large wing before gluing.
This model required a lot of fitting and adjustments before glue is applied.


On one side, the cut out for the wedge fin had to be widened slightly.