Showing posts with label Q Future Launch Vehicle. Show all posts

Saturday, February 8, 2020

Quest Future Launch Vehicle #3013 Build, Finished


The wraps are very well drawn and add a corrugated rib dimension to the model.

The kit supplied fins and nozzles were too thin! They had to be beefed up. One hard landing would have bent them up.

B6-4 and C6-5 engines are recommended. It's fairly heavy and might be better off with shorter delay engines like a B6-2 or C6-3.
TRIVIA: A C6-4 would be perfect - MPC made that engine and delay at one time!

Quest Future Launch Vehicle #3013 Build, Part 13, Fin Gluing & Fillets


The fins are glued into the cut slots.

TIP: On a print wrapped model like this, use white glue for the fillets. White glue dries clear and won't be noticed. Wood glue fillets would dry yellow.
I made a small mistake on this one - The fin covers should have the same design on both sides of the same fin. Mine don't match up! Not a biggie.

On the left is before the white glue fin fillets. On the right in the dried fillet. It's a subtle difference, the glue helps camouflage and blur the fin joint seam.


TIP: After a parachute is assembled, I store them in a zip bag with the snap swivel out the top of the closed bag. This prevents tangles while it sits before installing in the rocket.

Friday, February 7, 2020

Quest Future Launch Vehicle #3013 Build, Part 12, SRB & Nozzle Gluing


It's a good idea to rough up the gloss on the wrap for a better glue bond.

220 grit was wrapped around a Q-tip for a soft, rounded sanding surface. Sand and remove the ink down the printed glue line.
Here's the first SRB glued on. Note it overhangs the back of the main body tube.
Visually sight down the SRB body to be sure it is straight.

TIP: The SRB tubes felt a bit wobbly after gluing onto the main air frame tube.
I didn't try to fillet down the length of the SRB tubes. That would lead to many air bubbles down the crevice gap when the glue dries.
I did put a good sized single drop of white glue at the top and bottom and let that run into the joint. The glue drop went at the lowest orange stripe on the SRB shown in the picture on the left. Another drop went at the top, below the nose cone. The extra glue dots really strengthened the bond and weren't noticeable after drying.


TIP: Use your aluminum angle to double check the SRB vertical alignment.
The angle isn't touching the SRB tube, I made sure the space between the angle and tube was consistent down the entire length.
The nozzles are simply pressed into the end of the SRB tubes.

A line of glue was run around the inside perimeter. This was smoothed and evened out with a turn of a fingertip.
Drop in the nozzle and be sure it is centered and even on all sides.

Thursday, February 6, 2020

Quest Future Launch Vehicle #3013 Build, Part 11, Large Wraps


I went through a few pieces of scrap cardboard spraying all the seaprate wraps.

Here's one of the large main body wraps stuck down for spraying with some 3M 77 adhesive spray.
To the right is one of the tape rolls with the sticky side out.


Here's the lower wrap.
The edge is placed down the pencil line drawn down the body tube.


This is the low end of the same wrap, even with the end of the body tube.

Notice I haven't totally pressed it down until I am happy with the placement on the pencil line. The wraps are thin and would probably tear if lifted after sticking it down.


Gently smooth the wrap as you go to keep the air out.

I used the side of my finger to smooth it out and work out any air bubbles.
GOTCHA: The upper wrap was rolled on, butted up against the lower wrap. It wasn't quite tall enough and didn't reach the top of the tube! It's an easy fix, the 1/8" of white tube was trimmed off and sanded square.

It's optional to paint the larger top nose cone. I painted it gloss black before putting on the wrap. The bottom of the wrap is actually right on the shoulder edge. That black at the bottom is a Sharpie line inside the shoulder edge to camouflage the body tube/nose cone break.
EDIT: This probably wasn't the best idea - the black line shows at the tube/nose cone joint.

Wednesday, February 5, 2020

Quest Future Launch Vehicle #3013 Build, Part 10, Slotting The SRBs


Here's the three SRBs with the dry fitted.

Before gluing the nose cones in, line up the open areas of the wraps, as shown here in the middle SRB.
To cut the fin tab slot through the wrap -
Press the fin slot area with a fingernail.
I didn't remove a long rectangular piece from the wrap.
A single line is cut, centered down the slot. In the lower picture - On the ends cut two short vertical lines making an elongated "H" shape, like this -     I----------------I.
When the fin tab is pressed in, the long sides will fold in making a tighter fit.


Here's one of the fins dry fitted into the slot. I glued them in after the SRBs were glued onto the body.
On the very sides of the root edge you can still see the outside of the words: "GLUE FIN HERE".


Tuesday, February 4, 2020

Quest Future Launch Vehicle #3013 Build, Part 9, SRB Wraps


I've already cut TTW fin tab slots so the fin area on the wrap will center on those. This picture shows a dry wrap (no spray adhesive yet) to check the positioning.

Instead of starting the wrap edge by laying down a pencil line, I'll have to center the wrap and start on over the fin slot line.
I rolled some masking tape into a circle with the sticky side out. These rolls are stuck down on a scrap cardboard piece for the adhesive spray.
Before the tape was turned into a roll, I stuck it to my pants leg 7 or 8 times to leave denim lint and remove some of the stickiness of the tape. I don't want to take a chance of tearing the wrap or lifting the print.
Stick down the tape roll, lightly stick the printed side of the wrap on the tape.


Here's the visible side of the SRB wrap.

On the right notice the open area down the seam side. This is short on purpose to give you a better gluing area on the main body tube.

The wide end of the three small nose cones get a wrap.
On the left, all three wraps are held down on some making tape, sticky side up.

On the right is the nose cone wrapped. Like the SRB wraps, it doesn't go all the way around

Monday, February 3, 2020

Quest Future Launch Vehicle #3013 Build, Part 8, Smaller Wraps


You can use a glue stick to adhere the smaller wraps that are placed on Kraft tubing.

The motor mount tube gets a nozzle wrap. Test fit it dry - without glue to see how it is spaced around the engine hook.

The rear centering ring was blacked using some Sharpie pens.


This isn't necessary, but I wanted the launch lug seams covered.
There is plenty of white scrap left from the large wrap sheets.


Don't cover the entire lug, I leave a side open for gluing onto the main body.


This shows how thin the print wrap sheets are. Be careful, you can easily crease them.

Sunday, February 2, 2020

Quest Future Launch Vehicle #3013 Build, Part 7, Nozzle Shroud Upgrade


The stepped layers under the base of the nozzle shroud are trimmed off using a single edge razor blade.

This leaves a thick, rough edge.


The edge is hardened for sanding with some CA glue applied with a Q-tip.

On the right is the nozzle after the bottom is sanded flat with 400 grit on a block.


On the top is the single paper layer thickness nozzle from the kit. The nozzle is flimsy and could get bent beyond repair after a single flight.

Below that is my triple thickness replacement. It feels as strong as a molded plastic nozzle. I probably could have got by with two layers of cardstock.

Saturday, February 1, 2020

Quest Future Launch Vehicle #3013 Build, Part 6, Nozzle Shroud Fix


I scanned the wrap sheets and did a tracing of the nozzle shrouds.

These (and plenty extras) were copied and printed on 110 lb. card stock.


I did my typical forming with a dowel in the heel of my left hand.

The right side picture show how little glue is used to adhere the shroud tab.


Two dowels were used to support and press the shroud edge into the glue tab.

For the extra needed strength, I'm doing "nested shrouds". two shrouds are glued and stacked.


The third layer is the scanned print, another layer of 110 lb. card stock. Notice the layered "steps" on the inside.

The shrouds were stuck down on some masking tape with the sticky side up. Card stock home prints do need a coat of clear acrylic or the printer ink can run if landing on dewy grass.

Friday, January 31, 2020

Quest Future Launch Vehicle #3013 Build, Part 5, Fin Skins


Here you can see the difference in the kit fin laminate on the left -
and my thicker fin laminate on the right.


For a leading edge that won't peel back, cut the top edge long, not down the gray print line. This top extension will roll over the leading edge for smoother coverage.


Here's how the laminate sits, glued on with a glue stick.

On the right is the top rolled over and onto the other side. The right side laminate print glues over this side.


All three fins -

I did mess up, nothing major. One fin should have a triangle on both sides, the second has circles and the third fin a square. I got them mixed up.
Look close, you can barely see the rolled over top edge under the skin.

Thursday, January 30, 2020

Quest Future Launch Vehicle #3013 Build, Part 4, Fin and Shoulder Fix


I mentioned earlier, the central core of the laminate fins is very thin, maybe 110 lb. card stock.


This definitely needs  an upgrade.
One fin core was cut out and traced onto some .050" thick centering ring stock.


A small through the wall tab was added.

This will require me to cut a tab slot into the 15mm SRB tubes.
This isn't necessary, but will be a good exercise making a stronger model. I'd feel better knowing the root edge is glued into the body tube, not just end glued to a glossy wrap.
I was only supplied with one nose cone shoulder, I need two more.
These 15mm nose cones don't have a molded shoulder, a coupler is glued into the base of the nose cone.

I have some BT-5 coupler material. I cut off three 5/8" lengths. It took two wraps of copy paper to get a good fit. The paper shim strips were glued on with a glue stick.


There is some molding flash on the nose cone edges. These were trimmed and sanded smooth with 400 grit on a block.


Wednesday, January 29, 2020

Quest Future Launch Vehicle #3013 Build, Part 3, Engine Mount

I'm not a big fan of the thin walled yellow engine mount tubes. This one was cut about 3/16" short of the normal 2 3/4" length.
If assembled by the instructions, using the engine hook slot - the engine block ring would extend beyond the top of the short tube!
I'll replace this tube with a Odd'l Rockets Heavy Wall BT-20H.


The fit of the centering rings is too loose in the main air frame tube. While it could be used, it would take too much glue to fill the gap.


The rings also needed a small relief notch for clearance over the engine hook. I used a rotary punch to make a partial crescent cut.
To make up for the loose centering rings, I made some balsa gussets. Cut them wide and sand to fit. These make the entire mount much stronger without adding any real weight.

To better seal the upper loose ring, a bead a glue was set around the edge and allowed to dry before gluing the mount in the body tube.

Tuesday, January 28, 2020

Quest Future Launch Vehicle #3013 Build, Part 2, More Parts


The body wrap sheets are the highlight of the kit. The art is very well drawn and printed. The lower wrap is on the right side. The wrap paper stock is pretty thin.

Here I'm laying them flat to take out some of the curl after being stored in the body tube.


Here's the thin fin (center) core card stock.

Below the core piece are the fin covers.
At the bottom is the single layer nozzle shrouds. They are are thin as copy paper, printed on glossy 20 lb. stock. Not as strong as I would like considering these nozzles will touch down first and could get bent.


I found the face card sticker interesting.
When the kit was first produced the warning read: "Recommended for ages 10 and up with adult supervision for those under 12."
Later a white sticker covered up that information and the ages were changed to "under the age of 14."

The 14" Quest parachute is flexible, not "crispy" like some of the older ones. The tape disks (rounded squares) look to be made from Tyvek.

Monday, January 27, 2020

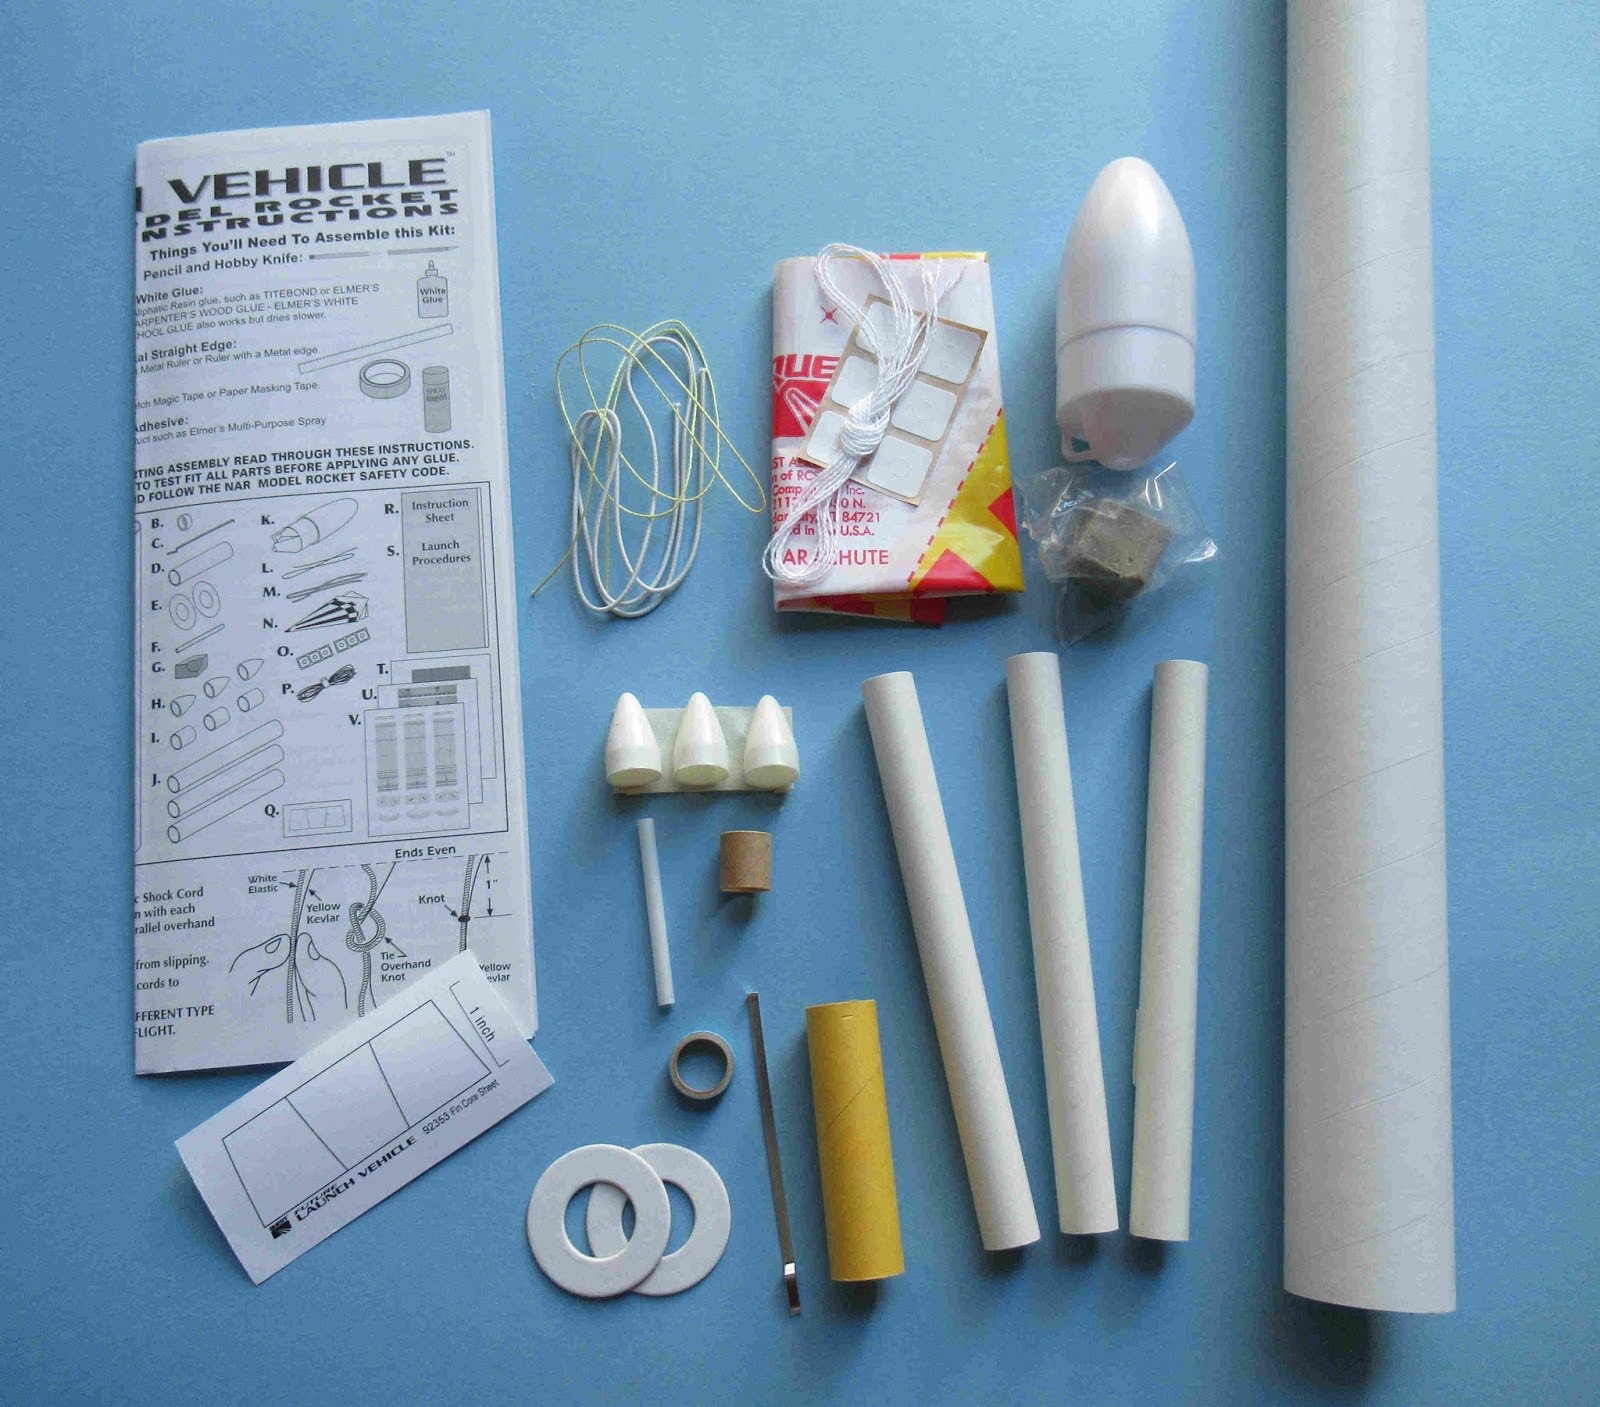
Quest Future Launch Vehicle #3013 Build, Part 1, Parts


All the parts - This is going to be an interesting build. While the model will build and fly fine as supplied, I'll be doing some light weight upgrades for stronger assemblies.
The tube wraps are rolled up, inside the large 40mm diameter Quest tube.

Parts of interest:
Some of these will be switched out.

On the left are the center core sheet for the 3 ply laminate fins - 110 lb. card stock, very thin.
The engine hook isn't spring steel. The thin yellow motor mount tube was cut short, by about 3/16".
Three small SRB nose cones are there, but I only got one nose cone shoulder coupler!
The centering ring outside diameter is small, a loose fit in the main air frame tube.