Showing posts with label Super Alpha. Show all posts

Tuesday, February 28, 2012

Super Alpha Open Rocket Results

I loaded the BT-60 based Super Alpha into the Open Rocket software to check it's stability and predicted altitudes.

I was concerned if nose weight might be needed with a 24mm D12-5 engine installed. The Super Alpha was designed for 18mm engines.

According to the software simulations,
The 18mm C6-5 altitude is 696 feet. (Super Alpha with an 18mm mount installed)
The 24mm C11-5 altitude is 622 feet, less than the 18mm C engine!
The 24mm D12-5 altitude is 1076 feet.
The 24mm D12-7 altitude is also 1076 feet.

I didn't think the the C6-5 engine to get a higher altitude than the C11-5.
I would expect the D12-7 would get a better altitude over the D12-5 - it should coast longer and go higher.

This probably isn't accurate, I'm new to inputting information into a simulator. I may have left something out.
Still, interesting results.

Monday, February 27, 2012

Super Alpha Build Finished


I added a 5/16" wide stripe like the picture from the 1974 Estes Catalog.
It was cut from the same black Contact paper roll used in the Mini Honest John build.

Overall a good build. It should scream with 24mm C11-5 and D12-7 engines.
I'll look up the center of gravity (CG) on the Super Alpha and add nose weight if needed. But with the size of the trailing fins, it's probably stable the way it is.

Sunday, February 26, 2012

Super Alpha Build Part 9 Cleaning Up

Before any spraying was done, a strip of masking tape was set sticky side out around the inside base of the lower main body tube. Reduce the stickingess of the tape by pressing it on your pant leg a few times. Otherwise, the tape could pull and lift a layer of the rough inside surfaces of the body tube.
Paper towel pieces are pressed into the recess and down to the lower centering ring.
This keeps all the paint out of the engine mount, it gives a cleaner look to the finished model.


After the paper towel pieces and tape removed there shouldn't be any paint in or on the mount.

The rear edge of the tube needed some black on the rim.
I used a permanent Sharpie pen.

In the picture the right side of the tube edge has been blackened.


I still have to scrape a bit of black paint off the engine hook.

Saturday, February 25, 2012

Super Alpha Build Part 8 Black Mask


This is the mask for the black, both sides of one fin and the body tube panel to the white fin to the right.

I should have taken more time on the mask. It looked simple and I treated it as such.


After the tape was pulled off, the root edge lines were sharp.
The line around the body tube wasn't as good. I spent more time on the root edges making sure they were well sealed. I obviously didn't take the time to seal the horizontal line on the body tube between the two fins.

Super Alpha Build Part 7 Red and White Paint

Ya' gotta love a simple body tube/nose cone color separation.

The body and fins were sprayed with the generic Duplicolor gloss white.
While it looked "wet" going on, after drying it had a flat or "blued" surface. This is because of the high humidity in Florida.
Some rubbing and polishing compound and I got a good gloss.

The nose cone is Rustoleum 2X Gloss Red, no polishing was needed.

This shows the final fillets.

You can see some slight orange peel in the finish. The picture makes it look more pronounced than it actually is.
I'm pretty happy with the Duplicolor spray, it'll take some practice to get used to it.
(Anything is better than the "cottage cheese" finish from the bad batch of Rustoleum 2X gloss white.)

Friday, February 24, 2012

Super Alpha Build Part 6 Fin Fillet Redo


Still not satisfied with the Titebond M&TG fillets I went back and added some Elmer's CWF to hopefully fill the slight valleys.

These were sanded with 400 grit over a dowel.


Then, another shot of Duplicolor gray primer and more sanding.

I'll keep messing with the fillets until they are round and smooth.

Thursday, February 23, 2012

Super Alpha Build Part 5 Fin Fillets and Primer

I won't bore you with the details on the fin and launch lug gluing. Everything was standard here.
I did substitute a 2" long X 3/16" diameter lug for the 1/8" lug supplied in the kit.

I'm still on the fence regarding Titebond Molding and Trim Glue for fin fillets.
It does shrink some, certainly not as much as white or yellow glue.
Down the root edge there is a slight "valley". I did three fillet coats of the the Titebond M & TG.

On a model this size, I prefer rounder, deeper fillets. I may go back and add some epoxy fillets after sanding down the primer.


The Titebond M & TG really works well on the launch lug fillets. No bubbles and no argument there.
I wish the root edge of the fins had this nice of a rounded fillet.


You can see the "step" where the raw balsa was on the top half of the re-shaped nose cone.
The lower half was still sealed from when it was on the cloned Red Maxx.

Super Alpha Build Part 4 Fins


It's hard to see in the picture, but the balsa sheet from the kit was made from two pieces of balsa, glued together parallel down the grain line.

The Super Alpha instructions have you round only the leading edges of the fins.


The original Alpha instructions say to round the leading edge and taper the trailing edges. The illustration showed a rounded leading edge and a short taper at the rear.
Enlarge the illustration at the left and look at the "A - A" section.
I decided to round all the edges, except for the root edge.

Wednesday, February 22, 2012

Super Alpha Build Part 3 Engine Mount


The engine block was notched for a better fit when butted up against the upper bend of the engine hook. This idea came from Todd. (Bradycross on TRF)


On the left you can see the split body tube over the engine hook.

The Kevlar went underneath the forward centering ring instead of tied onto the engine block ring. On larger diameter models it makes sense to keep the Kevlar away and outside the path of the ejection charge.

On the right is the finished engine mount.
Enlarge the picture and you'll see the filled spirals in the 3/16" launch lug.

Tuesday, February 21, 2012

Super Alpha Build Part 2 Engine Mount


I wanted a vintage look to the upscaled Alpha so that finger tab on the engine hook has got to go.
I can usually "score" both sides of the tab with my wire cutters.
With pliers, bend the tab along the scored line and it will break apart.
Follow with light filing to smooth out the edge and round the sharp corners.


Two 1/8" ply 50/60 centering rings were found in the spare parts box.
The plywood is probably overkill, but it was handy.
The engine hook notches were made with my small diamond files.
The corners of the notches were a little round after the filing so the were sharpened up with some small notch cuts with my hobby knife.

In the picture a small notch in the upper ring is made for the Kevlar to pass through. At the right of the same ring is the notch for the upper part of the engine hook.


Here's all the engine mount parts for a 24mm engine.
The split tube (at left center) will hold down the engine hook between the centering rings. It's simply a split piece of BT-50 and stronger than a wrap of tape.

The engine block is a 1/4" piece cut from an old D engine casing.

Monday, February 20, 2012

Super Alpha Build Part 1 Parts

I'll be doing a conversion from 18mm to 24mm engines.
I've got plenty of C11 and D12 engines that should do well in this upscale.

Here's all the parts including the re-shaped nose cone from my old Red Max clone.
The nose cone posts are here:
PART 1
PART 2
PART 3

I had some plywood 50/60 centering rings, BT-50 tube, Kevlar and a 3/16" launch lug.
The picture shows some 1/8" elastic. I'll have to get some 1/4" elastic to replace that.


These are the parts left out from the stock 18mm version. Everything will go into the spare parts box for a future build.

That's a 24" long rubber shock cord, still a little short for me.


This will be painted like the Alpha I never built from the 1974 Estes catalog.

Tuesday, January 31, 2012

Super Alpha Nosecone Part 3 Final Shaping


The sandpaper was switched over to 220 grit.
The center dot is still visible.


More shaping and the center dot is almost gone.


The balsa cone was taped to the wall.
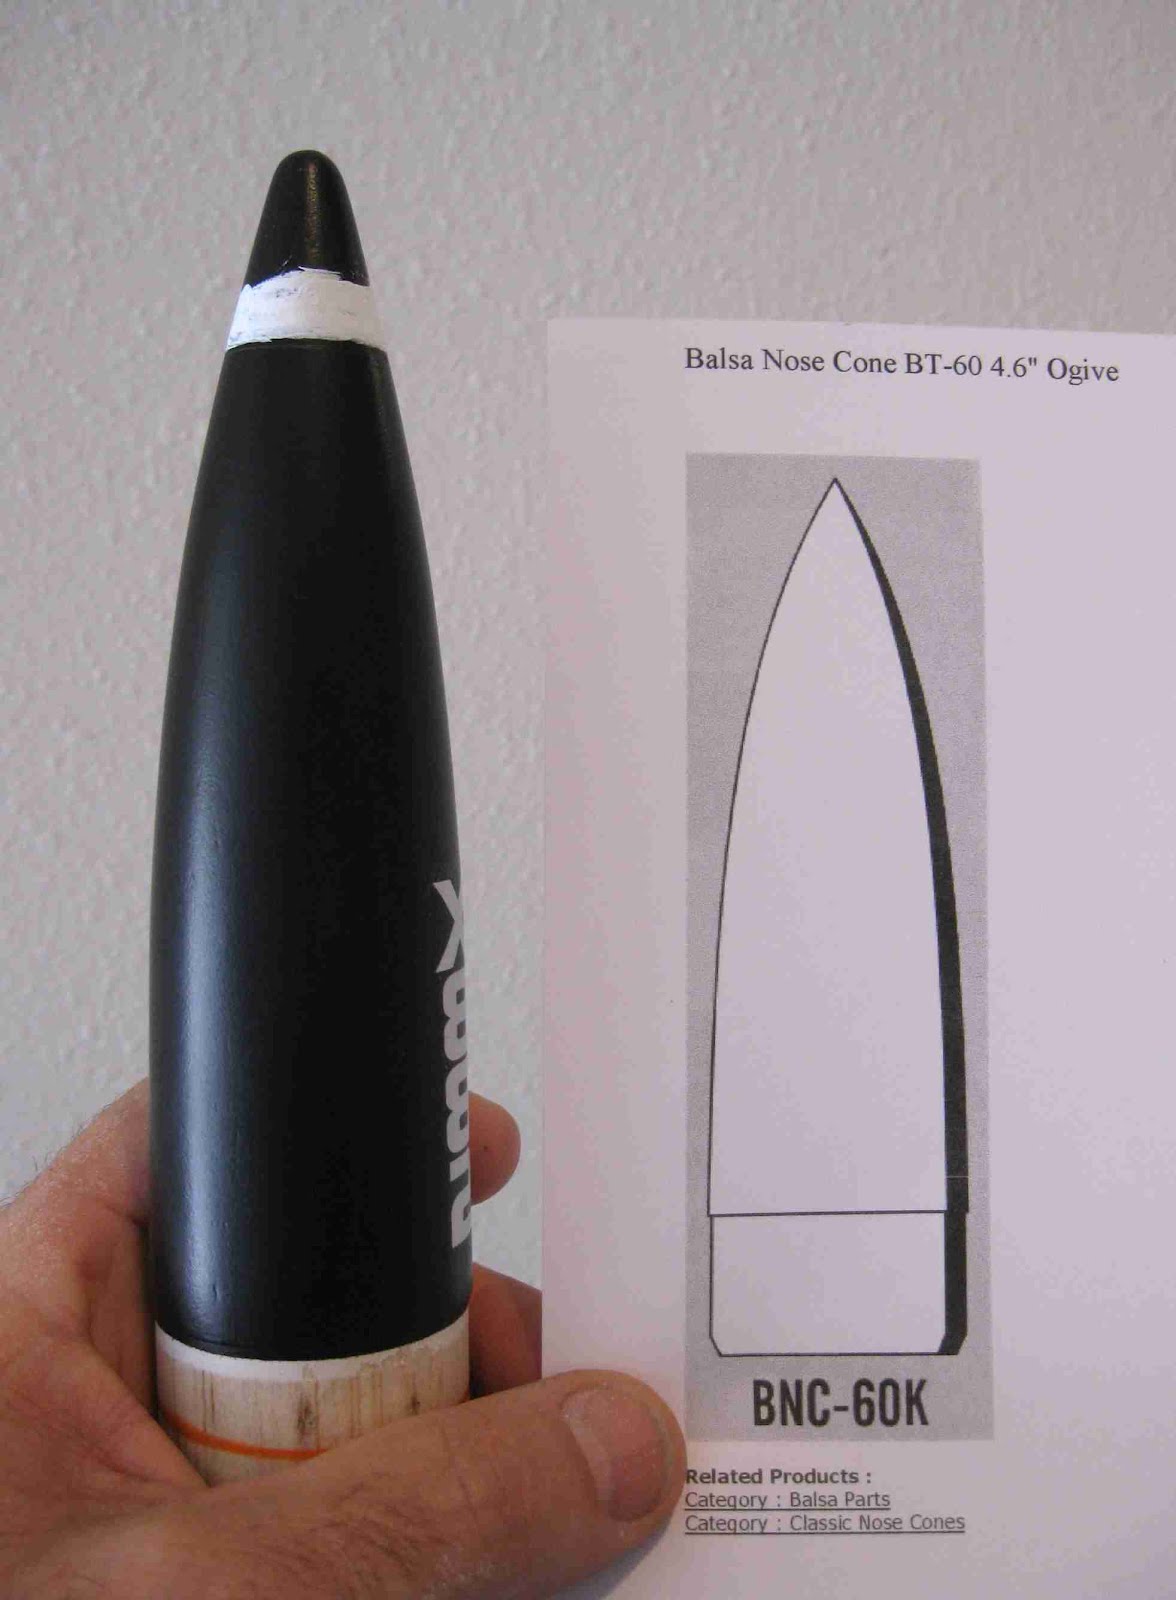
I held the print a little forward of that to check the profiles side by side.

Is it perfect? No, but it's close enough for me.
Over the years the same catalog nose cone changed shape depending on how old the grinder was.


A half an hour later, the new shaped nose cone.

Sure, it would have been easier to order a new nose cone.
Not to take any business away from Semroc, but I just saved $7.10 off my next order.

Monday, January 30, 2012

Super Alpha Nosecone Part 2 The Center

Sand the cut top smooth and flat.
Remember I mentioned the first scored circumference line was cut slightly above the 4.6" length? When sanding the top flat, you are getting closer to the final length.

With a fine point pen, find the center and mark with a dot.
This is critical for a centered tip in the final shape. Take your time, measure twice from different sides to make sure of the center.


Start making small chip cuts using the center point as a guide. Keep the flat top area round as you make the chip cuts.
Keep cutting away until you get about 1/16" away from the center point mark.


Rough sand the nose cone using 100 grit on a block.
Concentrate on the final contour, check the nose cone profile print often.

Sunday, January 29, 2012

Super Alpha Nosecone Part 1, 4.6" Length

I'm taking a day off from the Scavenger build until I find a better brand of spray paint that works! So for now, here's some prep for another build coming up.

After a few years I finally figured out what was wrong with my Red Max clone.
The nose cone was too short.
This is the first blog post: HERE

I had bought a Super Alpha on Ebay with the replacement plastic nose cone. I wanted the Alpha nose cone shape. The old Red Max clone would get the plastic cone from the Super Alpha kit. To save a few dollars the old balsa Red Max cone would be shaped to the Alpha profile.

I don't have a lathe. I've made nose cones on a drill before but it's tough to center a dowel in the nose cone shoulder. I figured I'd just wing it.


At the Semroc website a search was made for the BNC-60K nose cone. Scaled up from the BNC-50K this new cone is 4.6" tall.

I marked the Red Max cone with a pencil but it'd be hard to see in a photograph. White out was used to show the area to be removed.


The nose cone was scored just above the 4.6" line around the cone top.
The cut line is less than 1/16" in. This is a "stop" for the chip cuts to follow.


Small chip cuts were made down to the scored line from picture 2.

After making chip cuts around the cone, score another horizontal circumference line and follow with more chip cuts working towards the center of the nose cone.