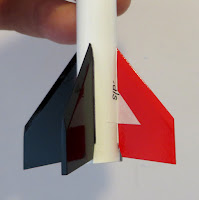
I have one room in my home for rockets and rocket supplies. All of the Odd'l Rockets parts are stored there.
The walls have been bare since the room was remodeled two years ago.
I found and bought an original Estes ad on Ebay. This is the same ad I saw in 1969. I sent for the catalog after paging through a classmates catalog in my eight grade home room.
Estes ran out of the 1969 catalogs and sent out Xerox copies, reduced images of the pages.
The magazine ad brought back memories and will fill up some empty space on the rocket room wall.
Wednesday, February 28, 2018
Semroc Mini Optima Build, Part 4, Interior Tube and Fin Shaping
The top of the engine mount is glued into the insulator tube.
The upper white centering ring is recessed 1/16" inside the tube.
There are six fins on the rocket, on the left is the upper fin.
The lower fin has a fin tab that glues through the pre-cut fin slots and onto the engine mount tube.
The leading, outside and trailing edges of the fins are rounded.
Be careful when rounding the upper, smaller fins. The grain runs parallel to the small leading edge.
Tuesday, February 27, 2018
Semroc Mini Optima Build, Part 3, Engine Mount and Interior Tube
The white, slightly narrower ring goes to the top of the engine mount tube. This fits into the ST-9 insulating tube.
GOTCHA: The instruction drawing shows the ring just covering the upper bend of the engine hook, sitting even with the end of the tube
The ring actually sits lower down the tube than the illustration shows.
Here's the finished mount with the lower ST-10 brown ring in place. Notice there is no Kevlar line used in this model.
The interior tube works like an insulator protecting the main airframe tube (and paint) from the hot ejection charge. It is slightly narrower than the ST-10 main outside tube.
The shock cord mount is old style, attached through slits cut into the body tube.
I used my long tweezers to depress the body tube in between the two slits.
You'll find it easier to feed the line through from the top. Pick up the line with tweezers and pull it through.
A knot is tied on the short inside end.
After the shock cord is at the correct position, press the tube depression back out and lock the cord onto the tube.
I applied a little wood glue to the slit areas.
Monday, February 26, 2018
Semroc Mini Optima Build, Part 2, Cleaning Up Parts
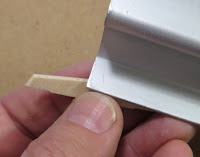
The engine mount tube is slotted for the top bend of the engine hook. On the left is the pre-cut "slot" from the kit. It's really just a stab of an X-Acto knife. Pressing the upper bend of the engine hook into this stab hole could tear the tube.
TIP: To make a cleaner "squared off" slot, pierce one side of the slot. Use the dull back side of the knife blade (on right) on the outside ends of the slot to square them up. Flip the knife blade over to pierce then square up the other side.
Here's the finished slot. With the sides cleaned up it is probably stronger than the original knife pierce.
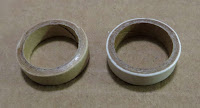
Two different centering rings are supplied. One fits the ST-10 main air frame tube. The white ring fits the ST-9 insulator tube.
The reason for the different sizes will be explained soon. The white ring on the right is slightly smaller diameter than the one on the left.
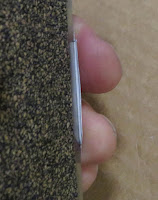
The burr on the inside of the rings was burnished down using the backside of a Sharpie pen.
Sunday, February 25, 2018
Semroc Mini Optima Build, Part 1, Parts
It's too bad Semroc is discontinuing the "Mini" line of kits. Carl McLawhorn (Semroc founder) called these his "Ready To Build" series.
There are some very clever features on these models.
Parts of very high quality. The only thing missing in this Mini kit are the sparkly orange and chrome trim bands. These are all there as orange and grey water slide decals.
The lower body tube has laser cut fin slots.
Body tubes are thicker walled Centuri style, ST-7 for the engine mount and an ST-10 for the main body tube.
The upper body is a payload section with a coupler and disk bulkhead connection. This model would be perfect for altimeter flights.
Parts of interest:
Two different sized centering rings. More on this later.
To the right is the coupler and bulkhead disk. The hole in the disk center is for the screw eye.
The long tube on the right is the insulating tube. It is an old style Centuri ST-9 and slides into the ST-10 tube.
In the center is the laser cut fin alignment tool. Notice there are fin slots for three and four fin kits. Some of the other Mini kits have four fins.
Saturday, February 24, 2018
Odd'l Rockets F-104 Starfighter Kits On Sale at NARCON!
The Odd'l Rockets F-104 Starfighter kit made its debut at NARCON! Here's the first nine kits at the JonRocket booth.
Roger and Bracha Smith (JonRocket.com) posted this picture on the NAR Facebook page.
They are also listed now on the Sirius Rocketry website: CLICK HERE
More kits will go to JonRocket.com when they return from NARCON.
Apogee will get their first allotment of F-104 kits sent out on Monday!
Roger and Bracha Smith (JonRocket.com) posted this picture on the NAR Facebook page.
They are also listed now on the Sirius Rocketry website: CLICK HERE
More kits will go to JonRocket.com when they return from NARCON.
Apogee will get their first allotment of F-104 kits sent out on Monday!
Semroc Mini Optima Build Background
The Optima was a BIG model for Estes, available from 1990 - 1994.
2.6" diameter and almost four feet tall. D engine powered, it could reach 390 feet!
A good demonstration model it featured chrome and metallic orange trim.
The same design was re-released as The Shadow in 1994 - 1996. The paint decor and decals were different.
The engine mount was adapted to fit the new (and short lived) E15 engines. E engine altitude was advertised at 550 feet.
This newer black and silver model was trimmed with a goofy blue name decal. For me it didn't have the appeal of the earlier Optima paint and trim.
The Semroc Mini Optima kit reflects the first paint scheme.
Friday, February 23, 2018
Old Enerjet Engine
I only have two original Enerjet engines, both are E24-7s meant for my Enerjet Nike Smoke.
This one has a hand written number on it, "477". You'd think that might mean April of 1977, but the Enerjet product line only lasted a few years.
To see the 1972 Enerjet catalog: CLICK HERE
The casing looks to be fiberglass, the nozzle is graphite.
There is a bead of epoxy around the nozzle.
The upper end has an old style paper cap over the ejection charge.
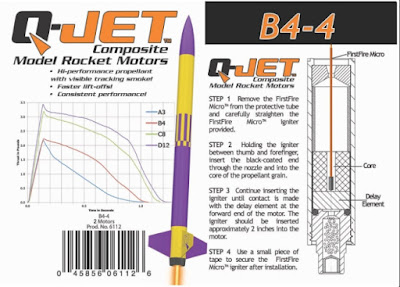
Is it a coincidence that the new Quest Q-Jet labels are orange, black and white?
One thing that hurt Enerjet sales was the price. Each E24 engine was $4.00 in 1972. That was way out of line for most hobbyists.
Let's hope that isn't a factor for the new Quest 18mm composite engines.
ASP D Region Tomahawk Build,Finished
Thursday, February 22, 2018
Quest Q-Jet Composite Engines (Almost) Available!
"Quest Q-Jets (Composite A and B) are now up on their website. Certified by TRA. Priced about 20% more than comparable Estes motor . . ."
For now - If you try to add the new engines to your shopping cart you get a "Product Unavailable" message. To go to the Quest Aerospace website: CLICK HERE
A3-4, A3-6, B4-4 and B4-6 engines are sold in two-packs. A engines are $7.99, B engines are $8.99.
Looks like C8 and D12 engines are also on the way . . .
That 18mm D12-3 engine might be perfect for models like the Mars Lander.
ASP D Region Tomahawk Build, Part 17, Nose Cone Tip Paint
Just the very tip of the nose cone is brown.
The instructions say you could dip the nose cone tip in paint, it's worth a try.
The same brown from the nose cone base was sprayed into a baggie set in a mixing cup.

The nose tip was dipped in the paint but I couldn't get an even line.
I came back with a paint brush trying to straighten out the edge. That only made the paint surface uneven.
After the brown completely dried the high spots were lightly sanded with 400 grit.
I sprayed more paint in a cup and brushed again. This time it came out better.
Wednesday, February 21, 2018
ASP D Region Tomahawk Build, Part 16, Fin Plate Setting and Streamer
The backs of the card stock fin plates were sprayed with 3M 77 adhesive spray.
Here's how the plates fit around the curve of the tube and with the folds tucked into the fin root edges.
The great thing - the fin plates covered the bad and touched up mask lines.
A Q-tip was used to gently press the fold into the root edge. You won't scratch the print using a soft burnisher.
There is a 1/8" wide aluminum band at the rear edge of the body tube. Instead of masking and painting, a strip of Trim Monokote was cut and applied. It took a few tries to tuck it into the fin base but it was easier than masking.
The streamer is thick yellow plastic, 3" wide X 24" long.
The streamer is taped to the shock cord, 1" from the end of the streamer. Fold the end over the shock cord and tape it again.
ASP D Region Tomahawk Build, Part 15, Fin Plate Forming and Adhesion
Bend the long (already embossed) sides over a straight edge.
You should be able to set the metal edge of a ruler into the embossed line. Press up with your fingertips. Crease the entire length of the fold.

You'll have to go back and curve the bottom again after folding the sides.
Here's the underside and outside of the fin plates.
Set them into the space between the fins to be sure you have the curve and folds right. Re-form them if needed.
Set them on a scrap piece of cardboard for adhesive spray. Here they are set on masking tape with the sticky side up.
The backside of the plates were lightly sprayed with 3M 77 spray.
Tuesday, February 20, 2018
ASP D Region Tomahawk Build, Part 14, Folding and Cutting the Fin Plates
Emboss the fold lines before cutting out the fin plates. It's easier to make the fold lines while the pieces are still on the larger paper.
I'm using the tip of a butter knife, the flat area above any serrations on the cut side of the knife.
Most of the straight lines were cut with a new X-Acto blade and a straightedge. Cut and leave the black edge border lines.
The shortest lines were cut with a single edge razor blade.
Here's the four plates ready to be formed.
Notice the bolt head circles - They alternate three bolts then four bolts.
To wrap around the body tube, form a curve in the plate in the heel of your hand. Use a 1/4" dowel or the rear of an X-Acto handle.
ASP D Region Tomahawk Build, Part 13, New Fin Plates
I looked back at the Estes Tomahawk instructions and Peter Alway's Rockets Of The World for more information on the fin plate shape.
The plates are slightly raised above the body tube so I decided to print them on 60 lb. card stock. This lighter card stock will also allow the plates to be folded and glued into the root edges.
Below: 1" reference lines were added to the kit decals. The decals were scanned and dropped into Corel Draw.
Above: The outside lines were .5 width. The 3 ridge "flats" were drawn with gray lines. This will visually imply the raised sections.
Monday, February 19, 2018
ASP D Region Tomahawk Build, Part 12, Fin Plates
I probably could have sanded and shot the black root edges again but thought I'd take the easier way out.
Most of the root edges will be covered by a fin plate decal so it doesn't have to be perfect.
I used a fine point Sharpie right down the root edge fillet. It took a few passes to get a dark black to match the paint coat.
Here's the decal of the fin plate from the kit. It was inkjet printed on white decal paper.
My only concern is sometimes the white backed decal paper isn't as opaque as I'd like. The paint color underneath the decal can show through.
To check how dense the white paper decal was I cut off a corner and transferred it onto the model.
Over the red fin you can see it's a bit pink.
While these decals are usable and would look good, I wanted to try an upgrade.
Sunday, February 18, 2018
ASP D Region Tomahawk Build, Part 11, Fin Masking
The D Region Tomahawk has three black fins and one red fin.
Here's the mask for the single red fin. On the left is the Scotch tape surrounding the root edges.
In the second picture a grocery bag is taped covering the rest of the model.

This is the mask for the three black fins.
I had good lines on some fins, not on others.
I might have waited too long to pull up the tape. There was some lifting and tearing of the paint.
The fix is coming up.
Space X Tube Wrap?
Brian McCormack posted this picture on the Facebook Model Rocket Fanatics page:
"Got my SpaceX Falcon 9 rocket kit today.
Not to thrilled with the lumpy body tube wrap but it’s better than trying to paint it!"
Geez! That's crap!
When the kit first came out it was up to the builder to apply the large peel and stick wrap. It was thin and nearly impossible to get right.
After Space X got complaints they decided to place the wrap for you.
In my book this lumpy wrap is unacceptable.
Friday, February 16, 2018
ASP D Region Tomahawk Build, Part 10, More Masking
A brown band goes on the base of the nose cone, 7/32" above the shoulder lip.
On the left the nose cone has been lightly marked with pencil in four locations around the nose cone. I use more than one single mark, it makes alignment of the tape line much easier.
To the right is the Scotch tape mask and brown tape above and below it.

The only drag of this kit was I had to buy a can of brown spray paint! I've never used brown on a model before.
Yes, I know, it should all be flat paint.
On the left the nose cone has been lightly marked with pencil in four locations around the nose cone. I use more than one single mark, it makes alignment of the tape line much easier.
To the right is the Scotch tape mask and brown tape above and below it.

The only drag of this kit was I had to buy a can of brown spray paint! I've never used brown on a model before.
Yes, I know, it should all be flat paint.
Subscribe to:
Posts (Atom)


