Showing posts with label S MMX Blue Bird Zero. Show all posts

Friday, August 17, 2018

Semroc MMX Blue Bird Zero Build, Finished


There was a few questions raised in the instructions. I have mentioned them to Randy at Semroc.

It's interesting that a Micro Maxx downscale probably as difficult to construct as the full size original. Maybe harder?
There are the same amount of parts as in the original full-size kit, just smaller.

Thursday, August 16, 2018

Semroc MMX Blue Bird Zero Build, Part 8, Coupler Gluing and Streamer


Run the Kevlar line through the upper, blue body tube.

A line of glue was set into the upper tube and the tube slid over the coupler.


The "screw eye" dowel was pushed into the nose cone base and marked with a pencil. Cut the toothpick off at the pencil line.

Knot the end of the Kevlar line and push it into the hole in the nose cone base.
Put some glue into the hole and press the toothpick piece into the hole, locking the Kevlar line into place.

The streamer material is cut in two and taped to the Kevlar line.

Wednesday, August 15, 2018

Semroc MMX Blue Bird Zero Build, Part 7, Paint and Decals


After the first white coat, there were still some rough areas especially around the fin fillets.


This is what I mentioned early on - Don't glue the body tubes together until after the upper section is painted blue.

This blue is a bit dark. I didn't want to buy another can of spray paint. Blue is rarely used to finish a model rocket. I used what I had.


The wrap decal was a little long. I hid the end match below a fin.


The decals are small!
I used a wet Q-tip to get the eagle decal into the crux of the root edges.


Tuesday, August 14, 2018

Semroc MMX Blue Bird Zero Build, Part 6, Ends and Edges


GOTCHA: The instructions say to push the toothpick approximately half way into the nose cone.
Halfway is pretty far! You could split the nose cone. You really only have to push the toothpick in about 3/8".

I marked the center of the nose cone base before pushing the toothpick in.


I'd recommend roughing up one side of the launch lug for better glue adhesion.


The launch lug is tacked on with Super Glue. Fillets follow.


Here's the whole model ready for gloss white paint. The upper tube hasn't been glued on yet so it can be separately painted light blue.

Thursday, August 9, 2018

Semroc MMX Blue Bird Zero Build, Part 5, Fin Gluing


The body tube was marked for the fin positions earlier in Step 3.


The fin alignment slots were too tight on the fins. It took a little sanding with 400 grit to widen the slots.


GOTCHA: The instructions recommend tacking the fins on first with medium Super Glue. I wouldn't recommend this, Super Glue seals the surfaces and effects the adhesion of the glue fillets that follow.
Super Glues become brittle over time and those joints could fail. Super Glues are good for strengthening the ends of body tubes and stiffening up card stock shrouds, not for basic model rocket construction.

TIP: Glue on one fin before using the fin alignment tool. Let the fin dry, then slide on the alignment tool over the glued on fin.
This will steady the alignment tool and makes the second and third fin much easier to place.


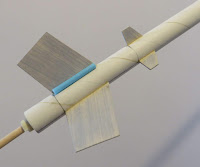
The same method is used for the smaller, forward fins. Glue one on, slide on the tool and follow with the second and third fins.

Wednesday, August 8, 2018

Semroc MMX Blue Bird Zero Build, Part 4, Fins

With all the NARAM coverage I wanted to get back to the MMX Blue Bird Zero - sorry about the delays!


The fins are tiny and only 1/32" thick. Its good they are cut from basswood!

The instructions don't mention it, but I rounded the outside edges of the fins with 400 grit.


Basswood has very little grain so you can get by with filler/primer to fill the grain.

Here the fins are taped down to scrap cardboard. The root edges are butted against each other to keep the primer off.


Here's one large fin after sanding off the filler/primer. You can see the gray filler in the grain lines.

Note the root edge (to the right) has more of the filler/primer sanded off for better glue adhesion.

Sunday, August 5, 2018

Semroc MMX Blue Bird Zero Build, Part 3, Body Tube Lengths


Step 3 says to "Take one of the body tubes" and mark it for the fins. It doesn't specify which tube to mark.
Choose the shorter tube, it should be 5 1/4" long. Mine was 5 3/8" long. The upper tube was 6" long. It should probably be closer to 6 1/4" long to be scale.
I cut the long blue coupler down to a 1" length. It just seemed too long to me.

Glue the coupler halfway into the top of the lower 5 1/4" tube.

GOTCHA: Step 8 has you glue the two tubes together.
Don't glue the tubes together, leave them separate for now. You can paint the lower body section white and the upper body light blue. Then glue them together - no masking!

Saturday, August 4, 2018

Semroc MMX Blue Bird Zero Build, Part 2, Engine Mount


The centering rings are laser cut from Letramax material. The laser cutting chars up the parts. Wipe off the ash before gluing anything up.
The instructions say to tie a knot in the Kevlar and set it under the inside engine block inside the engine mount tube.
I went more mainstream and tied the shock cord outside around the engine tube and under the upper centering ring.
This required a notch to be cut in the upper ring.


GOTCHA: The instructions have you glue the engine block flush with the top end of the engine mount tube. With the engine block even with the top, a MMX engine goes in too far. It ends up almost even with the low end of the engine tube. There is very little of the engine hanging out the back end.
For me there's not enough of the casing exposed to easily remove it after a flight.


The engine block will have to be glued down inside the tube. In the picture above, notice the block set next to the engine mount. This is how far down the engine block should be recessed.

With the engine block recessed down from the top, the engine will extend out the back. Enough is exposed to grab and remove a friction fit engine with pliers.

Friday, August 3, 2018

Semroc MMX Blue Bird Zero Build, Part 1, Parts

The original Estes Blue Bird Zero (#1335) was introduced in 1980 and on sale through 1985. BT-55 based and tall, it stood nearly 40". The 1980 price was $6.00.


This was my first purchase of the new Semroc Micro Maxx line.
Most parts were good quality. I had a few concerns - these are explained below:


The two main tubes had some rough cuts. It's understandable, small tubes can be hard to cut clean.

The launch lug and engine block were laser cut. The laser melted the end of the lug and burnt the outside of the engine block.


You are supplied with three fin alignment tools. You probably only need two of these.


The decals are all in black ink. The original bigger kit had the name in white to go over the blue upper tube section. The sheet was cut a bit close to the word "Zero".