Showing posts with label Fairings. Show all posts

Saturday, January 17, 2026

Estes Semi-Scale Saturn V, Kit #K-39, Part 12, Fitting The Fairings

Try as I might, I couldn't get those glue tabs fully under the former sides.

Usually, I can figure it out and get a decent fit by the fourth try. I ended up with a mediocre fit on the sides of all four fairings.


While the glue is drying, 
Try to get a straight line down the sides of the fairings. The sides will want to round out.

I used my sharpened dowel to press and form a straight line. You can only do this while the glue is still wet.

The gap at the root edge was filled with some CWF pushed in with a single edge razor blade.
Light 400 grit sanding followed.

This was shot with filler/primer. The filler/primer showed the raised fibers in the sanded cardstock. More light sanding removed the raised fibers.


After all the filling and sanding,
Some CA glue was wiped on the inside and rear edge to stiffen up the fairings.

Friday, January 16, 2026

Estes Semi-Scale Saturn V, Kit #K-39, Part 11, Fitting The Fairings

Steam forming the fairing seems to make them stiffer and stronger.

This is a dry fit of the fairing and clear fin. I wanted to be sure the root edge and fairing angle were close.

While holding the fairings in place, trace around the fairing edge with pencil.


Scrape off the filler/primer for the glue tab inside the fairing.


After steaming the fairings round, the glue tabs needed to be re-folded with a sharp line. I used a smaller, pointed dowel.

It's difficult to glue these fairings in place. Preparation helps!

Monday, January 12, 2026

Estes Semi-Scale Saturn V, Kit #K-39, Part 10, Forming The Fairings


Start the cone form by rolling the fairing in the heel of your hand.
Roll the dowel in an arc putting a slight curve into the cardstock.

You'll have to take it slow or creases could form in the fairing cardstock. 
Continue tightening the arc curve over steam, then roll over the sharpened dowel again.

Put some water over medium heat. Let the cardstock absorb some of the water vapor. Pinch the cardstock over the sharpened dowel.

The curve will have to be tight to look correct on the finished model.


Hold the fairing over the dowel as the cardstock dries. This will take a few minutes.

On the right notice the curve of the lowest fairing. It's a little tighter than a half circle.


The previously folded glue tabs will have to be re-bent after forming the conical fairings.

Slits are cut under the sides of the shroud formers for the fairing glue tabs. The slits don't go too deep, just long enough for the width of the glue tabs.

Sunday, January 11, 2026

Estes Semi-Scale Saturn V, Kit #K-39, Part 9, Forming The Fairings


The instructions say to form the fin fairings by rolling them around a sharpened pencil. I sharpened a larger 5/8" dowel. I would think the pencil would be too narrow.

I tried to "roll" a  first test fairing (I printed extras) around the sharpened dowel. This is going to require some extra step for a smooth cone shape - folding the glue tabs first.


The glue tabs are narrow. Trying to crease them after forming the cone would be difficult. 
I went ahead an embossed the line with the smooth tip of a butter knife, as originally shown in the old Estes Saturn 1B instructions.

The folds were creased using smooth pliers.


The sharp fold was made by rolling over the edge with a smaller smooth dowel.

The rounded bottom of the skirt hasn't been cut on this first fairing yet.


Here's all four fairings with the glue tabs folded under.

They are ready for "coning" and shaping in the next post.

Thursday, January 8, 2026

Estes Semi-Scale Saturn V, Kit #K-39, Part 6, Shroud Formers


The crescent shaped piece is the shroud former pattern.

Set the inside edge on the card the 20/60 rings came from. Trace with pencil.

Cut with a sharp new blade.

The area between the "A" marks is scraped for better adhesion.

On the right, the shroud former is glued onto the edge. I used my sanding block to even up the face of the former and tube edge.


Here's the four shroud formers in place, almost ready for the fairings.

Thursday, September 22, 2022

Estes Space Shuttle Columbia Build #1385, Part 11, Body Side Fairing Gluing


Interesting - 
The face card picture (of an pre-production build) doesn't show the cardstock sides overhanging the front and onto the nose cone.


Bottom flap is glued on first -
The bottom long flaps are sharply folded in and are glued onto the body tube. 
Try to keep the length of the fairing straight and at a 90 degree angle to the flat wing. 

After the bottom flaps are glued and dried - 
The rear side tabs are glued onto the body tube.

Apply a glue "skin" (it doesn't take much) down the top edge and press down the sides, leaving the rear tabs open.


On the left, you can see how little glue was used on the inside of the top edge. Smooth it out and press onto the tube. 

I used a burnisher to smooth out the sides of the fairing where the glue made contact.

Wednesday, September 21, 2022

Estes Space Shuttle Columbia Build #1385, Part 10, Wing Gluing & Cardstock Fuselage Sides


Dry fit the wing before gluing onto the body tube.

Notice how the front of the wing overhangs the BT-60 body tube and onto the notch running across the bottom of the nose cone.
 
GOTCHA: The instructions say there is a space of 1 1/8" from the back of the body tube to the edge of the wing extension. 
With the wing all the way forward and against the recess notch in the nose cone -  my rear spacing was at 1 1/32".

The back of the wing extension is straight, there is some camera distortion.

The instruction drawing does not show the nose cone in place. Glue the wing on with the nose cone seated in the tube to be sure the wing front is far enough forward. 

Pre-bend the cardstock sides. Be sure your two pieces are "mirrored".


With the nose cone in place - 
Do plenty of dry fits.


Note how the cardstock fairing sides are slid all the way forward and stop in the side notch on both sides of the nose cone.

Thursday, December 30, 2021

Estes Skylab #001973, Build, Part 18, Cut, Smooth & Fill

I usually use a break-off blade knife for most of the builds. This is one of those times where a more expensive X-Acto style blade is needed,

In the side cuts, my (new #11) blade was set at an angle almost laying down on the fairing sides.
The top line against the tape goes straight in at a 90 degree angle.

GO SLOW! 
Don't try to cut through with a single cut. 


After the piece is removed the cuts look pretty rough.
Notice the side cuts aren't right against the fairings. I tend to cut wide and trim down to fit. 

I ended up doing a lot of small trim cuts to clean everything up.

First, CWF fill was used in the joints and sanding with 400 grit.

Filler/Primer was sprayed in a small cup then dabbed onto the joints to fill any remaining gaps.

Wednesday, December 29, 2021

Estes Skylab #001973, Build, Part 17, Cutout Between The Fairings


Here's where some measurements don't add up.
The instructions say 5 1/2" from the body tube cut (coming up below) to the bottom of the second wrap.
After this next step the tube cuts left just 5 3/16" for the height of the vertical black bands.
I checked Peter Always Rocket of the World for a second reference drawing.

I penciled in the cut lines straight out to the horizontal taper line on the fins. This is the same line as in the Estes instructions.
If I were to cut as high as the horizontal fin taper line, the vertical black bands would end up short of the 5 1/2" height in the instructions.
Cutting at the horizontal taper line, you would cut right into the corrugations.

Estes doesn't say how tall the cuts should be.
I made a guess and a compromise.

Earlier, the instructions have you cut the wraps with a 1/16" border edge just outside the end of the corrugations. I did the same 1/16" edge here at the bottom of the lowest wrap. This made my cut just at the bottom of the center, tall embossed detail.


I marked the cut line with a pencil.
A piece of tape followed to (visually) make sure the line was horizontal. 

Get ready - Change out your knife with a new blade.
More in the next post.

Monday, December 27, 2021

Estes Skylab #001973, Build, Part 15, Fairing Fillets & Tunnel Gluing


With the fairing top and crescent base glued to the body,
Now you can follow up with light liquid cement fillets down the sides of the fairing joints.


You'll still see some gaps along the edges.
I used yellow glue to fill the gaps and smooth everything out.

Note in the right side picture there is not much glue used. When the fillet is smoothed out some glue will "pool" against the ribs on the low wrap. 
Smooth the fillets with a single "down" swipe only to keep the fillets small against the ribs. 
When the glue dries and shrinks it won't be as noticeable. 

I know - yellow glue doesn't add any strength, it won't soak into the plastic. It's just something to fill any remaining joint gaps. It will stay put.


I only ran glue down the underside center rib of the tunnels.
I didn't want any glue squeezing out on the sides when pressed in place.

After the glue dries, yellow glue fillets were applied down the length of the tunnel sides. Again, the yellow glue was used as a gap filler.

Sunday, December 26, 2021

Estes Skylab #001973, Build, Part 14, Gluing On Fins & Fairings

This is a bit tricky -
Place both the fairing and fin into place. 
Carefully lift off the fairing while still holding the fin in place against the body.

Use a little bit of liquid plastic cement initially so  adjustments can be made if needed.

Check the position with the fairing in place. If all is good, then add some liquid cement down the root edge fin joint. 


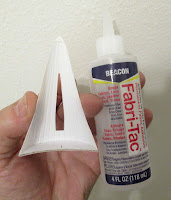
I only used a small amount of Beacon Fabri-Tac on the filler tip piece and along the card stock reinforcement root edge. No glue yet on the thin sides.

Side glue fillets follow after the next step.


Use the placement template piece to be sure the fins are straight and centered in the fairing.

Follow with fillets of liquid cement along the fairing sides applied with a brush.
At one time I was concerned that the liquid cement might melt the thin plastic along the fairing sides. As long as you don't overdo it, it works well as a fillet.

Estes Skylab #001973, Build, Part 13, Fin Fairings - Enough Already!


Here's what the fin slot looked like after fitting and trimming.


You'll know when you've got the slot right when the fin slides in (dry fit against the lower body wrap) and there is a straight line down the long sides of the fairing slot - No bulges or distortion of the fairing!


The rounded tip of the fairing overhangs the top of the low wrap. This overhang leaves a gap.
You don't have to fill this tip gap, it's up to you.

I mentioned about keeping some of the excess border from the vacu-form sheet.
Cut a slightly oversize piece, slip it under the fairing tip and trace with a pencil.


After the tip is glued on,
Cut and sand to the fairing. 

The picture on the right is slightly distorted, that tip piece is glued on straight.

Saturday, December 25, 2021

Estes Skylab #001973, Build, Part 12, Fin Fairings - Patience!

That vacu-form lip on the inside will have to be sanded to match the contour of the card stock crescent piece.
Notice the center mark on the cardstock crescent lines up with the (inside) center rib of the fairing.

Back to the sandpaper taped to the body tube

Sand just to match the circular cut of the card stock crescent - no more. It fits the BT-101 tube curve perfectly.
I've mentioned this is previous builds - 
The original Centuri Saturn V kit provided a Fairing Trim Guide to show the curve of the fairing sides.
While the guide says "trim sides" you'll have more control (and not remove too much) through careful sanding.

If you have sanded correctly, you should end up with that subtle curve on the sides.
I've sanded and fitted just up to the forward ends of the fairing ribs on the side edges.

Notice the fin slot line has a slight up-bulge against the sides of the fin - it's not a straight line. That tells me the fin slot isn't wide enough where the line distorts. That slot still needs more sanding to widen the slot. Go slow and check after sanding. It won't take much to improve the fit.

Look close at the fit of the fairing. 
The fairing sides should fit just inside the corrugations on the lower body wrap. The rounded tip extends over the top of the wrap.
I've seen a few finished Saturn Vs where heavy fillers have covered up a poor fit of the fairings.
The fairings should not rest on, but fit inside the ribs on the low wrap. 

If the fairings don't fit fairly easily inside the corrugation ribs, you probably have more sanding to do.

Thursday, December 23, 2021

Estes Skylab #001973, Build, Part 11, Fin Fairings

Before I get into the Fairings: 
They will fit - if you take the extra time to get the sides sanded and trimmed enough to fit just inside the ribs in the low wrap

TIP: Don't cut the sides off too close! The excess edges will crack off when sanding.
Leave a good 1/16" around the fairing sides.

NOTE: On this build I cut out the fin slot before sanding down the sides.
Next time, I would probably work on sanding the sides before cutting out the fin slot. With the slot intact the fairings seem stiffer making sanding down the sides easier.

Trace around the slot recess with a pencil before cutting. This makes the inside lines easier to see.


Some 220 grit sandpaper was taped around the widest, open part of the main body tube.

This is what takes the extra time.

Back and forth, back and forth over the sandpaper


Keep an eye on the sides and corners as they get thinner when sanding.
They will start to fold back.

When the plastic gets thin enough, you can bend it and remove the edges.
Add the reinforcement disks inside the bottom of the fairings before continuing sanding.

I did something similar on my Saturn V #1969 build. Those were simple 110 lb. card stock glued to the bottom face of the fairing.
These thick crescent disks are glued inside the fairing base. I used Fabri-Tac to adhere them.

Notice the inside edge overhangs the crescent disks. There is still more sanding and fitting to be done.