Showing posts with label Capsule. Show all posts

Tuesday, February 23, 2021

Estes Mercury Redstone Capsule Tip

When I assembled my Mercury Redstone capsules - 
I scraped and turned a small file to remove paint from the gluing "dimples" in the upper ring. (Shown at the right) With the paint removed I can get a better glue bond.

Here's a great TIP in a comment from LDJBaxter:
"As an experiment on our Little Joe capsule we placed a drop or two of white glue from a toothpick into the "dimples" prior to painting. After the glue dried and the piece was painted we used the hobby knife blade to pop out the glue and had a clean surface for glue."

Thanks Mr. Baxter! A small dot of white glue won't stick to the plastic and when removed makes a great small "point" mask! 

Tuesday, December 15, 2020

Estes Saturn 1B, #7251 Build, Part 18, Tunnel Mask & Capsule Tower Paint

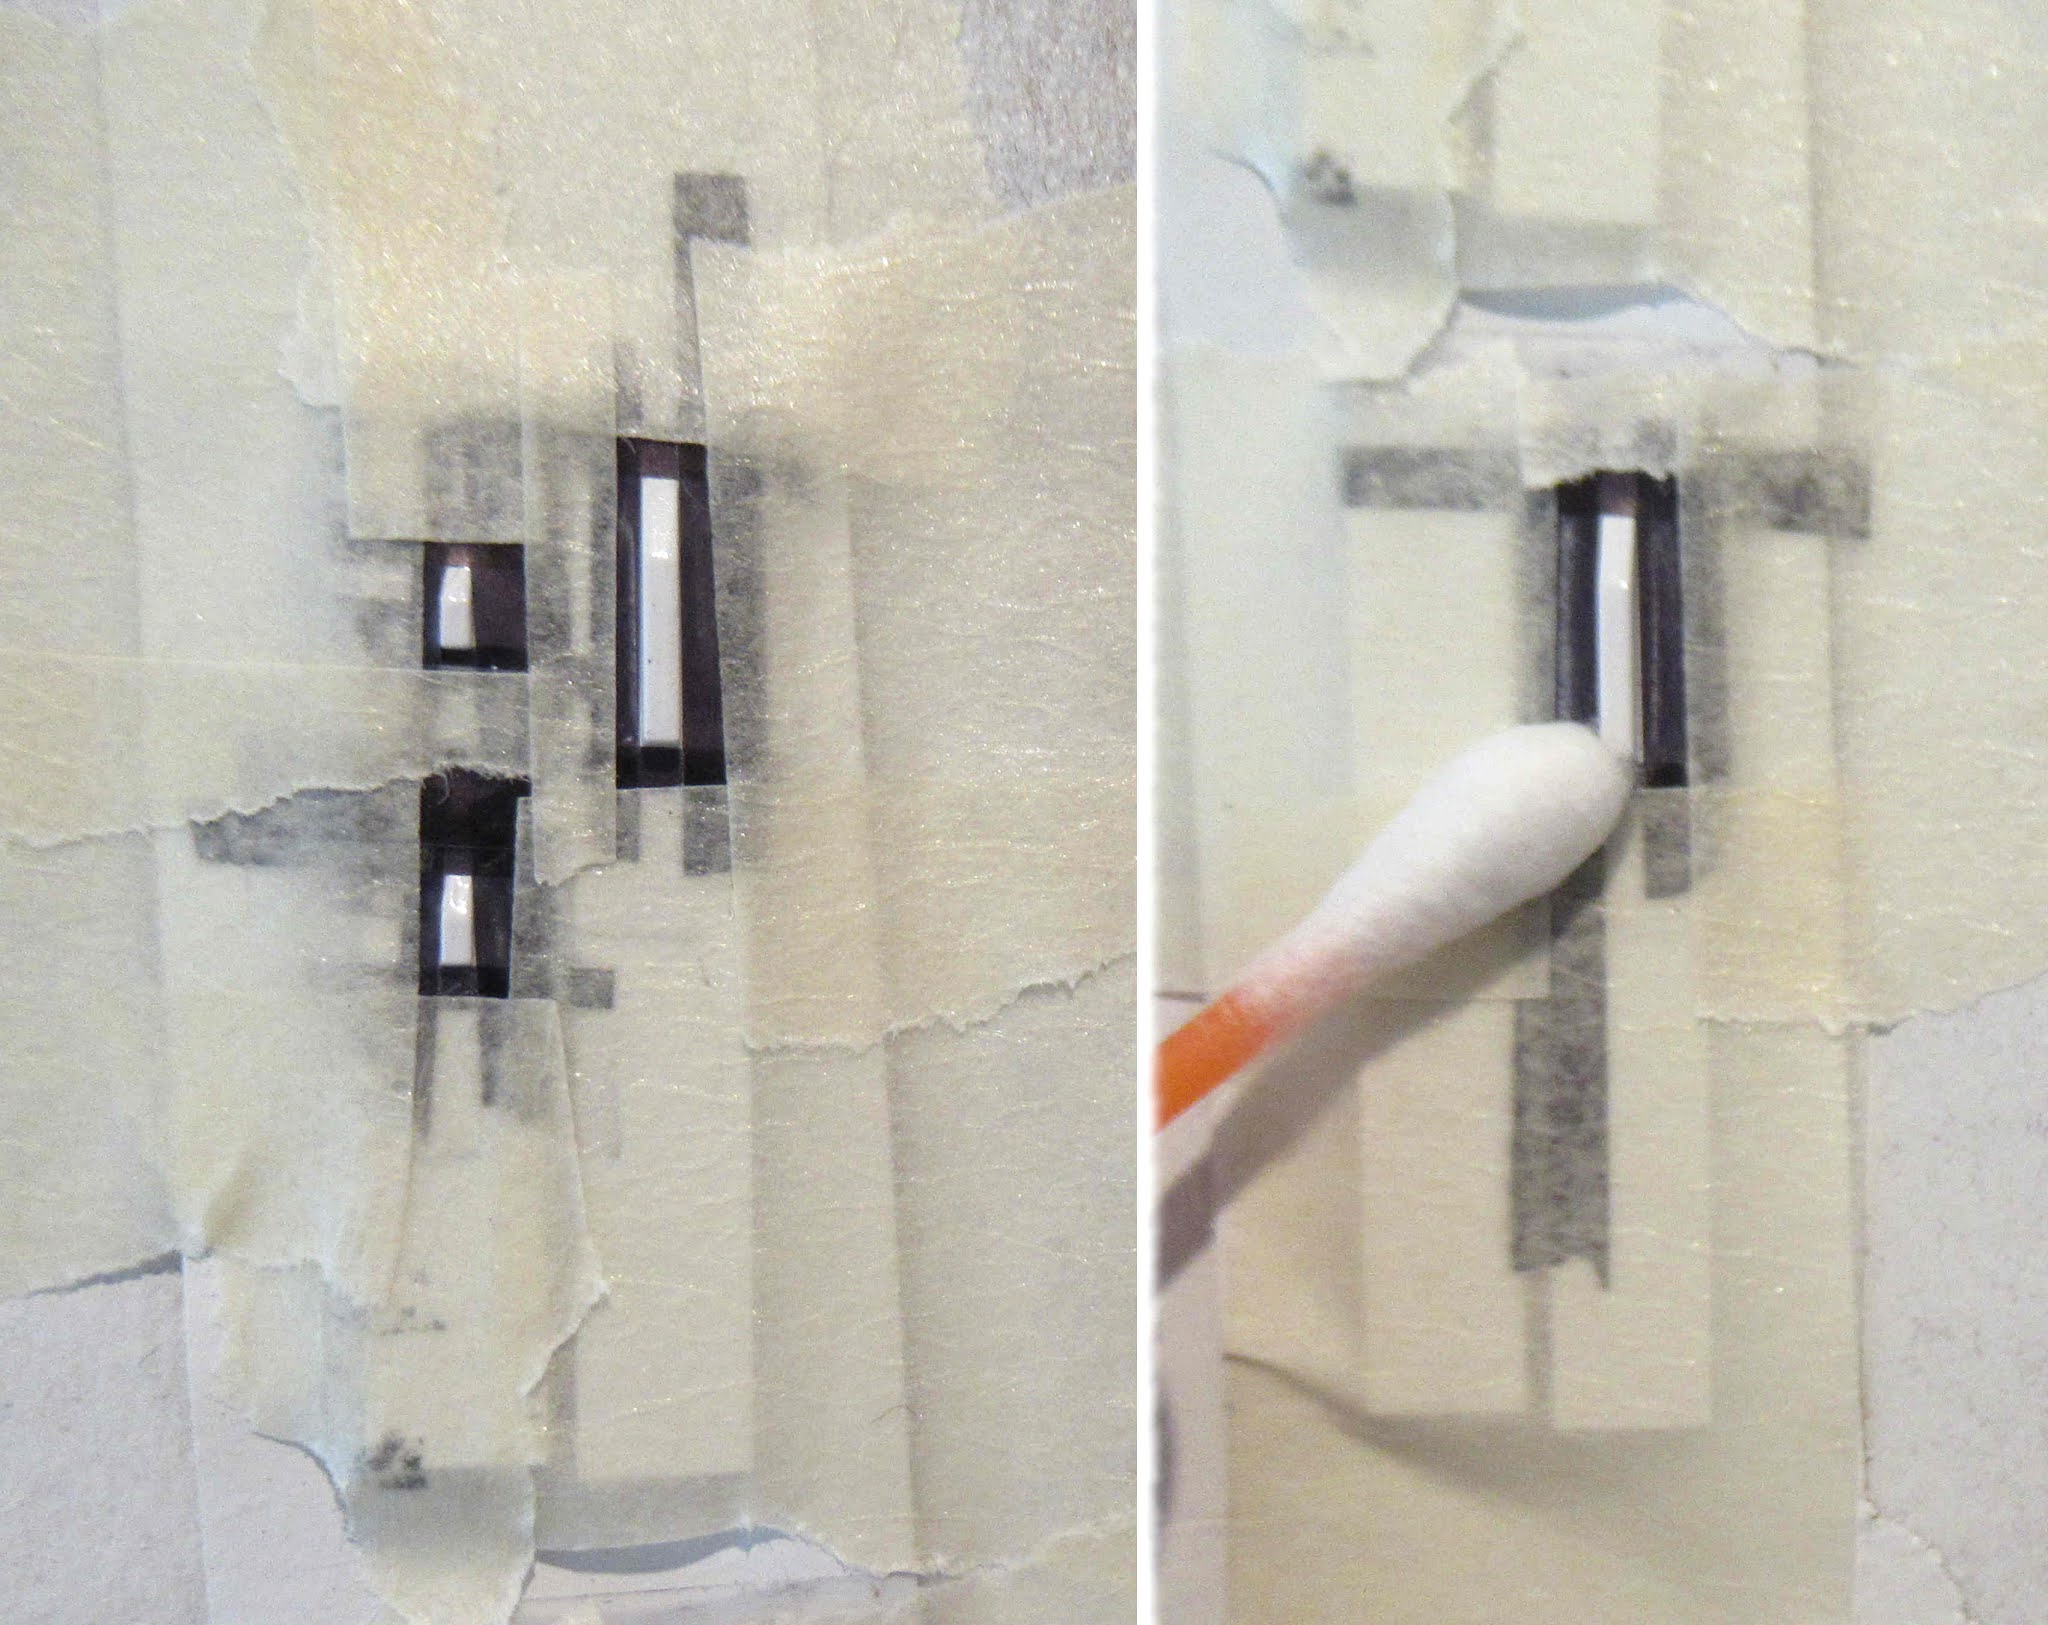
The Antennas have raised vertical yellow bars. I wasn't sure about masking these, they would be a bear to hand paint. I figured I'd try to Scotch tape mask them

Scotch tape is set on a plexiglass, black Sharpie lines are drawn down the strips. The black edges are needed to see the clear tape on the surface borders. 

Before applying the marked clear tape to the model, wipe off any excess ink with a paper towel so it won't transfer onto your fingers or the model.  


This took some time and quite a few tape strips.
After the black tape was set down, brown masking tape covered the outside areas. 

Before painting, the edges were pressed down using a Q-tip.


These really turned out well, one of my favorite parts of the build.
When masking on a smooth surface, the edges come out sharp and clean.
The Command Module and tower were spray painted Gloss White separately. This is too be sure I get paint on the top of the command  module. If the tower were glued on, the paint wouldn't get under the struts.

The tunnels were also sprayed gloss white. The entire model will get a shot of clear flat after the decals are applied.

Build time:
Prep Tunnels, Tower & Antennas: 25 minutes
Mask & Paint Antennas: 45 minutes
Total build time so far: 12 hours, 5 minutes

Tuesday, April 21, 2020

Estes MRN Orbital Transport Laboratory Build, Part 15, Windows & Nose Trim


It's hard to see in the instructions picture, but the Gemini style capsule has a white circle disk on the nose and the hatch windows are white.

These would bee a tough mask. Hand painting white over black would take a few coats.


I needed something to trace around.
A 13mm "T" engine is just about the right size.

The engine casing was a close fit the to the curve of the  hatch window.
I traced around the engine casing onto the self-adhesive paper used on the previous Argus build.

The nose circle was cut inside the pencil line.
The hatch windows took a few tries - they ended up being a bit smaller than the 13mm casing.


Here's the finished capsule.
Considering the small size of the window stickers, they should stay in place.

Sunday, April 12, 2020

Estes MRN Orbital Transport Laboratory Build, Part 7, Hatch Windows

The MRN picture shows hatch windows carved into the Gemini style nose cone. I'd bet they grabbed an already finished nose cone off the catalog Gemini Titan catalog model an used it for the picture.

Here's the illustration from the Estes Gemini Titan kit showing the hatch carving measurements.


After drawing some guide lines, the 3/16" spacing from the center line seemed too wide. I drew the hatches closer together.

Those pencil circles to the right of the windows are there to remind me those areas need more CWF filler. 


The backs are cut first, straight down.


Chip cuts are made to the back cut lines.


Some 220 grit sandpaper is wrapped around a dowel to round out and smooth the bottom of the hatch cavity.


Some additional round forming to the back edge was done by pressing the smooth dowel into the cavity.

Monday, June 10, 2019

Estes Saturn V #1969 Build, Part 29, Assembling the Capsule


The instructions show two pats of clay supplied and pressed into the capsule. The kit supplies four pieces of clay.

GOTCHA: The kit supplies four pieces of clay. Estes is now recommending to use all four pats of clay.
Two of the clay pieces weigh just over 1/2 oz. Four pats of clay would equal 1 oz. of clay weight.
Here's two of the clay pats pressed into the capsule. Use all four!
Before I read the posts on TRF I was only going to use two pats of clay as shown in the instructions.

On TRF, There was a discussion about how much clay to use:
jnmiller said:  
"Question re nose weight... I noticed 4 pats of clay in my kit but the instructions only show 2 pats. Does anyone know if I should be using 2 pats or 4?" 
Secondrow wrote:
"I emailed Estes about this. They told me to use 2 pats like the instructions say. The other two are extras. However, my first flight on an E20 was a sky writer. I’ve since added the weight, but haven’t had the chance to fly it again."

On April 18, 2019 MJennings wrote on TRF:
"I recently emailed ESTES and they told me to use all 4 pats of clay"


The fit of the escape motor body tube was very tight in the top of of the tower assembly. To better fit the small tube, the top was rounded off with sandpaper.


Here's the finished capsule and tower assembly.

Notice the escape motor tube spirals were filled before assembly. CWF was brushed on the tube and sanded. Filler/Primer was sprayed and sanded.

Assembly time so far:
17:35 minutes previous
  0:15 minutes this post
17:50 Total so far

Sunday, December 16, 2018

Semroc Saturn 1B, Build, OOP #KS-1, Part 45, Capsule Details


The seven lines were cut from some adhesive backed paper from an Avery CD label.
Using self-adhesive strips is just cleaner and easier, no glue.


Here's a dry fit of the tower.

Look below and you can see the subtle tape on the seven lines and the hatch cover. It's not a lot of detail but I think it's better than the old hand drawn print of what was under the protective cover.

Under the the escape rocket, four small circles were scraped exposing the balsa under the paint.

On the left - 
Four white glue drops were set on the tower tops. The glue drops are consistent in size. When the escape rocket is pressed in place the glue will squeeze out around the tower side struts making automatic fillets.


Build time this post: 0 hour, 45 minutes
Total build time so far: 41 hours, 15 minutes

Friday, December 14, 2018

Semroc Saturn 1B, Build, OOP #KS-1, Part 44, Capsule Details


You knew I'd get back to the capsule and tower sooner or later - 

The instructions have you use the tower assembly jig to mark the capsule top for the tower leg ends. If you use the assembly jig, punch out the center hole. The tabs should be trimmed and the open circle lightly sanded so you don't scar up the balsa.
The instructions say to use a scrap dowel to make indentations at the tower leg locations. I didn't have any scrap dowels left after the tower build!

I ended up pressing the tower ends into the balsa top. Make sure your tower is straight before making the impressions.
I went back and made the dents deeper and the edges cleaner.


I wanted to add some details to the capsule cover.
Page 282 of Alway's Rocket of the World has an overhead drawing.
There are seven lines running evenly out from the center.


The Alway drawing was blown up and the lines extended outside the BT-70 diameter.

Set the capsule assembly over the blown-up drawing and pencil mark the seven divisions.
This picture shows some of the "test" tape lines.
More in the next post - 


Build time this post: 0 hour, 30 minutes
Total build time so far: 40 hours, 30 minutes

Saturday, December 8, 2018

Semroc Saturn 1B, Build, OOP #KS-1, Part 38, New Vector Control Housings & Capsule Cover


Just under half of the dowel back was carved off.
Leave a little more than half the dowel diameter so a body tube curve can be sanded on the underside.

My old sanding block has a curved side. The 220 made a concave dip on the underside.


Here's the fit of the housing on the large kit tube.

The housings were then cut to length.

Changing the model over to the SA-205 configuration means more changes.
I never liked the drawn details on the capsule wrap. The SA-205 had a white protective cover that was jettisoned with the escape tower after launch.
This printed wrap looks more like the capsule after the tower and cover were gone. The wrap was peeled off and the glue cleaned off.


I printed off another wrap and flipped it over with the print on the inside.
I'll be adding some subtle raised details later on.

Build time this post: 0 hour, 30 minutes
Total build time so far: 35 hours, 50 minutes

Wednesday, November 14, 2018

Semroc Saturn 1B, Build, OOP #KS-1, Part 15, Escape Tower Painting


Before the decals can be applied, all the tower pieces were painted gloss white.

I tend to paint my scale models with gloss paint. Flat white paint is a dirt and finger oil magnet. You can quickly soil a good finish. Dirt and oils don't stick to gloss paint. If the rocket gets dirty it can be cleaned off. If this model were to be entered in Scale Competition it would have a flat finish and be handled with clean gloves.


Here's the escape motor assembly was painted.

Let paint dry for a few days before trying to apply decals.


The underside of the skirt is marked for the tower structure gluing.
The top of the tower jig is slipped over the raised center circle.
Paint was scraped off where the tower top will glue on.

Build time this post: 0 hour, 45 minutes
Total build time so far: 15 hours, 55 minutes

Friday, November 2, 2018

Semroc Saturn 1B, Build, OOP #KS-1, Part 2, Capsule and Tower Parts

I was going to start on the engine mounts and body construction but was missing the couplers and engine hooks. I called Semroc (ERockets) and was assured they would be sent right out.
So we'll start with the capsule and tower kit.


Clockwise from the left - 
The screw eye seems too big.
The outside edge of the large centering ring/shroud support is purposely cut in a "wedge" to better fit the shroud taper.
The C/M and S/M Umbilical pieces were loose in the bag. The shaping tapers are burnt into the top.
The nose cone and tail cone are turned as one piece and cut apart by the builder. The tail cone had a ragged edge, small pieces of balsa that chipped off the lower ring when it was shaped. This edge will be filled and built back up.

Build time: 10 minutes
Total build time so far: 20 minutes

Tuesday, April 24, 2018

Estes Little Joe II (Small) Build, Part 12, Tower Assembly


The long escape rocket is glued into the tower skirt.
The fit of the pin was very tight. I sanded down the bulb on the end slightly.

Here's the finished tower, ready for a coat of gloss white.
You probably don't have to paint it, but after sanding off the capsule details you'll want a smoother surface for the decals to stick.


A screw eye is set into the capsule base disk.
The hole is small and required a much smaller than standard screw eye. I picked up these size 8 screw eyes at Home Depot.

Monday, April 16, 2018

Estes Little Joe II (Small) Build, Part 3, Capsule and Tower Comparison

Kit history is sometimes confusing.
The current Estes Mercury Redstone is really the old Centuri kit. The vacu-form wraps and fin fairings on the Estes Saturn V came from the Centuri Saturn V kit.

I didn't know where the current 1/100th capsule and tower came from. This 1/100th Estes Little Joe II kit is the same size as the smaller Centuri Little Joe II. The older Centuri version used 18mm engines, the Estes "reissue" uses 13mm "T" engines.


Here's the parts from the Estes kit, also the same used in the Saturn V model. Notice the raised details on the Estes capsule.
The escape rocket is a solid piece of plastic. The four escape nozzles (center of the picture) are very small, loads of fun to position and glue under the tower skirt.


In my old rocketry binders I found the 1/100th scale Centuri Little Joe instructions. Look at the APOLLO CAPSULE & TOWER at the bottom. These two plastic kits are definitely from two different molds.

The Centuri capsule is smooth with no umbilical connection. The escape nozzles (V shapes) and tower skirt are molded and assembled like the much larger Estes 1/45th scale Little Joe II kit.
The escape tower is like a launch lug, rolled clay weight goes inside.
The lowest diagonal tower struts (below the "Z") don't meet in the center.

Monday, July 3, 2017

Old Carded Mercury Capsule


After seeing Manuel Mejia's card stock Mercury Capsule from Saturdays launch, I asked him to send the PDF to me to share.

This looks like a free premium from the early 1960s. Many companies sent these out to schools or would mail them out if you sent a letter asking for information. McDonnell Aircraft produced the Mercury Redstone capsule.
To get the PDF of the Friendship 7 capsule: CLICK HERE
This one perfectly fits the diameter of a Pringle's can.


As a kid I remember making card stock models. Sometimes you'd find them on the back of cereal boxes.

This one reminds me of the old Estes Mercury Capsule kit. This PDF is larger, better drawn and prints up black, not white with black lines..

To get the back story, CLICK HERE

Saturday, June 24, 2017

Estes Apollo Little Joe II Build, Part 22, Tower Assembly


Mentioned earlier, the top left strut of the "X" aren't in the holes. The plastic was a bit warped.
It's easier to take care of this after the tower was glued up.


Push in the pin, brush on the glue and hold until dry.


Set the top into the escape rocket bottom and check the alignment.


Here's a dry fit.
This is an impressive assembly, almost worth the 47 years it took for me to get the kit!

Friday, September 23, 2016

Estes Gemini Titan #1978 Build, Part 8, Lower Capsule Tan Ring


On the shoulder end of the capsule is a tan band.


The closest color I had is Rusto 2X Gloss Almond.
This was sprayed on some white backed decal scrap.
This will be cut into a strip and transferred onto the model as a water slide decal - No Masking! 

Thursday, September 22, 2016

Estes Gemini Titan #1978 Build, Part 7, Capsule Mask

Florida is VERY humid in the Summer. While the body tube dried in two days the white on the capsule stayed sticky for a week! I had to wait before doing any masking. The sticky back of the masking tape could go right into the paint if not fully dried.

There are raised details on the blow molded capsule that are right at the mask line.
I used a fine point Sharpie to define the black line. On the left you can see some practice passes I made on the upper part of the capsule. The pen tip easily stayed in the grooves.

On the right is the low end of the black. I blackened above the the line so the masking tape could overlap the black slightly without worry.

Small pieces of Scotch tape were set slightly above the line edge and all around the capsule.

Masking tape went below that and a grocery bag covered the shoulder.

On the right, the capsule after the mask was removed. Some very light scraping with a knife sharpened the mask line even more.

Friday, August 5, 2016

Enerjet News, Mercury Little Joe I, Part 3, Capsule Gluing

Look close at the capsule base shoulder.
That raised ring at the bottom of the three piece capsule sides should be the same width all the way around.
The sides will be glued from the inside after it is in the base. Leave the rubber band on around the top.
It'll take some coaxing and downward pressure to get the sides to SNAP into the recessed ring. When you think you've got everything in, rotate the capsule and base together completely and check to make sure the lip is even.


Once the sides are snapped into the base you can turn it over without any worry of it falling out. It should be friction fitted into the base.

Brush some liquid glue over the seams from the inside rear.


Here's the assembled capsule.
The antenna housing hasn't been glued on. The only parts that have glue now are the capsule sides and the shoulder base .