Showing posts with label Nike Smoke. Show all posts

Thursday, April 5, 2012

Nike Tomahawk - Another "One Day" Build

I was looking through an old AVI catalog on Ninfinger's: HERE
and ran across the old Nike Tomahawk kit.

The specs say it's a 35mm below and a 20mm body tube above.

It looks to be a composite of the old MPC Nike Smoke (35mm) and Tomahawk (20mm) kits.
Both plastic fin units are available from Quest. That Nike Smoke fin can is nearly indestructible.
I would assume the only 20mm Quest plastic nose cone is the same one from the kit.

The transition looks to be the only stumbling block. Something could be built up from card stock shrouds.
Semi-scale? It'll look cool anyway.

Looks like I'll be ordering some parts from Quest and using the 40% off coupon from the NAR Member Guidebook.

Sunday, August 22, 2010

OOP Quest Nike Smoke Finished! Decals


I finally printed off the Nike Smoke decals today.

Usually I'll wait until a few models are ready for decals, three rockets were combined on one sheet so there wasn't much waste.

The decals were drawn on Corel Draw then printed on my HP Officejet Pro 8000 printer. Decal paper is from:
http://www.beldecal.com/

I'll get into some tips on how to print your own decals at home soon. Stay tuned.

Sunday, July 25, 2010

OOP Quest Nike Smoke Build Part 13


Here's the dry fit, awaiting the stenciled "UNITED STATES" decal.

The decal has been drawn up on Corel Draw. I'm waiting on another project so I can print for two rockets on one decal sheet.

After the decal is applied, I have to decide whether to spray a flat coat or gloss coat overall. Flat finishes get dirty quickly and white can really show the dirt.

OOP Quest Nike Smoke Build Part 12


Here's the complete mask, ready for the fluorescent Red/Orange.

As I mentioned before, this is a complex mask. It required twenty pieces of Scotch tape just around the fin root edges. On top of that, masking tape holds the piece of plastic over the already painted yellow fin.

I went over all the edges with a smooth, rounded dowel twice to make sure the edges were down and secure.

After removing all that tape, here's the finished fin can.
Those thick molded-in "fillets" took a little bit of guesswork, but in the end I'm happy with the results.

Thursday, July 22, 2010

OOP Quest Nike Smoke Build Part 11


This is a complicated fin mask.

With all the angled tapering at the root edge and the ends, there is eight masking lines on each fin. Or to put it another way, each fin will have eight pieces of tape around it's base.

It's a little hard to see in the picture, but there is Scotch tape right at the mask lines. Brown masking tape outside of that taped to a bag covering the entire fin can. The engine mount is not glued in place yet.

To make it a little harder, at the root edge there is a very clean rounded joint or fillet. You almost have to guess where the tape edge goes.

Here's the fluorescent yellow fin after removing the tape. The mask came out very well.

I'd mask and paint the fluorescent red/orange but I got pink (or Pank) by mistake. My daughter was with me at Home Dept and told me there was no such thing as fluorescent red: "They don't make fluorescent red in fingernail polish, the closest you'll find is pink."
I returned the pink and will search for the red.

Wednesday, July 21, 2010

OOP Quest Nike Smoke Build Part 10


Here's the nose cone sprayed white and finished. One of the filled seams is facing the camera, right above and next to the light relection.

Filling the seams was a more work than I would have liked from a kit, But the end results were worth it.
Before anyone comments about the gloss finish, it will get a coat of clear flat after all is done.

OOP Quest Nike Smoke Build Part 9


That dried CA is very hard and will take some careful sanding with 220 grit on a block, followed by 400 grit.
While sanding the CA down to the seams I took a little off the plastic "transitional" edges. Those edges lost their sharpness.

The picture at the right shows a strip of 20 lb. paper I cut for a wrap. It is taped on the cardboard for spraying with self adhesive.

Directly to the left is the nose cone area where the wrap will be positioned.
Between the base of the cover plates and above transition at the shoulder.

While this strip will raise the area slightly, it'll look better than the rounded off edges.

On the left is the nose cone with the paper strip added. On the right is an original nose cone half.

After priming, I sanded the paper edge very lightly with 400 grit to take down any fuzziness and a bit of the edge.

Tuesday, July 20, 2010

OOP Quest Nike Smoke Build Part 8


Here you can see the deep seams down the sides of the nose cone.
I'm going to fill the seams the same way I did the scratches on the fin can.


Before filling, I used 220 grit sandpaper on a block, sanding down the raised side of the seam. I then ran a thick bead of CA over the recessed seam. In the picture you can see the wet CA bead laying on top of the seam. Before even thinking of sanding, let the CA dry thoroughly.

OOP Quest Nike Smoke Build Part 7


The nose cone replacement came quickly from Quest.
When I joined the two sides there was a pretty evident seam.
I don't know if it's an old piece of plastic or an old mold. There was a warp and the tip didn't line up very well.
This one is going to take some work. It is fixable though.

Here's the cap that fits over the tip of the two joined halves.
It doesn't really taper all the way up, but bulges out at the top.
That point on the right took a bit of shaping for that cap to fit.

Sunday, July 18, 2010

OOP Quest Nike Smoke Build Part 6


Those bright orange centering rings won't look great on a scale model. Well, if on any rocket, the orange might go along with the fluorescent red and yellow fins on the Nike Smoke!
Still, I didn't want the orange centering ring to take away from the finished model.

Here is the mask for the black. I first tried to blacken the area with a Sharpie pen but it wouldn't reach far enough inside. I'll have to spray it.

An engine casing was set into the mount and masking tape wrapped around it and the engine hook. The outside of the ring was masked forward of the rear edge to be sure no orange would be peeking through.

Here's the finished mask after removing the tape. I don't paint over engine hooks. Chances are, paint will eventually chip off the metal.
To me, the shiny metal hook "accent" is almost like a little bit of chrome trim on a car.

Quest OOP Nike Smoke Build Part 5

Just to test paint adhesion on the plastic, I lightly sprayed the fin can with gray primer and let it dry.
I stuck masking tape down on the dried paint and pulled the tape off quickly. I didn't lift any of the paint so I followed with a light coat of white.

I didn't notice this until after the first white coat of paint.
There were two short, deep scratches on the rear of the fin can.

I knew that wood filler wouldn't stay in a depression this shallow, so I borrowed a tip from my banjo building days.

A great guitar repairman named Dan Erlewine used clear super glue to fill small lacquer chips on guitar headstocks. After sanding to surface and polishing you can't tell the difference between the original lacquer and the CA fill.

I knew thick CA would stay in the shallow depression and sand down flat to the plastic surface. I would not use this trick on balsa, the dried CA is very hard compared to the surrounding balsa wood. This works best on plastic and concave seams on plastic nose cones.

In the first picture, the CA glue is set on on the scratch. the drop sits and dries higher than the surrounding plastic. Let it dry completely.
Here's the same area after sanding with 220 grit then 400 grit to surface. The two scratches are filled and I'm ready for another shot of gray primer.

Saturday, July 17, 2010

Quest OOP Nike Smoke Build Part 4


Two strips were cut off the Popsicle stick, 3/16" X 1 1/2"
The original Nike Smoke kit had a thick plastic lug measuring 1 1/2" long.

Both were glued together with white glue.
Clothespin clamps held both together while drying.

After the standoff was dry, it was sanded square with a sanding block.

The lug was glued to the top of the standoff.

Here's my built-up lug set next to an original MPC style plastic lug on a old MPC Nike Patriot. In comparison, the old MPC lug looks big and clumsy. That plastic lug was included in the OOP Quest Nike Smoke kits.

A little trivia: The MPC Nike Patriot was re-named and sold by Quest as the Nike K.

Quest OOP Nike Smoke Build Part 3


Here's the fin can as it came out of the box.

It's pretty clean, except for the edges. All four fins will have to be squared up with a sanding block.
To make it easier, I'll mask and paint it off the model. Before painting, it'll be washed off in soapy water.

I don't know if I'll lightly rough up the surface before spraying or not.
Depending on the plastic or brand of paint you use, there may be some trouble with the paint adhering to the smooth plastic.

Friday, July 16, 2010

Quest OOP Nike Smoke Build Part 2

The original instruction specs say the rocket is 19.5" long.
The plastic nose cone is 8 3/8" exposed. The fin can is 2.5" tall.
For everything to add up to the overall length of 19.5", I cut some 35mm tubing to 8 5/8" long.

If you know your Quest kits, you may have noticed my motor mount tube isn't yellow, it's white. BT-20 is a little thicker and much stronger than the yellow Quest motor mount tube. It fits these orange plastic centering rings and slides into Quest 20mm tubing perfectly.

To fit the fin can, I cut the BT-20 motor mount tube to just under 2.7" long. That's a little shorter than a regular 2.75" long motor mount tube.

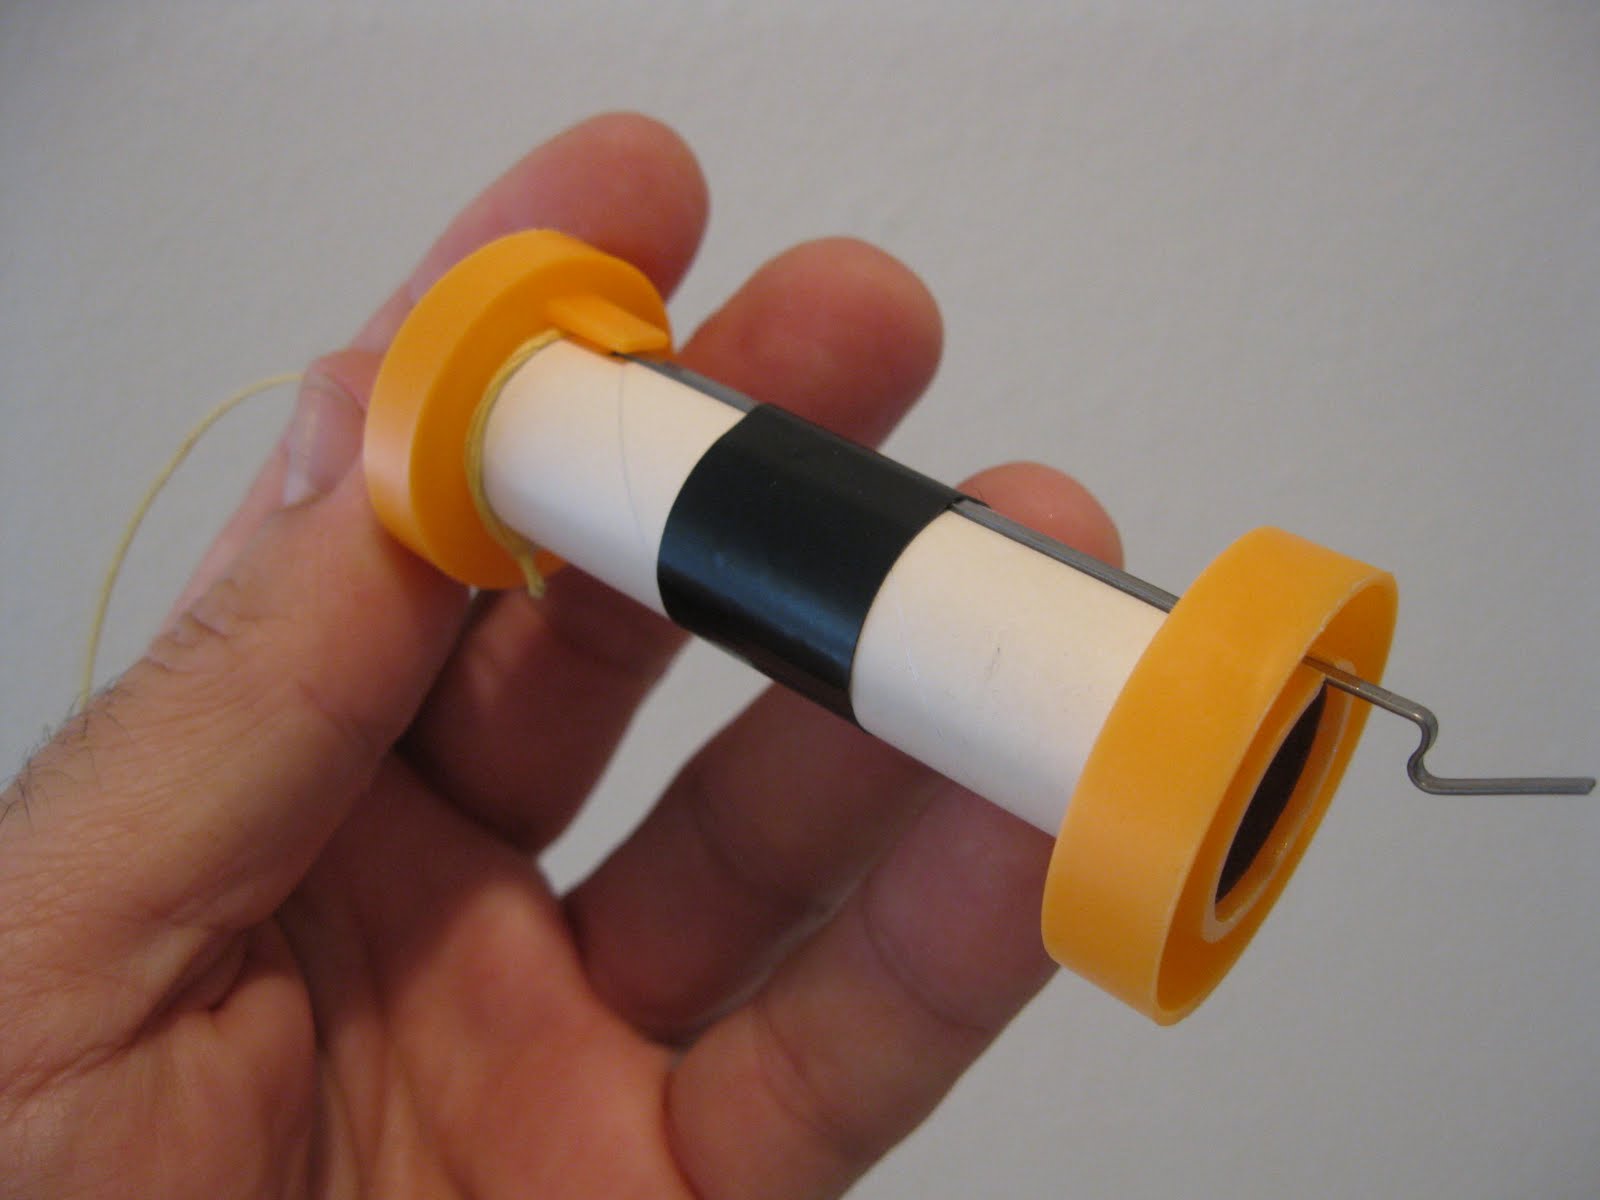
Take a look at the forward centering ring. It's a pretty amazing design from G. Harry Stine when he did the rocket design work for MPC in the early 1970s.

That middle forward extending ring fits inside the motor mount tube and acts as a engine block. The square tab at the bottom ends up over the engine hook preventing it from coming out of it's slot.

At the top I drilled a small hole for the Kevlar cord.


The original instructions have you tie the Kevlar to a hole in the fin can shoulder. I was concerned that would bulge and raise the body tube where the Kevlar was tied. By tying it around the top of the mount and out the drilled hole, I avoided this potential problem altogether.

Here's the finished mount - Notice the Kevlar going around the bottom of the upper centering ring.

Quest OOP Nike Smoke Build Part 1

I've always liked the Nike Smoke with it's clean, rakish lines. That long nose cone and fluorescent fins really set it off.

The parts available from Quest are very reasonable. The Nike nose cone is $1.25 and the fin can is $3.00. Their metric tubing is thicker than the Estes BT style. I already had some extra 35mm tubing.

I got a parts order from Quest today, only two days after ordering it online. (Oh boy - they sent another FLIC as a Freebie!)

A slight oversight on the Quest side, they sent me two "left side" nose cone halves - an easy mistake. While I could make due with it, the Nike Smoke nose cone had three cover plates. If I were to use these two left sides I would end up with only two plates. This picture doesn't show the Kevlar, parachute and shock cord. The Popsicle stick will be used to make a launch lug standoff. I emailed Nettie, a new nose cone is on the way!

I was surprised to find G. Harry Stine's drawings at: www.oldrocketplans.com/quest/que2007/que2007.htm Just scroll down to the bottom of the instructions for the plans and full size decal scan.

This looks to be a good, inexpensive build and a nearly indestructable flyer!