Monday, September 30, 2019

Launch! Schoolyard Soccer Field, September 29, 2019

I didn't get to the NEFAR launch yesterday, next month should be a lot cooler.
Off to the schoolyard about 7:30 a.m. before the wind kicks up.
I was trying a faster shutter speed at 3,200 of a second. This early in the day it probably doesn't let in enough light. The burst launch shots were dark. Next time I'll go back to the 2,500 setting.


My NIKE GOON went up first with a Estes A8-3 engine to about 200'. No damage on recovery. This model is how I like them, BT-60 diameter and sturdy.


I put this one together yesterday for Halloween. That's a cardboard coffin from the Dollar Tree store. I'm naming this one "BONES".

With a Estes A10-3t it probably got 225 feet. The good news, it is very stable! I still get a little nervous when launching an odd-ball the first time. It's best to test something like this before taking it to a club launch.


Not much room for a parachute so I went with a long streamer.
One fin broke off at the root edge when it touched down. I may have to cut a notch and do a partial TTC (Thru The Casket) fin attachment.
I'll see if I can find a 6" or 8" parachute.

This build will be featured on the blog soon.


I barely caught this one in frame!
That's the MPC RED GIANT. Big and stable, a good demo rocket for a small field.
The Estes B6-4 got it to an estimated 275 feet. The spill hole in the 15" Odd'l parachute brought it in close.


Another Estes B6-4 was used in the Quest STRIKER AGM.
This one is a favorite, it looks great in the air, today reaching an estimated 275'.

With the cloud cover and very fast shutter the launch picture was too dark.
On the left is the model descending under a 15" parachute.


The crepe paper wadding didn't get blown out of the tube.
TIP: It's best not to leave the wadding in the rocket after a flight, it could still be smoldering.

A recent hobby show picture showed a model that looked like a new version of the GYROC.
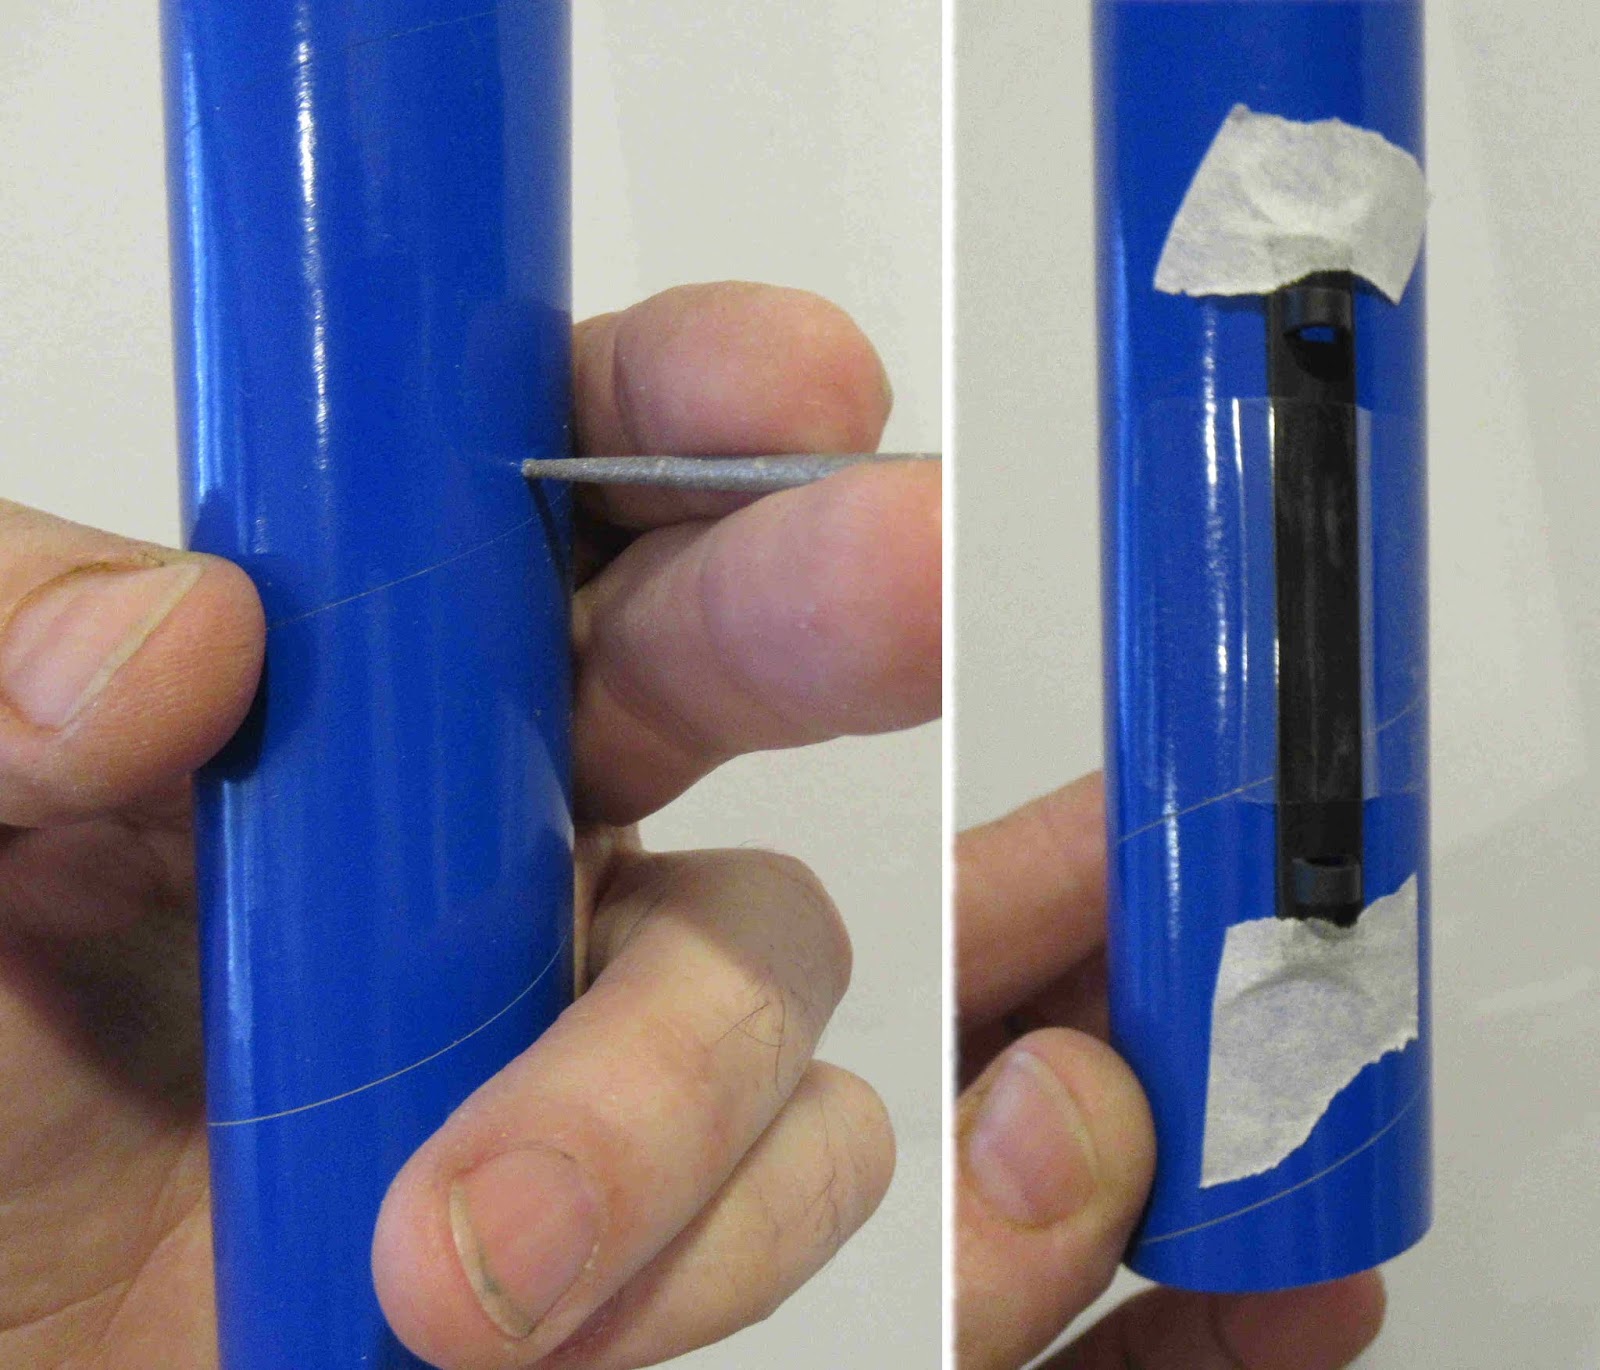
This is a clone built from old scans from the original Estes kit. I changed it up so one side of the elastic can be released between flights.

The Quest A6-4 boosted it higher than I would prefer for this small field. It may have got to 400'. Boost was quick, I finally saw it in the air at ejection.
There was drift, landing 400 feet away from the launcher on the hard baseball field.

Five up, five recovered with just a popped fin on the "Bones" rocket. A fine start to a Sunday morning.

Sunday, September 29, 2019

Estes Solo #7288 Build, Part 5, Cutting & Forming The Glider


I don't know what I was expecting, maybe a large tube like in the Flying Stovepipe plans. The body of the glider is rolled card stock.
(Don't stare at the printed circles too long - you'll be hypnotized!)

There is a thin yellow line to cut on with scissors.


I shaped the ring glider as always by using a dowel.
Set the card stock in the heel of your left hand. Press and slide the (clean) dowel over the card stock for a smooth round shape.

Curve the "arms" at the top until they touch.


On the left side a piece of Scotch tape is pressed.
Center and join to the right side.

Apply tape to both sides


The round glider body is slid into a slot running around the connecting ring.
The joint on the card stock body lines up with a molded line between the two molded lugs.

Estes Solo #7288 Build, Part 4, Gluing Things Up

TIP: I've brought this up before -
Beacon Fabri-Tac glue is great for some rocketry applications. Brush-on liquid plastic cement dries too quickly for some things. This Fabri-Tac glue gives you a little more working time. You can find the Fabri-Tac glue at fabric stores and Hobby Lobby.

Be ready - it can be messy. Just like the old plastic cement from a tube, you'll see strings of glue when you pull the tube away from the applied area. It is thick and can fill some gaps.

Here I used it to glue the shoulder cap onto the nose cone.


It's great for Kraft tube and plastic joints.

Gluing plastic adapters to body tubes, gluing plastic boat tails to body tubes and gluing fin cans like this into body tubes.

Saturday, September 28, 2019

Estes Solo #7288 Build, Part 3, Engine Mount & Fin Can

The fin can is interesting, there is no internal engine mount tubing. The top of the engine slips into a molded recessed ring at the top. A taller molded ring at the rear. The rear is threaded for the engine retaining ring.

The instructions show a tube of plastic cement used to glue the sides together. I held the sides together and brushed liquid cement on the inside joints.


I used Beacon Fabri-Tac glue on the root edge areas of the fins. Here I marked the root edge with a Sharpie to show where the glue was applied. The fins were slid into place.

More liquid cement was brushed onto the gap at the rear of the fin root edge. Let this glue dry before screwing on the engine retainer.


Here's the finished fin can. The fins with the glider attachment pins are on shown at the top.

As it is now, this fin can looks like the back end a sci-fi rocket.

Friday, September 27, 2019

Estes Solo #7288 Build, Part 2, Launch Lug Positioning

A line is drawn up the body tube for the launch lug. The lug is pressed against the tube. Two posts on the back of the lug strip indent the body tube at two locations. Be sure the indent marks are in a straight line.

The instructions say to cut small "X"s in the body tube for the short positioning pins on the back of the launch lug strip. I wanted a more accurate hole. Punching X slits with an X-Acto knife can easily give you larger slits than you want.


After the tube was marked by pressing the lug strip in place - Check to be sure the line is still straight. You can see the depressions in the light reflection on the left.

TIP: I started the holes with a pin.
The pin hole was enlarged with a small rat tail diamond file.


Spin the file a few times, check the fit and repeat until you get a good friction fit.

TIP: Before using the clear retention tape over the lug, I taped the lug strip down to the body tube. This freed up my left hand to make the placement of the clear tape easier.

Friction Fit Engines? Old School Motor Retention

I remember buying small rockets, the ones you could afford when you were a sub on a paper route. Usually BT-20 based and around 12" tall.
The Estes Wac Corporal was a disappointment. Trying to remove that friction fitted A8-3 engine was tough and would crimp the body tube.


Here's the problem - 

The nozzle end of the engine ended up EVEN with the bottom of the BT-20 body tube. You had no way to easily remove the engine!
Step 9 of the COUNTDOWN CHECKLIST says to "Insert the engine so the rear is even with the rear of the rocket." After a flight, how could you grab the engine casing with pliers to pull it out?

Well, you might be able to tap the engine out using a dowel from the top. An inexperienced 13 year old wouldn't think of that.
So the Wac Corporal ended up a single flight rocket. Removing the engine pretty much destroyed the thin BT-20 tube.

Somewhere I saw old instructions for what might have been an early Model Missile kit. Instead of masking tape, the engine was wrapped with rubber bands for a friction fit!

Thursday, September 26, 2019

Enterprise Restoration Video


On Facebook, Mario Perdue posted a link to the restoration of the USS enterprise model used in the Star Trek TV series. To see the video, CLICK HERE

Airbrushing, lots of masking tape and water slide decals - Horrors!
The restored model is now on display at the Smithsonian Air and Space Museum.

Estes Solo #7288 Build, Part 1, Parts


Here's all the kit parts! Everything is pre-colored in yellow and blue.
Sub-assemblies are in their own parts bags.
That yellow nose cone is 6 5/8" long. The rocket with ring glider attached is 25.3" long, bigger than you would expect!
The Skill Level is "Beginner" but after forming the tube glider I'd rate it as "Intermediate".


Parts of interest, from the top going clockwise:
Printed card stock glider "tube"
Black launch lug strip
Four fins, two of each style
Plastic glider forward ring
Launch lug strip retainer tape
Name sticker

Upper left going clockwise:
Clear nose cone shoulder cap
One side of fin can
Screw on motor retainer ring
Other side of fin can


The 11" BT-55 body tube:
On some ARTF kits, the pre-colored 20 and 50 sized body tubes feel a bit thin. This tube is very robust.

Wednesday, September 25, 2019

Estes Booth NRHSA Hobby Show, Las Vegas


This picture was posted on the Estes Model Rockets Facebook page.
I can see four models I built for Estes.
That's all I can say until the kits are released!
There are a few I haven't seen in person yet - 
On the large poster it looks like the old Orange Bullet: CLICK HERE
Above that is a black and white rocket with flipped vanes like a Gyroc.

Estes Solo #7288 Build, Background

When I first saw the new Estes Solo, I thought of the Flying Stovepipe. This design was by Larry Deran, Estes plan #56 going back to 1968.
To see the plan: CLICK HERE

The fins were airfoiled on one side to spin the rocket during boost and spin the ring glider at ejection.
The central booster was a lot like the old tumble recovery Astron Scout. I've never seen one of these launched.


I did a blog post about the Flying Stovepipe and the HurriK9 dog toy. The dog toy reminded me of the Stovepipe.


The Solo kit is a single ring glider version of the new Estes Double Ringer shown at the right. The Solo is a Hobby Lobby exclusive kit.

Here's the new packaging from the Hobby Lobby stores.

There were two Solo kits at my local HL store. Before heading to the cash registers -
TIP: Always check the body tubes to be sure they are round and not creased.
Look at the right side of the package - the ring glider card stock is turned up against the side of the package. In one kit the card stock was creased. I picked the kit that looked to have less damage (a slight bend) in the glider skin.

Tuesday, September 24, 2019

Old Rocketeer Rant - Part 2

"Listen up kid - you might learn somethin' . . ."

RIP-STOP NYLON?
Why, back in my day we made chutes from garbage bags. "Para-Wad" . . . yeah, that's what we called 'em.

EJECTION BAFFLES?
Think fiberglass Son, I say fiberglass.

INTERNET HOW-TO VIDEOS?
Nope, just Estes Yellow Pages. If you were lucky, you might see an  MRN Idea Box page.

CLUSTERS?
Hah! Ya better have "Sure Shots" and a car battery handy. Heads up!

3D PRINTED PARTS?
What you gonna' learn about life from that?

ROCKSIM?
You need a computer to design a rocket? We did it all on the fly!
You need RockSim? We used Luck-Sim.

FIN ALIGNMENT TOOLS?
Just a door frame and a pencil line. Our rockets spun on the way up.
Extra stable if you ask me.

KEVLAR?
Shock cords were rubber bands. They were short, waaaay too short.

E through M ENGINES?
We were lucky to get a "Mighty" D13 that didn't blow!

COMPOSITE ENGINES?
$5.00 for one Enerjet engine? An A engine was just four bits each!
No wonder Enerjet ain't around no more.

ALKALINE BATTERIES?
The PhotoFlash "D"s sorta' worked, if they didn't leak battery acid inside the base of your Electro-Launch.

PICTORIAL INSTRUCTIONS?
Our instructions had words - many, many words in English. Do these kids read?

ALTIMETERS?
Nah, we'd guess. Hey, my Big Bertha gets 2,000 feet on a C6-5!

CHUTE RELEASE?
Close recovery? Hah! That's what those two legs are for. Hey kid, go find my rocket.

MADE IN CHINA?
Dang Communists.

RTF? E2X?
WTH!

Monday, September 23, 2019

Old Rocketeer Rant - Part 1

Heck, when I was a boy - 

Did you have LASER CUT parts?
What's that? We had to cut out and trace a pattern, then cut out fins with a dull X-Acto blade.

ENGINE HOOKS?
We friction fitted and were happy to do it!

FINGER TABS?
Oooooh! You're a real rocket man aren't you.

PRE-ASSEMBLED PARACHUTES?
Heck no! Parachutes had to be cut out and tied up. Did you ever try to cut a straight line through a plastic sheet with Mom's good scissors? These kids today don't even know how to tie a decent knot!

Hobby Lobby DISCOUNT COUPONS?
Immediate purchase? I don't think so - We mailed one of Mom's checks and paid full retail. Then waited a week and a half for the mail order to arrive!

HOBBY STORE ROCKET DISPLAYS?
We'd buy rockets from a tiny line drawing in a comic book ad.

CARPENTER'S WOOD FILLER?
Fillercoat and sanding sealer was all we'd let near our balsa.

TAMIYA TAPE?
What in the Sam Hill? I'm not paying no extra for fancy yellow tape! We had one choice, brown paper tape.

PLASTIC NOSE CONES?
We filled the balsa, and got a bonus cheap high from Sanding Sealer fumes.

PLASTIC ESCAPE TOWERS?
You don't get your rocket man card 'till you've scratch built a Apollo Capsule tower from toothpicks.

TRI-FOLD MOUNTS?
Old School - Slit the tube twice, cut your finger then weave that bloody shock cord through the slits.

IGNITERS?
All there was, was bare Nichrome bent into a little coil. Cross your fingers and keep holding that button down.

LAUNCHERS?
A block of wood. Launch rod made from a straightened coat hanger.

PLASTIC FIN CANS?
Why I ought'a introduce your can to my boot!
I got more to say -

Sunday, September 22, 2019

Semroc (Centuri) Taurus Finished


I wish all the builds turned out as well! This one could end up being a display only model.

On the right you can see the slight ridge from the Contact paper blackboard trim piece.

I also added some chrome trim around the motor mount tube that extended out the back.

TIP: The colors follow a good design practice - Three colors in descending order of coverage area.
The major color being WHITE. A secondary color, BLACK. The third color is ORANGE.
The decals round out the finer details.
This might be why so many of the Centuri catalog pictures caught your attention. Check out their sport designs in the 1972 catalog: CLICK HERE

Sponged Goblin?

From a post by John Lightning Lajoie 
on the Facebook Estes Model Rocket page:

"So I'm getting ready to lay down the decals when my daughter takes a look at it and says, Goblin, eh? So I show her the packaging and she turns to me and says, it's missing something. I say, what? She replies, sponge blotting. I let her do her thing and in the end, I'm happy with the results. Thank you Miranda for the suggestion."

It's literally just getting some paint on a sponge, then dabbing it on to the model. Try it on some paper before hitting the model, to make sure you've got the spread and consistency you want."

A great idea! I've done some sponge painting before but not on a model rocket. 


Saturday, September 21, 2019

For Steam Punk Fans

From the Facebook Model Rocketry Fanatics page,
Dan Trimm posted a link:

CLICK HERE

It's not a Model Rocket, but a Rocket Model made out of metal.
I love watching these videos, like the "How It's Made" series.
This one will never fly, but should give you "Steam Punkers" some ideas for a tube and balsa rocket.

Semroc (Centuri) Taurus Build, Part 15, Gluing On The Conduits


This shows some vertical bands cut from the Contact paper blackboard cover material. You could mask it, but this is cleaner and much easier. I had to mask the fins, the peel and stick vinyl wouldn't work there.


The kit has supplied three tunnels, the face card seems to show two. With all the decals I decided to go with just two. I didn't want to crowd any of the detail and there are plenty.

TIP: When surface gluing pieces like this, use a white glue that dries clear. If you were to use wood glue you might see some dried yellow glue along the edges.

The tube has been scraped just inside the width and length of the conduit piece. Notice the contour sanded in the back of the conduit to fit the curve of the body tube. Glue just the back, here no fillets are needed.

Friday, September 20, 2019

Gee, I Wonder Where These Were Made?


For a while Quest BP engines were made in other countries and imported.

I've gone through quite a few, but never saw one like the engine on the left. The ejection charge cap is usually white like on the right side.


Semroc (Centuri) Taurus Build, Part 14, More Decals & Pod Trim


The kit has some trim pieces for the pods but they were not as shiny as the chrome trim I had.


GOTCHA: The kit supplied decal didn't fit around the nose cone as shown on the face card. I ended up placing it around the body tube, below the nose cone.

At the base is the shinier Monokote chrome trim.


The lower adapter was painted metallic silver.
I tried a strip of white decal paper but didn't like the contrast. I went with a strip of the Contact paper.


Before gluing onto the standoffs, the pod paint gluing line was sanded to the tube surface with a sanding block.

TIP: Shown in the second picture, the upper bar decal didn't make it all the way around the tube. I started and finished the decal wrap on the inside where the gap won't be seen.

Thursday, September 19, 2019

Semroc (Centuri) Taurus Build, Part 13, Ends, Edges, Upper Trim & Decals


There are two blue conduits shown on the face card picture.
The old Centuri catalog page showed these pieces glued lower on the adapter.


I didn't have blue paint, purple should work.


The nose cone and smaller pod cones were sprayed before gluing in their tubes.

TIPS: I used a strip of chrome trim Monokote around the base of the nose cone. A little bit of chrome really adds a lot to the looks of some designs.
The black vinyl is my old standby - Contact Paper Blackboard material.


You have some freedom with some hatch decals, place them where you want.

TIP: Cut out the inside middle of the canopy decal so it will conform to the curvature of the nose cone.