Showing posts with label Budget. Show all posts

Friday, July 18, 2025

School Supplies? Rocket Building Stuff!

Save some money - School supplies can are cheaper now than any other time of the year.

This is the nozzle on a bottle of school glue. I wouldn't recommend the water soluble school glue for model rocket building. 
Replace the wide applicator nozzle on your wood glue bottle with this orange, fine point nozzle for more control of the glue flow. 
Unscrew the nozzle at the white collar, wash out any school glue and replace  the wood glue nozzle. It will fit the threads on the wood glue bottle.


I've used glue sticks for cardstock adapters and in carded rocketry.

Using a glue stick can give your more control on a cardstock adapter "glue tab".


Sharpies come in handy for black paint touchups, line details and Saturn V masking. Go to my Saturn V build for more details.

Tuesday, May 27, 2025

Cheap Target Bag Parachute, DIY, Part 2


Here's the extended circle marks, all are 6" from the center of the middle dot.

Cut out the circle. It's easiest to trace around the circle with a sharp knife.


To mark the sheet for six shroud lines - 

Fold the circle in half.
Fold the outsides in into even thirds. Lightly mark the folds with a Sharpie.


I cut three 26" lengths of #10 cotton embroidery thread.
Cutting 26" long lines allows 1" on either side for the loop and knots.

Here's the finished chute, ready to be tied onto the shock cord.

Monday, May 26, 2025

Cheap Target Bag Parachute, DIY, Part 1


Do you shop at Target? Start collecting their shopping bags for cheap two color chutes.

The bags can make good 12" parachutes. 
There is a red and white target print, very visible in the air.
The bag seems to be 1 mil thick.


I'd recommend cutting the chute to a circle.
Measuring from the center of the middle dot, the largest incomplete circle band is 6". I wish this broken red circle went all the way around the bag.


With the 6" mark set at the middle of the center circle, (see picture above)
Make some cut reference marks from the end of the red print around into the white areas, completing the circle.

Next post - cutting out the chute.

Monday, July 12, 2021

"Stropping" A Single Edge Razor Blade?


I go through a LOT of single edge razor blades cutting launch lugs to size for kits.
Years back I did some leather work and remembered "stropping" the cutting tools.
Stropping a blade polishes the blade and can knock off some of the worn rough blade edge.
Ideally, stropping is done on the rougher, suede side of leather. A polishing compound is usually rubbed into the leather before polishing.

It seems a razor blade only cut clean through four launch lug cuts! 

I was cutting on a scrap piece of cardboard.
I tried stropping the blade on the cardboard. It helped re-establish the blade edge and let me make more cuts!

On the left, the blade is set down at a shallow angle and drawn to the left side.
Turn over the blade and draw it to the right. 
While the results might not be as good as a leather stropped blade, it did work and extended the usable life of the blade.

Friday, November 15, 2019

Tools - The Essentials, New Cheaper Sandpaper Roll!

I mentioned earlier how much I use the OOP Great Planes Easy Sander sanding block. The sandpaper is sticky, no clamping!

A problem - Great Planes sandpaper rolls are expensive and aren't available in grits finer than 220 grit.
I found some 400 grit sandpaper rolls on the Klingspor Woodworking website.
The sandpaper was very fine and very sticky! I couldn't pull it off the sanding block!
Daniel (The Rocket Noob) wrote and said to peel it off under running water. That helped, but still left some gum that needed Goof -Off to remove.


I found some adhesive backed sandpaper rolls on the Home Depot website. 400 grit, 75 feet for $20.00!
This is a much better price than the Great Planes or Klingspor rolls.
To see it: CLICK HERE


It's wider than the face of the sanding block, just cut off the excess with scissors. And, it's easy to peel off! No goo is left.
TIP: Cutting fine grit sandpaper with scissors can sharpen the scissors!

Thursday, October 31, 2019

Tools - The Essentials, Sanding Blocks Part 3

After some sanding you should check for build-up on the sandpaper.
These little nubs of filler/primer can get large enough to scar your balsa when sanding!

On the right is a soft brass wire brush I picked up at Home Depot. Be sure to look for a soft brass brush like you could use on suede shoes.
Budget TIP: In the sink, run some water over the sandpaper. Using circular motions, brush off the loaded up gunk.
Your sandpaper is as good as new! Well, close to new and reusable anyway. Each time you clean off the surface the sandpaper becomes a slightly finer grit. You can also wear down the brass bristles over time. My first brass brush lasted for years.

After removing most of the filler/primer from the tube or fins with 220 grit on the block, I lightly sand and smooth out any scratches with a small piece of 400 grit. (Shown below on the left.) This takes off most all of the gray filler primer filling any remaining balsa grain or tube seams.

Here's the same piece of filler/primer loaded 400 grit before -
and after brushing out the filler primer.

These new premium sandpapers are more expensive than the old black sandpapers. But, the new stuff can be brushed off and used over and over again. I'll probably use one single small piece like this to sand a Big Bertha sized model, brushing it off every time it gets loaded up.

OPINION: CWF does not seal the wood! Old style Sanding Sealer does seal the wood surface. Sanding Sealer or Balsa Fillercoat is hard to find today and expensive when you do. Body tubes are rarely sealed before spray painting. Why bring this up?
I sand my models dry - no wet sanding (if I do it at all) until the model has a fairly heavy, dried coat of enamel.
CWF is water based, the balsa can still absorb water when wet sanding and swell up. Kraft tubes will absorb water. Wet sanding will slow down the "loading" of sandpaper with filler/primer. If you decide wet sand, do it only after color coats are sprayed using very fine sandpapers. Keep the water away from the open ends of the body tube and engine mount.
Watch a video of someone clear coating a guitar or piece of furniture. The wet sanding is only done after a few color or clear coats have dried. Be very careful not to sand through the color or clear coats.

Wednesday, October 30, 2019

Tools - The Essentials, Sanding Blocks Part 2

Here's my favorite sanding block - The Great Planes Easy Sander. It's made of aluminum, the top fits your hand very well.

The problem - 
Hobbico hasn't sold them for a while. Remember that bankruptcy? CLICK HERE
EDIT: Dubro is selling these sanding blocks. They seem expensive, but are worth it. CLICK HERE

If you find one at your local hobby store - BUY IT! I liked these enough to buy three when they were still available. Two new 5.5" long Easy Sanders are still in the package.

You can still find the adhesive backed sandpaper rolls made for the sander. Their 220 grit seems a bit finer than what you'd find at Home Depot. Home Depot does sell sticky backed sandpaper rolls:
220 grit CLICK HERE, 400 grit  CLICK HERE
25 yards for $20.00 seems very reasonable.
The Great Planes rolls were 12 feet for $11.00.
The inset picture shows the overlap when the sticky strip is set down on the flat bottom plate. This overlap is cut off with scissors.


When I sand I set a old towel in my lap.
One pass is made on the primer/filler sprayed balsa, then the bottom of the block is wiped off on the towel. This prevents build-up of the primer on the sandpaper. I am dry sanding here.

More on this in the next post - 

Monday, October 28, 2019

Tools - The Essentials, Straight Edge Rulers

Here's what most of us start with, the cheap wooden ruler. That thin strip of metal set into the edge won't last as a metal straight edge. After you've cut out a few fins, the thin edge will slip out of the slot. Once it's gone your knife will cut into the wood ruler that remains.


Here's a metal ruler that's good but not ideal. The 1/32" markings are a little hard to read.
This metal edge would work to cut straight lines and fins using a hobby knife.

Notice the rounded off left end. There is a border margin before the measurement markings start.


Get a 18" long metal straightedge with a squared end.
You can double check the spacing of a centering ring. Rotate the ruler around tube at the base of the centering ring before the glue dries. Here the ring is set 3/8" from the end of the engine tube.
The cork back helps the ruler grip. If you were using Rapidiograph pens it raises the edge so the black ink won't run underneath.

TIP: If you use a straightedge to cut out parachutes, flip over the ruler with the cork side up. A raised ruler edge can allow the plastic to flex and you could end up with wrinkled cuts.


TIP: Here's a great ruler for marking, manufactured by Incra.
Those small holes are made for a metal scribe but a .5mm mechanical pencil will fit.
To learn more: CLICK HERE

Saturday, October 26, 2019

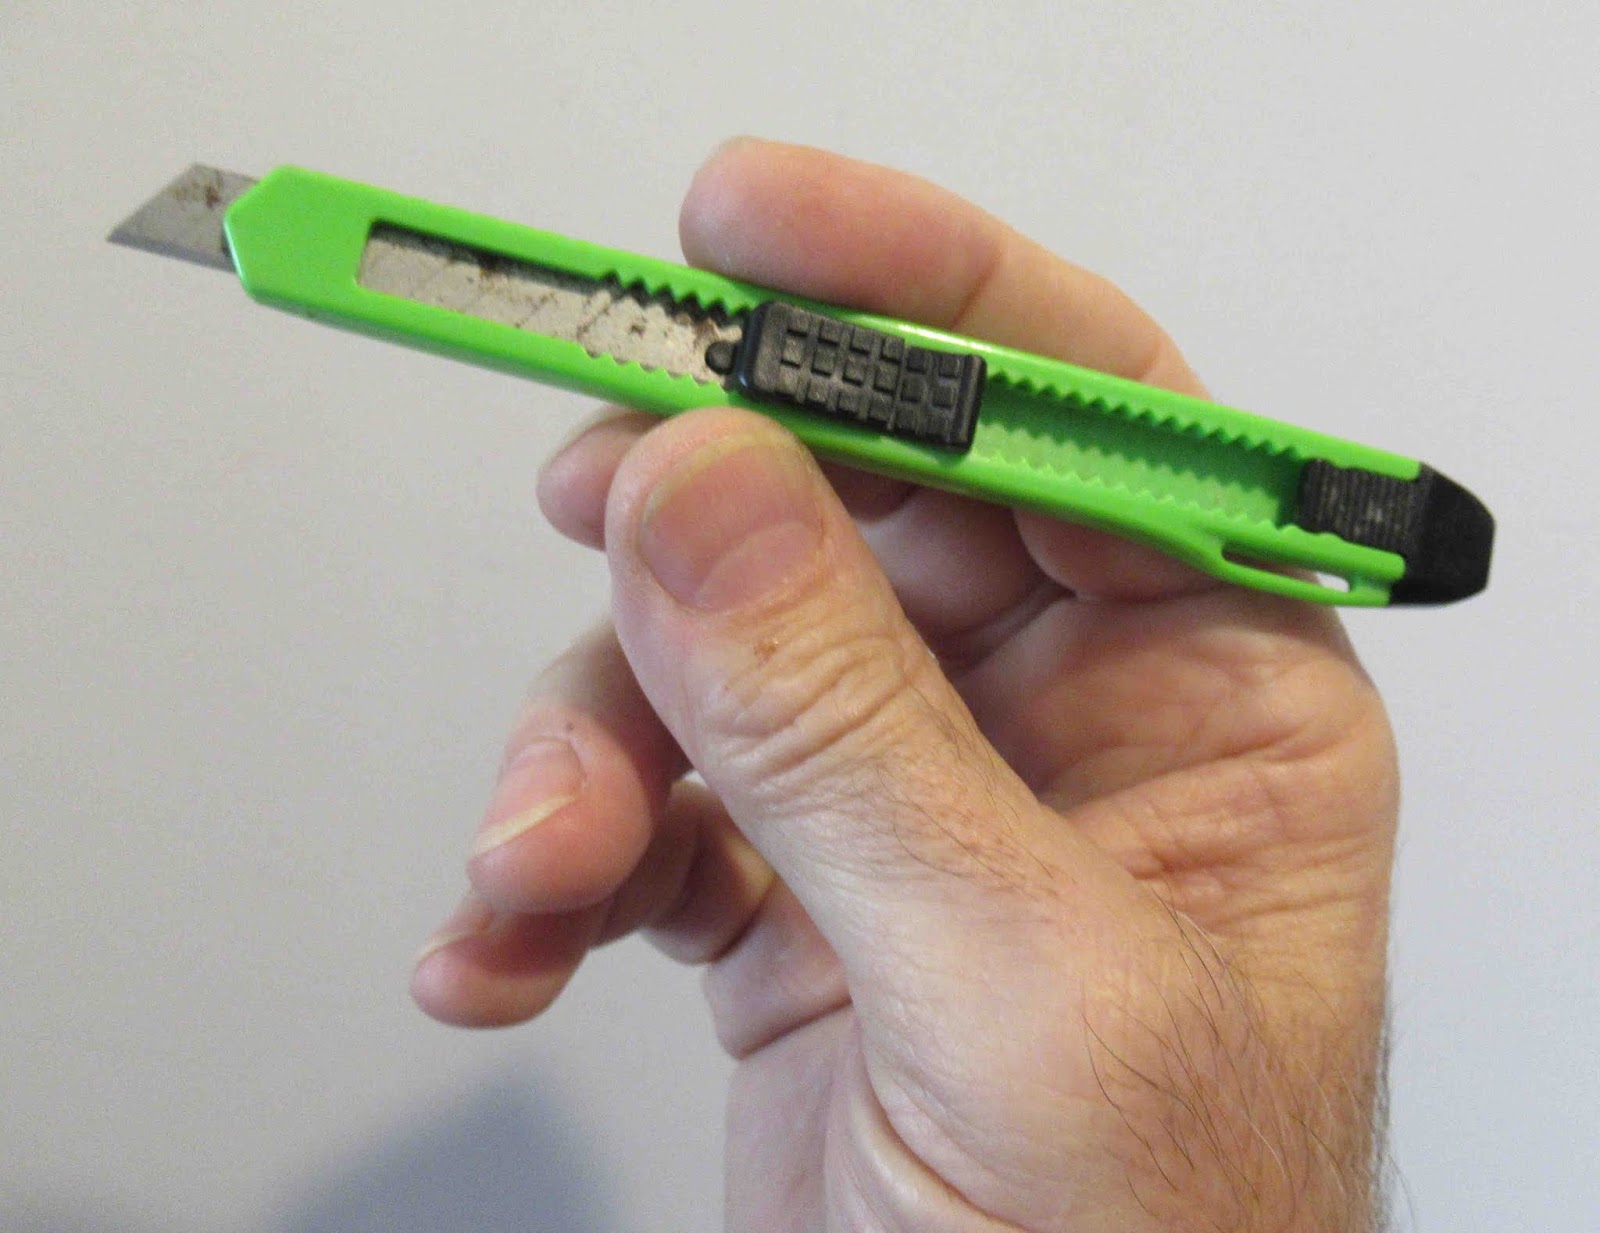
Tools - The Essentials, The Hobby Knife Alternative, Part 4 Changing The Blade

I realize most would know how to change out one of these knives.
But for those who haven't used one before -


On the left is a dull blade tip. Notice the diagonal break-off scored lines.

On the right is the back end of the knife. Press the ribbed button and slide off the end clip.


Only extend the blade "one click" outside of the wrapped metal end. You only want to break off one segment of the blade, down the score line.

The end clip piece has a slot molded into the back end. Slide this over the end of the blade. Press down on the clip and the blade should break off down the score.
When you've broken off all the available tips, the blade is replaced.
Remove the end clip again. Slide the black center hold piece out the rear.

There is a single round pin that goes into the hole on the blade strip end. Remove the old blade. Install a new, long blade over the round pin.
Slide the blade strip back into the center of the of the knife. Click the yellow rear clip in place.

You're ready to go!

The inset picture shows the back of the rear clip. the yellow overhang can be clipped on your shirt pocket.

Friday, October 25, 2019

Tools - The Essentials, The Hobby Knife Alternative, Part 3

X-Acto #1 handles are dangerous - They roll!
Years back I worked in a print shop doing old-school paste-up on a slanted drawing table. One day a heard a scream. Another artist ended up at the hospital for stitches when her knife rolled off her drawing board and stuck in her thigh!
X-Acto does make handles that are "anti-roll", but you don't normally find those at hobby stores. The large majority of knives are rolling #1 round metal handles.

I still use a #11 blade in an X-Acto knife for cutting tight curves.
But for straight cuts, why dull an expensive knife blade? Most all kits come with laser-cut balsa parts. You don't need a fancy knife to cut through small hold down tabs between the long cuts.

It occurred to me that on a #11 blade, the tip gets dull while three quarters of the blade is still sharp! If the tip breaks off and the blade is no longer usable.

The solution seemed to be a carpenter's break-off blade knife!
It is one long flat knife with a break off score about every quarter inch. Break off the dull top segment, and you've got a new sharp knife.

Here's my personal favorite: CLICK HERE
9mm blades strips fit it. It doesn't roll off the workbench!

TIP: On Amazon, break-offs are less expensive than the Excel blades. CLICK HERE
10 blades with 120 break-off tips are $6.59.
Divide $6.59 by 120 tips, it's like paying a little over $.05 each!


These cheap break-off blades knives are okay in a pinch. They won't last long in everyday use.
TIP: Carry a few of these in your range box. Leave your good knives at home.

Saturday, August 3, 2019

Back To School Supplies! TIPS

You can pick up some school supplies (rocket building supplies) cheap right now -
I bought glue sticks, get the name brand glue sticks, not the store brand. I also picked up two bottles of school glue. The school glue was $1.00 each, you can probably find them for less.

I wouldn't use school glue for model rocket building - I'm only interested in the nozzles.
The nozzle on the wood glue bottle is meant for woodworking. The open end is too wide for rocket building.


Luckily, the threads and open top on both bottles are the same size.
Blow the school glue out of the school glue nozzle, run water through it and blow it out again.
Screw it on your wood glue bottle and you are ready for more precise glue application!

Thursday, July 25, 2019

Dryer Sheet Wadding?

From the Facebook Estes Model Rocketry page:

Mark E. Johnson asked:
"Has engine thought about using crepe paper party streamers for recover wadding? Back in the day I don’t think it was fire proof/resident but these days I’m thinking it might be.

Matt Matt posted:

I like leftovers on the field from previous launches, but my go to is dryer sheets from the dollar store. Perfect for the application.

I use flame resistant crepe paper wadding all the time.

EDIT UPDATE: I just found two (old) dryer sheets. I didn't even know I had them. Single guys don't use fabric softener sheets, that's a married thing.
Anyway - I held a match under the dryer sheet and it easily melted! It didn't go up in a flash, but it did melt. Matt Matt may be using a different brand than I just tried.

Tuesday, February 21, 2017

Why A Break-Off Blade Knife?

Think about it. When do you normally change a #11 X-Acto blade? When the tip breaks off. Did you ever notice the edge below the broken tip seems sharp?

90% of knife use in rocket building is cutting laser cut fins free from the wood sheet. Why waste a blade that costs $1.00 each on laser cut fins? A break-off blade section is just pennies per segment.

Pop off a dulled segment on a break-off blade knife and you've got a new sharp edge. Save some money - Use your X-Acto knife and #11 blades for the complex curves and tight cutting.

The knife on the right isn't one of those cheap break-off handles. It's a 9mm blade handle made by Olfa, the XA-1. It sells at Home Depot for under $5.00. The blades can feel loose in the cheaper bargain bin utility knifes.

Sunday, March 27, 2016

Cheap Egg Nose Cones and Payload Section


Happy Easter Today - These go on sale tomorrow!
Cheap, smooth, bulbous payload nose cones.

While you can't usually find a body tube that fits the upper half, glue a coupler on the bottom to match whatever body tube you have.


Your model could end up looking something like the Quest Courier...

Thursday, January 29, 2015

Crepe Wadding Update

Wadding alternatives come up on the forums and on rocketry FaceBook pages. I've done quite a few blog posts about cheaper wadding in the past.

Lonnie B recently wrote:
"I finally made use of the bag of yellow crepe paper wadding you gave me a couple of years ago. I was getting fed up with how my new 'chutes were quickly getting burned, even with extra sheets of conventional wadding, so I tried yours and it was fantastic! It made a perfect seal that better protected the 'chute. I would love to purchase/find/make more."

He added the link on an old blog post is no longer valid. (I've gone back and fixed the link.)
Here's the new link to Crepe Paper wadding SHEETS -
CLICK HERE
Notice I specified SHEETS. These are 20" X 7.5' sheets. This is not the party rolls you find at the Dollar Store. Party rolls do work as wadding but are not very wide.
(Note: Some party rolls might not be flame resistant! Test them to see before using them in your rockets. You don't want to have flaming paper raining down on the field!)

I prefer cutting 4" squares, smaller than the 4.5" treated toilet tissue squares from Estes. Crepe Paper wadding is stiffer than the Estes and is easier to pack when it is slightly smaller.
TIP: With the crepe paper wadding (and the stiff Quest style) you crush up the sheets into a small ball then reopen it before going in the rocket. This puts many creases in the paper and softens it up making for easier packing and a better seal.

The colored crepe paper is easy to find on the field. Usually the first piece (closest to the top of the engine) is burnt and not reusable. The pieces right above it look like new and can be used again.

If you buy crepe wadding from the CrepePaperStore.com you should buy more than one package or the shipping charges will offset any savings over buying Estes or Quest wadding.

Right now, the crepe packages are $1.12 each.
Buy 5 packages for $5.60
Add shipping at $8.05 (Florida destination)
Total for 5 packs is $13.65
You can get more than 100, 4" squares from each package
Pictured above is the Canary Yellow color crepe paper.

Estes list price for wadding is $5.49 or 7 cents a square! (No shipping charges added)
Cut your own Crepe Wadding (with shipping charges) is under 3 cents a square!
(Even less if you buy more packages to offset the shipping charges.)

Wednesday, August 20, 2014

New Sandpaper Brush - Budget Tip

I bought a new sandpaper brush today.
I use the brush to knock off accumulated primer sanding dust from 400 grit sandpaper.
400 grit loads up quickly, especially when you are dry sanding the first primer coat.
You can remove the dust "mud" by brushing the sandpaper under running water. You shouldn't have to brush very hard to take off most of the loaded up primer.

This brass brush is like the old suede brushes. Over time the rough sandpaper will wear down the bristles. My previous brush lasted five years.
This new brush is the WorkForce #330761, $3.19 at Home Depot.
The amount of money I save by re-using sandpaper will pay for the brush many times over.

Monday, February 24, 2014

A10 to A8 Engine Comparison


At the small field launches I've been using 13mm A10-3t engines in place of 18mm A8-3 engines. This was first suggested by James Wentworth on a forum post.

It makes perfect sense - really a no brainer. (which probably explains why I didn't think of this years ago)

Right now at Hobby Lobby I can buy three A8-3 engines for $9.99
I can also pick four A10-3t engines for $9.99
Take off 40% with the online coupon its a better buy at $5.99!
$5.99 divided by three A8-3s is $1.99 each.
$5.99 divided by four A10-3ts is $1.49 each.


You do have to use a 5/20 engine mount but when the weights are compared,
The A10-3t engine and 5/20 mount are .43 oz.
The A8-3 engine alone is .57 oz.!

The A10-3t engine with the 5/20 mount is still lighter than the A8-3 by itself!

I don't use the Engine Comparison Tool on rocketreviews.com as often as I should - Click HERE

The graph above and side-by-side comparisons (on right) is a screen shot of the engine comparisons

Sure there are differences, The A10 has a higher initial peak thrust but a lower average thrust with a longer burn. The A10 has more propellant than the A8 engine.
An A10 engine will get any model you would normally fly with an A8 engine in the air - And, save you 50 cents per flight!

And, lighter by .14 oz. could get a few more feet in altitude.
In the future I'll be buying more A10-3t engines in place of the A8-3s.

Friday, February 7, 2014

Making Old School Igniters Part 2


With the 1" tail to the left -
Wrap the nichrome around the paper clip wire so you have three loops.
Try to make them even and close together.
Don't get frustrated, it takes a few tries to get it right.

Slide the loops off the end of the paper clip wire.
If they open up, squeeze them back together between your fingers.

You want the loops tight enough to fit into an engine nozzle but the loops can't touch or cross over each other. If a loop touches you could get a short. The inset picture shows what you are trying to make.


If the loops touch you can open them up by passing a knife blade between them.
I stick the igniters between 1/4" wide strips of masking tape like the Estes igniters.
You can use them uncoated or - Paint them with lacquer fingernail polish.
The fingernail polish does two things. It insulates the wire loops and is also a poor excuse for pyrogen.

With a 6 volt controller the 32 gauge wire will take 1/2 second to heat red hot.
Using a 12 volt system the wire heats very quickly and the lacquer will flash.

These are "old school" and the wire diameter is consistent without a thinner bridge wire at the top.
In the old Estes catalog Yellow Pages you were directed to attach the clips close, or farther up the igniter wire for more concentrated heating.

These homemade igniters will ignite single standard 13mm, 18mm and 24mm black powder engines. These will take an extra moment for ignition to occur.
I wouldn't recommend using bare nichrome in clusters. I still prefer the Quest Q2G2 igniters. You want simultaneous ignition when clustering.

Thursday, February 6, 2014

Making Old School Igniters Part 1


Here's the 32 gauge nichrome I bought from Jacobs:
http://jacobs-online.biz/nichrome_wire.htm

100 feet for $6.00!

Notice the wire end is taped down to the face of the spool.
Trust me, tape down the end. Otherwise it will unravel!
I've found a 2 1/2" long piece is about right for 18mm engines.
You can use a wire cutter or an old pair of scissors to cut it to length.

Don't use your good scissors! There is a chance you could nick up the edge of the scissor blade when cutting wire.


The vertical white wire is an unbent paper clip. It will be used to wrap the nichrome into a tight wound "filament" like what you'd see inside an older light bulb.

Start your wrap with a 1" tail on the side of the paper clip end.


If by chance a younger reader doesn't know what I mean by a light bulb filament . . .