Saturday, May 31, 2025

BMS School Rocket, Build, Part 3, Engine Mount


From the instructions:
This shows a dry fit, the centering rings aren't glued over the laser cut lines yet.
The Kevlar shock cord is tied through a cut hole and around the engine block.
I prefer tying a small loop knot and setting that under the top bend of the engine hook. This is an idea from Semroc. 
More later - 

OOPS! Originally I raised the lower centering ring above the laser cut positioning line to give more flex of the engine hook. I had to lower the ring, it would be in the way of the TTW fin tab.

I set the rings in a light ring of glue, applied to the tube. The ring is slid into the glue ring.


Side by side, 
Here's how the engine mount centering rings set when glued onto the laser cut lines.

You have some good space around the rings and fin tabs.


Friday, May 30, 2025

BMS School Rocket, Build, Part 2, Some Parts Prep


I like to strengthen the inside lip of BT-20 and 50 tubes with a wipe of medium CA glue.

Think ahead, You don't want any CA glue where wood glue would follow. The CA glue seals the tube, no wood glue can  soak in.


After the CA dries, 
square up the tube end with some 400 grit on a block.


Right out of the bag,
The corners of the nose cone shoulder are square.

Round the ends off for an easier insertion in the body tube.


Here's the rounded shoulder.

The rounded edge won't fray or start a peel of the inside layers of the BT-50 tube.

Thursday, May 29, 2025

BMS School Rocket, Build, Part 1, Parts


Parts are clean and ready for assembly without too much prep.

To the right is the nose cone with a hardwood dowel insert.
With the dowel glued in the pre-drilled hole, the screw eye will not easily pull out. 


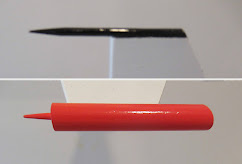
The main airframe tube (shown above) has laser cut fin slots.

On the left is the 3/16" diameter launch lug. The 3/16" lug was used to make it easier for a younger flyer to slide the rocket down a 1/8" launch rod. 

The engine mount tube has light laser cut lines for the centering ring positions. The square cutout is for the Kevlar tie.

Wednesday, May 28, 2025

BMS School Rocket, Build, Background

This is the original BT-50 based Balsa Machining Service School Rocket.
The picture is from the BMS website, in yellow and black school bus colors.

14" tall, 0.976" diameter
Balsa nose cone and balsa thru-the-wall fins
The fins and body tube fin slots are laser cut.
Kevlar Shock Cord
Shiny chrome Streamer recovery
3/16" diameter launch lug 

Perfect for school groups looking to actually build a model rocket.
A little like the Estes Alpha, but with four fins and a with a longer body tube for easier wadding and streamer packing.

The price is great for group purchases, $6.75 each in any quantity.
To see the catalog page and link to the online instructions: CLICK HERE

While the model assembly is for the most part standard, I'll incorporate some personal changes.

Tuesday, May 27, 2025

Cheap Target Bag Parachute, DIY, Part 2


Here's the extended circle marks, all are 6" from the center of the middle dot.

Cut out the circle. It's easiest to trace around the circle with a sharp knife.


To mark the sheet for six shroud lines - 

Fold the circle in half.
Fold the outsides in into even thirds. Lightly mark the folds with a Sharpie.


I cut three 26" lengths of #10 cotton embroidery thread.
Cutting 26" long lines allows 1" on either side for the loop and knots.

Here's the finished chute, ready to be tied onto the shock cord.

Monday, May 26, 2025

Cheap Target Bag Parachute, DIY, Part 1


Do you shop at Target? Start collecting their shopping bags for cheap two color chutes.

The bags can make good 12" parachutes. 
There is a red and white target print, very visible in the air.
The bag seems to be 1 mil thick.


I'd recommend cutting the chute to a circle.
Measuring from the center of the middle dot, the largest incomplete circle band is 6". I wish this broken red circle went all the way around the bag.


With the 6" mark set at the middle of the center circle, (see picture above)
Make some cut reference marks from the end of the red print around into the white areas, completing the circle.

Next post - cutting out the chute.

Sunday, May 25, 2025

Quest Intruder Kit Bash, Part 16, Comparisons


The original Estes Interceptor -
Lots O' Decals! 
I kept track. It took four hours to apply all of them.


The Quest Interceptor - 
Notice the same fins shapes but no plastic details on the fin outside edges.
Check out that canopy decal swoosh.


My kit-bash, 
The INTERTRUDER!

Saturday, May 24, 2025

Quest Intruder Kit Bash, Part 15, Finished Masks & Decals


While I liked the design of the Quest Intruder, it didn't have the flash of the overly decaled Estes Interceptor.
Bigger graphics work and can help a plain design.


The underside, 
I know, I stole the wing and rudder decals from the Estes Interceptor. The original Quest kit stickers were ruined and I didn't want this kit to sit in the bag. A kit bash would make a more interesting build.


The rounded, square windows.


My favorite decal, the Orbital Transport style canopy windows. I didn't like the Nike "swoosh" canopy in the Quest kit.

Friday, May 23, 2025

Quest Intruder Kit Bash, Part 14, Finished Masks & Decals


Here's the back end mask. The white paper covers allowed me to mask the red engines while the black toothpick spikes were sprayed.

After the black spikes dried, two more paper covers went over the black spikes and the red motors were sprayed. 


After the masks were removed -

The red mask turned out great, nice and sharp.
The black mask needed some touch up with a brush. The glue fillet was smooth but recessed not allowing a good seal.


Look close. you might see some pencil lines on the trailing lines of the wind flaps.
These were drawn purposely long and were to be trimmed to size.


Canopy decals are usually fitted over curved nose cones.
Experience has taught me to cut them as shown in the picture, This allows the decal to flex.

Note there aren't any sharp cuts on the inside arc. Don't give your decals a chance to tear.

Thursday, May 22, 2025

Quest Intruder Kit Bash, Part 13, Masking The Spikes

I don't mask like others.
I learned about Scotch tape masks from an Apogee Peak Of Flight Newsletter.

For years I masked using brown paper tape and even the more expensive Tamiya tape. Results were iffy at best.
In time I got better at smooth fillets giving cleaner masks.

After the first white undercoats look close at your fillets. Uneven fillets can be sanded using very fine 400 grit sandpaper. Masks come out clean and sharp when the glue fillets are smooth.

Most 3 fin, nose cone masks have a different, second color fin.

I lay clear Scotch tape on a plexiglass cutting board.
Down the center of the tape strip I mark a straight line. Wipe a paper towel down the line removing any excess ink.

This is cut through the ink line using a knife and straightedge. 
This gives you two half strips. The black ink lets you see the edge of the tape down the mask line. 


Here's the back side of the engine mask. The ends roll over and set down the side at an angle.


Here's another view with a mask on both sides.


The rest of the rocket body is covered with a thin plastic grocery bag.
A hole was cut in the bag and the fin tip slid through.
The bag was slid down far enough for brown masking tape to join the bag and Scotch tape. The brown masking tape covers the gap.

Wednesday, May 21, 2025

Quest Intruder Kit Bash, Part 12, Decal Print Fit Test

TIP: Before committing yourself and wasting a sheet of water slide decal paper - 
Do a print on plain white copy paper.

I can bet you'll want to make some size and line width adjustments before printing on decal paper.
Cut the paper prints to size and check them on the fins and body.

The model hasn't been shot with a final gloss white yet.


The Interceptor style wing decals (shown above) fit well, but the rudder fin decals were a little tall.

The tops and bottoms will be trimmed back in Corel Draw. 
I've still got to add the white stars to the blue box.


The canopy decal looks good, but is a little large for the nose cone - a simple reduction fix.

Tuesday, May 20, 2025

Quest Intruder Kit Bash, Part 11, Drawing Up New Decals

Here's a shot of the Quest kit decals.
These were peel and stick.

The red and dark blue triangles had to be pieced together with American flags between them.

I didn't like the nozzle or canopy stickers. The canopy is black, looks like a flipped over "U".
The nozzle wrap is all the triangles side by side.
The round windows need some tweaking.


And, the Estes Interceptor decals.

There are a LOT of them! I remember taking four hours to apply them all.

The decals I drew up would be a combination of the two. There will be fewer decals than the Interceptor has.


Here's what I drew up for home print water slides. I hate the looks of thick, shiny stickers.

I've always liked the bold wing decals from the Estes Interceptor.
The nozzle wrap has been redone.
The canopy windows take cues from the Orbital Transport.
The round passenger windows are now rounded rectangles.
I set two sizes of INTRUDER name decals. I may use them depending on the remaining space on the sides.

The stars in the blue blocks still need to be added.

Monday, May 19, 2025

Launch! R.O.A.R. Monthly, Christmas, FL, May 17, 2025

Summer heat is here!
I returned for a second monthly launch with the ROAR club in Christmas Florida.

The Quest kit-bashed Intruder has been renamed the INTERTRUDER . First launch was an Estes B6-4.
Some reviews say the boost can be squirrelly. Mine was straight and true to an estimated 350'. For half of the descent, the chute was caught up on on wing. It released and opened a hundred feet up.
I was expecting some damage but it touched down with the fin dowels and toothpicks intact.

This is a Jim Flis design, patterned after a playground gym.

The SKY RAIDER was stable but labored using the Estes C6-3.
I couldn't get a boost shot so here's the ejection. That's only an 8" parachute, easy to pack in what little area is left inside. 
I would guess the altitude to be around 400'. 
No damage at recovery.


Next up, the Estes SKY TRACER clone.
An A8-3 didn't give much altitude, maybe 175'. 

One of the trailing engine assemblies broke off, they are the first thing to hit under a parachute. 
I looked, but couldn't find all the pieces. These were a complex assembly, this rocket might be retired. 
The new Odd'l Rockets ROBOT prototype had two more test flights.
The first with another B6-4 to 275', the second launch a C6-5 to 425'.

The Robot arms are set to induce some spin stability. The spin was evident as the model slowed down on the C6-5 boost. This second test build also had .25 oz. of clay weight in the head.


Because of how the nose cone is attached, this rocket uses rear eject. The 12' chute is rolled around the engine mount centering rings. No wadding is needed.

Two more stable flights, no damage.
I don't think many of the ROAR members have had experience with MicroMaxx models of motors. They spent a few minutes questioning why the German made igniter wasn't giving them a usual ohm reading.

I got lucky with the burst feature and caught the launch of the Semroc MMX BLUE BIRD ZERO. MMX launches are quick!
You can easily see a size difference when loaded next to other models on the rack. Boost was a loft to 50'. Streamer recovery with no damage.

6 launched including the two prototype flights. One damaged. 
A hot but productive day.

Sunday, May 18, 2025

Quest Intruder Kit Bash, Part 10, Details

The jet pods and guns are missing on this Interceptor look-alike. I wanted to add these details, but not an exact copy.

I started with some shaped dowels on the wing tips.
I was happy with the angled back end of the dowels, but the simple rounded front didn't look good.


I went through my spare parts and found two BT-5 nose cones. Cutting off the tips could make some ramjets, but set on the rounded dowel ends it didn't look right.

More on this (and a solution) in an upcoming post.
In kit-bashing there is usually some trial and error.


I noticed some rough plastic on the nose cone shoulder. This is where the nose cone was broken off the molding "trees".

I applied a drop of medium CA glue for a raised fill.


After drying hard, 
this was sanded to surface filling the rough recess.

Saturday, May 17, 2025

Quest Intruder Kit Bash, Part 9, Joining Two Rounded Leading Edges


Joining two rounded leading edges can be tough.
How do you sand a rounded edge in a tight corner?

Round the smaller (forward) fairing piece leading edge first. Leave the leading edge of the wing fin square for now.
Then glue is to the (still square) larger wing fin.


My sanding block is at a 45 degree angle.

Round the wing leading edge while feathering the inside corner.
Don't sand hard into the corner.


Here's the finished round leading edge with (hopefully) a smooth transition between the two pieces.